-
Notifications
You must be signed in to change notification settings - Fork 0
Algorithm Overview
This is an extension to the simpler WallyFOV shadow-casting algorithm.
This is an algorithm for computing which tiles can be seen by a player in a 2D grid, where some of the tiles contain a body (an object that obstructs vision and nearly fills the tile), where there are some walls occupying the edges between tiles, and where some edges are warps (a.k.a. portals) to another location on another grid.
A naive way to determine any field of view would be to check each tile one by one, casting a ray from the player to the tile. Shadow-casting is a more efficient method. It works by processing the map outwards from the player, keeping track of the angles which are in shadow: those that been occluded by bodies or walls seen earlier.
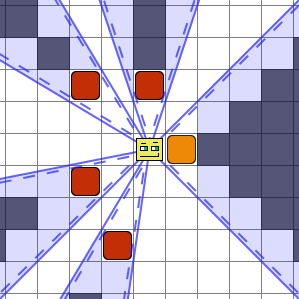
The smirking yellow guy is the player. The red and orange boxes are the bodies. Blue lines represent the angles that bound the shadows. Blue shaded regions represent the shadows themselves. Dark shaded tiles are not in the field of view (i.e. not seen by the player). The dashed blue lines will take some explaining.
Tiles that are only partially in shadow are considered visible. WallyFOV considers a tile to be visible if there exists a line from the center of the player's tile to any point in the target tile. Even if the player can only see the slightest sliver of the tile, it can be seen. This is most notable near the edges of the shadow created by the orange box.
Bodies in WallyFOV do not completely fill their tile but are just slightly smaller, so the orange box does not occlude the tile just north-west of it. This is important for a corner case which we'll discuss in the next section. The dashed lines indicate angles which have been shifted by a tiny amount in one direction, because they were generated by a body.
The 2D grid can occasionally create some unexpected artifacts. Look at the two boxes in the lower-left quadrant; the player can see the tiles just on the other side of them, but some tiles farther away are occluded.
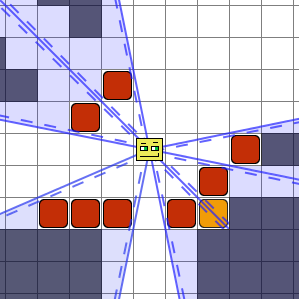
Here we see what happens when bodies are adjacent to one another. The three red blocks in a row on the south-west side form a kind of wall because their occlusion angles overlap. This is a normal way to make walls in a field-of-view algorithm without explicit wall support.
There's an important corner case when using bodies to form walls. In the corner of the room it's important that the bodies on either side of the corner not occlude the corner body. This is demonstrated in the example image by the orange block. If the red blocks in front fully occluded the orange block, then the player wouldn't be able to see it, which spoils the shape of the room. Because WallyFOV considers bodies just a little smaller than the tile, the player can see through a very small crack between those blocks.
In the top-right, this means the player can see beyond the diagonally-adjacent blocks. Since a tile is considered visible if any ray reaches any point inside it, the player can actually see quite a few tiles behind those blocks.
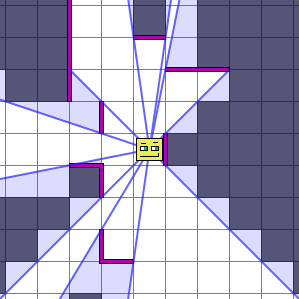
When you add a wall to a map in WallyFOV, you specify a tile and a compass direction. It will automatically add the corresponding wall on the other side, unless you specify otherwise.
While bodies do not fill the entire tile, walls do fill the entire edge. This is represented in the above diagram by the blue lines without the dashed lines beside them. The wall just to the east of the player in this diagram covers a slightly wider angle than the body just to the easy of the player in the first diagram. That small extra width is enough to put more tiles into shadow.
Unlike the case of diagonally-adjacent bodies, there will never be a small crack between two wall which touch.
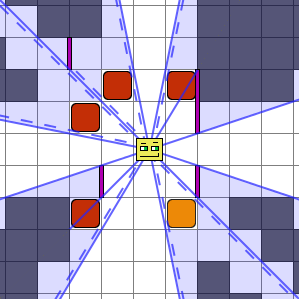
This example shows some cases where walls and bodies interact. A wall diagonally-adjacent to a body (such as the orange block here) will leave a narrow crack, just as in the body-body case. But here, note that only one side of that crack (the one on the body side) has the dashed line, which changes which tiles on the other side are visible.
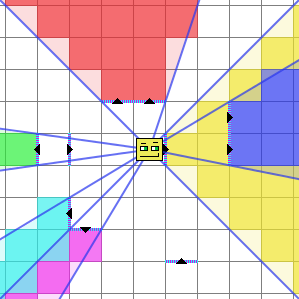
A warp connects the opposite edges of two tiles in two (possibly different) maps. For instance, it can connect the north edge of one tile with the south edge of another tile. In this example image, the colored regions indicate different maps that are visible from the point of view of the player. The striped edges with arrows on them indicate warps. A warp always points in one direction. If you want the player to be able to see back through the warp they traversed, you need to add another warp in the new map, back to the first one.
WarpField computes which map each visible location belongs to. Here the player can see the red map through the warp to the north. Sometimes a location might belong to more than one map. For instance, look at the location two north and two east of the player. The south edge of that location can be seen directly, and the east edge can be seen through the red warp. WarpField decides which map to choose based on the ranges of angles that can see it, using the following order of precedence:
- Choose a range of angles containing the center of the location, if there is one.
- Otherwise take the two ranges closest to the center that reach any part of the location. If one is closer than the other, choose that one.
- Otherwise, if they have passed through different numbers of warps, choose the range that has passed through the fewest warps.
- Otherwise, if they have different map ids, choose the one with the "lowest" id.
- Otherwise they're equivalent, choose arbitrarily.
All the locations along the 45-degree angle heading southeast are in the white map, since that involves fewer map changes than the angles passing through the yellow warp.
The 45-degree angle heading southwest tends to choose the teal map. In this case the angles going through the purple warp have the same number of warps (1), but the teal map has a "lower" map id.
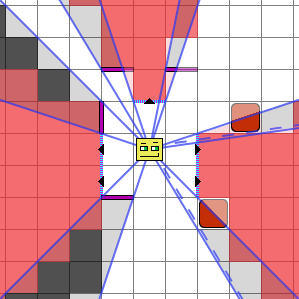
This example shows various cases where warps interact with walls and bodies. Let's start with the north warp. The wall on the west side is in the white map, so it blocks the rays that don't go through the warp. That's why the location just to the north is assigned to the red map: That boundary passes right down the middle, so normally the side with the fewest warp transitions (the white side) would be selected, but those white-map rays are blocked by the wall.
The wall on the east side of the north warp is in the red map. That wall isn't visible to the player (because the locations on either side are assigned to the white map), but it blocks some warped rays.
The body cases on the east side are similar. The southern body is in the white map, so it blocks the unwarped rays. Without the warp, it would block the location southeast of that body, but rays passing through the warp don't see a body there.
The location to the east of the eastern body would be assigned to the red map if not for that body. The body is in the red map, and blocks warped rays from reaching the center of that location. So WarpField chooses the rays that get closest to the center, which are the unwarped rays passing just counterclockwise of the warp.
The edges of warps can cause some confusion, especially when it makes tiles from two different maps look like they are adjacent. That's why it's generally a good idea to put obstacles on the sides of warps, like the walls on either side of the western warps. Walls like that (the longer the better) cast shadows that can help the user to spot the warp transitions.
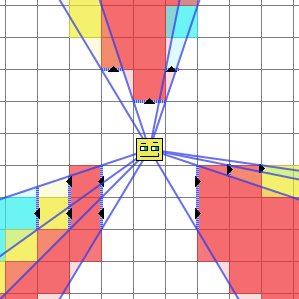
This example shows what happens when rays pass through and near multiple warps. WarpField allows as many warps as you want. On the west side, the red map contains warps to the yellow map, which contains warps to the teal map.
On the north side, the teal warp (found in the red map) is only slightly visible, but it's enough to generate a ray that hits the center of the location two to the north, so that's assigned to the teal map. The location just north of the teal warp is not in the teal map, because the warp boundary just crosses the center of that location, and the unwarped rays have a lower warp count.
Here are some more practical warp examples:
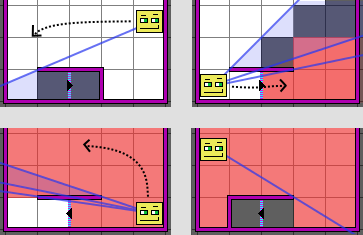
This shows an example of a staircase taking the player up (or down) to another floor of a building. When the player looks down the stairwell, they see through the warp to the other floor - tiles they couldn't see before they looked through the warp. Passing through the warp, they can see more of the red room.
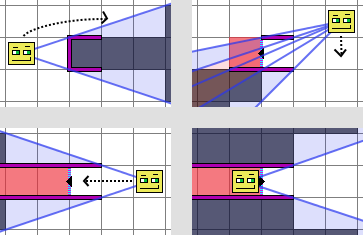
Here's an example of a tunnel passing underneath an area. When the player nears the tunnel opening, they can begin to see tiles on the inside of the tunnel (including a wall in the tunnel which they couldn't see before). Once they are lined up with the tunnel entrance they can see all the way down the tunnel, and then seamlessly walk inside.
- Roguebasin's pages on field-of-vision
- WallyFOV, the non-portal version of this algorithm