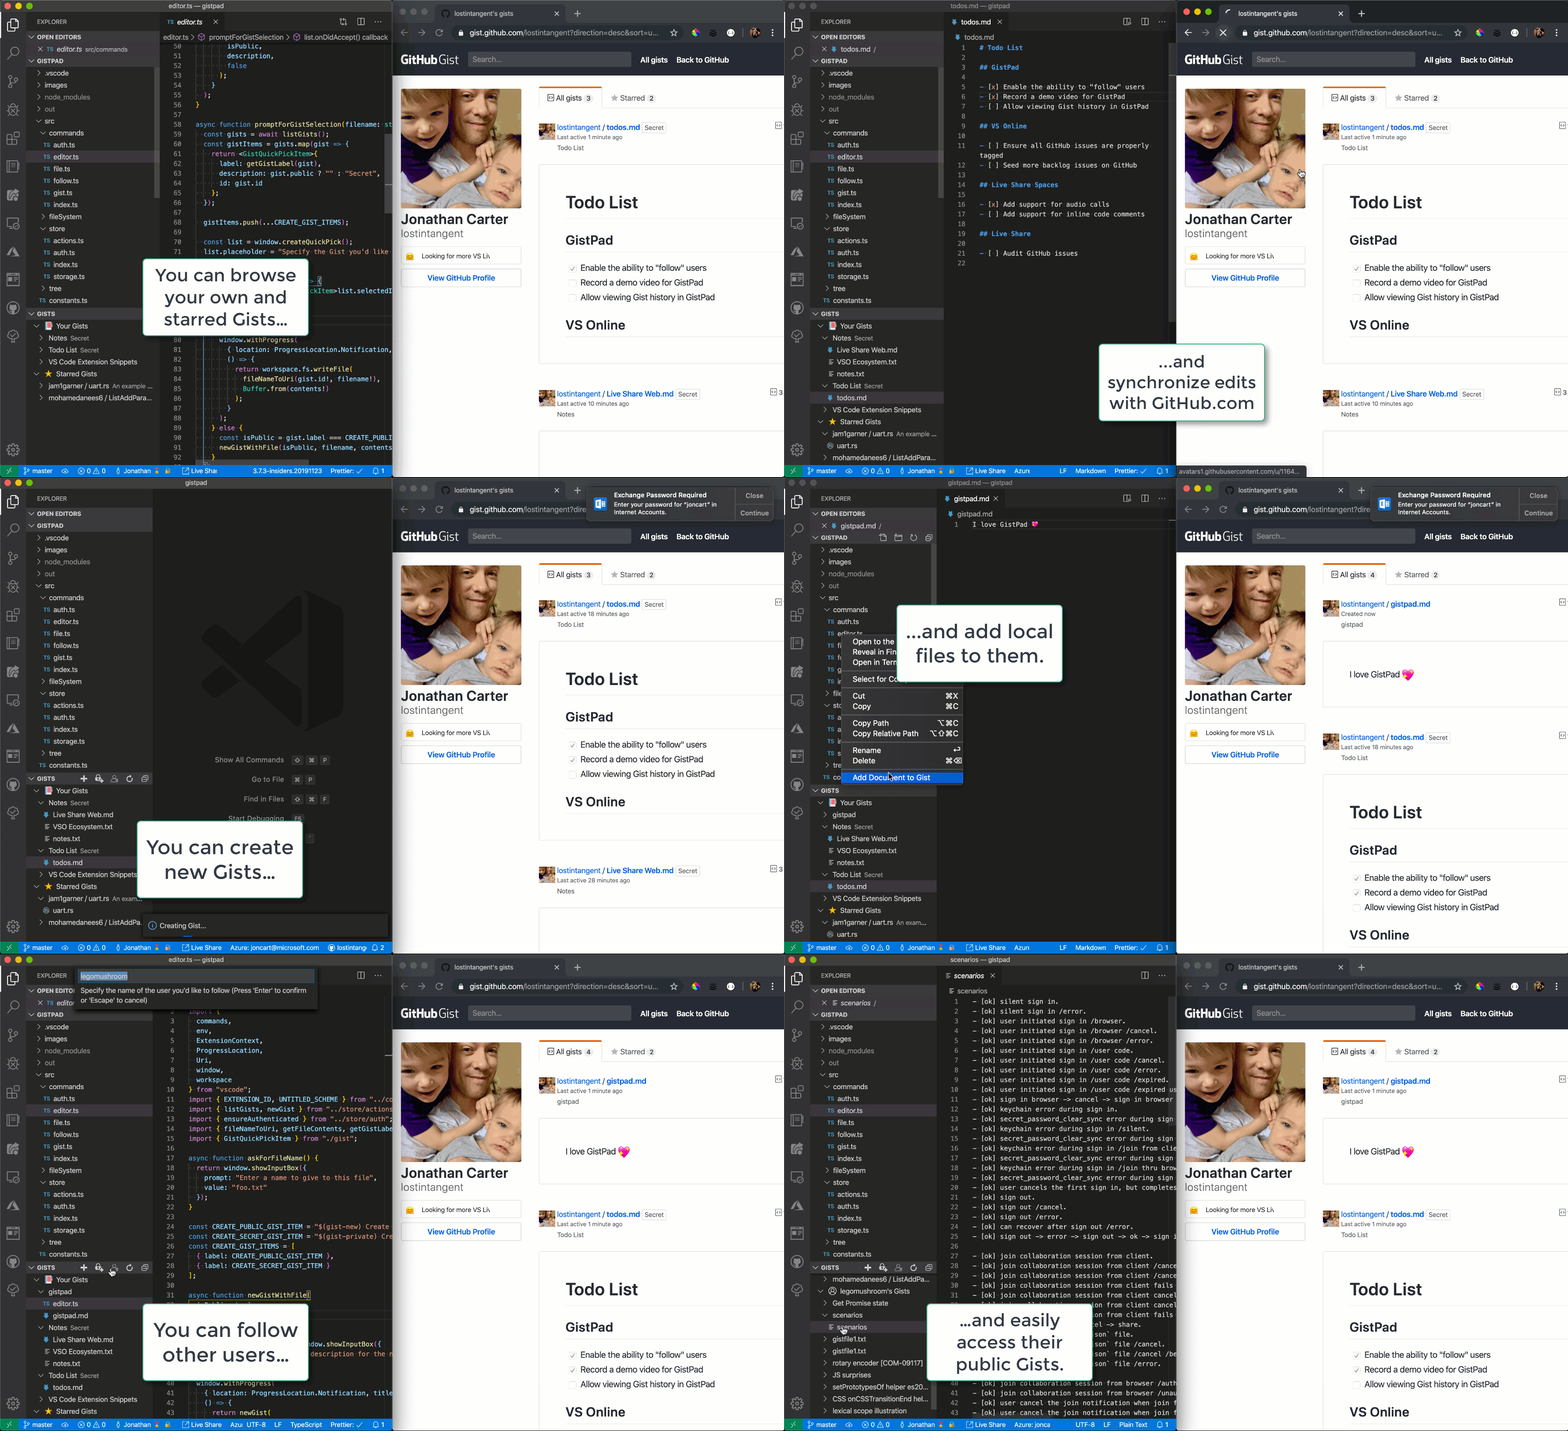
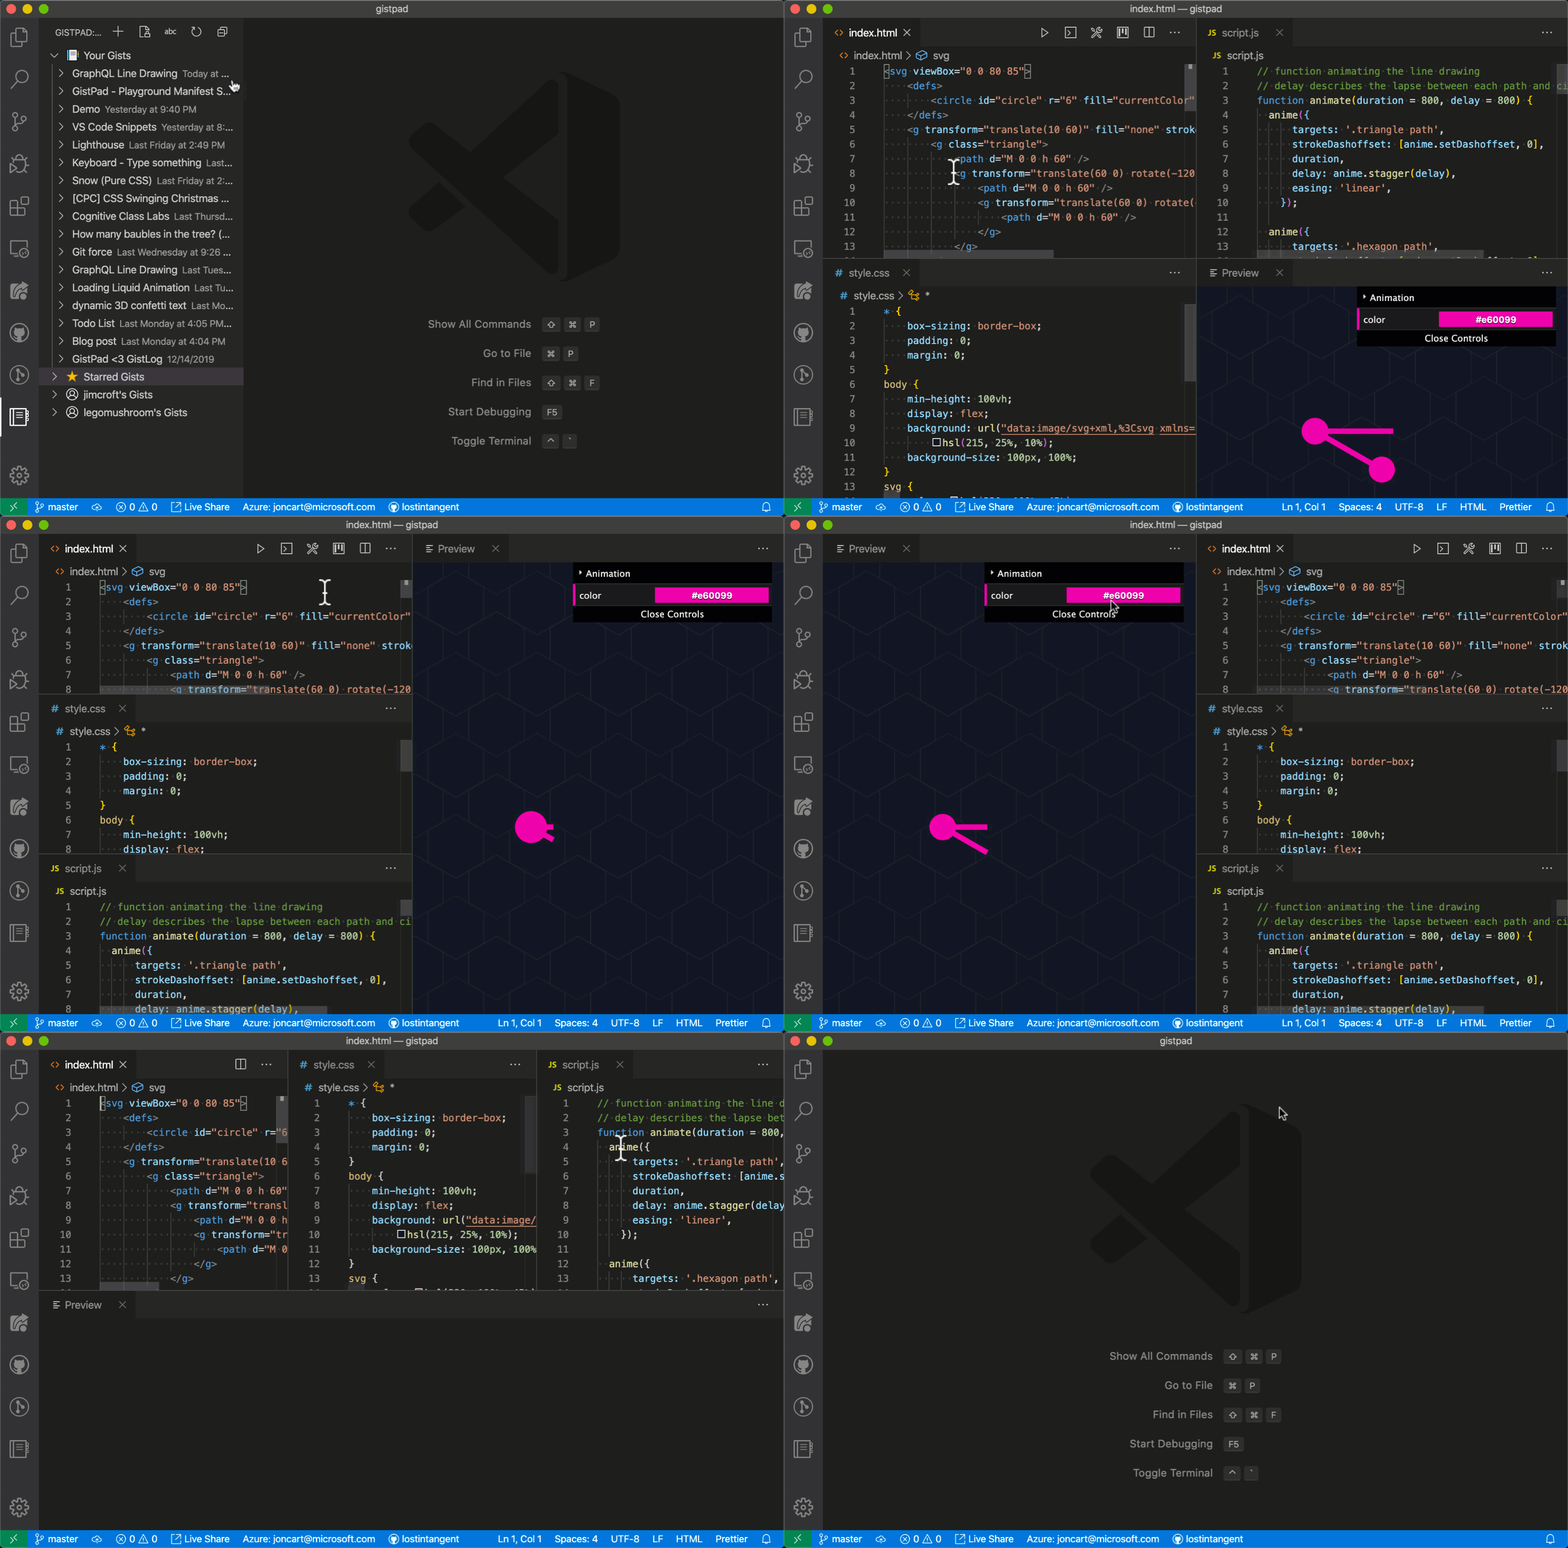
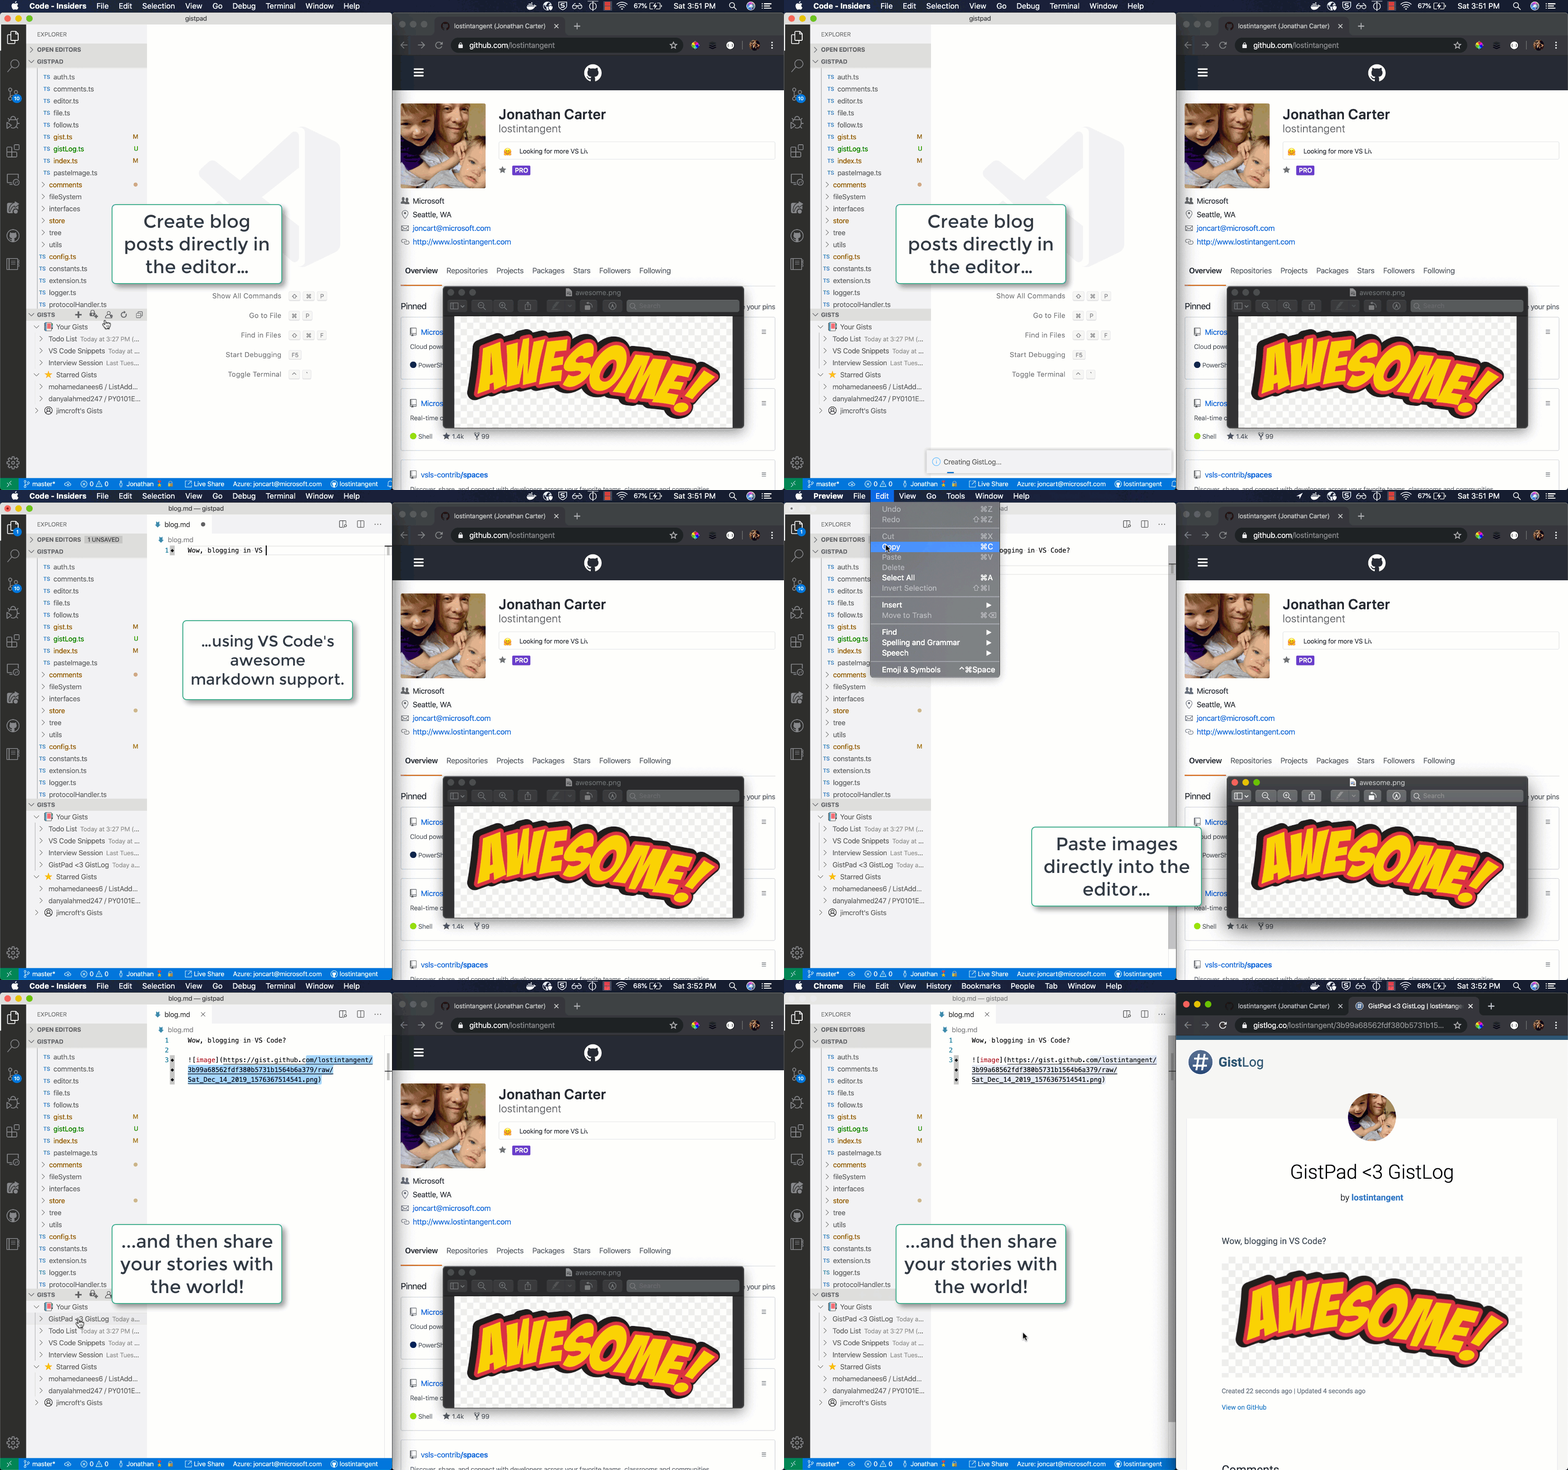
GistPad is a Visual Studio Code extension that allows you to manage GitHub Gists entirely within the editor. You can open, create, delete, fork, star and clone gists, and then seamlessly begin editing files as if they were local. It's like your very own developer library for building and referencing code snippets, commonly-used config/scripts, programming-related notes/documentation, and interactive samples. Additionally, you can collaborate with your friends and colleagues by "following" them, so that you can access/browse/fork and comment on their gists, without ever leaving Visual Studio Code. When needed, you can export gists to GitHub repositories, CodePen, and other services, so that you can start with simple code samples and then seamlessly grow them over time. 🚀
-
Install this extension from the marketplace and then reload VS Code
Linux Users: Ensure you have the
gnome-keyringandlibsecretpackages installed as well. These will enable GistPad to read/write your GitHub auth token securely.GitHub Enterprise users: Set the
gistpad.apiUrlsetting to point at the API URL of your GitHub server instance (e.g.https://[YOUR_HOST]/api/v3). -
Open the
GistPadtab (look for the notebook icon in the activity bar). From there, you can open a Gist by ID/URL, explore theShowcase, or sign-in in with a GitHub token, in order to view/edit/create/delete/fork/clone your own gists. To sign-in, you can generate an auth token by visiting this page, giving the token a name (e.g.gistpad), and ensuring to check thegistcheckbox.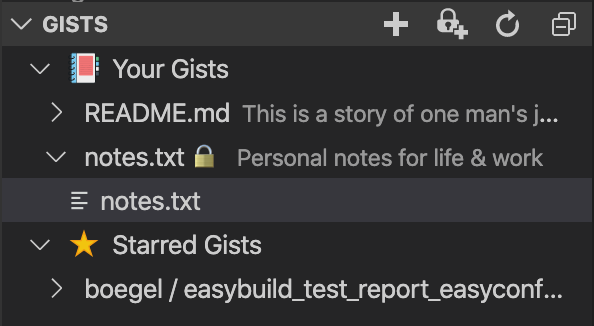
Git+HTTPS Users: If you've already signed-in to
github.comwith thegitCLI, GistPad will attempt to provide "single-sign on", assuming you're using HTTPS-based auth, and your login session includes thegistscope (SSH-based auth isn't supported). -
Create a new gist by clicking the
+icon in theGiststoolbar and specifying the files to seed it with (including support for directories!). Additionally, you can create gists from local files or snippets, by right-clicking them in theExplorertree, or right-clicking an editor window/tab, and selectingCopy File to Gist,Add Selection to GistorPaste Gist File Contents(details)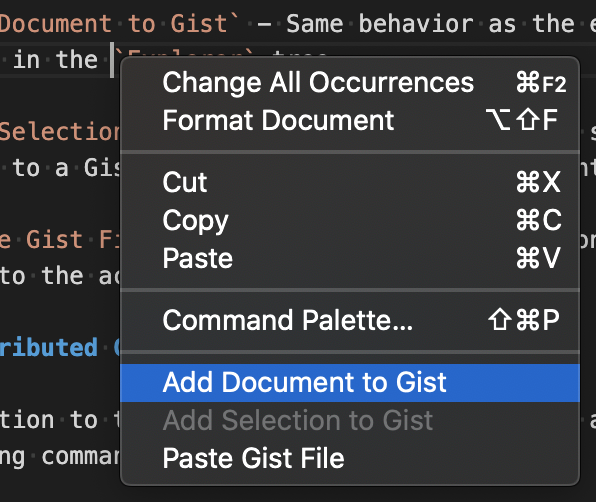
-
View and reply to comments in a Gist by scrolling to the bottom of a Gist file and interacting with the thread (including embedded code snippets!)

-
Stay up-to-date with your friend's and colleague's Gists by following them via the
GistPad: Follow Usercommand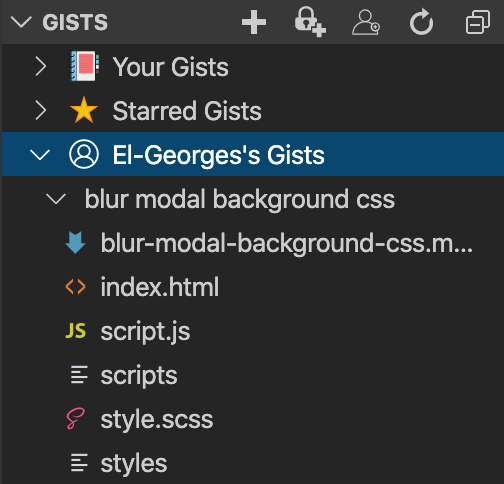
-
If you're working on a web app, and want to create runnable code samples, right-click the
Your Gistsnode and selectNew Playground(orNew Secret Playground. This will provide you with a live dev environment, to experiment with HTML, CSS and JavaScript, that is saved as a shareable gist
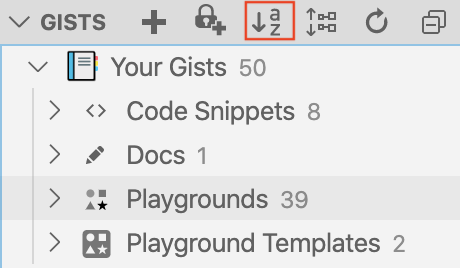
By default, the Gists tree sorts gist by their update-time, which allows you to focus on the most recently used gists. However, if you'd like to sort your gists alphabetically, you can click the sort toggle button on the Gists tree's toolbar.
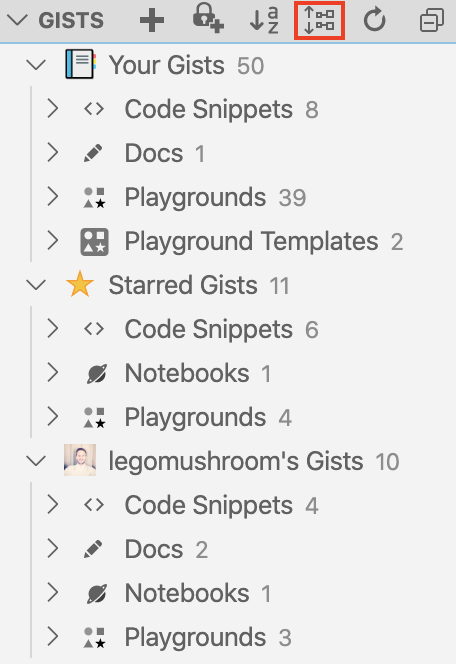
Additionally, by default, your gists are displayed as a flat list. However, if you'd like to group them by type, you can click the group toggle button on the Gists tree's toolbar.
When grouping is enabled, gists are grouped into the following built-in types:
- dos - Gists that are composed of nothing but
.txt,.md/.markdownor.adocfiles - notebook - Gists that are compose of nothing by Jupyter Notebook files (
.ipynb) - playground - Gists that include either a
playground.jsonfile and/or anindex.htmlfile. Read more about playgrounds here. - playground-template - Playgrounds whose
playground.jsonfile sets thetemplateproperty totrue. Read more about playground templates here. - tutorial - Playgrounds whose
playground.jsonfile specifies atutorialproperty. Read more about tutorials here. - tour - Gists that include a
main.tourfile, and were created by exporting a CodeTour. - code-snippet - Gists that don't match any of the above more-specific types.
Additionally, if you want to group gists by your own custom types, then simply add a tag to the end of the gist's description, using the following format: #tag (or #tag-name). Then, when you enable grouping of gists, your gists will be grouped by both the aforementioned types, as well as your custom tag types. You can identify tag groups by the use of the # icon next to them.
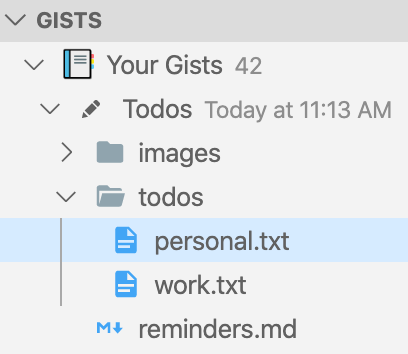
When you create a gist via the New Gist (or New Secret Gist) command, you can specify a comma-separated list of file names to seed the gist with. Furthermore, you could add / to your filenames, in order to add them to a sub-directory within the gist. For example, if you create a new gist, and specify todos/personal.txt,todos/work.txt,reminders.txt, the gist will include a reminders.txt file at the root of the gist, and personal.txt and reminders.txt files within a new directory called todos.
At any time, you can add new files to a gist or directory by right-clicking them and selecting Add New File(s) or Upload File(s). You can also rename/delete directories as well, by right-clicking them in the tree and selecting the appropriate command. If you'd like to move a file from one directory to another, simply right-click the file, select Rename File and edit the directory name that it's in. It's that simple!
Gist comments are exposed within the editor at the bottom of any opened Gist files. If a Gist includes multiple files, then the comment thread will be displayed at the bottom of them all (duplicated and synchronized).
If you're not authenticated, you can view existing comments, but you can't reply to them. If you are authenticated, you can add/reply, as well as edit/delete your own comments. In order to control the behavior of how Gist comment threads are displayed, refer to the GistPad > Comments: Show Thread config setting.
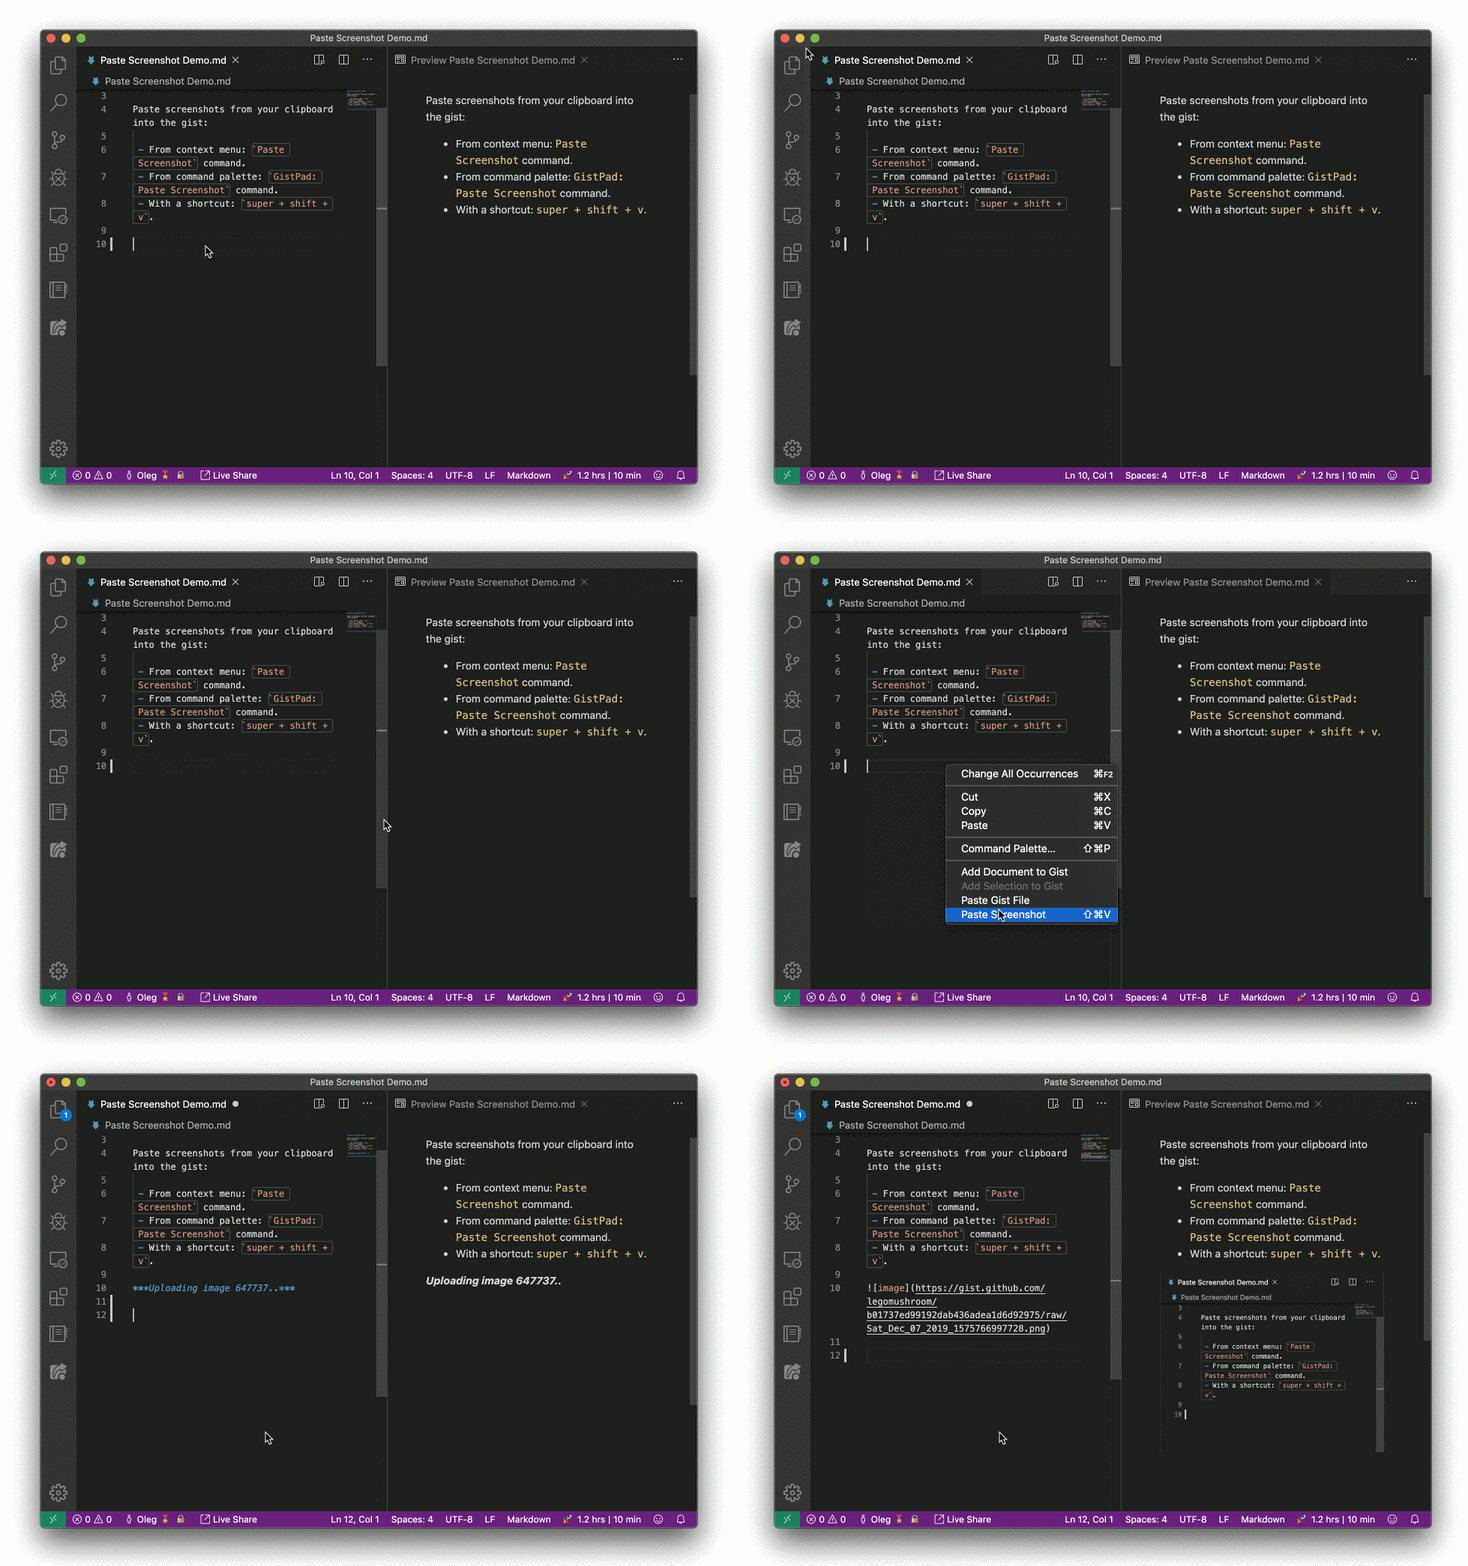
In order to make it easy to author markdown and HTML/Pug files that include image assets, you can copy images into your clipboard (e.g. taking a screenshot, clicking Copy Image in your browser, etc.) and then paste them directly into a gist file by right-clicking the editor and selecting Paste Image, or using one of the following keyboard shortcuts: ctrl + shift + v (Windows/Linux),cmd + shift + v (macOS).
By default, when you paste an image into a Gist file, it's uploaded as a .png to the gist, and the appropriate reference is added to it from the document (e.g. inserting an <img />). However, this behavior can be changed by using the GistPad > Images: Paste Format and/or GistPad > Images: Paste Type settings. Refer to the config settings section below for more details.
By default, when you paste an image, it is uploaded to a directory called images within the gist. However, if you'd like to change this (e.g. to assets instead), you can set the GistPad > Images: Directory Name setting.
GitHub Gists already allows you to star other user's gists, and when you do that, those will appear in the Gists tree, underneath a Starred Gists node. However, if you want to follow a GitHub user, and easily browse all of their current and future gists (without having to star each one!), you can run the GistPad: Follow User command and specify their GitHub user name. Once you've done that, you'll see a new node in the Gists tree which displays all of their public gists, and allows you to open/fork/clone/star them just like any other gist.
At some point, your code/notes might outgrow the feature set offered by Gists (e.g. when you want to start collaborating on the content with other developers). In that event, you can simply right-click the gist, and select the Export to Repository command in order to create a new GitHub repository, that contains the content of your gist. The created repo will be public or private, depending on the public/private state of the exported gist.
In order to use this command, the token you authenticate with needs to also have the repo scope, in addition to the gist scope. If it doesn't, simply generate a new token with the appropriate scopes, run the GistPad: Sign Out command, and then sign in again with the updated token.
To make it easy to capture ephemeral/fleeting notes as you learn new things throughout the day, GistPad allows you to create "scratch notes" by clicking the New scratch note... command under the Scratch Notes node in the Gists tree (or running the GistPad: New Scratch Note command). A scratch note is simply a text document, whose name is formatted based on the time it was created. By default, scratch notes create Markdown documents, but you can customize that behavior (e.g. to create text/AsciiDoc/etc. files) by customizing the GistPad > Scratch Notes: File Extension setting.
In order to help differentiate scratch notes from your "permanent notes", scratch notes appear as children of a top-level Scratch Notes node in the Gists tree. This makes it easy to view your outstanding scratch notes, so you can periodically audit them, in order to migrate any meaningful content to a more appropriate location (e.g. a new or existing gist).
You can create as many scratch notes as you need, and when you're done with them, you can delete indiviual notes and/or clear all of your notes by right-clicking the Scratch Notes node in the tree and selecting Clear Scratch Notes.
Behind the scenes, scratch notes are simply files that are managed within a "special" secret gist on your behalf. This way, you can focus entirely on the ephemeral nature of the notes, and not worry about creating/deleting gists.
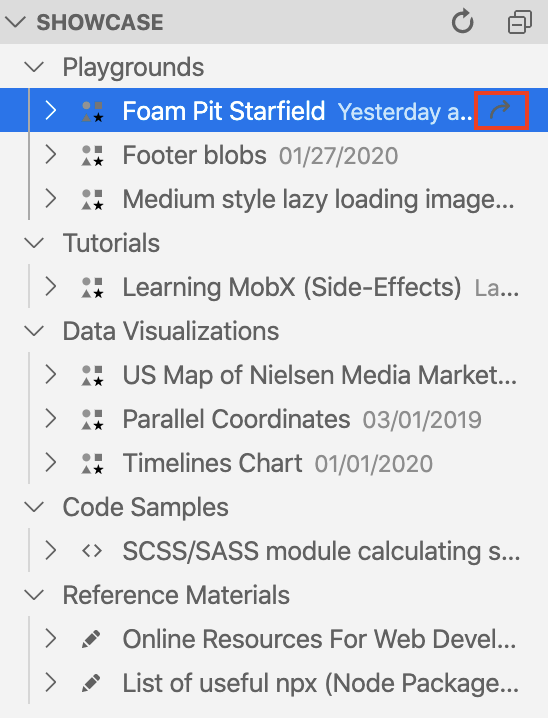
In order to illustrate what you can do with gists and playgrounds, as well as keep up-to-date with the cool stuff that folks in the community are building, you can check out the Showcase view in the GistPad tab. This shows a list of categories, which are meant to highlight different use cases for gists, along with some examples. Simply click the Open button for any gist in order to explore it, or expand the gist to see its file contents. If you have a gist that you think is worth showcasing, please open an issue and let us know about it. Otherwise, we'll keep the showcase updated periodically, to highlight new and interesting things. So stay tuned!
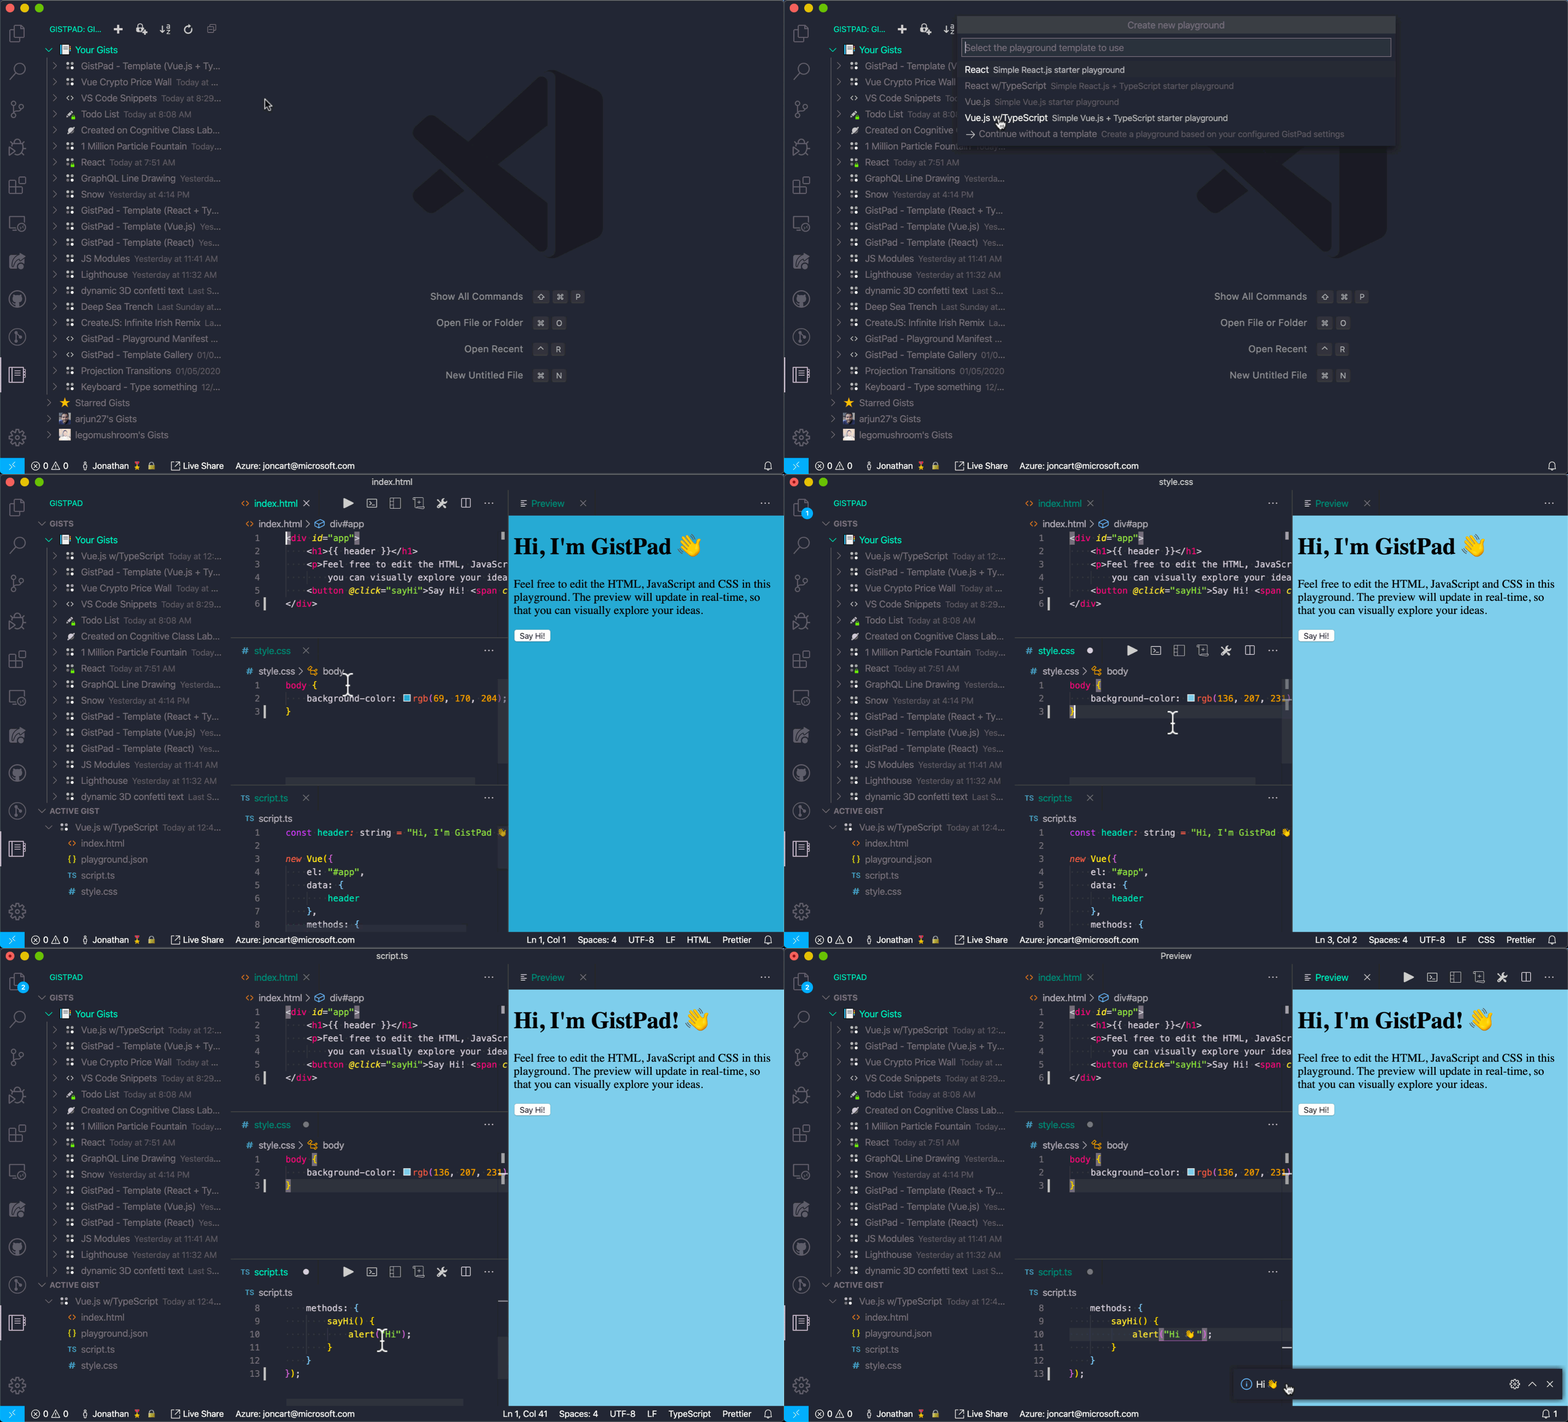
If you're building web applications, and want to create a quick playground environment in order to experiment with HTML, CSS or JavaScript (or Sass/SCSS, Less, Pug and TypeScript), you can right-click the Your Gists node and select New Playground or New Secret Playground. This will create a new gist, seeded with an HTML, CSS and JavaScript file, and then provide you with a live preview Webview, so that you can iterate on the code and visually see how it behaves.
When you create a new playground, you'll be asked to select a template, which is simply a way to get started quickly, using the libraries and languages you intend to use (e.g. React.js, Vue.js). You can also choose not to use a template, which will simply create a new playground, with an empty HTML, CSS and JavaScript file, which you can then add libraries to as neccessary.
Since the playground is backed by a Gist, your changes are saved and shareable with your friends. Additionally, as you find other playgrounds that you'd like to use, simply fork them and create your own playgrounds. That way, you can use Gists as "templates" for playground environments, and collaborate on them with others just like you would any other gist. When you're done with a playground, simply close the preview window and all other documents will be automatically closed. If you no longer need the playground, then delete it just like any other gist 👍
When you open a playground, this activates the "playground toolbar", which is a collection of helpful utilities that are displayed in the editor's title bar. The following describes the available actions:
- Run Playground - Re-runs the HTML, JavaScript and CSS of your playground. This can be useful when wanting to reset a playground's state and/or if you've disabled the auto-run behavior for playgrounds.
- Open Console - Opens the
GistPad Playgroundconsole, which allows you to view the output of anyconsole.logcalls that your playground makes (details). - Change Layout - Allows you to change the layout configuration of the playground editors (details).
- Add Library - Allows you to add an external library to your playground (e.g. React.js, Font-Awesome) (details)
- Open Playground Developer Tools - Opens the Chrome Dev Tools for your playground preview, which lets you use the DOM exlporer, evaluate JavaScript expressions in the console, etc.
You can reference HTTP-based images within any of your playground files, and they'll be downloaded/rendered automatically. However, if you need to add local images to your playground, you can upload them in one of two ways:
-
Right-click the gist in the
Gistsview and selectUpload Files(s). This supports any file type, and therefore is the most general-purpose solution. Once the image is uploaded, you can then reference it from your playground using only its filename (e.g.<img src="myImage.png" />), since the playground preview understands the context of the "surrounding gist". -
Copy/paste an image into your clipboard, open up an HTML or Pug file, right-click the editor and select
Paste Image. This will transparently upload the image to the gist, and then insert a reference to it for you (e.g. adding an<img />tag). This solution works best when you want to paste a "transient" image into your playground, such as a captured screenshot, or an image that you copied from a webpage.
By default, new playgrounds create an HTML, CSS and JavaScript file. However, if you're more productive using a different markup, stylesheet or scripting language, then simply rename the respective files to use the right extension, and the code will be automatically compiled for you on the fly! Specifically, GistPad supports the following languages:
- SCSS/Sass - Rename the
style.cssfile tostyle.scssorstyle.sass. *Note: While VS Code ships with language support for SCSS out-of-the-box, it doesn't ship support for Sass (the "indentended" syntax). So if you plan to author playgrounds with that syntax, it's recommended that you install this extension along with GistPad. - Less - Rename the
style.cssfile tostyle.less - Markdown - Rename the
index.htmlfile toindex.md - Pug - Rename the
index.htmlfile toindex.pug - TypeScript - Rename the
script.jsfile toscript.ts(orscript.tsx, in order to use JSX in your code) - JSX - Rename the
script.jsfile toscript.jsxin order to enable JSX to be written in "vanilla" JavaScript files. Additionally, if you add thereactlibrary to your gist'splayground.jsonfile, then*.jsfiles can also include JSX.
If you'd like to always use one of these languages, then set one or more of the following settings, and all new playgrounds will include the right files by default: GistPad > Playgrounds: Markup Language, GistPad > Playgrounds: Script Language, GistPad > Playgrounds: Stylesheet Language. View the settings documentation below for more detials.
Additionally, if you want to use other languages (e.g. Haml, AsciiDoc), check out the GistPad Contrib extension, which provides support for even more playground languages.
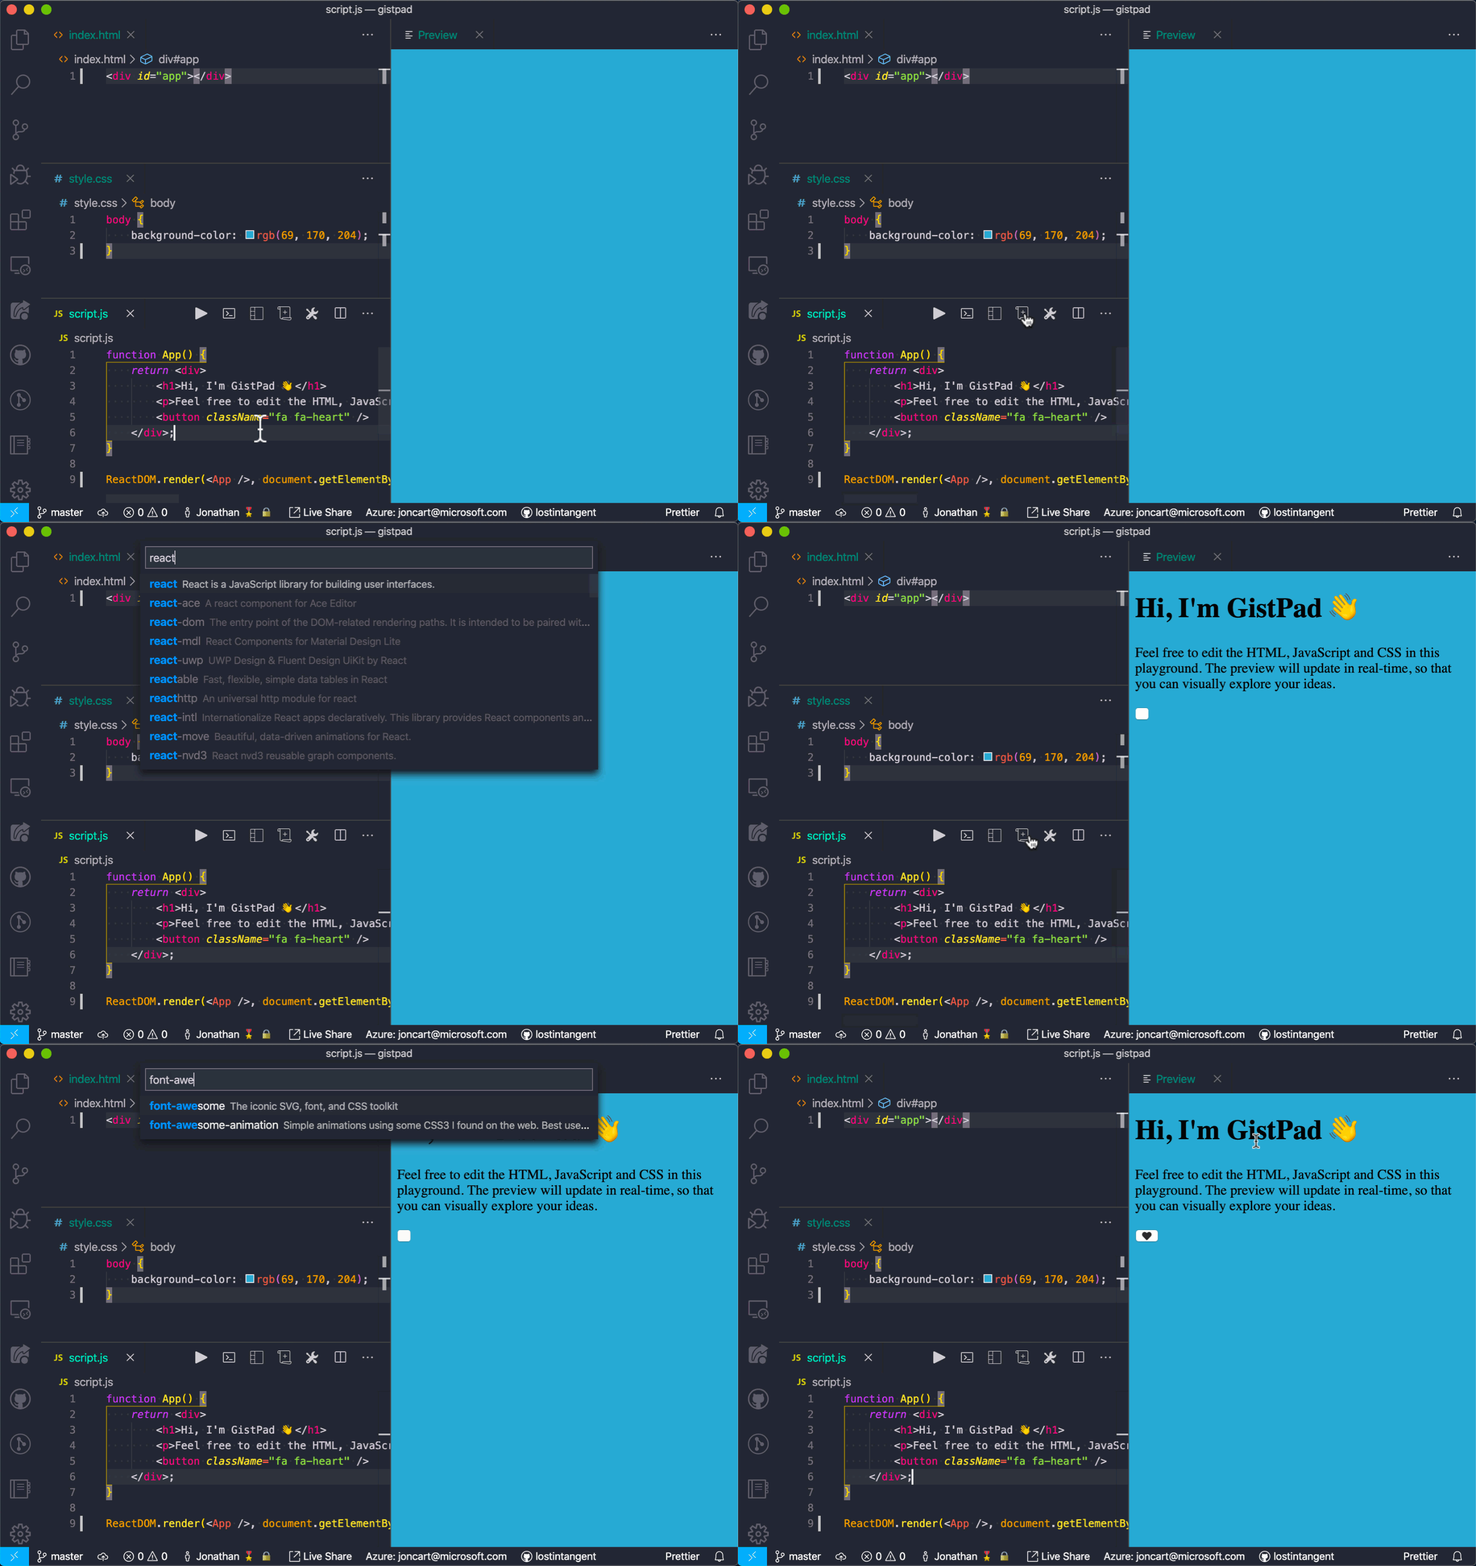
If you need to add any external JavaScript libraries (e.g. react) or stylesheets (e.g. font-awesome) to your playground, simply click the Add Playground Library commmand in the playground "action bar" (or run GistPad: Add Playground Library from the command palette). This will allow you to search for a library from CDNJS or paste a custom library URL. When you select a library, it will be automatically added to your playground.
Behind the scenes, this command update the playground's manifest file (playground.json), which you can also open/edit yourself manually if you'd prefer. Additionally, since Gist files provide an internet-accessible URL, you can use Gists as re-usable snippets for playgrounds, and add references to them by right-clicking a gist file in the Gists tree, select Copy GitHub URL, and then adding it as a library reference to the appropriate playground.
By default, when you create a playground, it will open in a "Split Left" layout, which vertically stacks the code editors on the left, and allows the preview window to occupy the fully IDE height on the right. However, if you want to change the layout, you can run the GistPad: Change Playout Layout command and select Grid, Preview, Split Bottom, Split Right, or Split Top.
Additionally, if you create a playground, that looks best in a specific layout, you can set the layout property in the playground's playground.json file to either: grid, preview, splitLeft, splitLeftTabbed, splitRight, splitRightTabbed or splitTop. Then, when you or someone else opens this playground, it will be opened with the specified layout, as opposed to the user's configured default layout.
The playground also provides an output window in order to view any logs written via the console.log API. You can bring up the output window, as well as run the playground or open the Chrome Developer Tools, by clicking the respective command icon in the editor toolbar. If you'd like to always open the console when creating/opening playgrounds, you can set the GistPad > Playgrounds: Show Console setting to true.
Additionally, if you create a playground that depends on the console, you can set the showConsole property in the playground's playground.json file to true. Then, when you or someone else opens this playground, the console will be automatically opened, regardless whether the end-user has configured it to show by default.
If you'd like to give your playground an introduction, you can create a file in the playground called README.md (or README.markdown), and by default, it's contents will be rendered above the playground code in the preview window. When a playground is opened, the README.md file isn't opened, which allows the playground to be focused on the core code assets (e.g. index.html, script.js), and allow the preview window to include embedded documentation.
Your playground can customize how the readme is rendered by setting the readmeBehavior property in your playground.json file to either previewFooter (which renders the content beneath the preview content), inputComment (which renders the content beneath an input file), or none (which doesn't render the contents at all).
By default, playground's assume you're using "standard" JavaScript code (<script type="text/javascript" />), and allows you to add 3rd-party libraries, which are added via new <script> elements in the preview page. However, if you'd like to write JavaScript code using import/export, you can set the scriptType property to module in the playground's playground.json file, and then begin to import modules. To simplify the process of importing 3rd-party modules, we'd recommend using either Unkpkg (adding the ?module parameter to any URLs), or the Pika CDN.
If you'd like to create a playground, without persisting it as a gist, you can create a "temporary playground" by selecting the Don't create gist button on the playground creation form (as opposed to giving it a description). You'll be able to edit, add, delete, and rename files just like a normal gist, but the changes are only kept in memory, and therefore, represent a great solution for exploring ideas quickly, and then moving on.
Note that temporary gists don't appear in the main Gists explorer tree, and therefore, to manage files within a temporary gist, you need to use the Active Gist tree on the GistPad tab.
If you'd like to add a link in your gist/readme, which references a file and/or line/column within a file in the gist, simply add a hyperlink, whose href value uses the gist: scheme (kind of like a mailto:), and specifies the file name you'd like to open (e.g. gist:index.html). Optionally, you can specify a line and column number as well (e.g. gist:index.html@23:5), which allows you to highlight a specific line/span of code when the end-user clicks on it.
If you need to customize the appearance/behavior of a playground and/or each step within your tutorial, you can create a config.json file with your playground to indicate the playground's configuration settings. This file will be automatically loaded/parsed, and exposed to your code via the widow.config global variable. This makes it really easy to customize your playground, without needing to write the code to load the step config manually.
If your playground needs to accept user input (e.g. to allow a user to take a challenge, play a game), then you can set the input property of your playground.json file to an object that includes two properties:
-
fileName- Indicates the "file name" of the virtual input file that will be created and displayed to the end-user. Note that this is mostly valuable for two reasons: setting the context to the end-user of what input the file expects (e.g.CSS Selector), and triggering colorization/language support by setting a file extension. -
prompt- Indicates an optional prompt (e.g.Specify the name of the CSS selector) that is rendered to the right of the input.
As the user types into the input file, the playground will look for a global function called checkInput, and if present, it will call that function, passing it the current value of the input file. This function should return a boolean which indicates whether or not the user completed the challenge.
Once completed, a modal dialog will appear, indicating to the user that they finished the challenge, and asking if they want to continue or exit the playground. If you'd like to customize the message that appears upon completion, simply set the input.completionMessage property to the desired string.
Note: If you want to provide additionally help information for your input, you can create a
README.mdfile in your playground/tutorial and set thereadmeBehaviorproperty in yourplayground.jsonmanifest toinputComment. This will render the contents of the readme as a inline code comment, directly beneath the input file.
If your playground requires a custom/interactive experience, but you don't want to place that HTML/JavaScript/CSS code in the index.html file (because it would open up for your end-users to see it), you can define a canvas.html file in your playground, which will be used as the main markup content for the playground.
For example, you could create a playground with a canvas.html file that contains your playground's HTML content, and a style.css file that's intended to include user-entered CSS. Because you define the HTML via canvas.html instead of index.html, then the HTML file wouldn't automatically open up, and therefore, the user could focus entirely on the CSS.
By default, a playground represents a single interactive sample. However, they can also represent multi-step tutorials/presentations, by making two simple changes:
-
Specifying a tutorial title, by setting the
tutorialproperty in the playground'splayground.jsonfile -
Defining a series of steps as gist directories, whose name starts with the step number and includes an optional description (e.g.
1,1 - Discussion of text,#1 - Intro). The contents of the directory match that of a standard playground (e.g. anindex.html,script.jsfile, etc.), and it's encouraged that each step have a readme that includes instructions. The number of steps in the tutorial is determined by the number of directories in the gist that follow the aforementioned pattern.
When a user opens up a tutorial playground, they'll only see the contents of the current step, and the preview window will include a navigation header that allows moving forward and backwards in the tutorial. Additionally, the user's current step will be persisted so that they can take a tutorial and pick up where they left off when they re-open the tutorial. To try an example, view the Learning MobX Tutorial.
GistPad includes integration with CodeTour, which allows you to author interactive walkthroughs of a codebase. This can be helpful for annotating relevant "markers" within a playground, and encouraging users/yourself where to focus. In order to create a code tour for a playground, simply open the playground, and click the ... menu in the editor window of any of the playground's document or the preview window. Select Record CodeTour and then start adding step annotations to your playground's code. Then, anytime you or someone else opens your playground, the tour will be automatically started.
For more information on CodeTour, and how to navigate/author tours, refer to the CodeTour documentation.
When you create a new playground, you'll see a list of templates, which let you create playgrounds using a pre-defined set of files and external libraries (e.g. React.js, Vue). This makes it really easy to get started quickly, and reduce repetitive tasks/boilerplate. By default, GistPad includes a standard set of templates, which come from two built-in galleries: web:languages and web:libraries. If you don't intend to use one or both of these, you can disable them by clicking the gear icon when running the New Playground (or New Secret Playground) command, and de-selecting the galleries you don't want. Additionally, you can modify the GistPad > Playgrounds: Template Galleries setting.
Behind the scenes, a template gallery is simply a JSON file, which is hosted somewhere (e.g. a gist, a git repo, your own web server), and defines a set of templates. A template is simply a gist, which includes the neccessary files (e.g. HTML, JavaScript, CSS, etc.), and then defines a name and description. To see an example of how to define a template gallery, see the built-in web:libraries gallery. Additionally, to see an example of a template, see the React.js template.
When defining the template, you can use the playground.json file to indicate not only the JavaScript and CSS libraries that the playgroud needs, but also, the layout it should use by default, and whether or not the console should be automatically opened (e.g. because the playground relies on writing console logs). See the docs for more details on this file.
In addition to using/creating template galleries, you can also mark your own local playgrounds gists as being templates, by simply setting "template": true in the playground's playground.json file. Then, when you create a new playground, you'll see your template in the list. This option is good for defining your own templates, that you don't intend to share with others.
Additionally, if you star a gist that is marked as a playground template, that will show up in the list of templates as well. That way, you can easily share templates with others, without needing to create a template gallery.
Whenever you create a playground, it includes a playground.json file, which defines the metadata for the playground, including it's behavior, requirements and intended presentation.
-
scripts- An array of URLs that indicate the JavaScript libraries which should be added to the playground when run. This property can be managed via theAdd Librarycommand in the playground toolbar, and therefore, it isn't neccesary to manually edit it. Defaults to[]. -
styles- An array of URLs that indicate the CSS libraries which should be added to the playground when run. This property can be managed via theAdd Librarycommand in the playground toolbar, and therefore, it isn't neccesary to manually edit it. Defaults to[]. -
showConsole- Specifies whether to automatically open the console when someone opens this playground. Note that this will take precendence over the user's configure console setting, and therefore, is useful when a playground relies on console output, and can ensure the playground is setup correctly without requiring the end-user to explicitly open the console. -
layout- Specifies the layout to use when someone opens this playground. Note that this will take precedence over the user's configured default layout, and therefore, is useful when a playground is optimized for a specific layout, and therefore, can ensure the end-user has the best experience by default. -
scriptType- Indicates the value of<script>element'stypeattribute, when injected into the playground preview page. Can either betext/javascriptormodule. Defaults totext/javascript. -
template- Indicates that this playground is intended to be used as a template for new playgrounds, and therefore, will appear in the list when creating a new playground. Defaults tofalse. -
readmeBehavior- Indicates how the playground's readme (if it has one) will be rendered to the end-user. Defaults topreviewHeader. -
tutorial- Indicates that this playground is intended to be used as a multi-step tutorial. When set, this property indicates the title of the tutorial. -
input- Indicates that this playground requires user input, and also specifies an optional input file name, prompt message and completion message.
If you export a pen to a GitHub Gist, and then refresh the Gists tree in VS Code, you'll be able to see the pen and then can open/edit it like any other playground. This allows you to easily fork someone's pen and work on it within VS Code.
Additionally, if you develop a playground locally, and want to export it to CodePen (e.g. in order to share it with the community), you can right-click the gist and select Export to CodePen. This allows you to develop within VS Code, and then share it when you're done. When a playground is exported to CodePen, it's tagged with gistpad so that the community can see the pens being created with it.
Bl.ocks is community for sharing interactive code samples/data visualizations, which are based on GitHub Gists. As a result, you can copy the URL for any Block, use it to open a gist within GistPad, and immediately have an interactive environment for viewing/exploring the Block.
Additionally, you can create new blocks with GistPad by adding the optional Blocks gallery, and then creating a new playground using one of the block templates. From there you can edit HTML, use the included D3 library, upload data files (e.g. JSON, CSV, TSV) and watch the preview update in real-time. If you'd like to view/share the playground, you can right-click the gist and select View Gist in Bl.ocks.
In addition to being able to use Gists to share code snippets/files, you can also use it as a mini-blog, thanks to integration with GistLog. In order to start blogging, simply run the GistPad: New GistLog command, which will create a new Gist that includes two files: blog.md and gistlog.yml.
The blog.md file will be automatically opened for editing, and as soon as you're ready to publish your post, open gistlog.yml and set the published property to true. Then, right-click your Gist and select the Open Gist in GistLog menu. This will open your browser to the URL that you can share with others, in order to read your new post.
In addition to being able to view individual posts on GistLog, you can also open your entire feed by right-clicking the Your Gists tree node and selecting the Open Feed in GistLog menu item. This will launch your GistLog landing page that displays are published GistLog posts.
In addition to the Gists view, GistPad also contributes an Copy File to Gist command to the context menu of the Explorer file tree, which allows you to easily add local files to a new or existing Gist.
In addition to the Explorer file tree commands, GistPad also contributes the following commands to the editor's context menu:
-
Add Selection to Gist- Allows you to add a snippet/selection of code to a Gist, instead of the entire document -
Paste Gist File- Allows you to paste the contents of a Gist file into the active editor -
Paste Image- Allows you to paste an image from your clipboard into a markdown, HTML or Pug file. The command will automatically upload the image and then add a reference to it.
The Copy File to Gist command is also available on the editor tab's context menu.
In addition to the commands added to the editor context menu, GistPad also contributes the following commands to the editor's title bar menu (click the ... in the upper right section of an editor window):
Rename File- Allows you to rename the current file.
In addition to the Gists view, this extension also provides the following commands:
-
GistPad: Delete Gist- Allows you to delete one of your Gists. If you have a Gist workspace open, it will delete that and then close the folder -
GistPad: Follow User- Follow another GitHub user, which allows you to browser/access/fork their Gists from within theGistsview. -
GistPad: Fork Gist- Forks the currently opened Gist, and then opens it as a virtual workspace. -
GistPad: Open Gist- Displays your list of Gists (if you're signed in), and then opens the files for the selected one. You can also specify a gist by URL,username/id, or ID, which doesn't require being signed in. -
GistPad: Open Gist as Workspace- Same behavior as theGistPad: Open Gistcommand, but will open the selected Gist as a workspace, instead of "loose files". -
GistPad: New Gist- Creates a new public Gist, and then opens its associated files. If you'd like to seed the gist with multiple files, you can specify a comma-separated list of names (e.g.foo.txt,bar.js). -
GistPad: New Scratch Note- Creates a new "scratch note", which is a file whose name is derived from theGistPad > Scratch Notes: ExtensionandGist > Scratch Notes: Formatsettings. -
GistPad: New Secret Gist- Same behavior as theGistPad: New Gist (Public)command, except that it creates a secret Gist. -
GistPad: New Web Playground- Creates a new playground. -
GistPad: New GistLog- Creates a GistLog. -
GistPad: Refresh Gists- Refreshes the gist data and reloads theGiststree. -
GistPad: Sign In- Sign-in with a GitHub token, in order to view/edit/delete your Gists. -
GistPad: Sign Out- Sign out of the currently authenticated GitHub session. -
GistPad: Starred Gists- Lists your starred Gists, and then opens the files for the selected one. -
`GistPad: Paste Gist File - Allows you to paste the contents of a Gist file into the active editor
-
Gistpad: Api Url- Specifies the GitHub API server to use. By default, this points at GitHub.com (https://api.github.com), but if you're using GitHub Enterprise, then you need to set this to the v3 API URL of your GitHub server. This should be something likehttps://[YOUR_HOST]/api/v3. -
Gistpad: Git SSO- Specifies whether to enable single sign-in (SSO) with thegitCLI, when you've already authenticated with github.com. Defaults totrue. -
Gistpad: Tree Icons- Specifies whether to show the gist type icons in the gists tree.
-
GistPad > Comments: Show Thread- Specifies when to show the comment thread UI whenever you open a Gist file. Can be set to one of the following values:always: Always display the comment thread whenever you open a Gist file. You can manually collapse it as needed.never: Never automatically open the comment thread when you open a Gist file. You can manually expand it as needed.whenNotEmpty(default): Automatically display the comment thread whenever there are actually comments in a Gist file. Otherwise, leave it collapsed.
-
Gistpad > Images: Paste Format: Specifies the markup format to use when pasting an image into a gist file. Can be set to one of the following values:markdown(default): Pastes the image reference usingMarkdownformat (e.g.).html: Pastes the image reference usingHTMLformat (e.g.<img src="link" />). Note, when you paste an image into an HTML file, it will always use this format type, regardless what the setting is.
-
Gistpad > Images: Paste Type: Specifies the method to use when pasting an image into a gist file. Can be set to one of the following values:file(default): The pasted image is uploaded as a.pngto the gist, and a reference is added to file it's pasted into.base64: The pasted image is base64-encoded and then embedded into the gist file.
-
Gistpad > Images: Upload Directory Name: Specifies the name of the directory to upload images to. Defaults toimages.
-
GistPad > Playgrounds: Auto Run- Specifies when to automatically run the code for a playground. Can be set to one of the following values:onEdit(default): Will re-run the playground automatically as you type.onSave: Will re-run the playground when you save a file.never: Don't automatically re-run the playground, and instead, only run it when theGistPad: Run Playgroundcommand is executed.
-
GistPad > Playgrounds: Auto Save- Specifies whether to automatically save your playground files (every 30s). If you've already set theFiles: Auto Savesetting toafterDelay, then that setting will be respected. Defaults totrue. -
GistPad > Playgrounds: Include Markup- Specifies whether to include a markup file (index.html) when creating new web playgrounds. Defaults totrue. -
GistPad > Playgrounds: Include Script- Specifies whether to include a script file (script.js) when creating new web playgrounds. Defaults totrue. -
GistPad > Playgrounds: Include Stylesheet- Specifies whether to include a stylesheet file (style.css) when creating new web playgrounds. Defaults totrue. -
GistPad > Playgrounds: Layout- Specifies how to layout the editor windows when opening a playground. Can be set to one of the following values:grid: Opens a 2x2 grid of editors, with the editors and preview window occupying an equal amount of space.preview: Simply opens the full-screen preview window. This is useful for interacting with complex playgrounds or viewing other's playgrounds.splitBottom: Opens a split-level layout, with the editors horizontally stacked on the bottom, and the preview occupying the full IDE width on the top.splitLeft(default): Opens a split-level layout, with the editors vertically stacked on the left, and the preview occupying the full IDE height on the right.splitLeftTabbed: Opens a split-level layout, with the editors grouped into a single tab on the left, and the preview occupying the full IDE height on the right.splitRight: Opens a split-level layout, with the editors vertically stacked on the right, and the preview occupying the full IDE height on the left.splitRightTabbed: Opens a split-level layout, with the editors grouped into a single tab on the right, and the preview occupying the full IDE height on the right.splitTop: Opens a split-level layout, with the editors horizontally stacked on the top, and the preview occupying the full IDE width on the bottom.
-
GistPad > Playgrounds: Markup Language- Specifies the default markup language to use when creating new web playgrounds. Can be set to one of the following values:html(default): Will result in anindex.htmlfile being created whenever you create a new web playground.markdown: Will result in anindex.mdfile being created whenever you create a new web playground.pug: Will result in anindex.pugfile being created whenever you create a new web playground.
-
GistPad > Playgrounds: Readme Behavior- Specifies how to display the contents of a playground's readme, if it has one. Can be set to one of the following values:none: If a playground has a readme, then it won't be displayed automatically when someone opens it.previewFooter: If a playground has a readme, then its contents will be rendered as the footer of the preview window.previewHeader(default): If a playground has a readme, then its contents will be rendered as the header of the preview window.
-
GistPad > Playgrounds: Script Language- Specifies the default scripting language to use when creating new web playgrounds. Can be set to one of the following values:javascript(default): Will result in anscript.jsfile being created whenever you create a new web playground.javascriptreact: Will result in anscript.jsxfile being created whenever you create a new web playground.typescript: Will result in anscript.tsfile being created whenever you create a new web playground.typescriptreact: Will result in anscript.tsxfile being created whenever you create a new web playground.
-
GistPad > Playgrounds: Stylesheet Language- Specifies the default stylesheet language to use when creating new web playgrounds. Can be set to one of the following values:css(default): Will result in anstyle.cssfile being created whenever you create a new web playground.less: Will result in anstyle.lessfile being created whenever you create a new web playground.sass: Will result in anstyle.sassfile being created whenever you create a new web playground.scss: Will result in anstyle.scssfile being created whenever you create a new web playground.
-
GistPad > Playgrounds: Show Console- Specifies whether to always show the console when opening a playground. Defaults tofalse. -
GistPad > Playgrounds: Template Galleries- Specifies the list of template galleries to use, when displaying the available templates when creating a new playground. Defaults to["web"]. -
GistPad > Scratch Notes: Directory Format- Specifies the moment.js format string to use when generating directories for new scratch notes. Defaults toLL(e.g.March 6, 2020). -
GistPad > Scratch Notes: File Extension- Specifies the file extension to use when generating new scratch notes. Defaults to.md. -
GistPad > Scratch Notes: File Format- Specifies the moment.js format string to use when generating new scratch notes. Defaults toLT(e.g.2:52 PM). -
GistPad > Scratch Notes: Show- Specifies whether or not to display the scratch notes node in the gists tree view. Defaults totrue. -
GistPad > Showcase URL- Specifies the URL to use when displaying the showcase entry. This allows teams/classrooms/etc. to create their own showcase and share it amongst themselves.
In order to allow other extensions to extend the default behavior and/or settings of GistPad, the following extensibility points are provided:
By default, GistPad ships with a new of template galleries, however, extensions can contribute new ones by adding a gistpad.playgrounds.templateGalleries contribution to their package.json file. This contribution is simply an array of objects with the following properties:
id- A unique ID that will be used to persist the enabled/disabled state of the gallery. Note that the display name of the gallery comes from the gallery definition itself.url- A URL that points at the actual template gallery. This URL must refer to a JSON file that conforms to the GistPad template gallery schema.
By default, GistPad ships with support for a handful of languages you can use in a playground. However, extensions can introduce support for new languages by adding a gistpad.playgrounds.languages contribution to their package.json file. This contribution point is simply an object of objects with the following properties:
type- The "type" of language that your extension is supporting. One ofmarkup,stylesheetorscript.extensions- An array of file extensions that your extension supports, including the leading period (e.g.haml).
When your extension contributes a custom language, GistPad expects that your extension returns an API, that includes the following members:
gistPadCompile(extension: string, code: string): string- Takes in the code and associated file extension (e.g..haml) and returns the compiled version of the code. For example, if your extension contributes support for Haml, then when the end-user opens a playground using a.hamlfile, this method would be passed the raw Haml code, and the.hamlextension, and you'd need to return the compiled HTML string.
For an example of how to use this API, check out the GistPad Contrib extension.
Once you've opened a Gist, you can perform the following filesystem operations:
- Editing existing files
- Adding new files
- Renaming files
- Deleting files
- Copying/pasting files
GitHub Gist doesn't support directories, and therefore, this extension doesn't allow you to create them.
In order to improve the productivity of editing Gists, and make VS Code behave similarly to the GitHub.com experience, the following extensions are recommended, depending on how you expect to use Gists (e.g. markdown files, code snippets):
| Extension | Stats |
|---|---|
| Markdown All-in-One | |
| Markdown Checkbox | |
| SVG Viewer | |
| Vega Viewer | |
| Geo Data Viewer |
