Building an XKB Keyboard
Note: This page contains old documentation from before 2013, but may still be of use. And it would still be okay to update, correct, and add to this page.
A large portion of this information was learned from the thorough, yet out of date: Unreliable Guide to XKB Configuration
We must first determine if your country is on the keyboard list. Under the Tools menu, click Settings, then Keyboard. Click Add Layout. You will be presented with a list of countries. Browse the list and try to find your country, or at least a keyboard similar to the custom one you envision. You'll see keys that have up to 4 characters.
 |A \u0190|
 |a \u025b|
If you're reading this, I hope you know that typing the key gives you the character in the bottom-left (a) and holding Shift when typing the letter gives you (A). The second column is normally accessed using the Right Alt (AltGr) button or Ctrl+Alt. In this example, holding AltGr and then typing the letter gives you (\u025b) and holding both Shift and AltGr when typing gives you (\u0190).
There are 2 important files in this section, The first> is in the symbols folder (/usr/share/X11/xkb/symbols/) and named with a 2-letter code. This is where your keyboard will go. This second file is /usr/share/X11/xkb/rules/evdev.xml, and contains sort of a table of contents in XML format.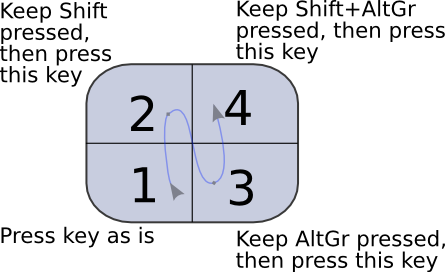
- You'll need root (admin) rights to do this: so I recommend opening a terminal and typing "gksudo nautilus &". Once you type the password, you will receive a window with root privileges.
- Browse to /usr/share/X11/xkb/symbols.
- Find the file named with the 2-letter code of your country. (If it does not exist, duplicate a country with keyboards similar to your own and rename it to your country code. (ex: cm, us, cn) )
- Open some of the country files and get a feel for how they're set up. Most country files will have multiple entries like the one below:
 xkb_symbols "qwerty"
 {
 	name[Group1] = "Cameroon Languages Qwerty";
 	include "level3(ralt_switch)"
 	include "cm(basic)"
 	key <AB01> { [              z,              Z,          U2026,          U2020 ] };
 ...
 	key <AC01> { [              a,              A,          U025B,          U0190 ] };
 ...
 	key <TLDE> { [          U030D,          U0303,          U0060,          U007E ] };
 };
 xkb_symbols "<span style="background:yellow">qwerty</span>"
 {
 	name[Group1] = "<span style="background:yellow">Cameroon Languages Qwerty</span>";
 	include "<span style="background:yellow">level3(ralt_switch)</span>"
 	include "<span style="background:yellow">cm(basic)</span>"
- The title beside xkb_symbols is the title you will use to reference this keyboard in the config files. make it short and with no spaces. You should use the standard titles like basic, dvorak, or nodeadkeys if applicable. More standard titles here here in Layouts/Variants, section 4.
- Without going too far into groups, name[group1] contains, functionally, the name of your Keyboard. Accepted layouts can have only one group.
- Includes are imports of modules from other sections or other files in the symbols folder. They are in the format filename(module), so level3(ralt_switch) points to the file "/usr/share/X11/xkb/symbols/level3" and the module "ralt_switch". If a key is redefined by an include module, it may be important whether the import comes at the beginning or the end of the module.
  key <<span style="background:yellow">AB01</span>> { [              <span style="background:yellow">z,             Z,          U2026,          U2020</span> ] };
  key <AC01> { [              a,              A,          U025B,          U0190 ] };
  key <TLDE> { [          U030D,          U0303,          U0060,          U007E ] };
 };
- AB01 is the reference to the key that is being defined. AB refers to the row, and 01 refers to a specific key on that row. You will probably want to print out this image to use as a reference. Always start counting from the left.
- z is the unshifted character.
- Z is the shifted character.
- U2026 is the Unicode value for the character recieved through AltGr.
- U2020 is the Unicode value for the character recieved through Shift+AltGr.
There is a utility to help you create your keyboard visually. This wonderful python tool works very well with the built-in character map to build a draft of your keyboard. I used it in a workshop setting on the projector to drag-and-drop each character into place. Layout Editor
There are 3 things that make this draft-quality for me:
- The file that it creates ignores any other keyboards in the file, and will create a file containing only your keyboard. Therefore, be careful that you create a temporary file and use a copy/paste workflow to move the data for testing.
- I don't like the way that it converts characters to their named equivalents. I would prefer that it used the Unicode value and put the Unicode name in a comment. I want to be sure that I'm using the correct letters, and names like "Armenian single guillemet" are a little distracting.
- It removes comments when I open a pre-made file.
Download the latest tarball from the KLE site.
Extract the folder somewhere that you have access.
...to be continued
You may, like me, choose to construct this file manually. For one keyboard, I started with a Microsoft Keyboard Layout Creator (KLC) source file in a text editor and used regular expressions to "massage" the data into a usable format.
See the following pages, when they exist for more help and tips.
Also, until a utility exists, a spreadsheet like this one may help: CAMQ2011.odsFrom an MSKLC source file and this chart, you should be able to glean all information needed to build your file.
For diacritics, you have 3 options (as far as I know).
- If you use mostly composed characters, there are predefined dead keys: dead_hook, dead_diaeresis, dead_grave\u2026. Adding these keys to your keyboard and pressing these keys will let the OS choose what character to display, and usually add the composed character. This is what we do for French. These combinations are explained in the file /usr/share/X11/locale/en_US.UTF-8/Compose, but don\u2019t bother making changes there.
- Use the \u201cCompose Key\u201d options in /usr/share/X11/locale/en_US.UTF-8/Compose .
- The other option is to create a key that inserts a combining diacritic. Thus typing a + U0300 gives you decomposed à . This is what we do here for Camerooninan languages because things like \u018f\u0300 do not exist in composed form.
- Press the key = combining low tone
- Shift + key = combining falling tone
- Alt (or ;) + key = double straight quote
- Alt (or ;) +shift + key = apostrophe
The level3 file contains all sorts of goodies that can be imported into your file. One of the most useful is Right Alt Switch (ralt_switch). This is the most common way of accessing special characters and allows you to hold the AltGr (Right Alternate) and Shift keys to get to the characters in the second column of you keyboard layout.
 xkb_symbols "ralt_switch" {
  key <RALT> {
    type[Group1]="ONE_LEVEL",
    symbols[Group1] = [ ISO_Level3_Shift ]
    };
  modifier_map Mod5   { ISO_Level3_Shift };
 };
Basically, it redefines your Right Alt Key to change levels. Whenever held, you get the second coumn of characters. It can be added to your keyboard with the line below.
include "level3(ralt_switch)"
The AltGr key is often awkward for certain combinations, especially for the letters nearest it. We decided a long time ago that the semicolon key was well located and infrequently used. Therefore, we took it over for accessing our special characters. This way, typing ";a" would give us \u025b just as AltGr + A. It will display the requested character, and then the keyboard returns to normal. The code below redefines the semicolon key as a "latch" rather than a "shift", meaning that once pressed, it changes the level until the next letter is pressed. You do not need to hold the key down like the AltGr key.
 partial modifier_keys
 xkb_symbols "semicolon_switch" {
  key <AC10> {
  symbols[Group1] = [ ISO_Level3_Latch,	colon,	semicolon,	colon ]};
  modifier_map Mod5	{ ISO_Level3_Latch };
 };
If you create code like this, you can add it at the bottom of your country file and include it in your keyboard with a reference like:
include "cm(semicolon_switch)"
I recommend that you put this include at the bottom of the module. I defined semicolon normally in the body of the module, then added the include at the end. This way, if someone does not like your special key method, they only have to comment out one line and continue using the AltGr method.
To test your keyboard, you must add your keyboard to the evdev.xml file. As before, I suggest running the following command to get a root window:
sudo nautilus
Browse to /usr/share/X11/xkb/rules/evdev.xml and find the place where your country fits alphabetically.
- If you are only adding a variant keyboard to your country, you must add from <variant> to </variant>.
 <variant>
  <configItem>
   <name>ike</name>
   <description>Inuktitut</description>
   <languageList><iso639Id>iku</iso639id></languagelist>
  </configitem>
 </variant>
- If you are adding a new country, you must add a new section from <layout> to </layout>.
 <layout>
  <configItem>
   <name>bg</name>
    <shortDescription>Bgr</shortdescription>
    <description>Bulgaria</description>
    <languageList><iso639Id>bul</iso639id></languagelist>
  </configitem>
  <variantList>
   <variant>
    <configItem>
     <name>phonetic</name>
     <description>Traditional phonetic</description>
    </configitem>
   </variant>
  </variantlist>
  <variantList>
   <variant>
    <configItem>
     <name>bas_phonetic</name>
     <description>New phonetic</description>
    </configitem>
   </variant>
  </variantlist>
 </layout>
Be EXTREMELY careful to maintain the spacing and structure.
To test your keyboard, you now must restart X server. The easiest way to do this is to log off and log back on. You can then go to Tools>Settings>Keyboard>Add Layout, then choose your country and layout. You will find when you make your first mistake that XKB doesn't really debug your script files in any meaningful manner, it just "plunks" when you login and gives you a generic error.
If you get into problems here, you can contact Keyboards_Cameroon@sil.org for help.
One of the most annoying parts of XKB is that the previews (RIght click on the KB manager and choose show current layout) are not updated automatically when the source changes
If you make changes to the keyboard, and want the preview of the keyboard to update, delete all .kkm files in /var/lib/xkb/ and they will be recreated from source the next time you view them.
So you've got the bugs worked out and want to share it, see: Submission of your XKB to FreeDesktop
- Unreliable Guide to XKB Configuration
- Simos' Blog
- Help from people who really understand what they are talking about
- The original protocol specs
- and The official Wiki
- If you get into problems here, you can contact Keyboards_Cameroon@sil.org for help.