Release Workflow Steps
If you're not working on a release-related branch you might rather want to look at the workflow step by step page.
When it’s time to prepare a new release we create a new release branch named after the upcoming release.
Open Git Gui, select Tools-->Release-->Create. As argument pass the name of the release: 1.1
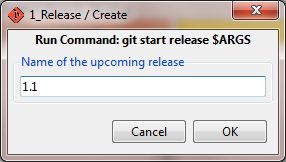
Alternatively on the command line:
$ git start release 1.1
Note: You need to be in the Gerrit group "FW Release Manager" in order to be able to create or release a release branch.
If someone else already started a release branch and you want to join development on the release branch, you need to track the release branch on the remote repo. This pulls the branch release/1.1 from the remote repo and sets it up as tracking branch.
Open Git Gui, select Tools-->Release-->Track. As argument pass the name of the release: 1.1
Alternatively on the command line:
$ git track release/1.1
[JohnT]4/11/13: this did not work at all for me. What worked for me: Start a git bash session and cd to fwrepo. fwmeta/initrepo --modify When it asks for Branches to Fetch, add the one you want to work on: for example, "master develop release/8.0" cd fw git checkout release/8.0 (or whatever release branch you want)
You may need to also do this on nested projects if you will be working on them or depending on changes to them.
[RickM]4/16/13: The steps I followed were similar to what John did. Start a git bash session and cd to fwrepo.
Next enter: fwmeta/initrepo --modify
Then the following is displayed: Available repos: FieldWorks FwMovies FwSampleProjects FwDocumentation FwHelps Fw Installer FwLocalizations FwSupportTools WorldPad AcceptanceTests test
Next choose one of the above repo's to get, e.g.: Repos to clone (test): FieldWorks
Next the prompt will display something like this: Branches to fetch (master develop release/8.0): pressing return will get it including the release branch
After this if go to the repo (e.g. cd fw) and then enter "git track release/8.0" (or whatever release branch you want)
Then work on any necessary bug fixes in the release branch. When your changes are ready for code review push them to Gerrit.
To start work on a bugfix in the release branch, open Git Gui, select Tools->Release-->Start Bugfix and provide the JIRA number of the bug. This will create a local topic branch.
NOTE: If this fails you should check that you're tracking the release branch.
Alternatively on the command line:
$ git start task release LT-93854
To upload the change for code review to Gerrit, open Git Gui, select Tools-->Release-->Submit for Code Review.
Alternatively on the command line:
(feature/LT-93854) $ git review
To finish work on the bugfix after the change has been submitted in Gerrit, open Git Gui, select Tools->Release->Finish Bugfix. This will fetch the latest changes from the remote repo and delete the local topic branch.
Alternatively on the command line:
(feature/LT-93854) $ git finish task
When you’re ready for release, the changes from the release branch need to be merged into the master and develop branches. First, make sure all pending changes for the release branch are either merged or abandoned in Gerrit. Then do the following:
Open Git Gui. If necessary switch to the Release branch (Branch-->Checkout), then select Tools-->Release-->Release and enter the name of the release as argument. After a short while an editor window will open up and allow you to enter a description of the release. The description entered here will be visible e.g. when displaying the tags on Github.
Alternatively on the command line:
(release/1.1) $ git finish release 1.1
This syncs the develop and master branches with the remote repo, merges release/1.1 into master and develop, creates a tag 1.1 on master, delete the release branch and eventually pushes the branches and tag to the remote repo.
Note: You need to be in the Gerrit group "FW Release Manager" in order to be able to create or release a release branch.
You can add the argument --no-push to the command line or in git gui if you want to inspect the merge locally before it gets pushed to the remote repo. Afterwards you can continue by running
$ git finish --continue
Sometimes it is necessary to fix bugs for the latest already released version (1.1). The fixed version will be called 1.1.1. A hotfix branch is similar to a release branch - the only difference is that it is based off of master or a support branch instead of develop.
Open Git Gui, select Tools-->Hotfix-->Create. As argument pass the name of the fixed version: 1.1.1 and select the parent branch (in this case master).
Alternatively on the command line:
$ git start hotfix 1.1.1
This will create a new branch hotfix/1.1.1 based on master and push it to the remote repo.
Note: You need to be in the Gerrit group "FW Release Manager" in order to be able to create or release a hotfix branch.
If someone else already started a hotfix branch and you want to join development on the hotfix branch, you need to track the hotfix branch on the remote repo. This pulls the branch hotfix/1.1.1 from the remote repo and sets it up as tracking branch.
Open Git Gui, select Tools-->Hotfix-->Track. As argument pass the name of the hotfix: 1.1.1
Alternatively on the command line:
$ git track hotfix/1.1.1
Then work on the bug fixes in the hotfix branch. When your changes are ready for code review push them to Gerrit.
To start work on a bugfix in the hotfix branch, open Git Gui, select Tools->Hotfix-->Start Bugfix and provide the JIRA number of the bug. This will create a local topic branch.
NOTE: If this fails you should check that you're tracking the hotfix branch.
Alternatively on the command line:
$ git start task hotfix LT-12984
To upload the change for code review to Gerrit, open Git Gui, select Tools-->Hotfix-->Submit for Code Review.
Alternatively on the command line:
(feature/LT-12984) $ git review
To finish work on the bugfix after the change has been submitted in Gerrit, open Git Gui, select Tools->Hotfix->Finish Bugfix. This will fetch the latest changes from the remote repo and delete the local topic branch.
Alternatively on the command line:
(feature/LT-12984) $ git finish task
When the hotfix is ready, the changes from the hotfix branch need to be merged into both master and develop:
Open Git Gui. If necessary switch to the Hotfix branch (Branch-->Checkout), then select Tools-->Hotfix-->Release. As argument provide the name of the hotfix release and select master as parent branch. After a short while an editor window will open up and allow you to enter a description of the release. The description entered here will be visible e.g. when displaying the tags on Github.
Alternatively on the command line:
(hotfix/1.1.1) $ git finish hotfix 1.1.1 master
This syncs the develop and master branches with the remote repo, merges hotfix/1.1.1 into master and develop, creates a tag 1.1.1 on master, deletes the hotfix branch and finally pushes the branches and tag to the remote repo.
Note: You need to be in the Gerrit group "FW Release Manager" in order to be able to create or release a hotfix branch.
You can add the argument --no-push to the command line or in git gui if you want to inspect the merge locally before it gets pushed to the remote repo. Afterwards you can continue by running
$ git finish --continue
When it becomes necessary to fix a bug in an older released version, we can create a Support branch. For example suppose we recently released version 1.1 but then it’s decided that we also have to re-release 1.0 with a bugfix. The re-release will be 1.0.1.
The support branch will be named after the base version we’re fixing, so in this case support/1.0. We base it on the tagged version 1.0.
Open Git Gui, select Tools-->Support-->Create. As argument pass the name of the support branch (1.0) and the tag it is based on (1.0).

Alternatively on the command line:
$ git start support 1.0 1.0
This will create a new branch support/1.0 based on the tag 1.0 and push it to the remote repo.
Note: You need to be in the Gerrit group "FW Release Manager" in order to be able to create a support branch.
If someone else already started a support branch and you want to join development on the hotfix branch, you need to track the support branch on the remote repo. This pulls the branch support/1.0 from the remote repo and sets it up as tracking branch.
Open Git Gui, select Tools-->Support-->Track. As argument pass the name of the support branch: 1.0
Alternatively on the command line:
$ git track support/1.0
The actual bugfixes will be done in a hotfix branch, so we need to create one based on our new support branch.
Open Git Gui, select Tools-->Hotfix-->Create. As argument pass the name of the fixed version: 1.0.1 and select the parent branch (in this case support/1.0).
Alternatively on the command line:
$ git start hotfix 1.0.1 support/1.0
This will create a new branch hotfix/1.0.1 based on support/1.0 and push it to the remote repo.
Note: You need to be in the Gerrit group "FW Release Manager" in order to be able to create or release a hotfix branch.
The work on the hotfix branch is identical to above: tracking the hotfix branch and then commiting changes and uploading for review.
When the hotfix is ready, the changes from the hotfix branch need to be merged into both the support branch and develop:
Open Git Gui. If necessary switch to the Hotfix branch (Branch-->Checkout), then select Tools-->Hotfix-->Release. As argument provide the name of the hotfix release and select support/1.0 as parent branch. After a short while an editor window will open up and allow you to enter a description of the release. The description entered here will be visible e.g. when displaying the tags on Github.
Alternatively on the command line:
(hotfix/1.0.1) $ git finish hotfix 1.0.1 support/1.0
This syncs the develop and support/1.0 branches with the remote repo, merges hotfix/1.0.1 into support/1.0 and develop, creates a tag 1.0.1 on support/1.0, deletes the hotfix branch and finally pushes the branches and tag to the remote repo.
Note: You need to be in the Gerrit group "FW Release Manager" in order to be able to create or release a hotfix branch.
You can add the argument --no-push to the command line or in git gui if you want to inspect the merge locally before it gets pushed to the remote repo. Afterwards you can continue by running
$ git finish --continue
When you get merge failures when trying to release a version because the develop has diverged, you can solve those merge failures and commit the change locally. Then open git bash and run:
$ git finish --continue
This will pick up the release procedure after the merge.
(more to come here...)
