Workflow Step by Step
(If you want to play around with the workflow and git/Gerrit/Jenkins you can use the test project)
When starting work on a new feature, branch off from the develop branch. This will create a new branch feature/FWR-1234.
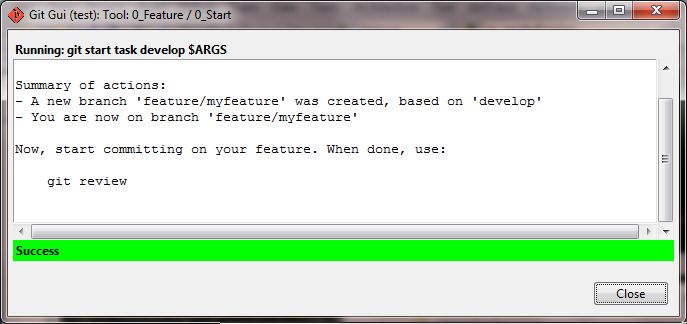
First make sure you are starting in the correct repository. The entire FieldWorks file set is split over several repositories. Open Git Gui. (One way to do this is to navigate in Windows Explorer to any file in your repository, right-click and select Git Gui.) In Git Gui, select Tools-->Feature-->Start. As argument pass the name of the feature: FWR-1234. Use the JIRA number of the task you're working on as name.

JohnT: if you get a message something like this: "Branches 'develop' and 'origin/develop' have diverged. And branch 'develop' may be fast-forwarded." you are probably working with an old version of the repo and need to get it again. EberhardB: To get it again, you can call Tools-->Rebase in Git Gui. (AlistairI: To get it again, you may need to do all the following in Git Gui (or possibly a subset): Remote => Fetch from => origin; Branch => Checkout => develop; Merge => Local Merge => select Tracking Branch and origin/develop.)
If everything succeeds you get the following screen:
Alternatively you can do it on the command line:
$ git flow feature start myfeature
After creating the feature branch you can implement the feature or fix the bug and commit locally:
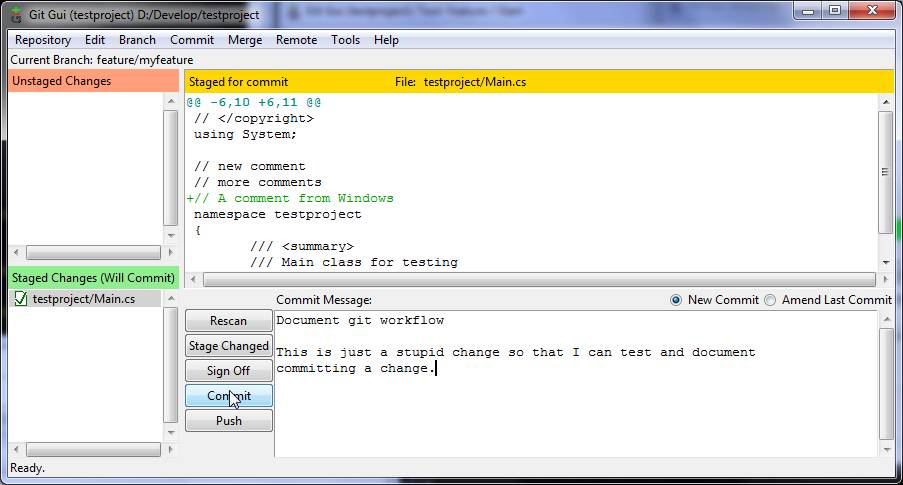
On the context menu select “Git Commit Tool”. Review your changes in the diff pane, or by selecting Tools-->Visual Diff. Stage specific modified files to commit by clicking them and selecting Commit-->Stage To Commit (AlistairI: or simply click on the icon next to the file in the Unstaged Changes pane), or stage all modified files for commit by selecting Commit-->Stage Changed Files To Commit. New files will also appear in the "Unstaged Changes" list and can be added similiarly. Enter a commit message (following the guidelines) and click Commit to commit the changes to your local repository.
It is possible to ignore certain files or directories by adding the names to a .gitignore file (which gets checked in) or .git/info/exclude (for files that only I have on my machine; not checked in). See this page or read the git help for details.
When you finish fixing the bug or implementing the feature, you can push the changes to Gerrit for code review. Before you do that you might want to polish the commits by modifying commit messages or squashing commits (see Squash commits by rebasing).
JohnT: Minimally you should make sure you have the latest from origin and that you have rebased your changes on that. This minimizes the chance of having to rebase after your changes are approved in Gerrit. Todo: describe how.
To upload the changes for code review: Open Git Gui and select Tools-->Feature-->Submit for Code Review.

Alternatively on the command line (as argument pass the name of the branch that these changes should eventually end up on, in the main repo):
(feature/myfeature) $ git review develop
Note: If you know someone specific who should review the change you made you can login to gerrit and appoint them a reviewer for this change.
Multiple commits will appear as separate entries on the Gerrit page. It’s not uncommon for a feature to be implemented using a series of smaller, self-contained commits, since this helps in tracking down problems (eg with git bisect) and generally understanding the history. However, sometimes it’s more useful to “squash” all the commits into one big commit.
Before attempting this you should do a get from origin and an ordinary rebase to make sure your changes are based on the lastest approved state of things. If you neglect to do this the interactive rebase will show other people's changes and become very confusing. Todo: (a) remind how to do get/rebase; (b) describe how to recover from starting the interactive rebase without this step.
This can be done with the following command before pushing to Gerrit:
Start Git Gui, select Tools-->Interactive Rebase. In the “Interactive Rebase” dialog select Local Branch: develop and press OK:
pics/Screenshot-gitguid-rebase.jpg
This brings up your favorite editor with the list of the commits. Leave the first commit as “pick” and change all others to “squash” (or “fixup”). Save and close the editor window.

After a few moments the editor opens again and allows you to massage the commit message to your heart’s content. Be sure to leave exactly one Change-Id line in the commit message:

Interactive rebase is a very powerful feature of git, and allows you to make almost any change imaginable in your local branch before pushing to Gerrit or the main repo. This provides the confidence to commit things incrementally and early to your local branch, knowing that you can rearrange and restructure the commits later to provide a more sensible picture of your changes.
NOTE: after squashing commits you need to re-submit your feature for code review.
Alternatively on the command line:
(feature/myfeature) $ git rebase -i develop
This brings up an editor with the list of the commits. Leave the first commit as “pick” and change all others to “squash”. After saving you get the commit editor where you can modify the commit message to your heart’s content. Be sure to leave exactly one Change-Id line in the commit message.
When you are appointed as the reviewer of a project, you should get an email with a link to the Gerrit page. Alternatively you can log in to Gerrit and see a list of all open change sets that are waiting to be reviewed. If you click on one it displays this change set in detail. The second-last block ("File Path...") lists the changes. Hot links offer ways to view the diffs.
It is possible to compare different versions of a change set. Consider the following scenario: the developer submitted code for review, you did the code review but discovered some things that need to be changed. The developer fixes the code and uploads the changes again. When you look at the new changes now you can compare them to the code in the remote repo or to the previous changes. To do that expand the “Patch History” button at the top of the page and select what you want to compare.

It is possible to ignore whitespace when showing the differences by choosing “Ignore Whitespace: All” and unchecking “Intraline Difference”. Unfortunately, there is currently a bug that doesn’t allow one to ignore whitespace while showing intraline differences.

You can press the question mark key (?) to see a description of available keyboard shortcuts you can use for your current location in Gerrit. These can speed navigating through files and differences.
You can add in-line comments by double clicking a line, or by clicking a line number in one of the diff windows. The Save button below the comment editing box allows you to save the comment as a draft (visible only to you). To make the comments publicly visible, press the Review button on the details page. Other reviewers and the author will then be able to see your comments on the code in context. This is usually a good way to comment on particular issues. (Note that your comments are drafts until you publish them. This is done as part of the process of finalizing a review, as described below. If you want to publish comments without expressing a definite opinion on the change as a whole, the Review screen offers an option to just "Publish comments".)
To finish a code review press the Review button on the left just above the change list. The bottom block in the page that appears allows you to express your opinion of whether this change should proceed (+2), be further reviewed (+1 or 0), or be rejected (at least until problems are fixed) (-1/-2). You should also write an overall comment if appropriate giving your reasons. Then press the “Publish” or “Publish and Submit” (might not be visible, depending on permissions) button. By pressing the “Publish and Submit” button the changeset gets merged into the remote repo. Pressing “Publish” marks the changeset as reviewed but someone else needs to submit it to the remote repo later. You’ll get an error message if the submit fails, e.g. because the patches can’t be merged into the remote repo because of conflicting changes. In this case the developer needs to do the merge locally and re-submit the changes for code review.

Submit is only possible if the change set has a +2 for code review and a +1 in the Verified column.
When you do a code review you would give a +2 if you’re satisfied with the changes and you want them to be submitted as is (Note that giving a +2 doesn’t automatically submit, it only marks it as being ready for submit). You would give a +1 if the changes look good to you but you’re not so familiar with that area of the code and would like someone else to have a look at these changes.
You’d give a -1 if you found some small problems that you’d like to have changed but it would be OK if someone else decides that they’re good as is. A -2 says that this patch set has major problems and can/should not be checked in without some modifications.
Note that it is possible to add a comment to the change set without giving any points in the code review column. It’s possible for the developer and the reviewer(s) to have a back-and-forth discussion in this way before the review result is determined. The advantage of doing it in Gerrit rather than purely by email is that the discussion is preserved for future reference and is visible by others.
The Verified and Verified-Linux columns get filled in automatically by Jenkins. However, you can override this, e.g. when the Jenkins build failed because of an intermittent problem that has nothing to do with your patch set. By setting the Verified column you testify that the patch set builds correctly.
Any disagreement between the reviewer and author can be discussed in the comments on the change.
After you uploaded the change for review you can work on another task. If it depends on the change submitted for review you can continue working in the same feature branch. If it is independent from the change submitted for review you simply create a new feature branch.
JohnT: What if the new task is a distinct Jira issue, yet depends on the pending change? How can I create a new feature branch based on the pending one? Or should I do something else?
If the reviewer added comments to your change that requires some modifications, you can make the necessary changes locally. Make sure that you switch to the feature branch first. When you commit the changes you amend your previous commit (in Git Gui click the "Amend Last Commit" radio button; see also Implement Feature) and re-upload it for review. This will add a new patch set to the existing change set and sends a notification email to the reviewer.
Jenkins verifies that the changes build and the tests pass. When the review is complete, click the button in Gerrit to submit the changes to develop in the main repo. Submitting is only possible if building the changes succeeded and code was approved by the reviewer.
Note: Gerrit might say "Please rebase the change locally and upload again for review." This may be because there is a conflict it cannot resolve automatically. In Git Gui, select Tools => Rebase. That will then highlight any conflict. If there is a conflict, you can resolve it in various ways; and if you right-click on the conflicting text the context menu should help. When you have resolved the conflict, in Git Gui select Tools => Interactive Rebase (Continue). Finally, you will have to resubmit your feature for code review again, even if there was no conflict.
Once the feature has been merged successfully into develop, you can finish the feature branch. This merges feature/myfeature into develop, deletes the feature/myfeature branch and syncs with the remote repo.
Open Git Gui. If necessary switch to the feature branch (Branch-->Checkout), then select Tools-->Feature-->Finish.
Alternatively on the command line:
(feature/myfeature) $ git featfin myfeature
Questions:
1. Is there a Command Line equivalent to the Gui Tools => Rebase?
(feature/myfeature) $ git fetch origin develop && git rebase origin/develop
Or you can make use of the alias which does a little bit more and is what gets called when you do it from the GUI:
(feature/myfeature) $ git pullrebase
2. Is there a benefit to using the Gui Tools => Rebase (and Continue) over trying the Gerrit Rebase button?
No. Using the Gerrit Rebase button usually is easier, but it won't work if there are conflicts. In that case you'll have to do the rebase locally.
3. Once recently I had a 'hanging feature'. I submitted through Gerrit successfully, but when I did Finish, git didn't seem to recognize my feature branch name. I eventually had to do cmd line 'git branch -d {featurebranchname}'. Then that feature was no longer available in the Gui Branch => Checkout dialog (as expected). Any idea why that happened?
Unfortunately not. Were you on the feature branch? If this happens again send me the error message.
To share a feature so that others can contribute, you can publish the feature. This pushes the feature/myfeature branch to the remote repo.
Open Git Gui. If necessary switch to the feature branch (Branch-->Checkout), then select Tools-->Feature-->Publish.
Alternatively on the command line:
$ git flow feature publish myfeature
Note: depending on the permissions in Gerrit, publishing a feature might not be possible until an administrator first creates the feature branch in Gerrit (Branch Name: feature/myfeature, Initial Revision: develop).
If someone else started work on a feature and you want to join working on it, the other person has to publish the feature first (see above). Then you can track the feature. Doing so will pull the feature/myfeature branch from the remote repo and set it up as tracking branch.
Open Git Gui. If necessary switch to the feature branch (Branch-->Checkout), then select Tools-->Feature-->Track and enter the name of the feature as argument.
Alternatively on the command line:
$ git flow feature track myfeature
Further instructions about releases, hotfixes, and support branches can be found on the releases workflow page