Lab6_20151104
This tutorial is updated on Thursday, Nov 5, 2015
In this lab, we will practise using the Eigen math library to generate a patch of the Perlin noise. Perlin noise is an algorithm invented by the computer scientist Ken Perlin for generating simple and continues (no abrupt change) multi-dimensional noise. One good property of Perlin noise is that it is really easy to implement, compare to other noise algorithms that provide the same (or somewhat better) properties. Most computer graphics + game applications take Perlin noise as the default option for generating procedure noise.
Ken Perlin's webpage explains how he implements his own algorithm:
[http://mrl.nyu.edu/~perlin/noise/]
Our algorithm of generating a single frequency Perlin noise is divided into two parts. In the first part, we use std::rand() to generate a matrix of random two-dimensional vectors as the base for Perlin noise. In the second part, we use Ken Perlin's algorithms to sample this random number matrix to get the final Perlin noise.
In many articles you may read online, Perlin noise's base matrix is done in shader, using a permutation table. This is because on graphics cards there are no API for random number in shaders, and permutation table is a way of getting pseudo-random numbers. Since we are programming on CPU, we don't need the permutation table but just use the standard C library for random numbers.
This programming practise should be filled in project "perlin", in file "main.cpp".
The base noise matrix is a two dimensional matrix which contains random unit 2D vector for each position. We initialize this matrix by creating a random 2D vector and normalize it. Notice that we use 3D vector such that we can visualize the result; but the last component of the 3D vector is kept to zero.
    int width = 512;
    int height = 512;

    //Create the base noise

    RGBImage base(width, height);
    //Note: std::time(0) doesn't work on Windows
    //On mac you can do std::srand(std::time(0)); to get a completely randomized Perlin patch
    std::srand(1);
    for (int i = 0; i < width; ++ i)
        for (int j = 0; j < height; ++ j)
        {
            //we use vec3 instead of vec2 but set the last component to zero
            randGradientVec(0) = cos(2 * M_PI * rand0_1());
            randGradientVec(1) = sin(2 * M_PI * rand0_1());
            randGradientVec(2) = 0;
            base(i, j) = randGradientVec;
        }
Certainly, we will need to define that rand_Num() function before the main function. We use std::rand().
//return a random floating point number between [0, 1]
float rand0_1()
{
    return ((float) std::rand())/((float) RAND_MAX);
}
At this point, please experiment with the following line to see what a random (white noise) patch look like by putting the following line at the end of the main function:
showImage(base, "Base Noise");As you can see, the noise is not smooth. It contains many pixel-level grains which looks like from a broken graphics card.
Remember to remove or comment out this line before you move onto the next section.
A Perlin noise is defined on a certain frequency/period. To create such a Perlin noise of period P (frequency 1/P), we sample the random vector on a sub-grid of size P. Then, for each pixel inside that sub-grid, we sample four weighted random numbers by calculating the dot-product of the distance vector from the pixel to the grid corners and the random unit vector on that corner. We then calculate the final pixel colour using the Bi-linear interpolation.
We will need the linear interpolation function mix and the smooth blending function f:
float mix(float x, float y, float alpha)
{
    return y * alpha + x * (1.0f - alpha);
}


float f(float t)
{
    float t_3 = t * t * t;
    return 6 * t * t * t_3 - 15 * t * t_3 + 10 * t_3;
}
Then we do the sampling algorithm for Perlin noise. Please refer to the lecture slide for an illustration of this process:
   int period = 64;
   float frequency = 1.0f / period;
   RGBImage PerlinNoise(width, height);
   for (int i = 0; i < width; ++ i)
       for (int j = 0; j < height; ++ j)
       {
           int left = (i / period) * period;
           int right = (left + period) % width;
           float dx = (i - left) * frequency;

           int top = (j / period) * period;
           int bottom = (top + period) % height;
           float dy = (j - top) * frequency;

           vec2 a(dx, -dy);
           vec2 b(dx - 1, -dy);
           vec2 c(dx - 1, 1 - dy);
           vec2 d(dx, 1 - dy);

           vec3 topleft = base(left, top);
           float s = topleft(0) * a(0) + topleft(1) * a(1);
           vec3 topright = base(right, top);
           float t = topright(0) * b(0) + topright(1) * b(1);
           vec3 bottomleft = base(left, bottom);
           float u = bottomleft(0) * d(0) + bottomleft(1) * d(1);
           vec3 bottomright = base(right, bottom);
           float v = bottomright(0) * c(0) + bottomright(1) * c(1);

           float fx = f(dx);
           float fy = f(dy);

           float st = mix(s, t, fx);
           float uv = mix(u, v, fx);
           float noise = mix(st, uv, fy);

           PerlinNoise(i, j) = vec3(noise, noise, noise);
       }
   showImage(PerlinNoise, "Perlin Noise");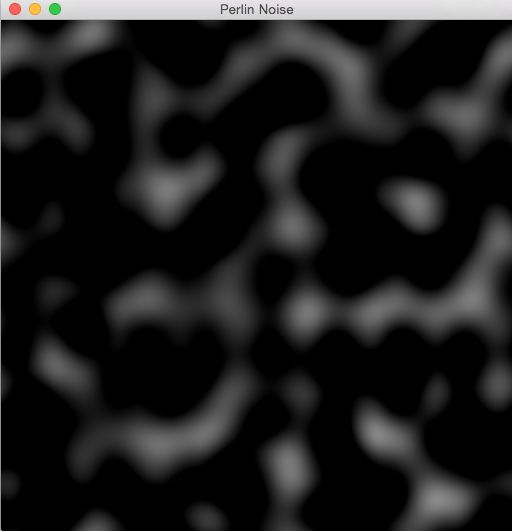
Single frequency Perlin noise has a property: all details on the noise patch are of the same size, so visually the noise patch looks like "containing a single size of details". Sometimes you might want details of different sizes, and to achieve this you simply adds several Perlin noise with different frequencies together.
A simple algorithm of achieving this is described as the following. Please practise on your own to implement a multi-frequency Perlin noise, which will be very helpful for your last assignment. There will be more details in the process for you to figure out. For example, should the three noise be weighted differently in the last step when you add them together?
- Create a single base noise matrix (base).
- Generate one Perlin noise patch of period 16 (frequency 1/16) from base. Let's call this matrix as Perlin16.
- Generate another Perlin noise patch of period 8 (frequency 1/8) from base. Let's call this matrix as Perlin8.
- Generate another Perlin noise patch of period 4 (frequency 1/4) from base. Let's call this matrix as Perlin4.
- Add Perlin16, Perlin8 and Perlin4 together, element by element, to get the combined noise!.