Standalone Walkthrough: Windows with config file
ATTENTION: This walkthrough was tested with the version being shown below, which, as of this writing, is 1.1.0-Beta5. If you try to go through this walkthrough, but substitute 1.0 or 1.5, it will not work. Any 1.1 release should be safe.
Please follow this walkthrough exactly as written. Don't put files in alternate locations or do things differently to how they are described here until you've seen it work and have an understanding of WHY things work the way they do. This walkthrough has been followed successfully many many times on several different setups. The screenshots and output samples were all captured while running through it. It works as written. Please follow it at least the first time through for the best chance of success.
Windows has some special challenges for this sort of walkthrough; notably the lack of built-in tools to do things like uncompressing the telly release archives and retrieving files from the web.
That means that unlike the Mac OS X and Linux cases. you'll need to install a prerequisite, and some of the steps will be more "Now go do this thing" rather than "type this specific command":
You need this to decompress and unarchive the gzipped tar archive that you'll download. If you already have that capability on your Windows system you can skip this. [If you're wondering if you do, you probably don't] Download the appropriate release for your Windows system and run the install.

First, download the telly release appropriate to your Windows installation:

ATTENTION: This walkthrough was tested with the version being shown below, which, as of this writing, is 1.1.0-Beta5. If you try to go through this walkthrough, but substitute 1.0 or 1.5, it will not work. Any 1.1 release should be safe.
Extracting the gzipped tar archive is a two-step process.

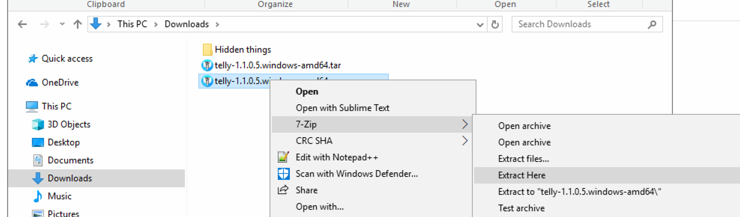
Right-click on the gzipped file and choose "7-zip -> Extract here":

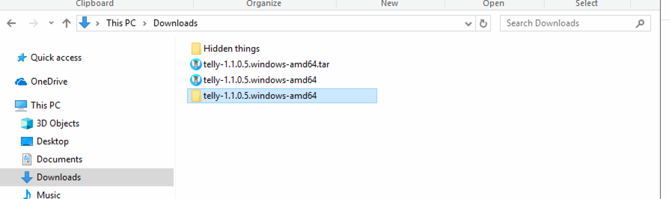
Right-click on the new file [the tar archive] and choose "7-zip -> Extract here":
This will leave you with a new directory:
And in that directory you will find telly:

Telly is a command-line program. If you double-click telly.exe you'll see a command window open, print out some logging, then close. This is standard Windows behavior. You need to run telly from a command line or as part of a script.
Now open a command window and cd into that directory.

Let's run telly with the --help flag to show the help:
C:\Users\chaz\Downloads\telly-1.1.0.5.windows-amd64>telly.exe -h
Usage of telly.exe:
  -c, --config.file string          Path to your config file. If not set, configuration is searched for in the current working directory, $HOME/.telly/ and /etc/telly/. If provided, it will override all other arguments and environment variables. $(TELLY_CONFIG_FILE)
      --log.level string            Only log messages with the given severity or above. Valid levels: [debug, info, warn, error, fatal] $(TELLY_LOG_LEVEL) (default "info")
      --log.requests                Log HTTP requests $(TELLY_LOG_REQUESTS)
      --version                     Show application version
  -b, --web.base-address string     The address to expose via discovery. Useful with reverse proxy $(TELLY_WEB_BASE_ADDRESS) (default "localhost:6077")
  -l, --web.listen-address string   Address to listen on for web interface and telemetry $(TELLY_WEB_LISTEN_ADDRESS) (default "localhost:6077")
pflag: help requested
Note: telly will often produce more output than will be shown here; typically the material not shown here will be error messages that would only serve as clutter in this context.
There are only a few flags, but the best practice is to leave all the configuration in the config file; everything config-related can and should be set via the config file [except, of course, the location of the config file].
Step one is to create a config file.
Download the config file template and open it in an editor.
Paste this URL into your web browser:
https://github.com/tellytv/telly/wiki/files/examples/telly.config.toml

Then select all and copy:

Paste it into a new notepad document:

NOTE: this must be Notepad or another text-only editor. DO NOT use something like MS Word.
Save it in the same directory as telly with the name telly.config.toml:

Leave the config file open in Notepad.
Back in the command window, type dir to verify that the file is in the right place and has the correct name:
Z:\Downloads\telly-1.1.0.3.windows-amd64>dir
 Volume in drive Z is Shared Folders

 Directory of Z:\Downloads\telly-1.1.0.5.windows-amd64

09/05/2018  06:23 PM        18,739,200 telly.exe
08/10/2018  12:29 PM             1,069 LICENSE
08/11/2018  06:35 PM                62 NOTICE
09/23/2018  11:44 AM             4,812 telly.config.toml
               4 File(s)     18,745,143 bytes
               0 Dir(s)  40,863,023,104 bytes free

Z:\Downloads\telly-1.1.0.5.windows-amd64>
From here, we will edit the config file in Notepad and run it in that command window.
The first thing we will change is the [Web] section; for purposes of this how-to, nothing above that needs to change.
We need the local IP address of your PC. In your command window, type ipconfig:
Z:\Downloads\telly-1.1.0.5.windows-amd64>ipconfig

Windows IP Configuration


Ethernet adapter Ethernet:

   Connection-specific DNS Suffix  . : localdomain
   IPv6 Address. . . . . . . . . . . : fdb2:2c26:f4e4:0:6400:c0d1:c5a7:9c3e
   Temporary IPv6 Address. . . . . . : fdb2:2c26:f4e4:0:a0b4:8861:db0:b59
   Link-local IPv6 Address . . . . . : fe80::6400:c0d1:c5a7:9c3e%6
   IPv4 Address. . . . . . . . . . . : 10.211.55.23
   Subnet Mask . . . . . . . . . . . : 255.255.255.0
   Default Gateway . . . . . . . . . : fe80::21c:42ff:fe00:18%6
                                       10.211.55.1
That 10.211.55.23 is the value we need [yours will be different]. Change the Base-Address setting in the config file to match what was reported in your case:
[Web]
  Base-Address = "10.211.55.23:6077"   # Set this to the IP address of the machine telly runs on
  Listen-Address = "0.0.0.0:6077" # this can stay as-is
Next, configure a source. There are two options:
- A known named source, which as of this writing is one of: "area51", "Iris", OR "IPTV-EPG"
- Any source that provides an M3UPLUS URL [or file] and maybe an EPG XML URL [or file].
For purposes of this tutorial, I'll use an Iris account, but I'll configure it as a custom account since I'm expecting that everyone reading this has an iptv account that provides M3UPLUS and EPG links.
The custom sources are now all out of date; you should use “Custom” in all cases now.
Make sure that you are using an M3UPLUS file or link, not an M3U.
Delete all the Source blocks EXCEPT for the "Custom" source, and enter your M3U and EPG URLs. Comment out the four filter-related lines:
[[Source]]
  Provider = "Custom"
  M3U = "http://irislinks.net:83/get.php?username=REDACTED&password=REDACTED&type=m3u_plus&output=ts"
  EPG = "http://irislinks.net:83/xmltv.php?username=REDACTED&password=REDACTED"
#  Filter = "YOUR_FILTER_REGULAR_EXPRESSION"
#  FilterKey = "group-title"
#  FilterRaw = false
#  Sort = "group-title"
Save the file, go back to your terminal, and run telly. You should see something like this:
Z:\Downloads\telly-1.1.0.5.windows-amd64>telly.exe
[36mINFO[0m[2018-09-23T11:58:30-05:00] telly is preparing to go live (version=1.1.0.5, branch=dev, revision=567f9062e94f32fd46bd6b82f10c1ac2e7f711c5)
[36mINFO[0m[2018-09-23T11:58:30-05:00] Loading M3U from http://irislinks.net:83/get.php?username=REDACTED&password=REDACTED&type=m3u_plus&output=ts
[36mINFO[0m[2018-09-23T11:58:31-05:00] Loading XMLTV from http://irislinks.net:83/xmltv.php?username=REDACTED&password=REDACTED
[36mINFO[0m[2018-09-23T11:58:42-05:00] Loaded 629 channels into the lineup from
[31mPANI[0m[2018-09-23T11:58:42-05:00] telly has loaded more than 420 channels (629) into the lineup. Plex does not deal well with more than this amount and will more than likely hang when trying to fetch channels. You must use regular expressions to filter out channels. You can also start another Telly instance.
panic: (*logrus.Entry) (0xa7e100,0x14e04f60)
And telly will exit.
Hurray, our first error.
Plex has a limit of 420 channels; more than that result in unpredictable behavior. Because of this, telly will panic and exit if more than 420 channels are loaded.
If, instead, you see something like this:
Z:\Downloads\telly-1.1.0.5.windows-amd64>telly.exe
[36mINFO[0m[2018-09-24T11:39:05-05:00] telly is preparing to go live (version=1.1.0.5, branch=dev, revision=567f9062e94f32fd46bd6b82f10c1ac2e7f711c5)
[36mINFO[0m[2018-09-24T11:39:06-05:00] telly is live and on the air!
[36mINFO[0m[2018-09-24T11:39:06-05:00] Broadcasting from http://localhost:6077/
[36mINFO[0m[2018-09-24T11:39:06-05:00] EPG URL: http://localhost:6077/epg.xml
[Note that there is no mention of reading an M3U file or of channels found before telly is live and on the air!]
That indicates that telly did not find its config file. Go back and verify that the name of the file is exactly telly.config.toml.
That brings us to filtering.
It's impossible to come up with a generic solution for filtering. You're going to be applying a regular expression to portions of the lines in your M3U file to end up with just the channels you want. I'll go through an exercise here to filter my Iris channel list. You should be able to adapt what you see here easily.
Most IPTV providers split channels into "Groups"; "BRAZIL", "UK SPORTS", "Premium Movies", etc. So, an easy way to filter is by those group titles.
A channel in an M3U file will be identified with a line like this:
#EXTINF:-1 tvg-id="skysportsnews.uk" tvg-name="VIP Sky Sports News FHD" tvg-logo="http://picon.helixhosting.ninja/30950.png" group-title="UK VIP HD/FHD",VIP Sky Sports News FHD
That "group-title" is what we're interested in.
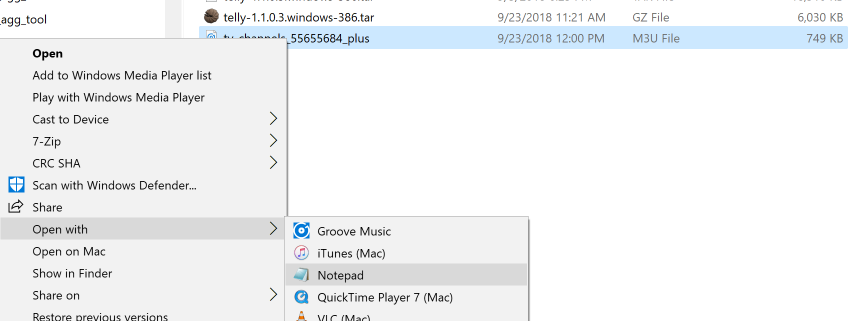
In Windows, figuring out what we want to keep is a little trickier than other platforms. If you go visit the Mac OS X walkthrough, you'll find a one-line command that will produce a list of all the group-title tags in the playlist. Sadly that doesn't work on Windows.
Paste your M3U URL and choose to "Save" the file when asked:

Open the playlist file in Notepad:
As you look through the playlist, you'll see all the groups that are available: 
You'll need to make notes as to which groups you want to keep.
Say we want to end up with:
- UK Sports
- All the movie networks
Back in the config file, I'm going to uncomment the filtering lines and modify them like this:
[[Source]]
  Provider = "Custom"
  M3U = "http://irislinks.net:83/get.php?username=REDACTED&password=REDACTED&type=m3u_plus&output=ts"
  EPG = "http://irislinks.net:83/xmltv.php?username=REDACTED&password=REDACTED"
  Filter = "UK SPORTS|MOVIE NETWORKS"
  FilterKey = "group-title"
  FilterRaw = false
  Sort = "group-title"
FilterKey tells telly what field from the M3U line to look in.
That Filter means "Look for channels where group-title contains 'UK SPORTS' OR 'MOVIE NETWORKS'".
If FilerRaw was true, That filter would be applied to the entire line, not just the group-title.
The filter shown above should pull in all the channels from:
The M3U group "UK MOVIE NETWORKS" because this group name contains "MOVIE NETWORKS"
The M3U group "UK SPORTS NETWORKS" because this group name contains "UK SPORTS"
The M3U group "USA MOVIE NETWORKS" because this group name contains "MOVIE NETWORKS"
Save the config file and run telly again:
NOTE: You may get asked to allow network access. You should allow this.
Z:\Downloads\telly-1.1.0.5.windows-amd64>telly.exe
[36mINFO[0m[2018-09-23T12:14:53-05:00] telly is preparing to go live (version=1.1.0.5, branch=dev, revision=567f9062e94f32fd46bd6b82f10c1ac2e7f711c5)
[36mINFO[0m[2018-09-23T12:14:53-05:00] Loading M3U from http://irislinks.net:83/get.php?username=REDACTED&password=REDACTED&type=m3u_plus&output=ts
[36mINFO[0m[2018-09-23T12:14:54-05:00] Loading XMLTV from http://irislinks.net:83/xmltv.php?username=REDACTED&password=REDACTED
[36mINFO[0m[2018-09-23T12:15:08-05:00] Loaded 119 channels into the lineup from
[36mINFO[0m[2018-09-23T12:15:08-05:00] telly is live and on the air!
[36mINFO[0m[2018-09-23T12:15:08-05:00] Broadcasting from http://0.0.0.0:6077/
[36mINFO[0m[2018-09-23T12:15:08-05:00] EPG URL: http://0.0.0.0:6077/epg.xml
Now your channels have been filtered down to a much smaller number [119 in my case].
This will be an iterative process for you to come up with the regex that includes all the channels you're interested in.
One place to learn more about regex is Regex One.
That's it; telly is running.
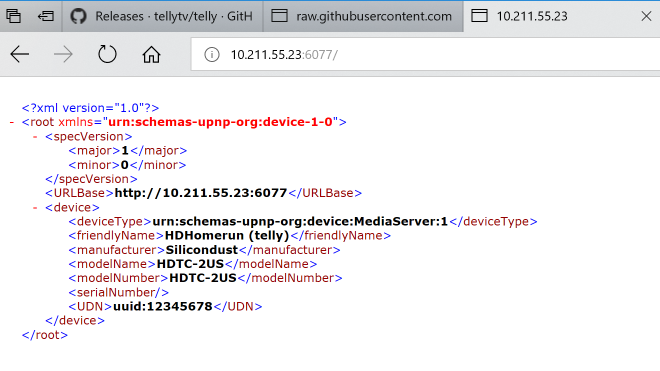
To verify this, enter the url to telly's default page into your browser]:
http://YOUR_MACHINE_IP:6077
Check the channel list by requesting the lineup in the browser:
http://YOUR_MACHINE_IP:6077/lineup.json

That will produce a lot of JSON output, but as you scroll through you should recognize your channel names.
You should now be able to move on to add telly to Plex.