Interface walkthrough
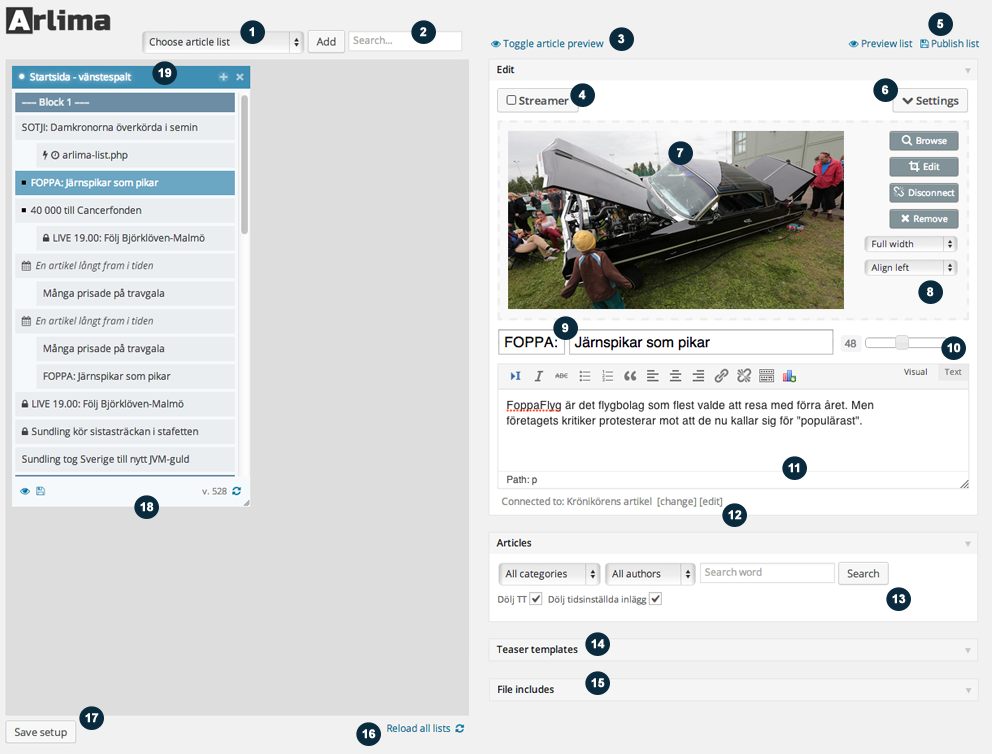
Notice! Some of the features in the article form may be hidden if not supported by the template used in the article
1) Drop down with all article lists. Press on the button "add" and the currently chosen list in the drop down menu will be added to the list manager.
2) Input where you can search for a specific list
3) Opens a preview of currently edited article in the same window. (Keyboard shortcut ctrl+p on windows and cmd+p on MacOS X)
4) Adds a streamer to the article.
5) Buttons used to preview and save the list that the currently edited article belongs to. The list preview opens up a new window with a preview of the entire list. The list has to be related to a wordpress page if it should be possible to preview. (Keyboard shortcut ctrl+l on windows and cmd+l on MacOS X)
6) Drop down menu where you can control the following:
- Template — Makes it possible to override the default template used in the list.
- Format — Here you can read more about article formats
- Schedule — Use this option if you only want the article to appear on certain days and/or hours of the day.
- Admin lock — Control whether or not it should require admin privileges to edit the article.
7) Image container where you attach images to the article. Upload a new image either by dragging it from your desktop to this container or by clicking on the button labeled "Browse". You can also click on this container to choose an image from the featured images of the post that the currently edited article is connected to.
8) Control buttons for the image.
9) The title text of the article.
10) Slider used to set the font size of the title.
11) Text editor.
12) Displays the URL of the article. Click on "edit" to connect the article to another post or URL. Click on the link "edit" to edit the post in wp-admin.
13) Container where you search for wordpress posts that you can drag to your list.
14) Container where you can find some empty article templates that you can drag to your list to start off with when you're about to create a new article.
15) Container where you can find the file includes
16) Reloads all lists added to the editor.
17) Saves the current list setup so that the lists currently added to the editor will be opened the next time you visit the list manager.
18) Controls for the list. Swap between different versions of the list, open a preview of the entire list, resize the list container etc...
19) Header panel of the list. Changes color when having unsaved changes. Click and hold down the mouse key on the header panel to move the list inside the list container.