To run the example project, clone the repo, and run pod install from the Example directory first.
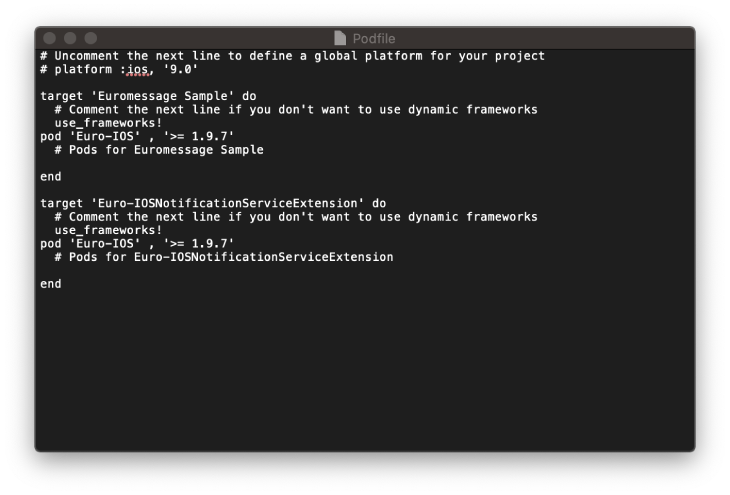
Euro-IOS is available through CocoaPods. To install it, simply add the following line to your Podfile:
pod 'Euro-IOS', '>= 1.9.12'The Euro-IOSNotificationServiceExtension allows your iOS application to receive rich notifications with images, buttons, and badges. It's also required for Euromessage's analytics features.
-
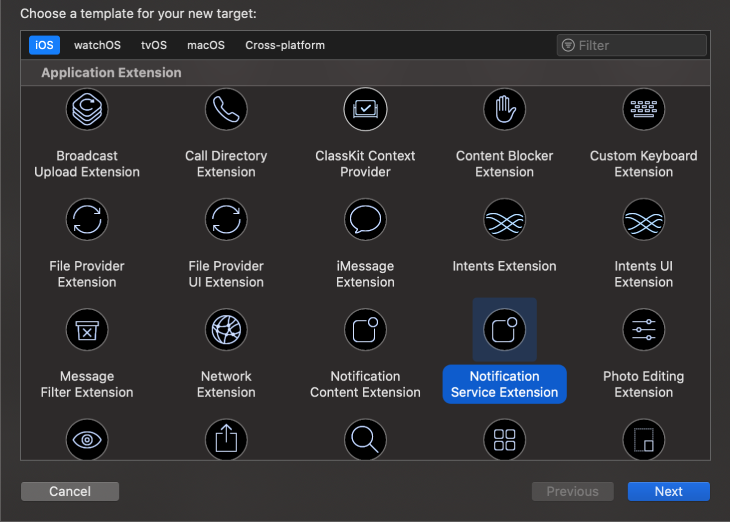
In Xcode File > New > Target...
-
Select Notification Service Extension then press Next.
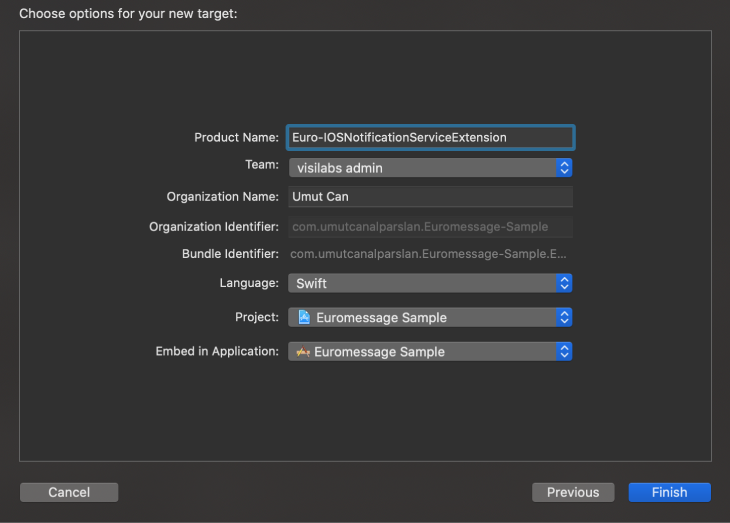
- Enter the product name as Euro-IOSNotificationServiceExtension and press Finish.
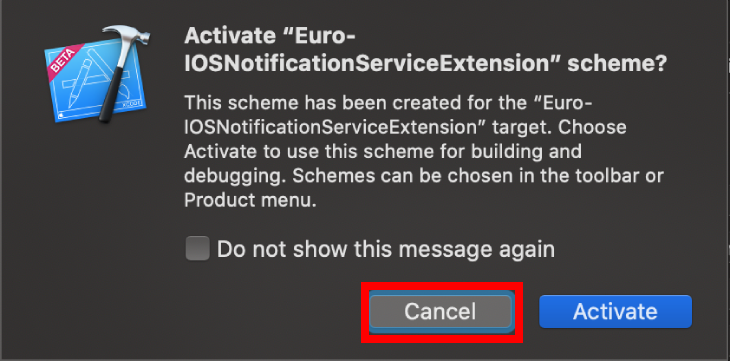
Do not select Activate on the dialog that is shown after selecting Finish.
- Press Cancel on the Activate scheme prompt.
By canceling, you are keeping Xcode debugging your app, instead of the extension you just created.
If you activated by accident, you can switch back to debug your app within Xcode (next to the play button).
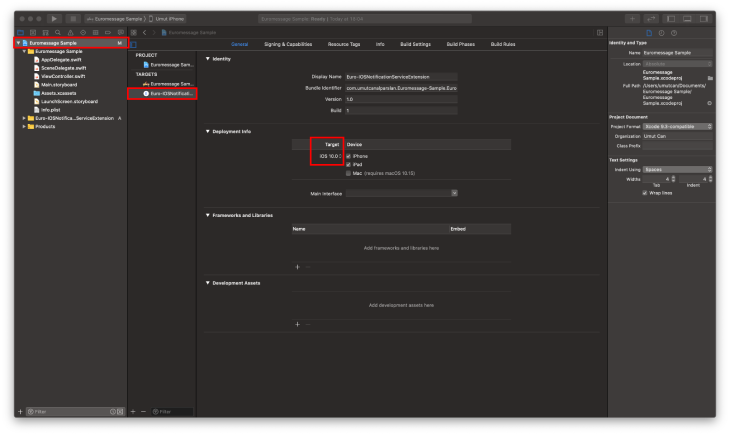
- In the project navigator, select the top-level project directory and select the Euro-IOSNotificationServiceExtension target in the project and targets list.
Unless you have a specific reason not to, you should set the Deployment Target to be iOS 10.
- Open NotificationService.swift and replace the whole file's contents with the following code.
import UserNotifications
import Euro_IOS

class NotificationService: UNNotificationServiceExtension {
    var contentHandler: ((UNNotificationContent) -> Void)?
    var bestAttemptContent: UNMutableNotificationContent?

    override func didReceive(_ request: UNNotificationRequest, withContentHandler contentHandler: @escaping (UNNotificationContent) -> Void) {
        self.contentHandler = contentHandler
        bestAttemptContent = (request.content.mutableCopy() as? UNMutableNotificationContent)
        EuroManager.didReceive(bestAttemptContent, withContentHandler: contentHandler)
    }

    override func serviceExtensionTimeWillExpire() {
        // Called just before the extension will be terminated by the system.
        // Use this as an opportunity to deliver your "best attempt" at modified content, otherwise the original push payload will be used.
        if let contentHandler = contentHandler, let bestAttemptContent = bestAttemptContent {
            EuroManager.didReceive(bestAttemptContent, withContentHandler: contentHandler)
        }
    }
}
Ignore any build errors at this point, step 2 will import Euromessage which will resolve any errors.
If you have already added the Euromessage library to your project, simply add the Euro-IOSNotificationServiceExtension section.
Add this code under didFinishLaunchingWithOptions.
func application(_ application: UIApplication, didRegisterForRemoteNotificationsWithDeviceToken deviceToken: Data) {
    EuroManager.sharedManager("EuromsgTest")?.registerForPush()
   }
User has to accept to receive push messages. If the user accepts and the device is successfully registered to the APNS, the following method is called in AppDelegate
func application(_ application: UIApplication, didRegisterForRemoteNotificationsWithDeviceToken deviceToken: Data) {
        EuroManager.sharedManager("EuromsgTest").registerToken(deviceToken)
    }
In the APPLICATION:DIDREGISTERFORREMOTENOTIFICATIONSWITHDEVICETOKEN: method, deviceToken variable is the generated token by APNS. After receiving this token, registerToken method is called in EuroManager. This token value must be recorded to the RMC system in order to send messages. In the example, EuromsgTest value is a code value that is given by RMC for your application.
P.S. : Depending on the reference of your account, one of the setUserKey or setUserEmail functions is required. You must also call the code below during login and registration.
func application(_ application: UIApplication, didRegisterForRemoteNotificationsWithDeviceToken deviceToken: Data) {
        EuroManager.sharedManager("EuromsgTest").registerToken(deviceToken)
        EuroManager.sharedManager("EuromsgTest")?.setUserKey("1234567890")
EuroManager.sharedManager("EuromsgTest")?.setUserEmail("umutcan.alparslan@euromsg.com")
EuroManager.sharedManager("EuromsgTest")?.synchronize()
    }
If a push notification arrives, application:didReceiveRemoteNotification method is invoked. The incoming message content should be given to the handlePush method in the EuroManager instance. This should be used for sending push open information.
func application(_ application: UIApplication, didReceiveRemoteNotification userInfo: [AnyHashable : Any], fetchCompletionHandler completionHandler: @escaping (UIBackgroundFetchResult) -> Void) {
        EuroManager.sharedManager("EuromsgTest")?.handlePush(userInfo)
}To register email IYS:
let success: (() -> Void)? = {
    print("registerEmail sucess")
}

let failure: ((String?) -> Void)? = { message in
    print("registerEmail failure")
    print("\(message ?? "")")
}

EuroManager.sharedManager("EuromsgTest")?.registerEmail("test@euromsg.com", emailPermit: trur, isCommercial: false, success: success, failure: failure)egemen@visilabs.com, egemen.gulkilik@relateddigital.com, umutcan.alparslan@euromsg.com
Euro-IOS is available under the MIT license. See the LICENSE file for more info.


