We read every piece of feedback, and take your input very seriously.
To see all available qualifiers, see our documentation.
Have a question about this project? Sign up for a free GitHub account to open an issue and contact its maintainers and the community.
By clicking “Sign up for GitHub”, you agree to our terms of service and privacy statement. We’ll occasionally send you account related emails.
Already on GitHub? Sign in to your account
https://github.com/yuzd/AntDeploy
请在qq群(488312978)文件里面获取
把文件上传你的linux服务器
解压后有3个文件
按照下面更改AntAgent.service中的 WorkingDirectory 和 ExecStart
[Unit]
Description=AntAgent

[Service]
Type=notify

## WorkingDirectory是上面的AntDeployAgentLinuxService所在目录
WorkingDirectory=/home/ubuntu/download
## ExecStart是AntDeployAgentLinuxService执行文件的完整路径
ExecStart=/home/ubuntu/download/AntDeployAgentLinuxService
SyslogIdentifier=AntAgent
Restart=always
RestartSec=5

[Install]
WantedBy=multi-user.target
赋予这个可执行文件权限
chmod +x AntDeployAgentLinuxService
修改agent配置文件AntDeployAgentLinuxService.config
<configuration>
  <appSettings>

    <!-- 访问agent的Token,保护你服务器安全的 -->
    <add key="Token" value="aaaa"/>

    <!-- agent对外提供服务的端口号,在云服务器里面得开放端口不然访问不进来 -->
    <add key="Port" value="8091"/>

    <!--下面的一般保持默认即可 -->
    <!--是否启用备份  true代表备份 false 代表不备份  不填=true  -->
    <add key="NeedBackUp" value="" />

    <!--配置Mac白名单地址列表 多个用半角逗号隔开-->
    <add key="MacWhiteList" value="" />

    <!--配置发布历史最多保留个数(默认10),解释:每次发布就是一个发布历史,回滚的时候是选择这个发布历史进行操作的-->
    <add key="OldPulishLimit" value="10" />

    <!--每个项目的发布版本历史记录会保底留存10个(上面配置的),对于超过的会走日期比对(当前服务器时间-版本批次日期)>10(下面配置) 的发布文件夹会被删除,防止磁盘占用过大 10代表10天 不填默认10-->
    <add key="ClearOldPublishFolderOverDays" value="10" />

    <!--发布使用目录 为空代表当前目录 ->
    <add key="DeployDir" value=""/>
  </appSettings>
</configuration>
执行下面命令把AntAgent安装为linux服务运行
sudo cp AntAgent.service /etc/systemd/system/AntAgent.service

sudo systemctl daemon-reload

sudo systemctl enable AntAgent

sudo systemctl start AntAgent
安装成功后使用命令:sudo systemctl status AntAgent 查看是否成功运行
如果agent已经启动了 再修改agent的配置文件,那你可以用命令
sudo systemctl restart AntAgent
重新运行agent
为了更方便的在linux服务器上安装agent我写了一个快速安装的脚本(只需要敲一行命令即可安装为agent为服务):
curl https://mysharelist.com/installAgent.sh|sudo sh
如果下载很慢可以插件市场官网下载下来双击安装: https://marketplace.visualstudio.com/items?itemName=nainaigu.AntDeployVsix
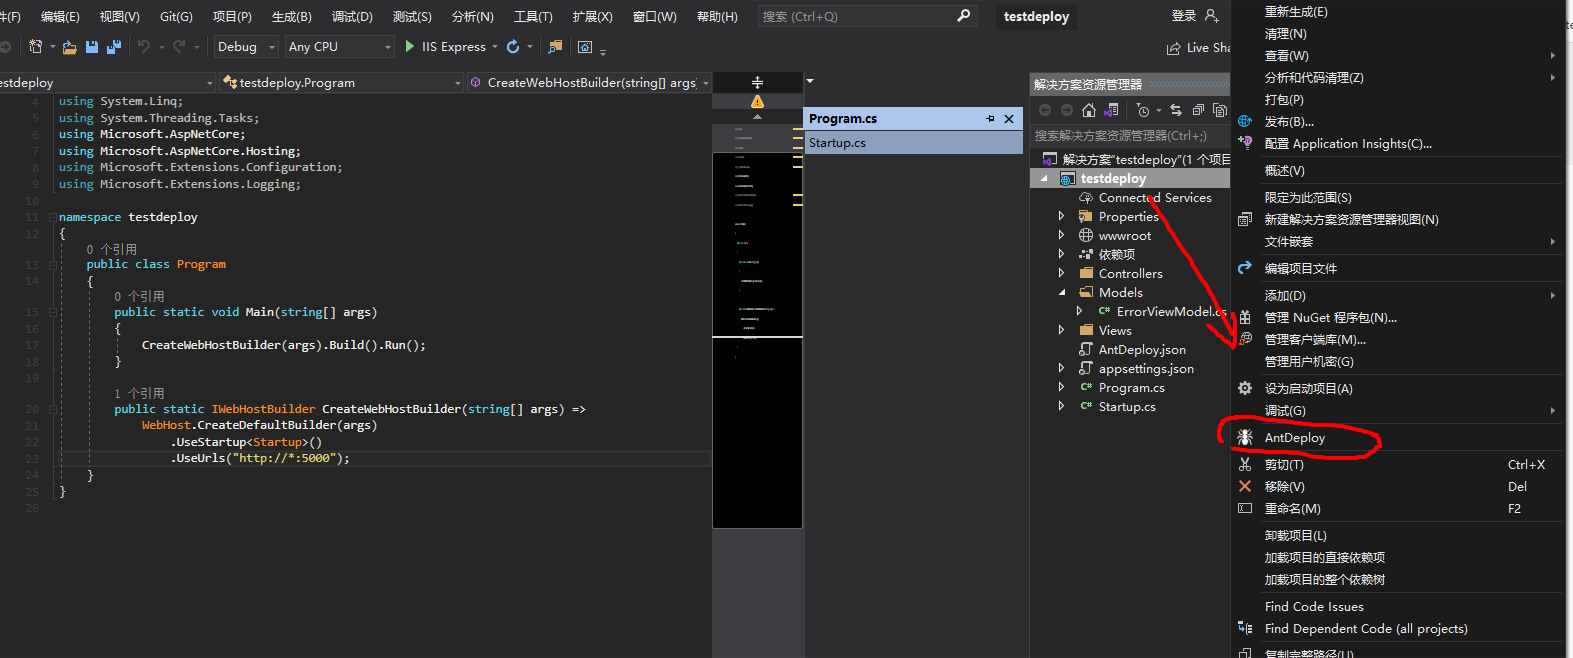
工程文件右键可以召唤AntDeploy 如果没有 看下是不是被禁用了
The text was updated successfully, but these errors were encountered:
No branches or pull requests
AntDeploy 是我开发一款开源一键发布插件
AntDeploy的代码托管地址(感恩star)
https://github.com/yuzd/AntDeploy
本章介绍如何使用AntDeploy一键部署到远程linux服务器作为服务运行
第一步 安装Linux端Agent
请在qq群(488312978)文件里面获取
把文件上传你的linux服务器
解压后有3个文件

按照下面更改AntAgent.service中的
WorkingDirectory 和 ExecStart
赋予这个可执行文件权限
修改agent配置文件AntDeployAgentLinuxService.config
执行下面命令把AntAgent安装为linux服务运行
安装成功后使用命令:sudo systemctl status AntAgent
查看是否成功运行
好了,以上服务器上agent安装完毕
如果agent已经启动了 再修改agent的配置文件,那你可以用命令
重新运行agent
为了更方便的在linux服务器上安装agent我写了一个快速安装的脚本(只需要敲一行命令即可安装为agent为服务):
curl https://mysharelist.com/installAgent.sh|sudo sh
第二步 安装AntDeploy插件
如果下载很慢可以插件市场官网下载下来双击安装:
https://marketplace.visualstudio.com/items?itemName=nainaigu.AntDeployVsix
打开你要发布的工程
工程文件右键可以召唤AntDeploy

如果没有 看下是不是被禁用了
第一次发布需要配置服务器的agent信息
进入Linux服务发布
agent做了什么日志里面详细记录了
The text was updated successfully, but these errors were encountered: