Documentation Tools Creature Animation Browser
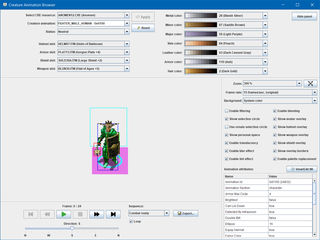
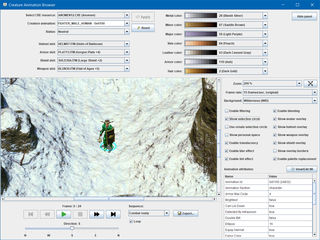
The Creature Animation Browser can be used to view the animation of any creature of the game. The creature is displayed with their equipment, such as armor, weapons, shield and helmet, as well as selected visual effects such as stoneskin, translucency, blur and various color-related effects. Moreover, the browser allows you to enable various visual helpers to inspect selection circle, personal space or the bounding box of individual sprite layers. Palette or false color replacements can be turned on and off as well.
Creature animations can be displayed in any supported orientation and action sequence. It is possible to loop playback or advance animations frame by frame. To simulate different environments it is possible to choose from a set of different background colors and images.
The Creature Animation Browser can be opened from Tools menu > Creature Animation Browser. It is also possible to open it from the Animation tab of a selected CRE resource.

This panel allows you to select the creature resource for display. Once selected it is possible to change selected properties of the creature. A virtual creature with default equipment and coloring is preselected if the browser is opened directly from the menu.
The option "Creature animation" allows you to assign a new animation to the creature. The option "Status" can be used to change the color of the selection circle. More information can be found in the Settings Panel section below.
You can manually equip helmets, armor, shields and weapons. The shield selection also allows you to choose an off-hand weapon if the main-hand weapon allows it. Available equipment is automatically adjusted depending on your choices.
The color selections influence the base colors of the creature as well as of equipment. However, colors defined by the equipment itself takes preference. Some games support random colors. They are visualized as a pseudo-color which changes to a real color whenever you press the "Apply" button to reload the creature animation.
Press the "Apply" button to make creature selection or any changes to the creature visible. The "Reset" button allows you to revert properties to their defaults as defined by the creature resource.
Since the creature selection panel takes up lots of screen space it can be toggled on and off by the "Hide panel" button in the top-right corner.
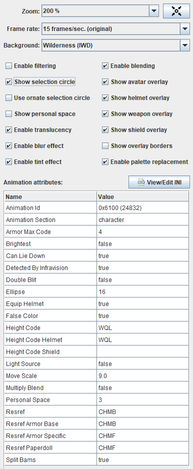
This panel allows you to set options which influence the visual appearance of the creature animation.
- Zoom: This option magnifies the creature animation to the chosen percentage. The button next to the selection control can be used to center display on the creature if a background image is selected.
- Frame rate: Defines the playback rate of the animation. By default the animation is played back at 15 frames per second.
- Background: This option allows you to change the viewer background to a predefined or customized color. Alternatively you can choose from a selected number of background images.
- Enable filtering: Enable this option to turn on bilinear filtering. Filtering is only effective for zoom factors greater or less than 100 %.
-
Show selection circle: This option toggles visibility of the creature's selection circle. The selection circle color can be overridden by the "Status" option in the creature selection panel. Among the three base allegiances "friendly", "neutral" and "hostile" it is also possible to enable the "Panicked" status. The size of the selection circle does not indicate how much space it occupies on the map. This is defined by the
Show personal spaceoption below. - Use ornate selection circle: This option activates the Planescape-Torment-style selection circle. It is enabled by default for PST and PST:EE.
- Show personal space: This option visualizes the search map tiles blocked by the creature. A humanoid creature usually take up less space than a giant creature or a dragon. It is defined independently from the selection circle size.
- Enable translucency: This option can be used to toggle visibility of translucency effects applied to the creature. It does nothing if no translucency effect is applied.
- Enable blur effect: This option can be used to toggle visibility of the blur effect. It does nothing if no blur effect is active.
- Enable tint effect: This option can be used to toggle visibility of special tint effects applied to the creature. It does nothing if no tint effect is active.
- Enable blending: A small number of creature animations provide special blending effects, such as Wisps, Movanic Devas, or Gaseous Clouds. This option can be used to turn blending on and off.
- Show avatar overlay: This option toggles visibility of the avatar sprite. Monster animations usually consist only of an avatar sprite. Humanoid animation may also provide various sprites for equipment.
- Show helmet overlay: This option toggles visibility of the helmet sprite. Does nothing if no separate helmet sprite is defined.
- Show weapon overlay: This option toggles visibility of the weapon sprite. Does nothing if no separate weapon sprite is defined.
- Show shield overlay: This option toggles visibility of the shield sprite, which also includes off-hand weapons. Does nothing if no separate shield sprite is defined.
- Show overlay borders: Enable this option to draw bounding boxes around the individual sprite layers or segments.
- Enable palette replacement: Monster animations may contain global palette replacements (such as bear animations which may come as cave bear, black bear or polar bear). Character animations may also use a false color palette to support individual coloring of skin, hair, cloth, weapon or armor (see color options in the Creature Selection Panel). This option controls whether these palette-related features are applied.
Below the options panel a list of creature animation attributes can be inspected. The View/Edit INI button allows you to edit the related animation definition if available. Otherwise this button is disabled.

Create animation with activated helper options.

This panel controls playback as well as orientation and action sequence of the creature animation.
The playback control provides the following options (from left to right):
- Move to start: Jumps to the first frame of the animation sequence.
- Backward: Goes one frame back.
- Play/Pause: This button toggles between playback and pause. The current frame is retained in paused mode.
- Stop: Stops playback and jumps to the first frame of the animation sequence.
- Forward: Advances one frame.
- Move to end: Jumps to the last frame of the animation sequence.
Below the playback controls is a slider that controls the orientation of the creature animation. It is set to southern direction by default. Moving the slider to the left rotates counter-clockwise over west to north. Moving the slider to the right rotates clockwise over east to north. The number of available directions is defined by the animation type.
The Loop option controls whether playback is looped.
The Sequence control allows you to select a specific action sequence associated with the current creature animation. By default the Stand sequence is preselected if available.

Selecting a new action sequence.
Near Infinity - An Infinity Engine Browser and Editor
Project | Download | Discussions on GitHub | Topic on Spellhold Studios | Topic on Beamdog Forums

