- Show support on Youtube: https://www.youtube.com/@ChuckBuilds
- Check out the write-up on my website: https://www.chuck-builds.com/led-matrix/
- Stay in touch on Instagram: https://www.instagram.com/ChuckBuilds/
- Want to chat? Reach out on the ChuckBuilds Discord: https://discord.com/invite/uW36dVAtcT
- Feeling Generous? Buy Me a Coffee : https://buymeacoffee.com/chuckbuilds
- Hzeller @ https://github.com/hzeller/rpi-rgb-led-matrix for his groundwork on controlling an LED Matrix from the Raspberry Pi
- Basmilius @ https://github.com/basmilius/weather-icons/ for his free and extensive weather icons
- nvstly @ https://github.com/nvstly/icons for their Stock and Crypto Icons
- ESPN for their sports API
- Yahoo Finance for their Stock API
- OpenWeatherMap for their Free Weather API
- Randomwire @ https://www.thingiverse.com/thing:5169867 for their 4mm Pixel Pitch LED Matrix Stand
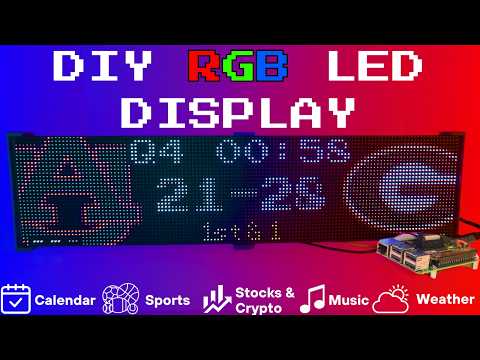
Modular, rotating Displays that can be individually enabled or disabled per the user's needs with some configuration around display durations, teams, stocks, weather, timezones, and more. Displays include:
-
Real-time clock display

-
Current Weather, Daily Weather, and Hourly Weather Forecasts


-
Google Calendar event display

The system supports live, recent, and upcoming game information for multiple sports leagues:
-
NHL (Hockey)


-
NBA (Basketball)
-
MLB (Baseball)

-
NFL (Football)
-
NCAA Football
-
NCAA Men's Basketball
-
NCAA Men's Baseball
-
Soccer (Premier League, La Liga, Bundesliga, Serie A, Ligue 1, Liga Portugal, Champions League, Europa League, MLS)
-
(Note, some of these sports seasons were not active during development and might need fine tuning when games are active)
- Near real-time stock & crypto price updates
- Stock news headlines
- Customizable stock & crypto watchlists


- Music playback information from multiple sources:
- Spotify integration
- YouTube Music integration
- Album art display
- Now playing information with scrolling text


-
Custom Text display

-
Youtube Subscriber Count Display

-
Font testing Display (not in rotation)
The system is built with a modular architecture that allows for easy extension and maintenance:
DisplayController: Main orchestrator managing all display modes- Individual managers for each feature (sports, weather, music, etc.)
- Separate authentication handlers for different services
- Configurable display modes and rotation patterns from one file - config.json
The system can be configured through a JSON configuration file that allows users to:
- Enable/disable specific features
- Set display durations
- Configure API keys and endpoints
- Customize display modes and rotation patterns
- Set preferred music sources
- Configure sports team preferences
- Raspberry Pi 3b or 4 (NOT RPI5!) : Amazon Affiliate Link: Raspberry Pi 4 4GB (https://amzn.to/4dJixuX)
- Adafruit RGB Matrix Bonnet/HAT : https://www.adafruit.com/product/3211
- 2x LED Matrix panels (64x32) (Designed for 128x32 but has a lot of dynamic scaling elements that could work on a variety of displays, pixel pitch is user preference) : https://www.adafruit.com/product/2278
- 5V 4A DC Power Supply for Adafruit RGB HAT : https://www.adafruit.com/product/1466
- By soldering a jumper between pins 4 and 18, you can run a specialized command for polling the matrix display. This provides better brightness, less flicker, and better color.
- If you do the mod, we will use the default config with led-gpio-mapping=adafruit-hat-pwm, otherwise just adjust your mapping in config.json to adafruit-hat
- More information available: https://github.com/hzeller/rpi-rgb-led-matrix/tree/master?tab=readme-ov-file

I 3D printed stands to keep the panels upright and snug. STL Files are included in the Repo but are also available at https://www.thingiverse.com/thing:5169867 Thanks to "Randomwire" for making these for the 4mm Pixel Pitch LED Matrix.
These are not required and you can probably rig up something basic with stuff you have around the house. I used these screws: https://amzn.to/4mFwNJp (Amazon Affiliate Link)
2 Matrix display with Rpi connected.

- Create RPI Image on a Micro-SD card (I use 16gb because I have it, size is not too important but I would use 8gb or more) using Raspberry Pi Imager
- Choose your Raspberry Pi (3B+ in my case)
- For Operating System (OS), choose "Other", then choose Raspbian OS Lite (64-bit)
- For Storage, choose your micro-sd card

- Press Next then Edit Settings

- Inside the OS Customization Settings, choose a name for your device. I use "ledpi". Choose a password, enter your WiFi information, and set your timezone.

- Under the Services Tab, make sure that SSH is enabled. I recommend using password authentication for ease of use - it is the password you just chose above.

- Then Click "Save" and Agree to Overwrite the Micro-SD card.
- Open PowerShell and ssh into your Raspberry Pi with ledpi@ledpi (or Username@Hostname)
ssh ledpi@ledpi- Update repositories, upgrade raspberry pi OS, install git
sudo apt update && sudo apt upgrade -y
sudo apt install -y git python3-pip cython3 build-essential python3-dev python3-pillow scons- Clone this repository:
git clone https://github.com/ChuckBuilds/LEDMatrix.git
cd LEDMatrix- First-time installation (recommended)
chmod +x first_time_install.sh
sudo ./first_time_install.sh
This single script installs services, dependencies, configures permissions and sudoers, and validates the setup.
----- OLD STEPS (left for manual review) ----- 4. Install dependencies:
sudo pip3 install --break-system-packages -r requirements.txt--break-system-packages allows us to install without a virtual environment
- Install rpi-rgb-led-matrix dependencies:
cd rpi-rgb-led-matrix-mastersudo make build-python PYTHON=$(which python3)cd bindings/python
sudo python3 setup.py installTest it with:
python3 -c 'from rgbmatrix import RGBMatrix, RGBMatrixOptions; print("Success!")'- Remove unnecessary services that might interfere with the LED matrix:
sudo apt-get remove bluez bluez-firmware pi-bluetooth triggerhappy pigpio- Blacklist the sound module:
cat <<EOF | sudo tee /etc/modprobe.d/blacklist-rgb-matrix.conf
blacklist snd_bcm2835
EOF
then execute
sudo update-initramfs -u- Reboot:
sudo rebootTo reduce flickering and improve display quality:
- Edit
/boot/firmware/cmdline.txt:
sudo nano /boot/firmware/cmdline.txt-
Add
isolcpus=3at the end of the line -
Ctrl + X to exit, Y to save, Enter to Confirm
-
Edit /boot/firmware/config.txt with
sudo nano /boot/firmware/config.txt-
Edit the
dtparam=audio=onsection todtparam=audio=off -
Ctrl + X to exit, Y to save, Enter to Confirm
-
Save and reboot:
sudo rebootThe system uses a template-based configuration approach to avoid Git conflicts during updates:
-
First-time setup: Copy the template to create your config:
cp config/config.template.json config/config.json
-
Edit your configuration:
sudo nano config/config.json
or edit via web interface at http://ledpi:5001
For sensitive settings like API keys:
- Copy the secrets template:
cp config/config_secrets.template.json config/config_secrets.json - Edit
config/config_secrets.jsonwith your API keys viasudo nano config/config_secrets.json - Ctrl + X to exit, Y to overwrite, Enter to Confirm
The system automatically handles configuration updates:
- New installations: Creates
config.jsonfrom the template automatically - Existing installations: Automatically adds new configuration options with default values when the system starts
- Backup protection: Creates a backup of your current config before applying updates
- No conflicts: Your custom settings are preserved while new options are added
Everything is configured via config/config.json and config/config_secrets.json. The config.json file is not tracked by Git to prevent conflicts during updates.
The calendar display module shows upcoming events from your Google Calendar. To configure it:
- In
config/config.json, add the following section:
{
    "calendar": {
        "enabled": true,
        "update_interval": 300,  // Update interval in seconds (default: 300)
        "max_events": 3,         // Maximum number of events to display
        "calendars": ["primary"] // List of calendar IDs to display
    }
}-
Set up Google Calendar API access:
- Go to the Google Cloud Console
- Create a new project or select an existing one
- Enable the Google Calendar API
- Create OAuth 2.0 credentials:
- Application type: TV and Limited Input Device
- Download the credentials file as
credentials.json
- Place the
credentials.jsonfile in your project root directory
-
On first run, the application will:
- Provide a code to enter at https://www.google.com/device for Google authentication
- Request calendar read-only access
- Save the authentication token as
token.pickle
The calendar display will show:
- Event date and time
- Event title (wrapped to fit the display)
- Up to 3 upcoming events (configurable)
The odds ticker displays betting odds for upcoming sports games. To configure it:
- In
config/config.json, add the following section:
{
    "odds_ticker": {
        "enabled": true,
        "enabled_leagues": ["nfl", "nba", "mlb", "ncaa_fb"],
        "update_interval": 3600,
        "scroll_speed": 2,
        "scroll_delay": 0.05,
        "display_duration": 30
    }
}enabled: Enable/disable the odds ticker (default: false)enabled_leagues: Array of leagues to display (options: "nfl", "nba", "mlb", "ncaa_fb")update_interval: How often to fetch new odds data in seconds (default: 3600)scroll_speed: Pixels to scroll per update (default: 1)scroll_delay: Delay between scroll updates in seconds (default: 0.05)display_duration: How long to show each game in seconds (default: 30)
How it works:
- The ticker intelligently filters games based on the
"show_favorite_teams_only"setting within each individual sport's configuration block (e.g.,"nfl_scoreboard"). If set totruefor a sport, only favorite teams from that sport will appear in the ticker. - Games are sorted by the soonest start time.
The odds ticker shows information in this format:
[12:00 PM] DAL -6.5 ML -200 O/U 47.5 vs NYG ML +175
Where:
[12:00 PM]- Game time in local timezoneDAL- Away team abbreviation-6.5- Spread for away team (negative = favored)ML -200- Money line for away teamO/U 47.5- Over/under totalvs- SeparatorNYG- Home team abbreviationML +175- Money line for home team
The ticker displays team logos alongside the text:
- Away team logo appears to the left of the text
- Home team logo appears to the right of the text
- Logos are automatically resized to fit the display
- ESPN API access for odds data
- Team logo files in the appropriate directories:
assets/sports/nfl_logos/assets/sports/nba_logos/assets/sports/mlb_logos/assets/sports/ncaa_fbs_logos/
No Games Displayed:
- League Configuration: Ensure the leagues you want are enabled in their respective config sections
- Favorite Teams: If
show_favorite_teams_onlyis true, ensure you have favorite teams configured - API Access: Verify ESPN API is accessible and returning data
- Time Window: The ticker only shows games in the next 7 days
No Odds Data:
- API Timing: Odds may not be available immediately when games are scheduled
- League Support: Not all leagues may have odds data available
- API Limits: ESPN API may have rate limits or temporary issues
Performance Issues:
- Reduce scroll_speed: Try setting it to 1 instead of 2
- Increase scroll_delay: Try 0.1 instead of 0.05
- Check system resources: Ensure the Raspberry Pi has adequate resources
You can test the odds ticker functionality using:
python test_odds_ticker.pyThis will:
- Initialize the odds ticker
- Fetch upcoming games and odds
- Display sample games
- Test the scrolling functionality
The stocks display shows real-time stock and crypto prices in a scrolling ticker format. To configure it:
- In
config/config.json, add the following section:
{
    "stocks": {
        "enabled": true,
        "symbols": ["AAPL", "MSFT", "GOOGL", "TSLA"],
        "update_interval": 600,
        "scroll_speed": 1,
        "scroll_delay": 0.01,
        "toggle_chart": false
    }
}enabled: Enable/disable the stocks display (default: false)symbols: Array of stock symbols to display (e.g., ["AAPL", "MSFT", "GOOGL"])update_interval: How often to fetch new stock data in seconds (default: 600)scroll_speed: Pixels to scroll per update (default: 1)scroll_delay: Delay between scroll updates in seconds (default: 0.01)toggle_chart: Enable/disable mini charts in the scrolling ticker (default: false)
The stocks display shows information in this format:
[Logo] SYMBOL
       $PRICE
       +CHANGE (+PERCENT%)
Where:
[Logo]- Stock/crypto logo (if available)SYMBOL- Stock symbol (e.g., AAPL, MSFT)$PRICE- Current stock price+CHANGE- Price change (green for positive, red for negative)+PERCENT%- Percentage change
The toggle_chart setting controls whether mini price charts are displayed alongside each stock:
"toggle_chart": true: Shows mini line charts on the right side of each stock display"toggle_chart": false: Shows only text information (symbol, price, change)
When charts are disabled, the text is centered more prominently on the display.
The system also supports cryptocurrency symbols. Add crypto symbols to the symbols array:
{
    "stocks": {
        "enabled": true,
        "symbols": ["AAPL", "MSFT", "BTC-USD", "ETH-USD"],
        "update_interval": 600,
        "scroll_speed": 1,
        "scroll_delay": 0.01,
        "toggle_chart": false
    }
}- Yahoo Finance API access for stock data
- Stock/crypto logo files in the appropriate directories:
assets/stocks/ticker_icons/(for stocks)assets/stocks/crypto_icons/(for cryptocurrencies)
No Stock Data Displayed:
- Symbol Format: Ensure stock symbols are correct (e.g., "AAPL" not "apple")
- API Access: Verify Yahoo Finance API is accessible
- Market Hours: Some data may be limited during off-hours
- Symbol Validity: Check that symbols exist and are actively traded
Performance Issues:
- Reduce scroll_speed: Try setting it to 1 instead of higher values
- Increase scroll_delay: Try 0.05 instead of 0.01 for smoother scrolling
- Reduce symbols: Limit the number of symbols to improve performance
You can test the stocks functionality using:
python test/test_stock_toggle_chart.pyThis will:
- Test the toggle_chart functionality
- Verify configuration loading
- Test cache clearing behavior
For NFL and NCAA Football, the system now uses a game-based fetch approach instead of time-based windows. This is more practical for football since games are weekly and you want to show specific numbers of games rather than arbitrary time periods.
Instead of using past_fetch_days and future_fetch_days, the system now uses:
fetch_past_games: Number of recent games to fetch (default: 1)fetch_future_games: Number of upcoming games to fetch (default: 1)
{
    "nfl_scoreboard": {
        "enabled": true,
        "fetch_past_games": 1,
        "fetch_future_games": 1,
        "favorite_teams": ["TB", "DAL"]
    },
    "ncaa_fb_scoreboard": {
        "enabled": true,
        "fetch_past_games": 1,
        "fetch_future_games": 1,
        "favorite_teams": ["UGA", "AUB"]
    }
}fetch_past_games: 1: Shows the most recent game for your favorite teamsfetch_future_games: 1: Shows the next upcoming game for your favorite teamsfetch_future_games: 2: Shows the next two upcoming games (e.g., Week 1 and Week 2 matchups)
- Predictable Results: Always shows exactly the number of games you specify
- Season Flexibility: Works well both during the season and in the off-season
- Future Planning: Can show games far in the future (e.g., Week 1 when it's 40 days away)
- Efficient: Only fetches the games you actually want to see
- During Season:
fetch_future_games: 1shows next week's game - Off-Season:
fetch_future_games: 1shows the first scheduled game (even if it's months away) - Planning:
fetch_future_games: 2shows the next two matchups for planning purposes
The Music Display module shows information about the currently playing track from either Spotify or YouTube Music (via the YouTube Music Desktop App companion server).
Setup Requirements:
-
Spotify:
- Requires a Spotify account (for API access).
- You need to register an application on the Spotify Developer Dashboard to get API credentials.
- Go to the dashboard, log in, and click "Create App".
- Give it a name (e.g., "LEDMatrix Display") and description.
- For the "Redirect URI", enter
http://127.0.0.1:8888/callback(or another unused port if 8888 is taken). You must add this exact URI in your app settings on the Spotify dashboard. - Note down the
Client IDandClient Secret.
-
YouTube Music (YTM):
- Requires the YouTube Music Desktop App (YTMD) to be installed and running on a computer on the same network as the Raspberry Pi.
- In YTMD settings, enable the "Companion Server" under Integration options. Note the URL it provides (usually
http://localhost:9863if running on the same machine, orhttp://<YTMD-Computer-IP>:9863if running on a different computer).
preferred_source Options:
"spotify": Only uses Spotify. Ignores YTM."ytm": Only uses the YTM Companion Server. Ignores Spotify.
If you are using the Spotify integration to display currently playing music, you will need to authenticate with Spotify. This project uses an authentication flow that requires a one-time setup. Due to how the display controller script may run with specific user permissions (even when using sudo), the following steps are crucial:
-
Initial Setup & Secrets:
- Ensure you have your Spotify API Client ID, Client Secret, and Redirect URI.
- The Redirect URI should be set to
http://127.0.0.1:8888/callbackin your Spotify Developer Dashboard. - Copy
config/config_secrets.template.jsontoconfig/config_secrets.json. - Edit
config/config_secrets.jsonand fill in your Spotify credentials under the"music"section:{ "music": { "SPOTIFY_CLIENT_ID": "YOUR_SPOTIFY_CLIENT_ID", "SPOTIFY_CLIENT_SECRET": "YOUR_SPOTIFY_CLIENT_SECRET", "SPOTIFY_REDIRECT_URI": "http://127.0.0.1:8888/callback" } }
-
Run the Authentication Script:
- Execute the authentication script using
sudo. This is important because it needs to create an authentication cache file (spotify_auth.json) that will be owned by root.sudo python3 src/authenticate_spotify.py
- The script will output a URL. Copy this URL and paste it into a web browser on any device.
- Log in to Spotify and authorize the application.
- Your browser will be redirected to a URL starting with
http://127.0.0.1:8888/callback?code=.... It will likely show an error page like "This site can't be reached" – this is expected. - Copy the entire redirected URL from your browser's address bar.
- Paste this full URL back into the terminal when prompted by the script.
- If successful, it will indicate that token info has been cached.
- Execute the authentication script using
-
Adjust Cache File Permissions:
- The main display script (
display_controller.py), even when run withsudo, might operate with an effective User ID (e.g., UID 1 for 'daemon') that doesn't have permission to read thespotify_auth.jsonfile created byroot(which has -rw------- permissions by default). - To allow the display script to read this cache file, change its permissions:
sudo chmod 644 config/spotify_auth.json
This makes the file readable by all users, including the effective user of the display script.
- The main display script (
-
Run the Main Application:
- You should now be able to run your main display controller script using
sudo:sudo python3 display_controller.py
- The Spotify client should now authenticate successfully using the cached token.
- You should now be able to run your main display controller script using
Why these specific permissions steps?
The authenticate_spotify.py script, when run with sudo, creates config/spotify_auth.json owned by root. If the main display_controller.py (also run with sudo) effectively runs as a different user (e.g., UID 1/daemon, as observed during troubleshooting), that user won't be able to read the root-owned file unless its permissions are relaxed (e.g., to 644). The chmod 644 command allows the owner (root) to read/write, and everyone else (including the daemon user) to read.
The system can display currently playing music information from YouTube Music Desktop (YTMD) via its Companion server API.
The YouTube display module shows channel statistics for a specified YouTube channel. To configure it:
- In
config/config.json, add the following section:
{
    "youtube": {
        "enabled": true,
        "update_interval": 300  // Update interval in seconds (default: 300)
    }
}- In
config/config_secrets.json, add your YouTube API credentials:
{
    "youtube": {
        "api_key": "YOUR_YOUTUBE_API_KEY",
        "channel_id": "YOUR_CHANNEL_ID"
    }
}
To get these credentials:
- Go to the Google Cloud Console
- Create a new project or select an existing one
- Enable the YouTube Data API v3
- Create credentials (API key)
- For the channel ID, you can find it in your YouTube channel URL or use the YouTube Data API to look it up
Setup:
-
Enable Companion Server in YTMD:
- In the YouTube Music Desktop application, go to
Settings->Integrations. - Enable the "Companion Server".
- Note the IP address and Port it's listening on (default is usually
http://localhost:9863), you'll need to know the local ip address if playing music on a device other than your rpi (probably are).
- In the YouTube Music Desktop application, go to
-
Configure
config/config.json:- Update the
musicsection in yourconfig/config.json:"music": { "enabled": true, "preferred_source": "ytm", "YTM_COMPANION_URL": "http://YOUR_YTMD_IP_ADDRESS:PORT", // e.g., "http://localhost:9863" or "http://192.168.1.100:9863" "POLLING_INTERVAL_SECONDS": 1 }
- Update the
-
Initial Authentication & Token Storage:
- The first time you run
python3 src/authenticate_ytm.pyafter enabling YTM, it will attempt to register itself with the YTMD Companion Server. - You will see log messages in the terminal prompting you to approve the "LEDMatrixController" application within the YouTube Music Desktop app. You typically have 30 seconds to do this.
- Once approved, an authentication token is saved to your
config/ytm_auth.json. - This ensures the
ledpiuser owns the config directory and file, and has the necessary write permissions.
- The first time you run
Troubleshooting:
- "No authorized companions" in YTMD: Ensure you've approved the
LEDMatrixControllerin YTMD settings after the first run. - Connection errors: Double-check the
YTM_COMPANION_URLinconfig.jsonmatches what YTMD's companion server is set to. - Ensure your firewall (Windows Firewall) allows YTM Desktop app to access local networks.
Across all sports displays (NFL, MLB, NBA, etc.), you can control which games are shown using the "show_favorite_teams_only" and "favorite_teams" settings in your config/config.json.
How it Works:
-
"show_favorite_teams_only": true: When this is set totruewithin a specific sport's configuration (e.g., in the"nfl_scoreboard"block), the system will only fetch and display games (Live, Recent, and Upcoming) that involve one of the teams listed in your"favorite_teams"array for that sport. This is the best way to reduce API calls and keep the display focused. -
"show_favorite_teams_only": false: When set tofalse(or omitted), the system will display all available games for that sport, ignoring the"favorite_teams"list completely.
Example config.json for NFL:
"nfl_scoreboard": {
    "enabled": true,
    "show_odds": true,
    "show_favorite_teams_only": true, // <-- Only shows games for DAL & TB
    "favorite_teams": ["DAL", "TB"],
    "fetch_past_games": 1,
    "fetch_future_games": 1
},The system includes a comprehensive odds ticker that displays betting odds for upcoming sports games. The ticker respects the show_favorite_teams_only setting from each individual sports module. For example, if "show_favorite_teams_only": true is set in the nfl_scoreboard config, the odds ticker will only show odds for your favorite NFL teams.
Features:
- Multi-League Support: NFL, NBA, MLB, NCAA Football
- Configurable Leagues: Choose which leagues to display
- Favorite Teams Filter: Obeys the
show_favorite_teams_onlysetting in each sport's configuration block. - Team Logos: Displays team logos alongside odds information
- Comprehensive Odds: Shows spreads, money lines, and over/under totals
- Scrolling Display: Smooth scrolling text with team logos
- Time Display: Shows game times in local timezone
Display Format:
[12:00 PM] DAL -6.5 ML -200 O/U 47.5 vs NYG ML +175
Configuration:
Add the following section to your config/config.json:
{
    "odds_ticker": {
        "enabled": true,
        "enabled_leagues": ["nfl", "nba", "mlb", "ncaa_fb"],
        "update_interval": 3600,
        "scroll_speed": 2,
        "scroll_delay": 0.05,
        "display_duration": 30
    }
}
Testing: You can test the odds ticker functionality using:
python test_odds_ticker.pyThe LEDMatrix system uses persistent caching to improve performance and reduce API calls. When running with sudo, the system needs a persistent cache directory that survives restarts.
First-Time Setup: Run the setup script to create a persistent cache directory:
chmod +x setup_cache.sh
./setup_cache.sh
This will:
- Create
/var/cache/ledmatrix/directory - Set proper ownership to your user account
- Set permissions to allow the daemon user (which the system runs as) to write
- Test writability for both your user and the daemon user
If You Still See Cache Warnings: If you see warnings about using temporary cache directory, run the permissions fix:
chmod +x fix_cache_permissions.sh
./fix_cache_permissions.sh
Manual Setup: If you prefer to set up manually:
sudo mkdir -p /var/cache/ledmatrix
sudo chown $USER:$USER /var/cache/ledmatrix
sudo chmod 777 /var/cache/ledmatrix
Cache Locations (in order of preference):
~/.ledmatrix_cache/(user's home directory) - Most persistent/var/cache/ledmatrix/(system cache directory) - Persistent across restarts/opt/ledmatrix/cache/(alternative persistent location)/tmp/ledmatrix_cache/(temporary directory) - NOT persistent
Note: If the system falls back to /tmp/ledmatrix_cache/, you'll see a warning message and the cache will not persist across restarts.
- To allow the script to properly access fonts, you need to set the correct permissions on your home directory:
sudo chmod o+x /home/ledpi
- Replace ledpi with your actual username, if different.
You can confirm your username by executing:
whoami
From the project root directory:
sudo python3 display_controller.pyThis will start the display cycle but only stays active as long as your ssh session is active.
The LEDMatrix can be installed as a systemd service to run automatically at boot and be managed easily. The service runs as root to ensure proper hardware timing access for the LED matrix.
- Make the install script executable:
chmod +x install_service.sh- Run the install script with sudo:
sudo ./install_service.shThe script will:
- Detect your user account and home directory
- Install the service file with the correct paths
- Enable the service to start on boot
- Start the service immediately
The following commands are available to manage the service:
# Stop the display
sudo systemctl stop ledmatrix.service

# Start the display
sudo systemctl start ledmatrix.service

# Check service status
sudo systemctl status ledmatrix.service

# View logs
journalctl -u ledmatrix.service

# Disable autostart
sudo systemctl disable ledmatrix.service

# Enable autostart
sudo systemctl enable ledmatrix.serviceTwo convenience scripts are provided for easy service management:
start_display.sh- Starts the LED matrix display servicestop_display.sh- Stops the LED matrix display service
Make them executable with:
chmod +x start_display.sh stop_display.shThen use them to control the service:
sudo ./start_display.sh
sudo ./stop_display.shThe LEDMatrix system includes Web Interface V2 that runs on port 5001 and provides real-time display preview, configuration management, and on-demand display controls.
- Make the install script executable:
chmod +x install_web_service.sh- Run the install script with sudo:
sudo ./install_web_service.shThe script will:
- Copy the web service file to
/etc/systemd/system/ - Enable the service to start on boot
- Start the service immediately
- Show the service status
The web interface can be configured to start automatically with the main display service:
- In
config/config.json, ensure the web interface autostart is enabled:
{
    "web_display_autostart": true
}- The web interface will now start automatically when:
- The system boots
- The
web_display_autostartsetting istruein your config
Once installed, you can access the web interface at:
http://your-pi-ip:5001
# Check service status
sudo systemctl status ledmatrix-web.service

# View logs
journalctl -u ledmatrix-web.service -f

# Stop the service
sudo systemctl stop ledmatrix-web.service

# Start the service
sudo systemctl start ledmatrix-web.service

# Disable autostart
sudo systemctl disable ledmatrix-web.service

# Enable autostart
sudo systemctl enable ledmatrix-web.service- Real-time Display Preview: See what's currently displayed on the LED matrix
- Configuration Management: Edit settings through a web interface
- On-Demand Controls: Start specific displays (weather, stocks, sports) on demand
- Service Management: Start/stop the main display service
- System Controls: Restart, update code, and manage the system
- API Metrics: Monitor API usage and system performance
- Logs: View system logs in real-time
Web Interface Not Accessible After Restart:
- Check if the web service is running:
sudo systemctl status ledmatrix-web.service - Verify the service is enabled:
sudo systemctl is-enabled ledmatrix-web.service - Check logs for errors:
journalctl -u ledmatrix-web.service -f - Ensure
web_display_autostartis set totrueinconfig/config.json
Port 5001 Not Accessible:
- Check if the service is running on the correct port
- Verify firewall settings allow access to port 5001
- Check if another service is using port 5001
Service Fails to Start:
- Check Python dependencies are installed
- Verify the virtual environment is set up correctly
- Check file permissions and ownership
You can add any font to the assets/fonts/ folder but they need to be .ttf or .btf(less support) and updated in display_manager.py
Running the display without Sudo (Not recommended but can be useful for troubleshooting or overcoming write errors)
To run the display script without sudo, the user executing the script needs access to GPIO pins. Add the user to the gpio group:
sudo usermod -a -G gpio <your_username>
# Example for user 'ledpi':
# sudo usermod -a -G gpio ledpi
Important: You must reboot the Raspberry Pi after adding the user to the group for the change to take effect.
You also need to disable hardware pulsing in the code (see src/display_manager.py, set options.disable_hardware_pulsing = True). This may result in a flickerying display
If configured correctly, you can then run:
python3 display_controller.pyIf you are copying my setup, you can likely leave this alone.
- hardware: Configures how the matrix is driven.
- rows, cols, chain_length: Physical panel configuration.
- brightness: Display brightness (0–100).
- hardware_mapping: Use "adafruit-hat-pwm" for Adafruit bonnet WITH the jumper mod. Remove -pwm if you did not solder the jumper.
- pwm_bits, pwm_dither_bits, pwm_lsb_nanoseconds: Affect color fidelity.
- limit_refresh_rate_hz: Cap refresh rate for better stability.
- runtime:
- gpio_slowdown: Tweak this depending on your Pi model. Match it to the generation (e.g., Pi 3 → 3, Pi 4 -> 4).
- display_durations:
- Control how long each display module stays visible in seconds. For example, if you want more focus on stocks, increase that value.
- Each module (weather, stocks, crypto, calendar, etc.) has enabled, update_interval, and often display_format settings.
- Sports modules also support test_mode, live_update_interval, and favorite_teams.
- Logos are loaded from the logo_dir path under assets/sports/...
Example: NHL Configuration"nhl_scoreboard": {
  "enabled": true,
  "test_mode": false,
  "update_interval_seconds": 300,
  "live_update_interval": 15,
  "recent_game_hours": 48,
  "favorite_teams": ["TB", "DAL"],
  "logo_dir": "assets/sports/nhl_logos",
  "display_modes": {
    "nhl_live": true,
    "nhl_recent": true,
    "nhl_upcoming": true
  }
}You can customize the date format for upcoming games across all sports displays. The use_short_date_format setting in config/config.json under the display section controls this behavior.
"use_short_date_format": true: Displays dates in a short, numerical format (e.g., "8/30")."use_short_date_format": false(Default): Displays dates in a more descriptive format with an ordinal suffix (e.g., "Aug 30th").
"display": {
    "hardware": {
        ...
    },
    "runtime": {
        ...
    },
    "display_durations": {
        ...
    },
    "use_short_date_format": false // Set to true for "8/30" format
},LEDMatrix/
├── assets/ # Static assets like fonts and icons
├── config/ # Configuration files
│ ├── config.json # Main configuration
│ └── config_secrets.template.json # Template for API keys and sensitive data
├── src/ # Source code
│ ├── display_controller.py # Main application controller
│ ├── config_manager.py # Configuration management
│ ├── display_manager.py # LED matrix display handling
│ ├── cache_manager.py # Caching system for API data
│ ├── clock.py # Clock display module
│ ├── weather_manager.py # Weather display module
│ ├── weather_icons.py # Weather icon definitions
│ ├── stock_manager.py # Stock ticker display module
│ ├── stock_news_manager.py # Stock news display module
│ ├── music_manager.py # Music display orchestration
│ ├── spotify_client.py # Spotify API integration
│ ├── ytm_client.py # YouTube Music integration
│ ├── authenticate_spotify.py # Spotify authentication
│ ├── authenticate_ytm.py # YouTube Music authentication
│ ├── calendar_manager.py # Google Calendar integration
│ ├── youtube_display.py # YouTube channel stats display
│ ├── text_display.py # Custom text display module
│ ├── font_test_manager.py # Font testing utility
│ ├── nhl_managers.py # NHL game display
│ ├── nba_managers.py # NBA game display
│ ├── mlb_manager.py # MLB game display
│ ├── nfl_managers.py # NFL game display
│ ├── soccer_managers.py # Soccer game display
│ ├── ncaa_fb_managers.py # NCAA Football display
│ ├── ncaa_baseball_managers.py # NCAA Baseball display
│ └── ncaam_basketball_managers.py # NCAA Basketball display
├── rpi-rgb-led-matrix-master/ # LED matrix library
├── run.py # Main entry point
├── display_controller.py # Legacy entry point
├── calendar_registration.py # Calendar API setup
├── run_font_test.py # Font testing entry point
├── ChuckBuilds.py # Custom display module
├── start_display.sh # Service start script
├── stop_display.sh # Service stop script
├── install_service.sh # Service installation script
├── ledmatrix.service # Systemd service definition
├── requirements.txt # Python dependencies
└── config.example.json # Example configuration
The project is organized into several key components:
src/: Contains all the Python source code, organized by featureconfig/: Configuration files for the applicationassets/: Static assets like fonts and iconsrpi-rgb-led-matrix-master/: The LED matrix control library- Various utility scripts for running and managing the service
Each display module in src/ is responsible for a specific feature (weather, sports, music, etc.) and follows a consistent pattern of data fetching, processing, and display rendering.
The LEDMatrix system includes a comprehensive scoreboard display system with three display modes:
- Live Games: Shows currently playing games with live scores and game status
- Recent Games: Displays completed games from the last 48 hours (configurable)
- Upcoming Games: Shows scheduled games for favorite teams
- Real-time score updates from ESPN API
- Team logo display
- Game status indicators (period, time remaining)
- Configurable favorite teams
- Automatic game switching
- Built-in caching to reduce API calls
- Test mode for development
The LEDMatrix system includes a built-in API usage counter that tracks API calls made by various managers in a 24-hour rolling window. This feature helps monitor API usage and ensure compliance with rate limits.
- Real-time Tracking: Counts API calls for weather, stocks, sports, and news data
- 24-hour Window: Rolling window that resets every 24 hours
- Web Interface Integration: View current usage in the Overview tab of the web interface
- Forecast Display: Shows predicted API usage based on current configuration
- Automatic Reset: Counters automatically reset when the 24-hour window expires
- Weather: OpenWeatherMap API calls (geocoding + weather data)
- Stocks: Yahoo Finance API calls for stock and crypto data
- Sports: ESPN API calls for various sports leagues (NHL, NBA, MLB, NFL, etc.)
- News: RSS feed and news API calls
- Open the web interface in your browser
- Navigate to the Overview tab
- Scroll down to the "API Calls (24h window)" section
- Click "Refresh API Metrics" to update the display
The counter shows both actual usage and forecasted usage based on your current configuration settings.
The LEDMatrix system includes a robust caching mechanism to optimize API calls and reduce network traffic:
- Default cache directory:
/tmp/ledmatrix_cache - Cache files are stored with proper permissions (755 for directories, 644 for files)
- When running as root/sudo, cache ownership is automatically adjusted to the real user
- Weather data (current conditions and forecasts)
- Stock prices and market data
- Stock news headlines
- ESPN game information
- Data is cached based on update intervals defined in
config.json - Cache is automatically invalidated when:
- Update interval has elapsed
- Market is closed (for stock data)
- Data has changed significantly
- Failed API calls fall back to cached data when available
- Cache files use atomic operations to prevent corruption
- Cache files are automatically created and managed
- No manual intervention required
- Cache directory is created with proper permissions on first run
- Temporary files are used for safe updates
- JSON serialization handles all data types including timestamps
- Most configuration is done via config/config.json
- Refresh intervals for sports/weather/stocks are customizable
- A caching system reduces API strain and helps ensure the display doesn't hammer external services (and ruin it for everyone)
- Font files should be placed in assets/fonts/
- You can test each module individually for debugging
##What's Next?
- Adding MQTT/HomeAssistant integration
- Gambling odds (done!)
- Building a user-friendly UI for easier configuration (done!)
The web interface needs to run certain commands with sudo (e.g., reboot, systemctl start/stop/enable/disable ledmatrix.service, python display_controller.py). To avoid needing to enter a password for these actions through the web UI, you can configure the sudoers file to allow the user running the Flask application to execute these specific commands without a password.
- Shortcut to automate the below steps:
chmod +x configure_web_sudo.shthen./configure_web_sudo.sh
Manual Method:
WARNING: Be very careful when editing the sudoers file. Incorrect syntax can lock you out of sudo access.
-
Identify the user: Determine which user is running the
web_interface.pyscript. Often, this might be the default user likepion a Raspberry Pi, or a dedicated user you've set up. -
Open the sudoers file for editing: Use the
visudocommand, which locks the sudoers file and checks for syntax errors before saving.sudo visudo
-
Add the permission lines: Scroll to the bottom of the file and add lines similar to the following. Replace
your_flask_userwith the actual username running the Flask application. You'll need to specify the full paths to the commands. You can find these using thewhichcommand (e.g.,which python,which systemctl,which reboot).# Allow your_flask_user to run specific commands without a password for the LED Matrix web interface your_flask_user ALL=(ALL) NOPASSWD: /sbin/reboot your_flask_user ALL=(ALL) NOPASSWD: /bin/systemctl start ledmatrix.service your_flask_user ALL=(ALL) NOPASSWD: /bin/systemctl stop ledmatrix.service your_flask_user ALL=(ALL) NOPASSWD: /bin/systemctl enable ledmatrix.service your_flask_user ALL=(ALL) NOPASSWD: /bin/systemctl disable ledmatrix.service your_flask_user ALL=(ALL) NOPASSWD: /usr/bin/python /path/to/your/display_controller.py your_flask_user ALL=(ALL) NOPASSWD: /bin/bash /path/to/your/stop_display.sh- Important:
- Replace
your_flask_userwith the correct username. - Replace
/path/to/your/display_controller.pywith the absolute path to yourdisplay_controller.pyscript. - Replace
/path/to/your/stop_display.shwith the absolute path to yourstop_display.shscript. - The paths to
python,systemctl,reboot, andbashmight vary slightly depending on your system. Usewhich <command>to find the correct paths if you are unsure. For example,which pythonmight output/usr/bin/python3- use that full path.
- Replace
- Important:
-
Save and Exit:
- If you're in
nano(common default forvisudo):Ctrl+X, thenYto confirm, thenEnter. - If you're in
vim:Esc, then:wq, thenEnter.
visudowill check the syntax. If there's an error, it will prompt you to re-edit or quit. Do not quit without fixing errors if possible. - If you're in
-
Test: After saving, try running one of the specified commands as
your_flask_userusingsudofrom a regular terminal session to ensure it doesn't ask for a password. For example:sudo -u your_flask_user sudo /sbin/reboot
(Don't actually reboot if you're not ready, but it should proceed without a password prompt if configured correctly. You can test with a less disruptive command like
sudo -u your_flask_user sudo systemctl status ledmatrix.service).
Security Considerations:
Granting passwordless sudo access, even for specific commands, has security implications. Ensure that the scripts and commands allowed are secure and cannot be easily exploited. The web interface itself should also be secured if it's exposed to untrusted networks.
For display_controller.py and stop_display.sh, ensure their file permissions restrict write access to only trusted users, preventing unauthorized modification of these scripts which run with elevated privileges.
python3 start_web_v2.py
python web_interface_v2.py
Set "web_display_autostart": true in config/config.json.
Ensure your systemd service calls start_web_conditionally.py (installed by install_service.sh).
- Add the service user to
systemd-journalfor viewing logs without sudo. - Configure passwordless sudo for actions (start/stop service, reboot, shutdown) if desired.
- Required for web Ui actions, look in the section above for the commands to run (chmod +x configure_web_sudo.sh & ./configure_web_sudo.sh)
The project now defaults to Web UI v2. The v1 interface can be ignored. An LED matrix display system that provides real-time information display capabilities for various data sources. The system is highly configurable and supports multiple display modes that can be enabled or disabled based on user preferences.