- Project Overview
- Features
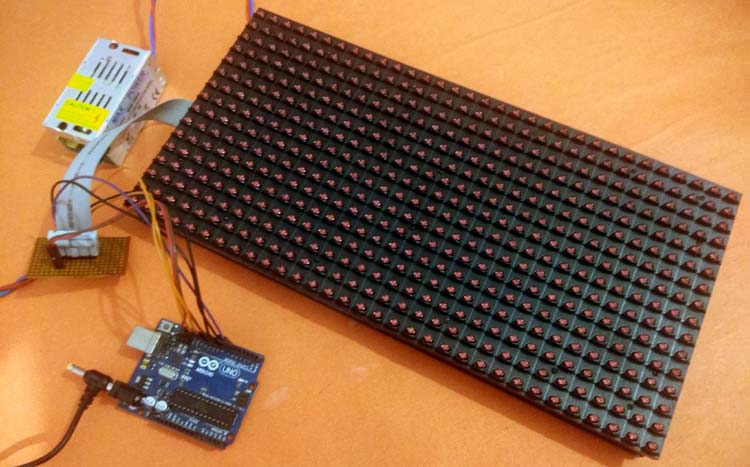
- Hardware Requirements
- Pin Configuration
- Circuit Diagram
- Software Setup
- Installation Guide
- Usage Instructions
- Troubleshooting
- Advanced Applications
- FAQ
- Contributing
- License
- References
This Arduino P10 LED Display project demonstrates how to create a professional-grade digital notice board using Arduino UNO and P10 LED Matrix Display modules. The system displays scrolling text messages that can be easily customized for advertising, announcements, or information display purposes.
Key Highlights:
- Professional LED display quality suitable for commercial use
- Energy-efficient design with high brightness output
- Modular construction allowing easy scaling
- IP65 waterproof rating for outdoor applications
- Cost-effective alternative to expensive commercial displays
Source Tutorial: Digital Notice Board using P10 LED Matrix Display and Arduino - CircuitDigest
- High-Brightness Display: 3500-4500 nits brightness for excellent outdoor visibility
- Large Pixel Matrix: 32×16 LED configuration (512 LEDs total)
- Scrolling Text Animation: Smooth left-to-right scrolling effect
- Customizable Messages: Easy text modification through Arduino code
- Low Power Consumption: Maximum 20W per module
- Modular Design: Cascade multiple modules for larger displays
- Weather Resistant: IP65 waterproof rating
- Wide Viewing Angle: 160°+ horizontal/vertical viewing angles
- Arduino Compatible: Works with standard Arduino libraries
| Component | Quantity | Specifications |
|---|---|---|
| Arduino UNO | 1 | Standard Arduino UNO board |
| P10 LED Matrix Module | 1 | 32×16 pixels, 10mm pitch |
| 16-Pin FRC Connector | 1 | For P10 module connection |
| SMPS Power Supply | 1 | 5V DC, 3A minimum |
| Jumper Wires | As needed | Male-to-female connectors |
| Parameter | Value |
|---|---|
| LED Configuration** | 32 columns × 16 rows (512 LEDs) |
| Brightness | 3,500-4,500 nits |
| Power Consumption | 20W maximum |
| Input Voltage | DC 5V |
| Waterproof Rating | IP65 |
| Pixel Pitch | 10mm |
| Viewing Angle | 160°+ horizontal/vertical |
| Contrast Ratio | High contrast for outdoor visibility |
| P10 LED Module Pin | Arduino UNO Pin | Function |
|---|---|---|
| ENABLE | 9 | PWM brightness control |
| A | 6 | Multiplex select pin |
| B | 7 | Multiplex select pin |
| CLK | 13 | Shift clock |
| SCLK | 8 | Store clock |
| DATA | 11 | Serial data input |
| GND | GND | Ground connection |
Arduino UNO                    P10 LED Module
    +5V  ────────────────────── VCC (via SMPS)
    GND  ────────────────────── GND
    Pin 9 ───────────────────── ENABLE
    Pin 6 ───────────────────── A
    Pin 7 ───────────────────── B
    Pin 13 ──────────────────── CLK
    Pin 8 ───────────────────── SCLK
    Pin 11 ──────────────────── DATA

SMPS 5V/3A ──────────────────── P10 Module Power
- DMD Library - For P10 LED operations
- Download from: GitHub - freetronics/DMD
- TimerOne Library - For interrupt handling
- Download from: GitHub - PaulStoffregen/TimerOne
- Download and install Arduino IDE (version 1.8.0 or higher)
- Install the required libraries:
- Sketch → Include Library → Add .ZIP Library
- Select downloaded DMD and TimerOne libraries
- Verify library installation in Library Manager
-
Power Supply Connection:
- Connect 5V, 3A SMPS to P10 module power terminals
- Ensure proper polarity (positive and negative)
-
Arduino Connections:
- Connect Arduino pins to P10 module as per pin configuration table
- Use female-to-male jumper wires for secure connections
- Double-check all connections before powering on
-
Safety Checks:
- Verify all connections are secure
- Check power supply voltage and current ratings
- Ensure no short circuits
-
Library Installation:
// Required includes
#include <SPI.h>
#include <DMD.h>
#include <TimerOne.h>
#include "SystemFont5x7.h"
#include "Arial_black_16.h"
-
Upload Code:
- Copy the complete project code
- Select correct Arduino board and COM port
- Compile and upload to Arduino
- Power on the system
- Observe the scrolling text "Welcome to Circuit Digest"
- Verify smooth scrolling animation
- Check display brightness and clarity
// In loop() function, modify the text message
led_module.drawMarquee("Your Custom Message Here", 25, (32 * ROW), 0);// Define display dimensions
#define ROW 1 // Number of module rows
#define COLUMN 1 // Number of module columns
#define FONT Arial_Black_16 // Font selectionFor larger displays, modify the ROW and COLUMN values:
// For 2x1 configuration (2 modules horizontally)
#define ROW 1
#define COLUMN 2

// For 2x2 configuration (4 modules total)
#define ROW 2
#define COLUMN 2Adjust PWM value on ENABLE pin (Pin 9) for brightness control:
analogWrite(9, brightness_value); // 0-255 range| Problem | Possible Cause | Solution |
|---|---|---|
| No display output | Power supply issues | • Check 5V supply connection • Verify power supply capacity • Test with multimeter |
| Flickering display | Insufficient current | • Upgrade to higher amperage SMPS • Check wire gauge and connections • Verify power distribution |
| Incorrect characters | Wrong pin mapping | • Double-check pinout configuration • Verify Arduino pin assignments • Test with multimeter |
| No scrolling effect | Library issues | • Reinstall DMD and TimerOne libraries • Check library compatibility • Verify Arduino IDE version |
| Compilation errors | Missing libraries | • Install all required libraries • Check library versions • Restart Arduino IDE |
| Dim display | Power or connection issues | • Check power supply voltage • Verify ENABLE pin connection • Test brightness control |
Error: 'DMD' was not declared in this scope
Solution: Install DMD library properly

Error: 'Timer1' was not declared in this scope
Solution: Install TimerOne library

Error: Font not found
Solution: Include correct font header files
// For 3 modules horizontally
#define ROW 1
#define COLUMN 3
// Power requirement: 60W (3 × 20W)// For 2 modules vertically
#define ROW 2
#define COLUMN 1
// Power requirement: 40W (2 × 20W)- Single Module: 20W (4A at 5V)
- Multiple Modules: 20W × number of modules
- Recommended SMPS: Add 20% safety margin
-
Serial Communication Control:
- Add Bluetooth/WiFi module for wireless control
- Implement web interface for remote text updates
-
Real-time Clock Integration:
- Display current time and date
- Schedule different messages for different times
-
Sensor Integration:
- Temperature and humidity display
- Motion sensor for automatic activation
-
Memory Storage:
- Store multiple messages in EEPROM
- Cycle through different announcements
Q1: What power supply is required for the P10 LED display with Arduino? A: A single P10 module requires a 5V DC, 3A SMPS power supply. Each module draws approximately 20W. For multiple modules, calculate total power requirement and upgrade accordingly.
Q2: Can multiple P10 modules be cascaded to make bigger displays? A: Yes! P10 modules are designed to be cascadable. Connect modules in an SPI chain configuration. Update the ROW and COLUMN values in your code and ensure adequate power supply capacity.
Q3: Why is my display flickering or showing wrong characters? A: Flickering usually indicates insufficient power supply current. Wrong characters typically result from incorrect pin connections. Verify your pinout matches the circuit diagram exactly and check power supply specifications.
Q4: What Arduino libraries are required for P10 LED programming? A: You need the DMD library for P10 control operations and the TimerOne library for interrupt handling. Download both from their official GitHub repositories and install in Arduino IDE.
Q5: How do I change the scrolling text on my P10 display?
A: Modify the string inside the drawMarquee() function in your Arduino code. For dynamic updates, implement serial communication to change text without reflashing the code.
Q6: What is the maximum viewing distance for the P10 LED display? A: P10 displays with 10mm pixel pitch are optimized for viewing distances of 10-50 meters. The high brightness (3500-4500 nits) ensures visibility even in bright sunlight.
Q7: Can I use Arduino Mega instead of Arduino UNO? A: Yes, Arduino Mega is compatible. Use the same pin mapping or reassign pins as needed. Mega offers more pins for additional features.
Q8: How do I add multiple text messages? A: Implement an array of strings and cycle through them, or use serial input to dynamically update messages.
Q9: Can I control the scrolling speed?
A: Yes, modify the timing value in the while loop. Lower values = faster scrolling, higher values = slower scrolling.
Q10: Is it possible to display static text (non-scrolling)?
A: Yes, use drawString() function instead of drawMarquee() for static text display.
We welcome contributions to improve this project! Here's how you can help:
- Report Issues: Found a bug? Please open an issue with detailed description
- Feature Requests: Suggest new features or improvements
- Code Contributions: Submit pull requests for enhancements
- Documentation: Help improve this README or add code comments
- Testing: Test the project on different hardware configurations
- Follow Arduino coding standards
- Add comments for complex functions
- Test thoroughly before submitting
- Update documentation if needed
This project is open-source and available under the MIT License. Feel free to use, modify, and distribute according to the license terms.
- Project Source: CircuitDigest - Digital Notice Board using P10 LED Matrix Display and Arduino
- DMD Library: GitHub - freetronics/DMD
- TimerOne Library: GitHub - PaulStoffregen/TimerOne
- Interfacing MAX7219 LED Dot Matrix Display with Arduino
- Interfacing WS2812B Neopixel LED Strip with Arduino
- Interfacing WS8211 RGB LED Strip with Arduino
- Arduino Projects
- Arduino Official Documentation
- P10 LED Module Datasheets
- SPI Communication Protocol
- PWM Control Techniques
Made with ❤️ for the Arduino Community
Happy Building! 🚀