What are AJAX and APIS ?
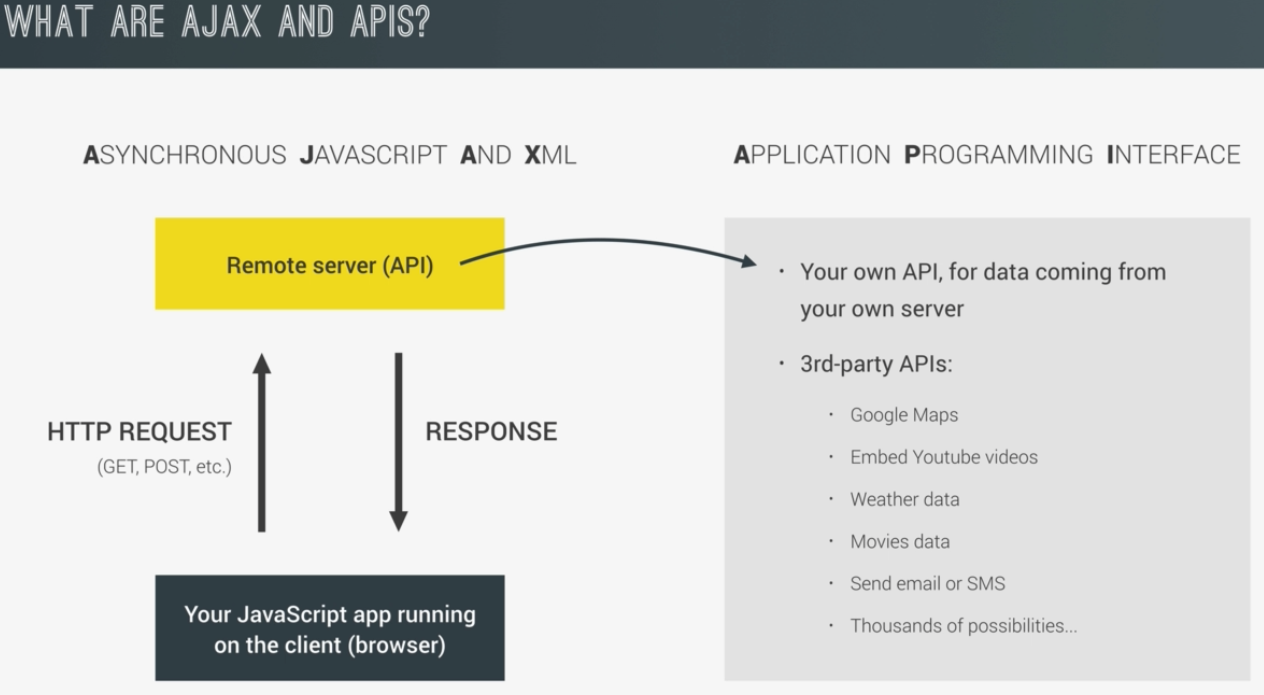
- Stands for Asynchronous Javascript and XML
- Allows us to communicate with Asynchronous Servers
-
Stands for Application Programming Interface
-
On a very high level is basically a piece of software that can be use by another piece of software in order to allow applications to talk with each others.
-
An API is not a Server itself but a part of the Server, an application which receives a requests and sends back responses.
-
There are 2 types of API's that you can use in Javascript:
 1. Your own API, for data coming from your own server
 2. 3-rd Party API's:
       - Google Maps
       - Embedded Youtube Videos
       - Weather Data
       - Movies Data
       - Send email or SMS
-  ls - shows the files contained in a Folder
- mkdir 'folder Name' - to create a new Folder
- rm - r - Delete a file(rm) or a folder and its containg files(rm -r)
- clear - to clear the terminal console
- mv - to move a file into another Folder
- touch 'file name' - creates a new file
- npm init - creates a package.json file( contains information about the Project for npm )
- npm install webpack --save-dev - in order to install packages ( what --save-dev means is that it
     will save webpack as a development dependency of our Project). When used without -dev that package
     it will be saved as a dependency and not as a development dependency.
- npm install - will install all the development dependency and
                non dependency as specified in your package.json file;
- npm uninstall packageName --save - command used to uninstall a package;
- npm run SCRIIPT-NAME - command used to run an npm script
- ! + tab - Write exclamation point + hit the tab, writes a pre-formatted HTML skeleton.
What is Webpack?
-
Most commonly used Asset Bundler which bundles not only javascript files but also all kind of assets like Images, Javascript, CSS;
-
Also webpack support 0 configuration file where you don't even need to write a configuration file. If you wanna do that all you need is to have one source folder in the root and then in there one index.js file; Webpack will created a distribution folder and put the bundled file in there. This option is just for really small Apps, for more complex Apps it is recommended to write your own Configuration;
-
Also in Webpack we have production and development MODE property.
- Development mode - simply build our bundle without minifying our code, in order to be as fast as possible but not compressed;
- Production mode - enables all kind of optimization liek minification and tree shaking in order to reduce the bundle final size.
-
To write your own webpack configuration file just go in your main src folder and add a file called webpack.config.js, which is just a regular js file in which your write your code for config:
    //write the Object in which you specify your settings, configurations:
    // you need to export this Obj from this file via using node js syntax
    // Now to create this configuration we need to know that in webpack there are 4 core concepts:
    //  - Entry Point
    //  - Output
    //  - Loaders
    //  - Plugins

    const path = require('path'); //Includes a build in module

    module.exports  = {
      // 1. Entry Property
      //Starting with the entry point all we need to do is to specify the Entry Property in this Object.
      // The Entry point is where the Webpack will start the Bundling,
      //  so basically this is the file where it will start looking for all
      //       the dependencies which it should then bundle together.
      //    Also here we can specify one or more entry files:
    entry: './src/js/index.js',

      // 2. Output Property
      // Tells webpack exactly where to save our bundle file.
      // Basically in here we pass an object, in which we put a path and filename properties
      //            which takes as values the path to the folder and file name.
      output: {
       // The Path needs to be an absolute Path
       // In order to have access to that Absolute Path, we need to use a build
       //          in node package, the one included at line 63.
       // Now we call the method included in the path as default build, which is called resolve()
       //  resolve() build in method, gives us access to __dirname variable
       //           - which stands for the current absolute path;
       //  so we use path.resolve(__dirname) to join the current
       //            absolute path with the one that we want our bundle to be in:
        path: path.resolve(__dirname, 'dist/js'),

        //standard name for webpack output
        filename: 'bundle.js'
      },

      mode: 'development'

    };
- In order to test out our webpack file config, we need to create a new Javascript file, create a test.js file and export( use the official ES6 export default syntax) a piece of code and then go ahead in your javascript entry file and import the newly created module, see example below:
    //creating a new js file - test.js and adding some code
    console.log(`This file is being imported!`)

    //using the ES6 syntax for exporting:
    export default 22;


    // going back in my entry point file - index.js, I am importing the newly created module:
    // Attention:  When we import from a module we don't even need to specify the file extension.
    //             What is exported from the module is stored in the variable number
    import number from './test';

    //Keep in mind that this code it won't even work in the browser if we didn't use
    //        webpack(or any other bundler),
    //        since the webpack does the bundling and joining files job;
    console.log( ` I imported ${number} from another module`);

//- Install webpack command line interface usinng the command line: npm install webpack-cli
- Next step is to go to package.json and add an npm script, i called it npm to call the webpack and run the newly created npm script(npm run dev), like in the example below:
      {
        "name": "forkify",
        "version": "1.0.0",
        "description": "Forkify Project",
        "main": "index.js",
        "scripts": {
          //npm script calls the webpack
          //as soon as we start the npm script called dev it will then open up the webpack,
          //  look up at our file confing and then do the work that we specified there.
          // It will read our entry file, do it's work ahd output it in bundle.js as we specified in the config.
          // Why do we have to use an npm script for this? - Well because this the the best way
          //      to lunch our locally installed dev dependency.
          //We can also set the Webpack mode here -  this one is for development
          "dev": "webpack --mode development",

          // npm script which runs webpack with the mode setted to production
          "build": "webpack --mode production"
        },
        "author": "Cosmina Palade",
        "license": "ISC",
        "devDependencies": {
          //here we only have webpack but we also need webpack command line interface
          "webpack": "^4.28.3",
          "webpack-cli": "^4.28.3"
        }
      }

  Command Line: npm run dev
For optimization we can use webpack dev server to our setup in ordert to automatically reload the page when we save our code. So besides all the amazing functionalities included in webpack it also provides us with a development server, which automatically bundles all our javascript files and then reloads the App in the Browser. Since is an npm package we have to install it via the following command line: npm install webpack-dev-server --save-dev as shown below:
      {
        "name": "forkify",
        "version": "1.0.0",
        "description": "Forkify Project",
        "main": "index.js",
        "scripts": {
          "dev": "webpack --mode development",
          "build": "webpack --mode production"
        },
        "author": "Cosmina Palade",
        "license": "ISC",
        "devDependencies": {
          "webpack": "^4.28.3",
          "webpack-dev-server": "^3.1.14"
        },
        "dependencies": {
          "webpack-cli": "^3.2.1"
        }
      }
Now we have to Configure our dev server and for this we have to go back to webpack.config.js file and add another property named "devServer" in which we pass an Obj literal with a set of properties to spcify the configuration as shown in the example below:
     const path = require('path');

     module.exports = {
         entry: './src/js/index.js',
         output: {
             path: path.resolve(__dirname, 'dist/js'),
             filename: 'bundle.js'
         },
         devServer: {
             //here we specify the folder from which webpack should serve the files:
             contentBase: './dist'
         }

     }
- Next step is to create a npm script usually called start - which will always be a script which keeps running in the background and updates the browser as soon as we change our code.
    {
      "name": "forkify",
      "version": "1.0.0",
      "description": "Forkify Project",
      "main": "index.js",
      "scripts": {
        "dev": "webpack --mode development",
        "build": "webpack --mode production",
        // by specifying open what it actually does it opens the page in the Browser
        "start": "webpack-dev-server --mode development --open"
      },
      "author": "Cosmina Palade",
      "license": "ISC",
      "devDependencies": {
        "webpack": "^4.28.3",
        "webpack-dev-server": "^3.1.14"
      },
      "dependencies": {
        "webpack-cli": "^3.2.1"
      }
}- Next step is to optimise our configurations even better byu adding Plugins, because rememeber in Webpack we have 4 major configurations which we can set - Entry Points, Outputs and Plugins.
What are Plugins? - Allow us to do complex processing of our input files, in this case index.html, for this we have to use a plug-in called HTML Webpack Plugin and in order to use it you need to install it. The Command line for it is:
npm install html-webpack-plugin --save-dev
Just like before we have to require this package and save it in a variable:
    {
      "name": "forkify",
      "version": "1.0.0",
      "description": "Forkify Project",
      "main": "index.js",
      "scripts": {
        "dev": "webpack --mode development",
        "build": "webpack --mode production",
        "start": "webpack-dev-server --mode development --open"
      },
      "author": "Cosmina Palade",
      "license": "ISC",
      "devDependencies": {
        "html-webpack-plugin": "^3.2.0",
        "webpack": "^4.28.3",
        "webpack-dev-server": "^3.1.14"
      },
      "dependencies": {
        "webpack-cli": "^3.2.1"
      }
}- FINAL STEP - is to Integrate Babel into our workflow, to complete the setup.
What is BABEL? - Babel is a Javascript Compiler making possible the use of next generation Javascript.
Setting Up Babel: In order to make Babel work you need to:
(1) Dowload Babel packages; (2) Add the settings for Babel in webpack.confi file; (3) Create a Babel config file.
STEP (1) Dowload Babel packages: npm install babel-core - which contains the core functionalities of the compiler; npm install babel-preset-env - Babel preset which takes care that all the modern JavaScript features are converted back to ES5; npm install babel-loader - Needed for Webpack to actually load Babel files;
NOTE: You can install many packages in the same command
   //installing multiple packages with the same commanand line:
   npm install babel-core babel-preset-env babel-loader --save-dev
STEP (2) Add the settings for Babel in webpack.confi file:
What does the Loaders in Webpack do?
- Allows us to import or load all kind of different files and more importantly to process them(like converting SASS to CSS Code or convert ES6 to ES5 Javascript);
What do we have to write in the webpack.config file in order to enable the Babel compiler?
- We enable it by using the module.exports module property and asign it an Object in which we pass the property rules. The rules property receives and array with all the loaders that we want to use - see example below:
 //in webpack.config.js add the following properties:

module.exports = {
   entry: './src/js/index.js',
   output: {
       path: path.resolve(__dirname, 'dist'),
       filename: 'js/bundle.js'
   },
   devServer: {
       //here we specify the folder from which webpack should serve the files:
       contentBase: './dist'
   },
   module: {
       rules: [
           {
               //Regular expression testing for all the Javascript files
               //  The test is looking for all the files and check if they end in js
               test: /\.js$/,
               //excludes anything that is a node modules folder
               // if we wouldn't do that, than Babel would apply to all of the thousands
               //    Javascript files inside node
               exclude: /node_modules/,
               use: {
                   loader: 'babel-loader'
               }
           }
       ]
   }
STEP (3) Create a Babel config file:
Just create a new file with the name .babelrc which will be automatically recognized by the IDE as babel 6 file. In here all we pass is just an Object. The .babelrc file is just a dot file and not a javascript file. Here is the full setup:
    {
        // preset is a collection of code transform plug-ins,
        // they are piece of code which apply transformation to our code
        "preset": [
            //stands for environment which is the Browser
            // corresponds to babel-preset-env
            "env", {
                "target": {
                    "browsers": [
                        //Babel automatically figures out which ES6 features
                        // needs to convert in order to work on
                        // the last five verions of all the browsers
                        "last 5 versions",
                        "ie >= 8"
                    ]
                }
            }
        ]
    }
Also we need to install polyfill babel package, since there are things that we cannot really convert since they were not present in the ES5 version of Javascript Language. That's why they need to be pollyfilled for example promises, methods like array.from, all the enhancements which were not present in ES5; Promises are not present in ES5, but what we can do is to write some ES5 code that basically implements the promise in ES5 so that we can use it in our Project, which is exactly what a polyfill does.
In order to use a Polyfill we need to install another package:
  //we are using --save because this is a real dependency which will go in our final bundle
  npm install babel-polyfill --save
Next Step is to add 'babel-polyfill' in the entry point in webpack.config.js file, as shown below:
      module.exports = {
          entry: ['babel-polyfill','./src/js/index.js'],
          output: {
              path: path.resolve(__dirname, 'dist'),
              filename: 'js/bundle.js'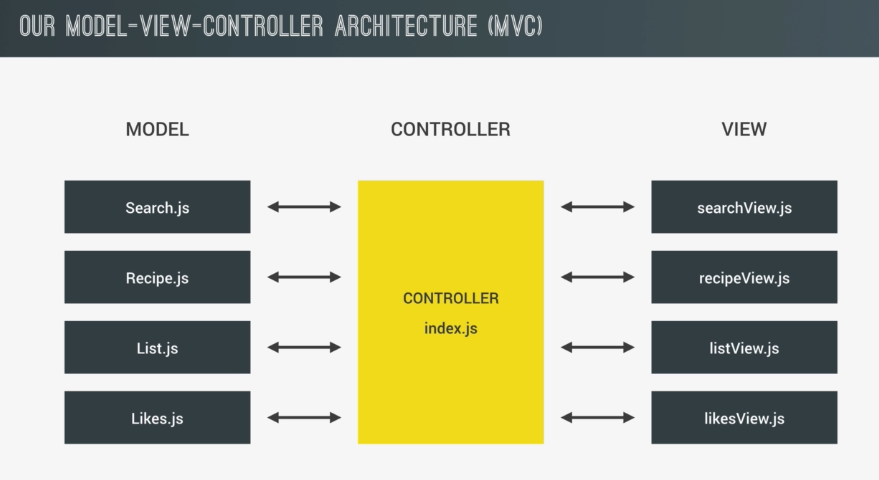
}Widely used and well known architecture, Model Vioew Controller Architecture(MVC) has its main advantage that it very nicely decouples the Presentation logic from the Application logic with a Controller in between them, that controls the entire App. MVC is possible thanks to ES6 Modules, which allows us to make our Javascript Apps more modular by separating different aspects of the App into different files.
For example let's say we have a Search functionality. We will have a Search Module in which we do the Ajax Calls to get the recipes for a certain search query from an API. And on the other hand we have the Search View where we get the search query string from the user interface and also where we print the results of the search. The last and most important piece of the MVC puzzle, is the Controller which brings Search Module and Search View together, working like a glue between them.
So Model and View never actually have to communicate, which makes the entire App more modular and easier to maintain. The Model is always concernead about the data and the apps logic, while the View gets and displays data from and to user interface.
What is an API?
- an API key it's like a password given to each user, unique ID which each user can use in order to make requests, so that the API can track how many requests you make per day( Usage: 0 / 50 ) as shown in the example below:

Instead of fetch(), you can use a very knowm HTTP library called axios, since fetch doesn't work in all browsers. To install axios just type the command below:
npm install axios --saveWhat are the advantages of using Axios?
- Automatically returns json
- Better at error handling;
- Works in all the broswers
Example of AJAX Call using the axios method:
import axios from 'axios';

export default class Search {
   constructor ( query ) {
       this.query = query;

   }

   async getRecipes () {

       // add your api key into const key
       const key = 'XXSSOOOO124343';
       // enables cross-origin requests to anywhere.
       const proxy = 'https://cors-anywhere.herokuapp.com/';
       const url = "https://something/api/search?"

       console.log(`Asyn fn call follows in several moments:`);
       try {

           const res = await axios(`${url}?key=${key}&q=${this.query}`);

           //encapsulating the result inside the Search Object
           this.data = res.data.recipes;

           console.log(this.data);

       }
       catch (error) {
           alert (error);
       }

   }

}
What is State? - imagine our final App running with all the search queries, recipies, likes, and shopping list. All of the below questions represent the state of the App, at a given moment.
- What is the state of our App in any given moment?
- What is currently in the customer's shopping list?
- How many servings are currently calculated?
- What is the current seach query?
- What is the current recipe?
All this data is a State and we want them to be in one central place, in one central variable liek an Object in which we have all the data that defines our App, in a given moment in one place and in one Object. There are entire state management libraries in Redux used with React, ngRX in Angular7.