实验环境:
- Ubuntu22.04
- RTX3060
实验设备:
- 小米13(Android)
- Realsense D455
一句话总结就是,使用我的手机连接realsense去室外录制相关离线数据(.bag格式),然后转换成ElasticiFusion的.klg格式进行三维重建。
过程中还是遇到了不少坑的,比如深度图的尺度以及编码问题,导致一开始的重建总是不顺利。
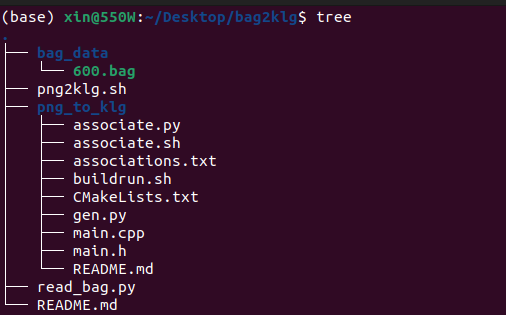
目录组织:
这里的代码主要参考了https://github.com/HTLife/png_to_klg
- CMake
- Boost
- zlib
- libjpeg
- OpenCV
==在编译之前要修改 main.cpp 下第45行的 depth_scale 为1000,realsense默认是1000==
build
cd png_to_klg
mkdir build
cd build
cmake ..
make建议使用虚拟环境
numpy
pip install numpyrosbag
pip install --extra-index-url https://rospypi.github.io/simple/ rosbag
pip install roslz4 --extra-index-url https://rospypi.github.io/simple/
cv_bridge
-
下载源码https://codeload.github.com/ros-perception/vision_opencv/zip/refs/heads/noetic
-
cd至cv_bridge文件夹
-
然后命令行安装
python setup.py install
sensor_image and geometry_msgs
pip install sensor_msgs --extra-index-url https://rospypi.github.io/simple/
pip install geometry_msgs --extra-index-url https://rospypi.github.io/simple/
rospy
pip install -i https://pypi.douban.com/simple rospycv_bridge.boost
在这里下载 https://github.com/rospypi/simple/raw/any/cv-bridge/cv_bridge-1.13.0.post0-py2.py3-none-any.whl
pip install cv_bridge-1.13.0.post0-py2.py3-none-any.whl- run read_bag.py
python read_bad.py -n YourBagFile -d YourDepthTopic -r YourRGBTopic - 根据提示修改 png2klg.sh相关参数
cd png_to_klg
# set  the path for the depth.txt and rgb.txt.  ** feed the depth file first and then rgb file **
python associate.py ../bag_data/600/depth.txt ../bag_data/600/rgb.txt > associations.txt
# to copy the associations.txt to your your_bag_data's path
cp associations.txt ../bag_data/600/associations.txt

cd build
# -w is the extracted rgb and depth images's path -o is the output
./pngtoklg -w ../../bag_data/600 -o ../../bag_data/600/600.klg -t
- run png2klg.sh
sh png2klg.sh最后的目录应该是这样:
- 使用编译好的 ElasticFusion运行
./ElasticFusion -l 600.klg


