Context here
Colour detection is the process of detecting the name of any color from the sample image. Simple isn’t it? Well, for humans this is an extremely easy task but for computers, it is not straight forward. Human eyes and brains work together to translate the light into the color. Light receptors that are present in our eyes transmit the signal to the brain. Our brain then recognizes the color . Since childhood, we have mapped certain lights with their color names. We will be using the somewhat same strategy to detect color names. Here is the project:
◼ About the Python Project
In this color detection Python project, we are going to build a color detecting through image application through which you can automatically get the name of the color by clicking on them. So for this, we will have a data file that contains the color name and its values. Then we will calculate the distance from each color and find the shortest one.
◼ The Dataset
Colors are made up of 3 primary colors; red, green, and blue. In computers, we define each color value within a range of 0 to 255. So in how many ways we can define a color? The answer is 256256256 = 16,581,375. There are approximately 16.5 million different ways to represent a color. In our current dataset, we need to map each color’s values with their corresponding names. But don’t worry, we don’t need to map all values. We will be using a dataset that contains RGB values with their corresponding names. The CSV file for our dataset has been taken from this link: Colors Dataset The colors.csv file includes 865 color names along with their RGB and hex values.
◼ Prerequisites
Before starting with this Python project with the source code, you should be familiar with the computer vision (CV) library of Python that is OpenCV and Pandas. OpenCV, Pandas, and numpy are the Python packages that are necessary for this project in Python. To install them, we have to simply run this pip command in your terminal:
Steps for Building a Project in Python – Color Detection Here are the steps to build an application in Python that can detect colors from a image:
The project folder contains 3 files:
- Color_detection.py – main source code of our project.
- Colorpic.jpg – sample image for experimenting.
- Colors.csv – a file that contains our dataset.
We are using the argparse library to create an argument parser. We can directly give an image path from the command prompt as below:

The pandas library is very useful when we need to perform various operations on data files like CSV. pd.read_csv() reads the CSV file and loads it into the pandas DataFrame. We have assigned each column with a name for easy accessing.

First, we created a window in which the input image will display. Then, we set a callback function which will be called when a mouse event happens.

It will calculate the rgb values of the pixel which we double click. The function parameters have the event name, (x,y) coordinates of the mouse position, etc. In the function, we check if the event is double-clicked then we calculate and set the r,g,b values along with the x,y positions of the mouse.
We have the r,g and b values. Now, we need another function which will return us the color name from RGB values. To get the color name, we calculate a distance(d) which tells us how close we are to color and choose the one having minimum distance.
Our distance is calculated by this formula:
d = abs(Red – ithRedColor) + (Green – ithGreenColor) + (Blue – ithBlueColor)

Whenever a double click event occurs, it will update the color name and RGB values on the window.
Using the cv2.imshow() function, we draw the image on the window. When the user double clicks the window, we draw a rectangle and get the color name to draw text on the window using cv2.rectangle and cv2.putText() functions.

The beginner Python project is now complete, you can run the Python file from the command prompt. Make sure to give an image path using ‘-i’ argument. If the image is in another directory, then you need to give full path of the image:


Double click on the window to know the name of the pixel color With these lines, we named our window as ‘image’ and set a callback function which will call the draw_function() whenever a mouse event occurs.


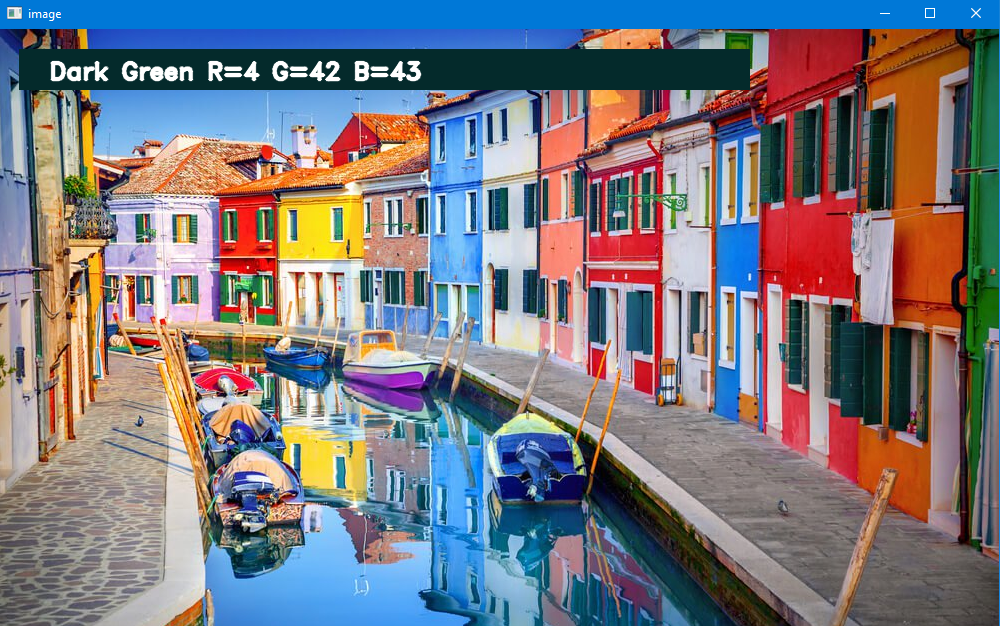 Outputs for the same.
If any suggestion or issue, feel free to post it in issue section !! Thanks !! More projects works on similar concept