This code is to get you started on our Week #5 Homework Assignment. If you need any help with the assignment, GitHub, or anything else, please feel free to reach out in Discord and one of the mentors will be happy to help you. Not sure if you're in the right place? Head back to the main preseason repository. You can also view the lesson plan
To get started on this assignment, you'll want to fork this repository, then clone it onto your local computer. Once you have it on your local computer, you should be able to get started editing in Visual Studio Code. All of the required plugins have already been setup in person.
Install GitHub Desktop from this link. We will be using this to manage and upload our code using "commits". We'll learn more about this in person as we approach kickoff. Sign in to GitHub Desktop with the GitHub account that you used to join our team's GitHub Organization. If you need help getting setup, reach out to us in Discord.
Next, we need to make a fork of the starter code repository. A fork is basically copying existing code from one repository, and making another repository with the same code that you are able to edit. This way, you will be able to make your own improvements. Then, once you've finished, you'll be able to merge the code back into the original repository using a pull request. We'll go over this more in depth later.
tip: This process will be easier if you create a create a duplicate of this tab (i.e. have two of these pages open at the same time). That way you can refer to the guide while you are forking the repository.
To fork the repository, start on the page for it on the GitHub website. You are first going to want to scroll to the top of the page and press the fork button.

Next, create a name for your fork of the repository, and click Create fork. The name doesn't have to be the same as the name of the current repository.

Great! Once the fork is finished creating itself, you should be all set to clone the code onto your own computer.
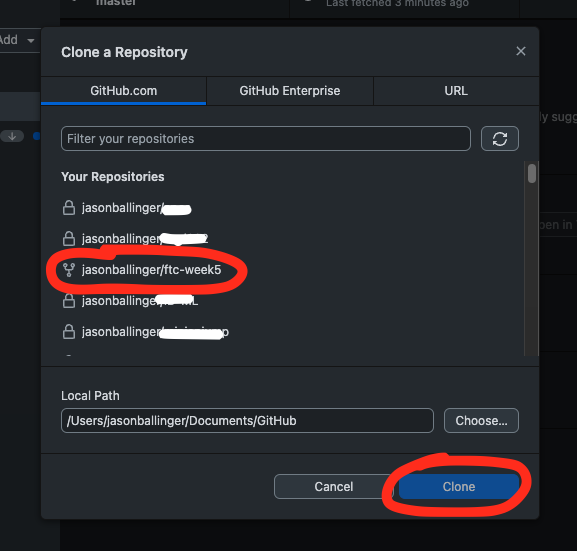
To clone the repository, open GitHub Desktop on your computer (the app you installed in Step 1). Click on Current Repository >> Add >> Clone Repository.

In the screen that pops up, select your fork of the Week 5 Starter Code repository and press clone.
Once you have the repository cloned, make sure you select "For my own purposes" on the screen that pops up.

Then, to get started editing, select "Open in Visual Studio Code". If the button says an editor other than Visual Studio Code, make sure to change it by clicking on preferences first.

You're now ready to start working on the assignment!
Download as PDF or view on Google Drive
We are going to be using Classes, Constructors, and Inheritance to create a library of books! We will include different types of books in our library, and we will touch on Arrays in order to organize them. If you are stuck or having trouble at any time, please feel free to reach out and we will be happy to help.
Please make sure that you have forked and cloned the repository from GitHub. You can view instructions on how to do that in the starter code’s README, which you can find towards the bottom of the page here.
As for the code, you are already provided with all of the files you will need in order to complete the assignments. Let’s start by looking at the Book class.
The Book class is mostly filled in for you, and should look like a review from Week 5’s lesson.
- Please fill in the blank constructor and the constructor that provides input parameters.
- Write the method that compares the price of two books. This method should return a boolean, and use an if statement to compare the price of “this” book and the book that is passed in as a parameter to the method.
The Textbook class is different from the Book class in that it has “editions” that can expand upon each other. The Textbook class extends the Book class, which means it contains all of the properties of the Book class, but has some of its own as well. Read more about inheritance in java. In your own words, explain the “extends” keyword on line 4, explain the “super” keyword on line 12, and explain “@Override” on line 29.
-
First, we want to finish the constructors for the class. Please initialize the edition variable in both constructors, and use super() to initialize title, author, and price in the second constructor.
-
Next, write getter and setter methods for edition at the end of the Textbook.java file. If you are confused about getter and setter methods, please refer back to the Book class.
-
Write the Override for the toString method. We essentially want to copy the toString method in the Book class, but include additional information that a Textbook would have compared to a Book.
-
Lastly, we want to write the canSubstituteFor method. The conditions for the method are as follows:
-
We take Textbook t as a parameter and we are returning a boolean
-
A textbook can be a substitute if it has the same title and it is a newer edition than the parameter textbook.
-
Example: Textbook bio2019 and bio2015 have the same title, but have a different title than math2023. bio2019’s edition is 3 while bio2015’s edition is 2.
bio2019.canSubstituteFor(bio2015) should return true

bio2015.canSubstituteFor(bio2019) should return false

bio2019.canSubstituteFor(math2023) should return false
-
Write the FictionBook class on your own. A FictionBook class should include
- All the same parameters of a Book class (FictionBook will extend the Book class)
- A genre variable (String)
- A gradeLevel variable (Integer)
- An empty constructor and a constructor with parameters, both utilize super()
- An @Override for toString to contain the additional information that a FictionBook contains
- Getter and setter methods for genre and gradeLevel
- A boolean method that checks if two books are the same genre
- Three boolean methods: one that checks if two books’ grade levels are equal, one that checks if the parameter book’s grade level is lower, and one that checks if the parameter book’s grade level is higher
As a bonus, create another class that extends the Book class. This book contains your own parameters and methods that you come up with. Ideas include a ChildrenBook class, a ColoringBook class, and an Encyclopedia class.
In the library class, we are using an object called ArrayList<Book> to store our books. An ArrayList is an Array but with an undefined length. Normal arrays have a length that you must define, and we want our library of books to be able to grow and shrink as we need it. So, we use an ArrayList instead of a regular Array. You won't need to worry too much about ArrayLists. We won't be coming across them much this season. However, if you are interested, feel free to play around with ArrayList and look up more information or documentation on it!
- Write the method printBooks(). This method should call toString() for all books that are in the library.
- Finish the method sumOfPrices(). Write the method, which calculates the sum of prices of all the books and returns an integer.
For these tasks, you may want to use a for loop to iterate over the length of the ArrayList.
Now, the main class. Let’s wrap the program all together. Here are the steps you have to complete:
- Initialize a new library. This is as simple as creating a new library object. The library constructor takes no parameters.
- Create books. Create a few books, preferably at least one of each type of book you made. Initialize them with all the proper variables - do not leave their values to be the default values initialized by the blank constructor.
- Add all the books to the library. One by one, add all of the books to the library object using library.addBook(Book). As a bonus - try and optimize this so that you can add the books to the library faster.
- Print all the books in the library. Call the method that prints all of the books in the library.
- Print the sum of the prices of all books in the library. You may want to use a print method since the method you will be calling returns an integer.
Run the program! If you get any errors, try and debug them yourself and get the program working. If you finish earlier in the week or you felt that this assignment wasn’t challenging enough, feel free to try to expand the project - how could we make things more efficient?
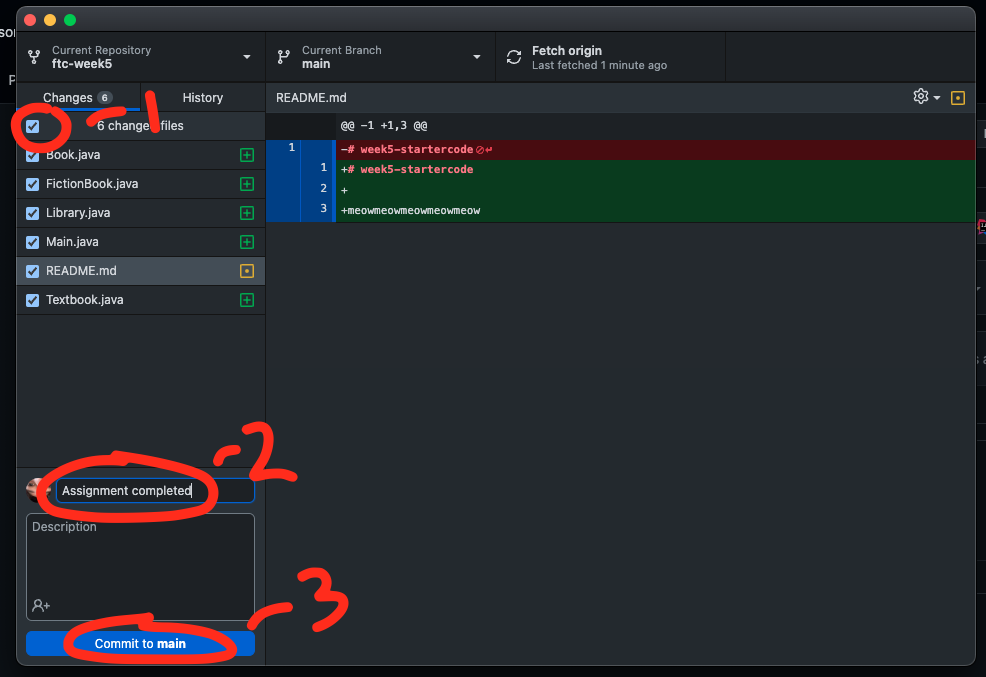
To submit, reopen GitHub Desktop and make sure all the changed files are checked. Type "Assignment completed" in the box labeled #2 in the picture, and press "commit to main"
Then click "Push origin" to upload your changes to your GitHub repository.

Navigate to YOUR FORK of the starter code on GitHub. Then, in the section that says "This branch is 1 commit ahead, x commits behind", click on "Contribute" and then "Open pull request"

On the next page that opens, type your full name in the box labeled #1, followed by "Assignment completed". The "Assignment completed" should already be there from your commit on your previous repository. Once that is complete, press "Create pull request"

Once this goes through, you have successfully submitted your assignment. If you need any help, please feel free to reach out through Discord. Congratulations on finishing your first solo Java assignment!