Rendering Profiles
These profiles determine how your series of snapshots will be turned into a timelapse. You can set the timelapse to have a fixed length (say 5 seconds) or use a constant FPS. You can add pre or post-roll frames so that your timelapses don't start or stop abruptly. The default output is MP4, which is required in order to (optionally) synchronize with the default timelapse plugin. When synchronizing with the default plugin, your timelapses will appear in the native timelapse plugin tab after rendering is complete.
click to see the tab
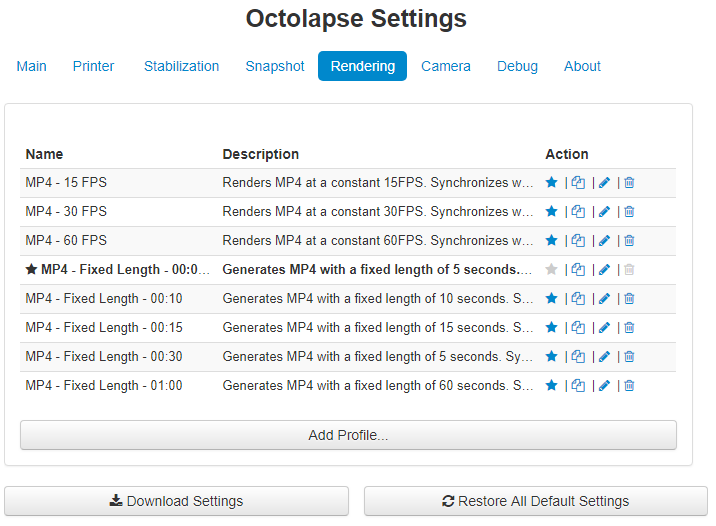
You can get to the rendering profiles by opening the Octolapse settings and clicking on the 'Rendering' tab.
click to see the profile
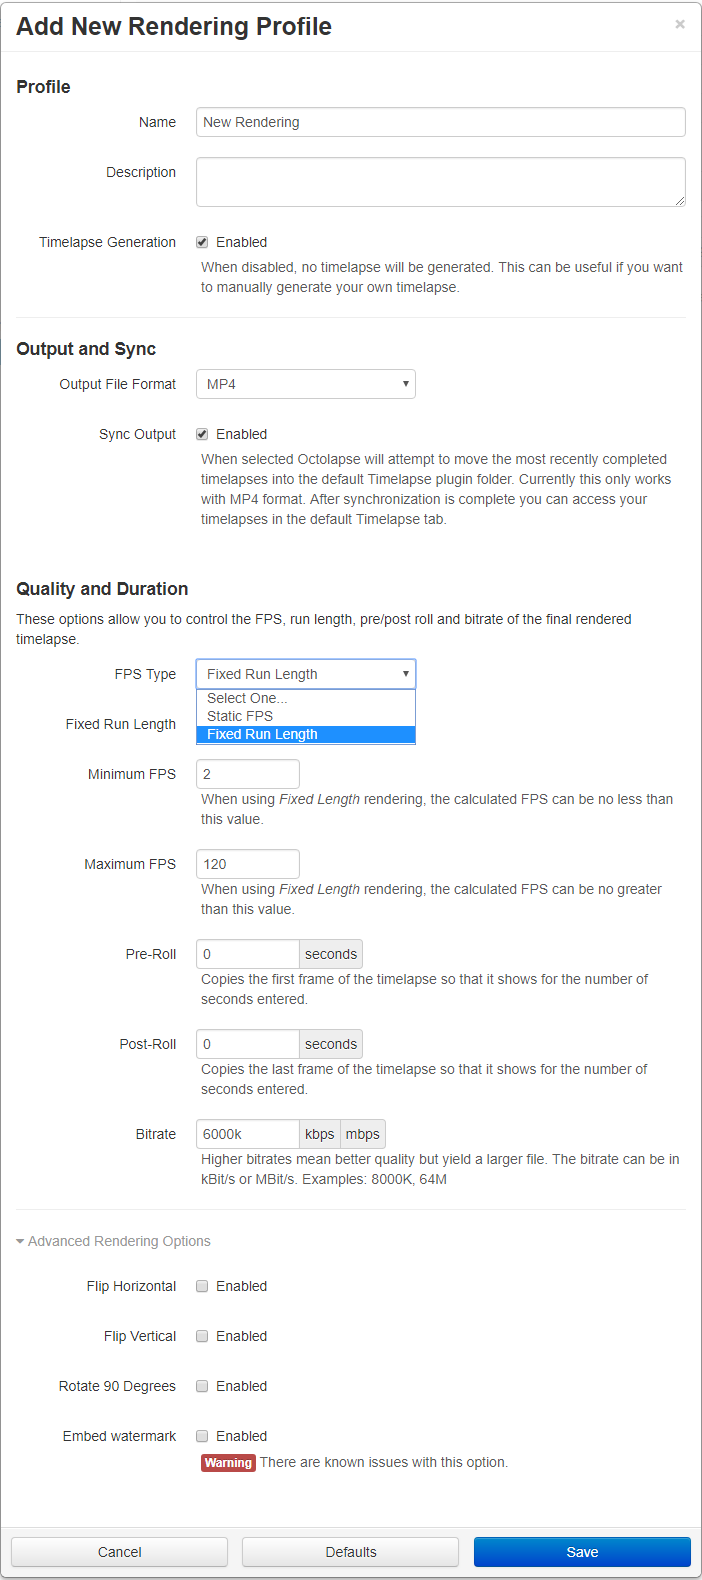
Enable or disable rendering completely if you only want to take snapshots.
Choose the output format. Pick MP4 if you want your timelapses to synchronize correctly with the build-in plugin. Let me know if you have any format requests. If they are easy to implement and there is demand, I'll consider adding them. Be sure to create an issue in the repository for your feature request. This is a really good idea because Octolapse currently has no native file browser for timelapse video.
This only works when using MP4 video (need to look into this), but is HIGHLY recommended since Octolapse has no built in file browser.
Octolapse has two methods for determining the rendered video's framerate. You can either choose a static framerate, or you can have Octolapse automatically adjust the framerate to achieve a video with a fixed length.
Fixed run length video features a calculated FPS so that your timelapses have the proper duration. Please note that pre and post roll time is NOT included, and that the Minimum and Maximum FPS will be applied if the calculated FPS is higher or lower than these settings.
For example, a 10 second fixed length video with 1 second of pre roll and 1 second of post roll and 100 frames will be 12 seconds long at 10 FPS
that will fit to the Choose from Fixed Run Length or Fixed FPS (Frames per Second).
The number of seconds, not including any pre or post roll, that the timelapse be after rendering. A fixed run length is achieved by changing the number of frames per second.
When calculating a fixed run length, this will be the lowest framerate allowed.
When calculating a fixed run length, this will be the highest framerate allowed.
The entered FPS will be used regardless of the number of snapshots taken.
Pre-roll can be used to eliminate an abrupt start to your timelapse by copying the first snapshot. Currently pre-roll does NOT take a video. The first frame will be visible for the number of seconds entered.
Post-roll can be used to eliminate an abrupt end to your timelapse by copying the final snapshot. Currently post-roll does NOT take a video. The first frame will be visible for the number of seconds entered.
This determines how much data is packed into every second of video. In general a higher bitrate video will be better quality than a lower one. However there are diminishing returns for higher (and lower) bitrates, and your final video will never exceed the quality of the snapshots used.
Here you can upload a custom watermark image and embed it within your timelapse. Select 'enabled' here to embed the selected watermark.
Add an text overlay using various tokens to add some interesting information to your final rendering.
Any text entered here will appear within your final rendering. There are several replacement tokens that can be used to embed information about your print.
- {snapshot_number} - Starting with 1, this token will be replaced with the snapshot number of the current camera. If a camera fails to take an image for any reason this number will not be incremented.
- {current_time} - Shows the current time based on the internal clock of the computer running Octoprint
- {time_elapsed} - Shows how much time has passed since the start of the print
- More tokens are coming!
Here is a sample using all three of the available tokens:
Snapshot Number: {current_time}
Current Time: {current_time}
Time Elapsed: {time_elapsed}
This is the font size that will be used to render your text overlay. Keep in mind that larger fonts will likely be needed for higher camera resolutions.
Choose between top, bottom and middle (center) to align your overlay text along the vertical axis.
Choose between left, center and right to align your text along the horizontal axis.
When using multiple lines of text, use this option to either left, right, or center align the text within its bounding box.
This can be used to add some margins around your text.
Choose the color of your text here, including transparency.
Currently fonts are only automatically detected for Windows or Linux where fontconfig is installed. If you don't see any fonts here, overlay cannot be used. I am working on improving font detection.
If fonts are displayed, select one to use by clicking on it.
Here you can view a preview of your text overlay. Octolapse will attempt to grab an image from the first active webcam that it detects (DSLR support is not available here yet) and use it to generate the preview. If it cannot acquire an image it will use a 640x480 sample image.
This is a beta feature, but I've tested the default template extensively.
You can use several available tokens to build your output filename. The extension is automatically added, and the plugin will not overwrite any existing videos. If a duplicate is detected, octolapse will append the filename with the lowest number possible that will make the file name unique. For example, Video.mp4 would turn into Video2.mp4 if there is already a Video.mp4, Video1.mp4 and Video3.mp4
Here is the list of available tokens
- {FAILEDFLAG} - Will be replaced with FAILED if the print does not complete successfully
- {FAILEDSTATE} - Will be replaced with the failed state, or will be empty of the print is successful
- {FAILEDSEPARATOR} - If the print fails, this will be replaced with an underscore (_), else it will be empty
- {PRINTSTATE} - The end state of the print, whether it fails or succeeds
- {GCODEFILENAME} - The name of the gcode file without the extension
- {DATETIMESTAMP} - Unix epoch of the rendering time.
- {PRINTENDTIME} - YYYYMMDDHHMMSS formatted print end time, the same format used in the default timelapse plugin
- {PRINTENDTIMESTAMP} - Unix epoch representation of the print end time
- {PRINTSTARTTIME} - YYYYMMDDHHMMSS formatted print start time, the same format used in the default timelapse plugin
- {PRINTSTARTTIMESTAMP} - Unix epoch representation of the print start time
- {SNAPSHOTCOUNT} - The number of snapshots captured, excluding pre and post roll (I think)
- {FPS} - Frames Per Second of the rendered video as an integer (no decimal points)
The plugin attempts to verify the resulting filename, but there are some potential hazards. If the template fails for some reason your timelapse will be given the following name: RenderingFilenameTemplateError
If you have a failure, please send me an error report, and be sure to include the template you used!
Determines how many threads are used to render the resulting video. In general, the higher this number is the faster rendering will go. However, if you exceed the number of cores on your CPU this can actually hurt performance.
I recommend that you not use a value higher than NUMBER-OF-CORES - 1. For example, if you have a 4 core computer, setting this number to 3 is relatively safe. If you set it to 4 you might have problems running Octoprint while rendering (though printing while rendering is not recommended).