Create and publish Windows apps to your Intune endpoints
- See here for the up-to-date readme: (readme.md) https://github.com/ITAutomator/IntuneApp
- See here for the blog post (blog): https://www.itautomator.com/intuneapp
- See here for the admin guide: (pdf) https://github.com/ITAutomator/IntuneApp/blob/main/Readme%20IntuneApp.pdf
- Is this product used for a business? Become a sponsor: https://github.com/sponsors/ITAutomator
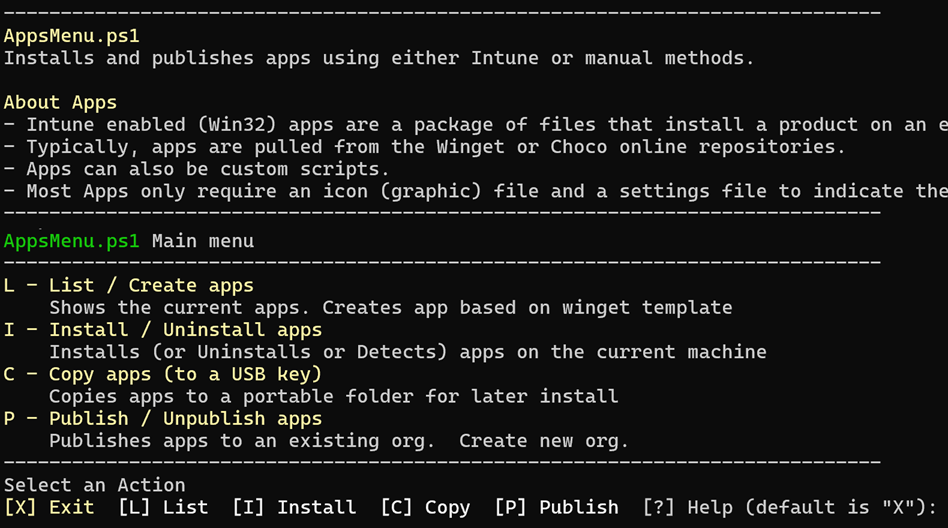
Main Screen
Download from GitHub as ZIP
Or Go to GitHub here and click Code (the green button) > Download Zip
Extract Zip into C:\Apps or a shared folder Z:\Apps (or anywhere)
Windows native security will block downloaded .cmd and .ps1 files.
This prevents them from running directly from Explorer (as a security measure).
You can unblock each .cmd manually via File > Properties > Unblock
Or use these steps to unblock all the code files at once:
Open Z:\Apps and double-click AppsMenu_Launcher.cmd (Click More info > Run anyway on the block message)
Choose [L] - List / Create apps
Choose [U] - Unblock any downloaded apps
This will test a simple package (7-Zip) on your machine.
Open Z:\Apps\7zip
Double click intune_command.cmd
Choose (D)etect – Look for the last line of info – it should say whether you already have 7zip.
Choose (I)nstall – This will install 7zip
Note: (D)etect, (R)equirements, (I)nstall, (U)ninstall are the four core Intune actions for Windows packages.
Here, you are able to run them manually to see what Intune does behind the scenes.
Open Z:\Apps and run AppsMenu_Launcher.cmd
Choose (I)nstall apps
On the list of apps that pops up, ctrl – click (select) one or more apps.
Choose (I)nstall
The installers should run for all the apps
This will prep your org for publishing
Choose (P) Publish to begin publishing
Choose (O) Org Prep to connect and prepare Org for publishing apps
Enter your org’s primary domain name.
Follow the prompts to install the publishing app in Entra.
ℹ️ A note about modules: These modules need to be on the publishing machine:
Microsoft.Graph
IntuneWin32App
Use the(M) Modulesmenu to install them, or install them manually.
Hint: Use theRelaunch as (A)dminoption so that modules are installed machine-wide.
This will publish / update apps in your org
- Choose
(P) Publishto begin publishing - Choose your org from the list of prepped orgs (see Org Prep above)
- On the list of apps that pops up, ctrl – click (select) one or more apps.
- After publishing the apps, look at the Intune list: Intune Admin > Apps > Windows
- Adjust the assignment groups (names start with IntuneApp): Entra Admin > Groups
This will push apps to endpoint machines
Published apps are assigned by these Entra Groups.
IntuneApp Windows Users
This is a special group where all mandatory apps get published.
Put all your Windows users in this group.
It is created as a static group, but can be changed to be dynamic (see dynamic below).
IntuneApp Windows Users Excluded
This is a special exclusion group to exclude people from all mandatory apps.
When first rolling out, you may want to make the include group dynamic for everyone, and statically add everyone to the exclude group. This will exclude everyone except for new users. You can then slowly remove people's exclusions to test that everything is working as expected.
IntuneApp <Appname>
Each app will have a group where you can add people that are supposed to get the app.
The app and all its required groups are created entirely by the code. You can adjust the created app, but it will be overwritten by any future updates applied by the code. To avoid getting overwritten, rename the app after making manual adjustments. But then no updates will be applied to the renamed app and the old app name will be re-created if it is again published.
The system creates all groups as static user groups (initally empty). Since all checking is done by name (rather than ID), the underlying structure of the created groups can be changed to device groups and / or dynamic groups and they will not be adjusted by the code.
Generally speaking, device groups should be avoided. A device will be considered to be a member of a user group as long as its primary user is a member of the group, which should be good enough and everyone's primary device will receive the app.
With user groups, the user should always get the assigned apps even if they are issued a new device.
App packages are structured in a way that's friendly to Intune.
The IntuneApp codebase facilitate installing and publishing apps.
For up-to-date information (and to download the IntuneApp system) see here: https://github.com/ITAutomator/IntuneApp
- Create a folder for all your apps
Z:\Apps - Copy the !IntuneApp folder here
Z:\Apps\!IntuneApp - Put the main menu here
Z:\Apps\AppsMenu_Launcher.cmdand.ps1 - Double-click the main menu (AppsMenu_Launcher.cmd)
- Choose
[L] List / Create apps - Choose
[B] Browse Winget libraryfor an AppID (e.g. Google.Chrome) - Choose
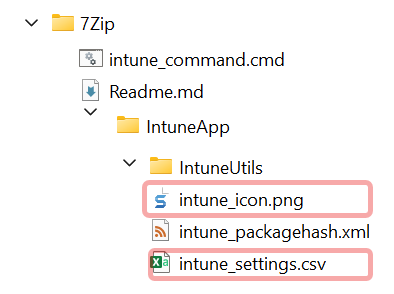
[C] Create a new app - Update the 2 required files
Z:\Apps\Google Chrome\IntuneApp\intune_icon.png,intune_settings.csv - Install, Test, Publish
- Test by running
intune_command.cmd(or choose[I] - Install/ Uninstall apps) Requirements- should sayREQUIREMENTS_METon any machine that can have the app (others will say Not available in Intune).Detected- should say Detected or not detected (if the app is already installed)Install- installs the appUninstall- uninstalls the app- Logs can be found in
C:\IntuneApp
- Must be done once per M365 tenant
- Choose
P - Publish/ Unpublish apps - Choose
O - Prepan Org for publishing - Creates the registered app (in Entra) required to publish:
IntuneApp Publisher - Requires admin credentials
- Choose
P - Publish app - Publishing your app does the following
- Puts the app in the company portal so users can self-install manually
- Creates your app in the Intune apps list https://intune.microsoft.com/
- Attaches up to 4 required groups (as per options set in
intunesettings.csv). The groups are created if not found, but existing groups are left as-is.IntuneApp Windows Users- Will receive mandatory apps (apps havingPublishToOrgGroup=TRUE) If you want this to be everyone, convert it to a dynamic group with the dynamic rules needed.IntuneApp Windows Users Excluded- Are excluded from aboveIntuneApp Google Chrome- Users that will get this app (and future versions) even if it isn't mandatoryIntuneApp Google Chrome Excluded- Users that will be excluded from this app (optional based onintunesettings.csv)
Use any of these methods to install your app(s)
- Copy the App folder to the target machine Downloads folder
- Run intune_command.cmd and choose Install
This is how you can manually install an app (as a user).
Published apps are available to users in the Company Portal app and can be installed from there (no admin rights are required).
Check the C:\IntuneApps folder on the endpoint for logging etc.
Admins looking to manually install can copy the individual app folders to the endpoint and run intune_command.cmd (see above).
- Copy the Apps folders to the target machine (e.g. to Downloads folder)
- Or use your USB-based installer (see below) and run from there
- Copy the !IntuneApp folder and the root AppsMenu files along with your apps
- Run AppsInstall.cmd to install multiple apps without stopping
- This is useful to set up a machine without waiting for Intune to install them in the background.
- Choose [C] - Copy apps (to a USB key)
- Copies your Apps to a thumbdrive folder (e.g.
D:\Apps). - Bring the thumbdrive to your target machine and run
AppsMenu_Launcher.cmdand choose I to install.
- Create the package for delivery
Zip the entire\IntuneAppfolder for delivery to your endpoint
Use the these commands to initiate the various actions
You can double-clickintune_command.cmdto see a menu to run them interactively - Install command
Powershell.exe -ExecutionPolicy Bypass -WindowStyle Hidden -File IntuneUtils\intune_install.ps1 -quiet - Uninstall command
Powershell.exe -ExecutionPolicy Bypass -WindowStyle Hidden -File IntuneUtils\intune_uninstall.ps1 -quiet - Detection command
Powershell.exe -ExecutionPolicy Bypass -WindowStyle Hidden -File IntuneUtils\intune_detection.ps1 -quiet - Requirements command
Powershell.exe -ExecutionPolicy Bypass -WindowStyle Hidden -File IntuneUtils\intune_requirements.ps1 -quiet
If an App is to be an Intune Required App for all users, two items need to be checked.
- The app’s
intune_settings.csvfile needs to havePublishToOrgGroup=TRUE.This will ensure theIntuneApp Windows Usersgroup is assigned to the app as required. - The
IntuneApp Windows Usersgroup membership must include the users, either statically or dynamically.
Normally, the IntuneApp Windows Users group should include everyone in the organization. However, manually maintaining a static group as users join the organization will be cumbersome.
Here's how to convert the IntuneApp Windows Users group from a static group (where users are manually added), to a dynamic group (that automatically includes everyone).
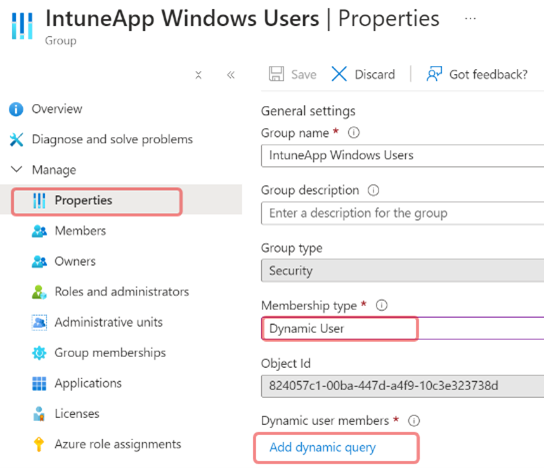
- Open the
IntuneApp Windows Usersgroup in Entra and click on Properties - Change the type from Assigned to Dynamic User
- Click Add Dynamic Query > Edit Query and paste the query from below.
This query means: All Licensed users, that are not disabled.
(user.assignedPlans -any (assignedPlan.servicePlanId -ne "[noplanplaceholder]" -and assignedPlan.capabilityStatus -eq "Enabled"))
-and (user.accountEnabled -eq True)
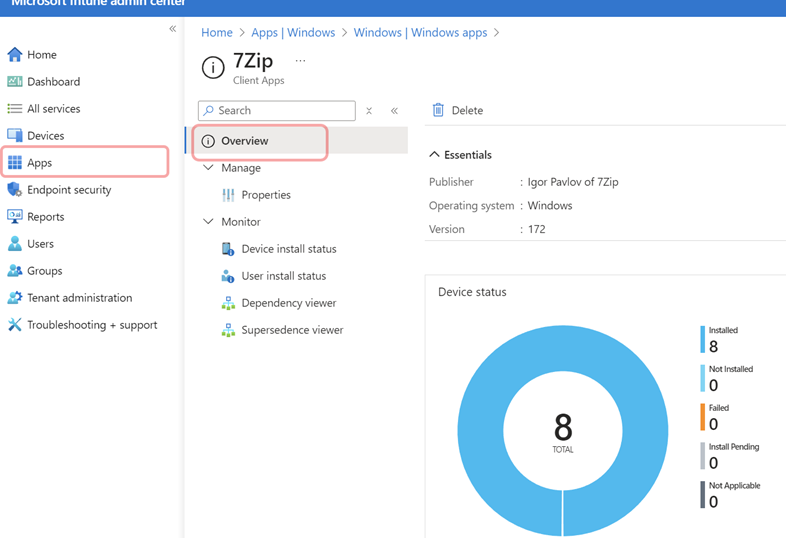
Open Intune Admin > Apps > Windows > (App) > Overview
This will show details about who has received the app
IntuneApp handles versions differently than native Intune versioning and dependency, which would be too complicated to maintain.
IntuneApp maintains versions within the intune_settings.csv file as follows.
During the publishing process, if any changes are detected since the last publish (using the content hash file), the AppVersion is automatically incremented. In Intune, the old app is erased and replaced with the new version of the App, and 0 devices will have it installed.
When Intune next checks in (every few hours), the detection process will determine if the new app is detected or not.
- If not, it will be installed.
- If its detected, the device count will be incremented in the App Overview section.
The default behavior of an IntuneApp is to detect based on the AppUninstallVersion in the intune_settings.csv file. If AppUninstallVersion is blank (the default), the app is considered detected if any prior version of the app has been installed.
If you are replacing a previously pushed version and you want to trigger a re-install for existing devices, you must change AppUninstallVersion to match the AppVersion. If you don’t adjust this, only new devices will get the new version of the app.
All logging and endpoint information is kept in the C:\IntuneApp folder, in csv and txt files.
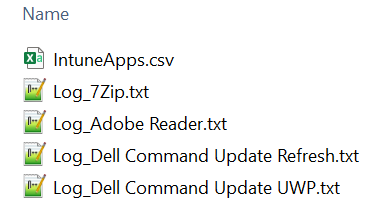
The Log *.txt files in the C:\IntuneApp folder show logging output from the scripts' Write-host commands.
- These files self-purge once they hit a certain size, so as not to impact disk space.
- Inspect the log files for debugging purposes.
- You should expect Intune's regular detection routine to update these files every few hours (when Intune makes sure the required apps are still installed).
The IntuneApp.csv in the C:\IntuneApp folder keeps track of installs and detections and versions.
If this file is deleted, all .ps1 installs will be considered undetected and will be installed again unless custom detections dictate otherwise.
For debugging purposes you can remove individual rows from the .csv file. This will trigger a re-detect as uninstalled and re-install the app.

The root package folder name (e.g. 7Zip) will be your App Name.
It must match the App name value in intune_settings.csv.
The root package folder contains:
- the
IntuneAppfolder with theintune_settings.csvfor core settings, theintune_icon.pngicon file, and other package files to install the app - the
intune_command.cmdwhich is an optional file to manually kick off the install, uninstall, detect, and requiment actions (for testing)
\ App Name                                             Package Root (Folder name must match App Name in intune_settings.csv)
| intune_command.cmd                                   Double click to manually launch Intune commands (Optional but convenient)
| Misc un-packaged files                               Reference files (not copied to Intune)
\-- Misc un-packaged folder1                           Reference files (not copied to Intune)
\-- Misc un-packaged folder2                           Reference files (not copied to Intune)
\-- IntuneApp                                          Package folder - copied to Intune
    | intune_icon.png                                  Package icon - Replace with app icon
    | intune_settings.csv                              Package settings - Edit app settings
    | (optional) intune_detection_customcode.ps1       Optional code file if needed - for advanced apps
    | (optional) intune_requirements_customcode.ps1    Optional code file if needed - for advanced apps
    | (optional) intune_install_followup.ps1           Optional code file if needed - for advanced apps
    | (optional) intune_uninstall_followup.ps1         Optional code file if needed - for advanced apps
    \-- IntuneUtils                                    Managed code - do not touch. Added by AppPublish.ps1
        | intune_command.cmd                           Menu of Intune commands: Install, Uninstall, Detect, Requirements
        | intune_command.ps1                           Menu code
        | intune_detection.ps1                         App Detection. True: app is installed
        | intune_detection_customcode_template.ps1     Template code for optional file
        | intune_icon_template.png                     Template code for optional file
        | intune_install.ps1                           App Install
        | intune_install_followup_template.ps1         Template
        | intune_requirements.ps1                      App Requirements - True: this machine meet requirements for app install
        | intune_requirements_customcode_template.ps1  Template code for optional file
        | intune_uninstall.ps1                         App Uninstall
        | intune_uninstall_followup_template.ps1       Template code for optional file
        | README.txt                                   Readme
The intune_settings.csv file contains all the controls for your package.
Note: The package folder name must match the AppName.
| Name | Value | Comment |
|---|---|---|
| AppName | 7Zip | (Required) Base package name (e.g 7zip) (Remove ! Character which hides sample apps) |
| AppVersion | 111 | (Optional) Package version. Whole numbers beginning with 100. Can be manually incremented but also autoincrements every time IntuneApp publish process detects a hash change. Not the same but similar to Intune product version. (e.g. 100 for 7zip-v100) (Recommended) |
| AppInstaller | winget | (Required) winget,choco,exe,msi,ps1. If winget choco is used leave AppUninstallName blank unless you want to uninstall an additional app |
| AppInstallName | 7zip.7zip | (Required) winget appid (case sensitive) or choco appid or filename of .exe or .msi or .ps1 or .cmd (wildcard OK). See https://winstall.app or https://community.chocolatey.org/packages for package ids. |
| AppInstallArgs | (Optional) Prefix with ARGS: Installer arguments for msi,ps1,exe (for msi usually /quiet or /q /norestart) (for ps1 with multi param try -var1 xyz -var2 pdq named format or else entire value is first param) | |
| AppDescription | zip file management | (Required) Info for company portal |
| AppUninstallName | (Optional) winget name or winget id (Use 'winget list' to show them) to detect/uninstall (also done prior to install). This is in addition to the normal choco,winget uninstall. This field is required for non-winget packages, unless customcode.ps1 is used, as it is the only way to detect an app | |
| AppUninstallVersion | 22 | (Optional) AddRemove Product version below which product is uninstalled. If AppUninstallName is blank use AppVersion numbers else use Winget numbers (e.g. 4.5.0). Detection: versions below this will not be considered Detected. Blank=Any version is considered a detection and later versions will not be installed. Set this to the same as AppVersion to trigger a re-install on all endpoints. |
| AppUninstallProcess | *7zip* | (Optional) Processes to end prior to uninstall. (e.g. Acrobat*) Show running names via powershell: get-process -Name Acrob*. Wildcards can be used |
| SystemOrUser | system | (Required) System to install as system User to install as user |
| Publisher | Igor Pavlov of 7Zip | (Required) Info for company portal |
| AppInstallerDownload1URL | Enter a URL to download into install folder before installer starts. Can be a public share from Google Drive (drive.google.com). Zip files will be extracted automatically. | |
| AppInstallerDownload1Hash | Enter the file hash (optional) Get-FileHash -Algorithm SHA256 | |
| AppInstallerDownload2URL | ||
| AppInstallerDownload2Hash | ||
| RestartBehavior | allow | Allow Installer to Restart (Default is allow) |
| Developer | Info for company portal | |
| Owner | Info for company portal | |
| Notes | Info for company portal | |
| InformationURL | https://www.7-zip.org | Info for company portal |
| PrivacyURL | Info for company portal | |
| CompanyPortalFeaturedApp | FALSE | (Required) Company Portal Featured (Default is FALSE) |
| AvailableInCompanyPortal | TRUE | (Required) Company Portal Availability (Default is TRUE) |
| PublishToOrgGroup | TRUE | (Required) App will be pushed immediately to the PublishToGroup group from AppsPublish_OrgList.csv (as a required app). False means do not push app to that group. Independent of this, apps are always published to its own IntuneApp [appname] group (Default is FALSE) |
| CreateExcludeGroup | FALSE | (Optional) When app is published, create both Include and Exclude groups specific to the app. (Default is FALSE) |
| AppVar1 | Custom var useable by ps1 files | |
| AppVar2 | Custom var useable by ps1 files | |
| AppVar3 | Custom var useable by ps1 files | |
| AppVar4 | Custom var useable by ps1 files | |
| AppVar5 | Custom var useable by ps1 files |
winget Microsoft's command line packaging system
choco Chocolate is a popular pre-Microsoft packaging system (Open source)
ps1 Powershell script
msi MSI installer
exe EXE installer
for winget and choco
wingetandchocoare the most common Windows package installers- if
AppInstalleriswingetorchoco, set theAppInstallNameto the app package ID as defined within those syetems - For Winget apps (e.g.
Google.Chrome) search here: https://winstall.app/ - For Chocolatey apps (e.g.
googlechrome) search here: https://community.chocolatey.org/packages
for everything else (e.g. msi)
- set the
AppInstallNameto the installer filename (egmyps1.ps1orsetup.msi) (it must exist as a file or as a download in the\IntuneAppfolder)
- (Optional) Prefix your arguments with the
ARGS:keyword - for
ps1with multiple parameters, it's best to use named parameters
ARGS:-var1 xyz -var2 pdq - for
ps1with single parameter, you can just pass the contents
ARGS:use settings file.xml
- (Optional) Prefix your arguments with the 'ARGS:' keyword
- for msi usually
ARGS:/quiet
ARGS:/q /norestart
If there's a file (folder) in \IntuneApp that should be downloaded prior to install or uninstall, use the AppInstallerDownload1URL setting.
- This is useful for large installers that exceed the maximum package size.
- It's also useful to keep your overall package repository is small as possible, for USB installs etc.
- The downloaded files will be merged (and overwrite if there's a conflict) into the
IntuneAppfolder files. - Zip file will be automatically unzipped.
- The download will happen just prior to install and uninstall actions.
- Downloaded files will be available to installers and
ps1scripts. - Note: Downloads are not available for detection or requirements actions, only install and uninstall. This is because detection and requirements actions run every few hours on all endpoints, so a large download size would be problematic.
Include the URL in AppInstallerDownload1URL
If you want to ensure a hash is matched (file contents haven't changed), see Read the hash value below
For instance, to zip a subfolder called \Installer , publish it, and include as a downloaded portion of your app:
-
Create the Zip
Right-click the\Installerfolder and ZIP it to your downloads folder calling itInstallerFolder.zipor similar.
Use 7-zip or any zipping tool, but the contents of the zip will be merged into the\IntuneAppfolder.
In this case, creating\IntuneApp\Installer. The folder can be deleted after it's zipped. -
Read the hash value (optional)
This ensures the hash from the download matches (file contents haven't changed) from when the package was originally set up.
Note: In the future, if the download is updated the hash will no longer match and will need to be re-calculated and updated in the .csv (or removed)
Run this powershell command to see the hash value from the zip file in the Downloads folder
gci $env:USERPROFILE\Downloads -filter *.zip -Recurse | Get-FileHash -Algorithm SHA256 | Select-Object Hash, @{n="File";e={Split-Path $_.Path -Leaf}}
Record the Hash value for pasting into theintune_settings.csv -
Upload the zip file to your Google Drive area and share publicly
Note: This assumes Google Drive is being used to share files, but use any public URL as needed. However, the installers know how to deal with either simple download URLs or Google URLs (can be an indirect download).
In the Google Drive interface: Right-click the ZIP > Share the .zip > Anyone with the link > Viewer
Record the Share URL for pasting into theintune_settings.csv -
Update
intune_settings.csvwith the two values
Note:AppInstallerDownload1Hashis optional. If omitted, the downloaded file's hash will not be checked.
AppInstallerDownload1URL: (Share URL)
AppInstallerDownload1Hash: (Hash value) -
Delete the zipped files from your package
In this case, delete\IntuneApp\Installer.
During the install process the entire package is created in a temp folder, where the zip is also downloaded.
To make this mandatory for new users only, but not for existing users, use this IntuneApp technique:
- Publish once with
PublishToOrgGroup=FALSEandCreateExcludeGroup=TRUE - This creates an app-only exclude group (ending in
Exclude). - Add all current users to the app-only exclude group.
- Publish again with set
PublishToOrgGrouptoTRUEto pubish to any future users.
If you are replacing a previously pushed package, use this IntuneApp technique to overwrite previous installs:
- Change
AppUninstallVersionto match the lastAppVersion - If you don’t adjust this, endpoints with prior versions will not get the new package
| Version | Description |
|---|---|
| 2025-06-08 | Winget install on fresh Windows install fix. When winget is run as a service, if no admin has run the MS Store or if VCredistributable is missing, winget returns no output. This is now detected and fix via an inline VCredist install |
| 2025-04-10 | Allow for ARM architecture. ARM Installers run in 32 bit mode will self-adjust to 64 bit mode. |
| 2025-03-01 | Initial release |