This project demonstrates how to connect and control an external LED using an Arduino Uno. It’s a simple and fundamental project that introduces the basics of digital output.
In this project, an external LED is connected to the Arduino Uno, and the LED's state (on/off) is controlled via digital pin 13. The Arduino is programmed to blink the LED at regular intervals.
- Arduino Board
- LED
- Resistor(220 ohm)
- Breadboard
- Jumper Wires
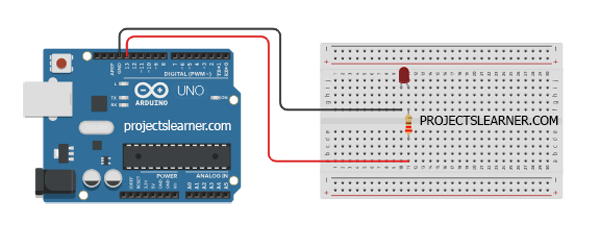
- Place the LED on the breadboard.
- Connect the longer leg (anode) of the LED to pin 13 on the Arduino.
- Connect the shorter leg (cathode) of the LED to one end of the 220-ohm resistor.
- Connect the other end of the resistor to the GND (ground) pin on the Arduino.
- Plug the Arduino into a USB port or power it with an external adapter.
- The LED should light up once the Arduino is powered.
Whether you're working on electronics projects, IoT applications, or robotics innovations, Projects Learner is your go-to platform for guidance and expertise.
🌐 projectslearner.com
📧 Email Us
📸 Instagram
📘 Facebook
📘Linkedin