Repository navigation
Project Based Learning
Cadet : May 3rd, 2021~
- Libft : C 라이브러리 및 링크드리스트 구현
- File processing : Get Next Line
- Netwhat : Network
- Printf : Mimic the real printf
- Java
- Push Swap : algorithm, sorting
- Minitalk : UNIX signals
- So Long : 2D game, miniLibX
- Philosophers : multi-thread/process, mutex, semaphore
- Born2BeRoot : virtualization, server setting
- Minishell : Mimic the bash shell
- 지역변수의 주소를 리턴시 주의 (동적할당)
-> 함수 호출할때 동적할당 할 포인터를 넘겨줘야 함 - Be Careful!: --n vs n--
- Short Circuit Evaluation in while condition
- Makefile
- ar : create and maintain library archives
[option]- c : Create the archive. The specified archive is always created if it did not exist, when you request an update. But a warning is issued unless you specify in advance that you expect to create it, by using this modifier.
- r : Insert the files member... into archive (with replacement). This operation differs from q in that any previously existing members are deleted if their names match those being added.
- s : Write an object-file index into the archive, or update an existing one, even if no other change is made to the archive. You may use this modifier flag either with any operation, or alone. Running "ar s" on an archive is equivalent to running ranlib on it.
- ar : create and maintain library archives
- memset (ft.memset.c) - fill a byte string with a byte value
- bzero (ft_bzero.c)
- memcpy (ft_memcpy.c)
- memccpy (ft_memccpy.c) - copy string until character found(max n byte, c included), return NULL if c unfound.
- memmove (ft_memmove.c) - copies len bytes from string src to string dst. The two strings may overlap
- if, dst==NULL && src == NULL, return NULL
- check (src < dst) vs (dst < src)
- memchr (ft_memchr.c)
- int memcmp(const void *s1, const void *s2, size_t n) - (ft_memcmp.c) : compares byte string s1 against byte string s2. Both strings are assumed to be n bytes long
- s1과 s2의 변수에 모두 0 이 나오더라도 상관없이 서로 다른 값이 나오거나 길이 n까지 계속 비교
- strlen (ft_strlen.c)
- isalpha (ft_isalpha.c)
- isdigit (ft_isdigit.c)
- isalnum (ft_isalnum.c)
- isascii (ft_isascii.c)
- isprint (ft_isprint.c)
- toupper (ft_toupper.c) : Be careful 'a' > 'A'
- tolower (ft_tolower.c)
- strchr (ft_strchr.c) : locates the first occurrence of c (converted to a char) in the string pointed to by s. The terminating null character is considered to be part of the string; therefore if c is `\0', the functions locate the terminating `\0'.
- strrchr (ft_strrchr.c)
- strncmp (ft_strncmp.c)
- strlcpy (ft_strlcpy.c) : Be careful about return value (length of str tried to copy), NULL-terminating the result = copy dstsize - 1 (except dstsize == 0)
- strlcat (ft_strlcat.c) : Be careful about return value = strlen(src) + min(dstsize, strlen(dst))
- strnstr (ft_strnstr.c) : Short Circuit Evaluation in While Condition
- atoi (ft_atoi.c) : whitespace=' ' , '\n', '\t', '\v', '\f', '\r'
- calloc (ft_calloc.c)
- strdup (ft_strdup.c)
| Function name | ft_substr |
|---|---|
| Prototype | char *ft_substr(char const *s, unsigned int start,size_t len) |
| Parameters | #1. The string from which to create the substring. |
| #2. The start index of the substring in the string ’s’. | |
| #3. The maximum length of the substring. | |
| Return value | The substring. NULL if the allocation fails. |
| Description | Allocates (with malloc(3)) and returns a substring from the string ’s’. The substring begins at index ’start’ and is of maximum size ’len’. |
| Function name | ft_strjoin |
|---|---|
| Prototype | char *ft_strjoin(char const *s1, char const *s2) |
| Parameters | #1. The prefix string. |
| #2. The suffix string. | |
| Return value | The new string. NULL if the allocation fails. |
| Description | Allocates (with malloc(3)) and returns a new string, which is the result of the concatenation of ’s1’ and ’s2’. |
| Function name | ft_strtrim |
|---|---|
| Prototype | char *ft_strtrim(char const *s1, char const *set) |
| Parameters | #1. The string to be trimmed |
| #2. The reference set of characters to trim. | |
| Return value | The trimmed string. NULL if the allocation fails. |
| Description | Allocates (with malloc(3)) and returns a copy of ’s1’ with the characters specified in ’set’ removed from the beginning and the end of the string. |
| Function name | ft_split |
|---|---|
| Prototype | char **ft_split(char const *s, char c) |
| Parameters | #1. The string to be split. |
| #2. The delimiter character. | |
| Return value | The array of new strings resulting from the split. NULL if the allocation fails. |
| Description | Allocates (with malloc(3)) and returns an array of strings obtained by splitting ’s’ using the character ’c’ as a delimiter. The array must be ended by a NULL pointer. |
| Function name | ft_itoa |
|---|---|
| Prototype | char *ft_itoa(int n) |
| Parameters | #1. the integer to convert. |
| Return value | The string representing the integer. NULL if the allocation fails. |
| Description | Allocates (with malloc(3)) and returns a string representing the integer received as an argument.Negative numbers must be handled. |
| Function name | ft_strmapi |
|---|---|
| Prototype | char *ft_strmapi(char const *s, char (*f)(unsigned int, char)) |
| Parameters | #1. The string on which to iterate. |
| #2. The function to apply to each character. | |
| Return value | The string created from the successive applications of ’f’. ㄲeturns NULL if the allocation fails. |
| Description | Applies the function ’f’ to each character of the string ’s’ to create a new string (with malloc(3)) resulting from successive applications of ’f’. |
| Function name | ft_putchar_fd |
|---|---|
| Prototype | void ft_putchar_fd(char c, int fd) |
| Parameters | #1. The character to output. |
| #2. The file descriptor on which to write. | |
| Return value | None |
| Description | Outputs the character ’c’ to the given file descriptor. |
| Function name | ft_putstr_fd |
|---|---|
| Prototype | void ft_putstr_fd(char *s, int fd) |
| Parameters | #1. The string to output. |
| #2. The file descriptor on which to write. | |
| Return value | None |
| Description | Outputs the string ’s’ to the given file descriptor. |
| Function name | ft_putendl_fd |
|---|---|
| Prototype | void ft_putendl_fd(char *s, int fd) |
| Parameters | #1. The string to output. |
| #2. The file descriptor on which to write. | |
| Return value | None |
| Description | Outputs the string ’s’ to the given file descriptor, followed by a newline. |
| Function name | ft_putnbr_fd |
|---|---|
| Prototype | void ft_putnbr_fd(int n, int fd) |
| Parameters | #1. The integer to output. |
| #2. The file descriptor on which to write. | |
| Return value | None |
| Description | Outputs the integer ’n’ to the given file descriptor. |
typedef struct		s_list
{
	void		*content;
	struct s_list	*next;
} t_list;| Function name | ft_lstnew |
|---|---|
| Prototype | t_list *ft_lstnew(void *content) |
| Parameters | #1. The content to create the new element with. |
| Return value | The new element. |
| Description | Allocates (with malloc(3)) and returns a new element. The variable ’content’ is initialized with the value of the parameter ’content’. The variable ’next’ is initialized to NULL. |
| Function name | ft_lstadd_front |
|---|---|
| Prototype | void ft_lstadd_front(t_list **lst, t_list *new) |
| Parameters | #1. The address of a pointer to the first link of a list. |
| #2. The address of a pointer to the element to be added to the list | |
| Return value | The new element. |
| Description | Adds the element ’new’ at the beginning of the list. |
| Function name | ft_lstsize |
|---|---|
| Prototype | int ft_lstsize(t_list *lst) |
| Parameters | #1. The beginning of the list. |
| Return value | Length of the list. |
| Description | Counts the number of elements in a list. |
| Function name | ft_lstlast |
|---|---|
| Prototype | t_list *ft_lstlast(t_list *lst) |
| Parameters | #1. The beginning of the list. |
| Return value | Last element of the list. |
| Description | Returns the last element of the list. |
| Function name | ft_lstadd_back |
|---|---|
| Prototype | void ft_lstadd_back(t_list **lst, t_list *new) |
| Parameters | #1. The address of a pointer to the first link of a list. |
| #2. The address of a pointer to the element to be added to the list. | |
| Return value | None |
| Description | Adds the element ’new’ at the end of the list. |
| Function name | ft_lstdelone |
|---|---|
| Prototype | void ft_lstdelone(t_list *lst, void (*del)(void *)) |
| Parameters | #1. The element to free. |
| #2. The address of the function used to delete the content. | |
| Return value | None |
| Description | Takes as a parameter an element and frees the memory of the element’s content using the function ’del’ given as a parameter and free the element. The memory of ’next’ must not be freed. |
| Function name | ft_lstclear |
|---|---|
| Prototype | void ft_lstclear(t_list **lst, void (*del)(void *)) |
| Parameters | #1. The adress of a pointer to an element. |
| #2. The adress of the function used to delete the content of the element. | |
| Return value | None |
| Description | Deletes and frees the given element and every successor of that element, using the function ’del’ and free(3). Finally, the pointer to the list must be set to NULL. |
| Function name | ft_lstiter |
|---|---|
| Prototype | void ft_lstiter(t_list *lst, void (*f)(void *)) |
| Parameters | #1. The adress of a pointer to an element. |
| #2. The adress of the function used to iterate on the list. | |
| Return value | None |
| Description | Iterates the list ’lst’ and applies the function ’f’ to the content of each element. |
| Function name | ft_lstmap |
|---|---|
| Prototype | t_list *ft_lstmap(t_list *lst, void *(*f)(void *), void (*del)(void *)) |
| Parameters | #1. The adress of a pointer to an element. |
| #2. The adress of the function used to iterate on the list. | |
| #3. The adress of the function used to delete the content of an element if needed. | |
| Return value | The new list. NULL if the allocation fails. |
| Description | Iterates the list ’lst’ and applies the function ’f’ to the content of each element. Creates a newlist resulting of the successive applications of the function ’f’. The ’del’ function is used to delete the content of an element if needed. |
file descriptor 의 값(fd) = 프로세스가 유지하고 있는 FD Table의 index
-
FD Table의 각 칸들은 FD Flag와 File Table Pointer를 가지고 있음
-
File Table의 각 칸들은 mode와 inode Table Pointer의 Offset을 가지고 있음
-
inode Table은 소유자 그룹, 접근 모드(읽기, 쓰기, 실행 권한), 파일 형태, 아이노드 숫자(inode number, i-number) 등 해당 파일에 관한 정보를 가지고 있음.
-
기본적으로 할당되는 파일 디스크립터
0 : 표준 입력 (Standard Input)
1 : 표준 출력 (Standard Output)
2 : 표준 에러 (Standard Error) -
OPEN_MAX (limits.h)
(기본적으로 할당되는 파일 디스크립터를 포함) OS가 동시에 열 수 있는 최대 파일 개수를 알려주는 환경 변수
- IP address
- IP Class
- Default Gateway
- Port
- Netmask
- subnet mask
- Public IP, Private IP
- 고정 IP , 유동 IP
- Protocol
- Protocol Layering
- OSI 7 Layer (Open System Interconnection)
- TCP , UDP
- DHCP server , DHCP protocol
- DNS server , DNS protocol
- Routing
호스트 ( 장치 - 컴퓨터,프린터,라우터 ..) 를 식별하는 32비트 숫자(IPv4)
네개의 영역이 점으로 분리된 십진수 형식(dot-decimal notice)

ex)192.168.123.132 = 11000000.10101000.01111011.100000100
각 8비트 섹션을 '옥텟'이라고 부른다.
- 구조 = Network ID + Host ID
- Network ID : 인터넷 상에서 모든 Host들을 전부 관리하기 힘들기에 Network의 범위를 지정하여 관리하기 쉽게 만들어낸 것 ( ex. 우리집 아파트의 주소 )
- Host ID : 각 호스트들을 관리 (ex. 우리집 호수)
Translator가 있어야 IPv4 주소와 통신, IPv4주소에 대해서 IPv6 주소를 겹치넨 오버레이 방식을 통해서도 해결 가능
- IPv6 주소의 길이는 128 비트이다. (16 바이트) = 2^128 로 약 340 * Billion * Billion * Billion 개 만큼 주소를 사용할 수 있다는 의미이다.
- IPv4 주소에서는 Octet을 . (Dot)으로 구분 했다면, IPv6 주소에서는 2개 Octet을 : (Colon)으로 구분한다.
- 1 바이트는 2개의 16진수로 표현되며 (1 바이트 = 8 비트 = 2개의 16진수), 총 16 바이트 길이를 2 바이트 단위로 묶으면 8개의 그룹이 : (Colon)`으로 구분 되는 형식이므로 총 32개의 16진수로 표현된다. (한 그룹당 4개의 16진수로 표현되므로)
- 간혹 주소 표현에 있어서 :: (Double Colon)으로 표기된 것을 볼 수 있는데, 이 의미는 0으로 채워진 2 바이트가 여러 그룹 있다는 것이다. ex. 2001:DB8:0:0:8:800:200C:417A = 2001:DB8::8:800:200C:417A
네트워크 영역과 호스트 영역을 나누는 방법(약속)
= 네트워크 크기에 따른 구분
= 하나의 네트워크에서 몇개의 호스트 IP까지 가질 수 있는가

| 클래스 | IP구분주소(s:네트워크 주소, h:호스트주소) | 네트워크 범위(개수) | 호스트 범위(개수) |
|---|---|---|---|
| A | 0sss ssss. hhhh hhhh. hhhh hhhh. hhhh hhhh | 1 ~ 126 시작 | 2^24 - 2 |
| B | 10ss ssss .ssss ssss. hhhh hhhh. hhhh hhhh | 128.0 ~ 191.255 시작 | 2^16 - 2 |
| C | 110s ssss. ssss ssss. ssss ssss. hhhh hhhh | 128.0 ~ 191.255 시작 | 2^8 - 2 |
- 클래스 D,E(멀티 캐스트용, 연구용으로 사용) : 자주 사용하진 않음.
- Broadcast address = 호스트 주소가 모두 1인 경우
- Network address = 호스트 주소가 모두 0인 경우
- 내부 네트워크에서는 라우터 없이도 통신이 가능(같은 브로드캐스트 도메인에서는 라우터 없이 통신 가능)
- 통신 시 목적지를 찾기 위해 내부 네트워크에서 먼저 찾음
- 없을 경우 기본 게이트웨이를 통해 외부 네트워크에서 목적지를 찾음(라우터의 이더넷 인터페이스)
- 라우터에는 인터페이스 별로 각각 IP를 배정
- 스위치나 허브는 IP주소를 장비별로 하나씩만 배정 (관리를 위한 것이지 IP주소를 배정하지 않아도 통신에 지장이 없음, 단, IP 주소 배정시 충돌이 없어야 함)
Gateway = 상호 연결된 네트워크에서 Packet-Switching을 이용하는 컴퓨터
(같은 망 내에 있을 떄에는 Rounter, 다른 Domain의 경우 Gateway)
- Router : 서로 다른 네트워크를 연결해주는 장치 (공유기)
운영 체제 통신의 종단점. 소프트웨어에서는 네트워크 서비스나 특정 프로세스를 식별하는 논리 단위이다.
(IP address : 컴퓨터를 찾을 때, Port : 컴퓨터안에서 프로그램을 찾을 때)
- 0번 ~ 1023번 : Well-known port, 잘 알려진 포트 (특정한 쓰임새를 위해서 할당한 TCP, UDP 포트 번호)
- 1024번 ~ 49151번 : registered port, 등록된 포트
- 49152번 ~ 65535번 : dynamic port, 동적 포트
| PORT | Protocol | 용도 |
|---|---|---|
| 20 | FTP | FTP - 데이터 전송 포트 |
| 21 | FTP | FTP - 제어 포트 |
| 22 | SSH | Secure Shell - ssh, sftp 같은 프로토콜 및 포트 포워딩 |
| 23 | Telnet | 텔넷 프로토콜 - 암호화 되지 않은 텍스트 통신 |
| 25 | SMTP | Simple Mail Transfer Protocol - 이메일 전송 프로토콜 |
| 53 | DNS | Domain Name System |
| 80 | HTTP | HyperText Transfer Protocol - 웹 페이지 전송 프로토콜 |
| 123 | NTP | Network Time Protocol - 시간 동기화 프로토콜 |
| 443 | HTTPS | HyperText Transfer Protocol over Secure Socket |
| 514 | Syslog | 시스템 로그 전송 프로토콜 |
네트워크 주소 부분의 비트를 1로 치환한 것
IP 주소와 넷마스크르 AND 연산 하면 네트워크 주소를 얻을 수 있음

ex) 203.0.113.4 = 203.0.113(네트워크 주소) +4(호스트 주소)
넷마스크 : 255.255.255.0 (= 11111111.11111111.11111111.0)
기본 서브넷 마스크 = 넷마스크
메인이 아닌 어떤 가공을 통한 네트워크를 만들기 위해서 씌우는 마스크
-
높은 클래스의 IP 주소를 받아서 서브넷을 만들지 않고 그냥 사용하는 경우 브로드캐스트 도메인이 너무 커져서 브로드캐스트가 지나치게 많이 발생하여 통신이 불가능해 지게 되는데 이때 서브네팅을 통하여 IP 주소를 네트워크 상태에 맞게 쪼개서 사용하게 된다. 이렇게 나눠진 네트워크들은 당연히 다른 브로드캐스트 도메인을 사용하게 되기 때문에 라우터를 통해서만 통신이 가능하다. 이렇게 쪼개어진 네트워크들을 서브넷, 그리고 이 서브넷을 만들 때 사용하는 것이 서브넷 마스크다.
-
IP의 어디 까지가 네트워크 부분이고 어디 까지가 호스트 부분인지 알려주는 용도로도 사용 된다. 그렇기 때문에 네트워크를 잘게 나누지 않을 때에도 디폴트 서브넷 마스크라는 것이 존재해서 어떠한 경우에도 서브넷 마스크는 존재 하게 된다. A 클래스의 디폴트 서브넷 마스크는 255.0.0.0, B 클래스는 255.255.0.0, C 클래스는 255.255.255.0이다.
큰 네트워크를 작은 여러 개의 네트워크로 나누는 기법.
CIDR 표기법 : /뒤에 네트워크 주소의 범위를 나타냄
ex. 192.168.0.1/24 : 앞에서부터 24비트가 네트워크 주소
-
Public IP (공용 IP 주소) : 인터넷 사용자의 로컬 네트워크를 식별하기 위해 ISP(인터넷 서비스 공급자)가 제공하는 IP 주소
- 전세계에서 유일한 IP주소를 가짐
- 공인 IP 주소가 외부에 공개되어 있기에 인터넷에 연결된 다른 PC로부터의 접근이 가능하다. 따라서 공인 IP 주소를 사용하는 경우에는 방화벽 등의 보안 프로그램을 설치할 필요가 있다.
-
Private IP (사설 IP 주소): 일반 가정이나 회사 내 등에 할당된 네트워크의 IP 주소
IPv4의 주소부족으로 인해 서브넷팅된 IP이기 때문에 라우터에 의해 로컬 네트워크상의 PC 나 장치에 할당된다.- 주소대역
Class A : 10.0.0.0 ~ 10.255.255.255
Class B : 172.16.0.0 ~ 172.31.255.255
Class C : 192.168.0.0 ~ 192.168.255.255
- 주소대역
-
Public IP vs. Private IP

| Public IP(공인 IP)) | Private IP(사설 IP) | |
|---|---|---|
| 할당 주체 | ISP(인터넷 서비스 공급자) | 라우터(공유기) |
| 할당 대상 | 개인 또는 회사의 서버(라우터) | 개인 또는 회사의 기기 |
| 고유성 | 인터넷 상에서 유일한 주소 | 하나의 네트워크 안에서 유일 |
| 공개 여부 | 내/외부 접근 가능 | 외부 접근 불가능 |
고정 IP : 한번 부여되면 IP를 반납하기 전까지는 다른 장비에 부여할 수 없음
유동 IP : 장비에 고정적으로 부여하는게 아닌, 사용할 때 남아있는 IP중에서 돌아가면서 부여
ex) 인터넷 상에서 서버 운영 - Public IP, 고정 IP
집에서 사용하는 인터넷 서비스 업체 - Public IP, 유동 IP
공유기 내부 - Private IP, 유동 IP
Sender 와 Receiver 상호간에 통신을 효율적으로 혹은 특정 목적을 달성하기 위한 규약
- Format : 통신에 있어서 메시지의 형식
- Order : 메시지를 어떤 순서로 받을 것인지
- Action : 해당 메시지를 받거나 전달했을 때 수행할 행동
=> 위의 3가지 요건을 지켜야 함.
프로토콜은 layer라는 단계(기능별로 계층을 나누어 놓은 것)로 구성된다.
- Protocol Stack = 층층이 둔다는 점에서 layering과 의미 동일
특정 Protocol로 사용자와 통신을 하는 과정에서 메세지의 Delivery가 발생했다고 하면, 그외의 일은 한 장치에서 모두 수행하지 않는다.
즉, Protocol이 수행하는 특정 행위 외의 모든 것들을 하위 계층의 Protocol에게 맡긴다. (하위 계층의 Protocol은 다시 하위 계층의 Protocol에게 위임) = Recursive Relationship
이 때의 논리 구조를 Protocol Stack 이라 부른다.
- 기대 효과
- 각 protcol은 상호독립적인 기능을 가진다 -> 독립적인 수정이 가능 (<-> 하위 layer서비스에 의존)
- 각 protocol의 내부를 일종의 블랙박스라고 여길 수 있다 -> 내부 동작 원리에 대해서 전혀 지식이 없더라도 Input을 넣었을 때 Output을 볼 수 있다.
- Protocol Layering의 원칙
-
Bidirectional (양방향성)
통신을 해야하는 경우에 각 Layer는 송신과 수신 두 가지에 대해서 수행할 수 있어야 한다. (Sender, Receiver를 수행할 수 있어야 한다는 것)
-
두 객체 아래의 Layer들은 동일하게 쌓여 있어야 한다.
-
4개의 layer로 보기도 함
= 1,2 계층을 묶어서 Link Layer, 5~7계층을 묶어서 Application Layer, 나머지 3,4계층
| 계층 | 이름 | |
|---|---|---|
| 7 | Application | 네트워크 자원에 접근할 수 있도록 해주는 Layer (송신과 수신을 위한 데이터를 네트워크에 제공), 사용자에게 보이는 부분 |
| 6 | Presentation | 데이터에 대한 Translate, Encrypt (Decrypt), Compress (Decompress)을 수행, 데이터를 Network Format <-> Application Format |
| 5 | Session | Session 대한 생성, 관리, 종료를 담당 |
| 4 | Transport | 메세지를 구성하여 넘겨주어(unreliable data delivery) error detection / corrrection 수행 |
| 3 | Network | Packet의 형태로 Source에서 Destination으로 운송(Routing), 목적지에 대한 Data Link Layer의 주소를 명시할 수 있어야 데이터를 성공적으로 보낼 수 있음. |
| 2 | Datalink | 비트 데이터 혹은 Packet을 기기 간 Hop-to-Hop 전달 |
| 1 | Physical | 전기신호를 통해 물리적 통신 (Data Link Layer로부터 받은 Frame을 실제 비트로 해석할 수 있도록 비트 스트림으로 만듬) |
-
Packet : Pack + Bucket = 우체국에서 큰 화물을 적당한 크기로 나누어서 운송장을 붙이듯이 네트워크를 통해 전송되는 데이터 조각
-
Hip-to-Hop 전달 : 서로 속한 네트워크가 같으면서 인접한 기기 (Adjacent Node)에게 데이터를 전달한다(기기가 가진 실제 주소 - MAC 주소 - 를 이용), Errorr 전달됨
-
Mac 주소 : (= Media Access Control) 각 기기의 네트워크 카드(하드웨어)에 부여된 고유한 물리적 주소
-
Routing : Source 에서 Destination 까지 데이터를 보내기 위해 가장 좋은 경로를 결정하는 기능
-
Internetworking (네트워크 간의 상호 작용) : interface 간의 송수신 = 최종 Destination까지의 통신 + 중간 개체들까지의 송수신
(endpoint간의 packet 송수신, 다른 네트워크의 Gateway 혹은 Router간의 Packet 송수신도 포함) -
Network Layer 에서 사용하는 주소 : IP 주소 -> 기기에 대한 실질적인 주소가 아닌 logical address.
-
Connection-Oriented Protocol 의 기능
- Connection Management (TCP의 경우 3 Hand-Shaking)
- Connection Multiplexing (Port를 이용한)
- Segmentation (SCTP의 Chuck)
- Reliable Delivery
- Flow Control(수신 측에서 수행), Congestion Control (송신 측에서 수행)
-
Session : 인간이 일하는 단위 (Connection을 담고 있기 때문에, 전반적인 Connection을 관리힘)
Endpoint를 사용하는 사용자 간의 Application Process들 사이에 Session을 열고 닫고 관리하는 메커니즘을 수행한다. 따라서 두 Host 사이에 첫 Connection을 열기도 하고, 이렇게 열린 Session을 통해서 정해진 시간동안 데이터 송신과 수신을 가능하게 해준다.예를 들면, VoIP(Voice over IP)에서 사용되는 SIP (Session Initiate Protocol)가 이에 해당한다.
이러한 Session Layer가 중요한 이유는, Endpoint간 메세지 송신 수신을 진행하면서 Dialog Control (Endpoint의 Token을 이용하여 누가 전송할 차례인지에 대한 순서 조정 및 관리)과 Synchronization (Stream으로 들어오는 데이터에 대해서 동기화 지점을 기록)이 가능하도록 만들어주기 때문이다.
-
Session layer 종류

- OSI 7 Layer 이용의 장점
- 한 계층에서의 수정이 다른 계층에 대한 수정을 야기하는 것을 방지할 수 있다.
- 산업적으로 표준화를 이끌어 낼 수 있다.
- 네트워크 통신 과정을 여러 작은 요소로 쪼갬으로써 개발, 디자인, 문제 해결 등을 용이하게 한다.
- 네트워크 구성 요소의 표준화를 통해 네트워크에 대한 여러 공급 업체를 개발할 수 있다.
- 네트워크 관리자에게 네트워크 관리를 용이하게 할 수 있다. (문제가 생겼을 때 전체를 탐색하는 것이 아니라 해당
Layer만 찾아보는 식으로 빠르고 효율적으로 대처를 할 수 있다.)
네트워크 통신시 사용되는 프로토콜
-
TCP : (전화로 통화하기) Connection-Oriented Service , 데이터에 대한 무결성이 보장됨 (3-way Handshaking), 양방향 데이터 전송 가능, Stream Data Service 제공 -> 상위 계층으로부터 수신한 데이터 스트림을 segment 형식의 단위로 분리하여 네트워크로 전송하며 목적지에서 TCP에 의해 segment를 재조립, reliability service(segment에 포함된 checksum을 이용하여 손상여부를 검사함) , flow control(sliding window)->상호협의한 윈도우 크기만큼 데이터를 송신(송신한 데이터에 대한 응답이 아직 안왔어도), Congestion Control (과도한 패킷이 들어와 라우터의 버퍼 용량을 초과하게 될 때 혼잡이 발생하고 패킷들이 손실되는 것을 방지)
-
UDP : (확성기로 소리치기) Connectionless Service(송신측,수신측간에 접속 절차를 거치지 않음), 3-way Handshaking/ 데이터 스트림 서비스 / 재전송 서비스 / 혼잡 제어 기능 수행 x, Best Effort Service (신뢰성은 보장하지 않음), 신뢰성 보장 서비스로 인한 데이터 전송 지연이 발생하지 않아 신속한 데이터 전송 가능(실시간으로 트래픽을 전송하는 멀티미디어 서비스, 단순한 데이터 요청 및 응답, 오류제어가 불필요한 경우나 내부적으로 매커니즘을 갖고 있는 경우, 멀티캐스트와 브로드케스트 서비스에 사용)
DHCP = Dynamic Host Configuration Protocol
호스트의 IP주소와 각종 TCP/IP 프로토콜의 기본 설정을 클라이언트에게 자동적으로 제공해주는 프로토콜
네트워크에 사용되는 IP주소를 DHCP서버가 중앙집중식으로 관리
- DHCP의 구성 = DHCP 서버 + DHCP 클라이언트
DHCP를 통한 IP 주소 할당은 “임대”라는 개념을 가지고 있는데 이는 DHCP 서버가 IP 주소를 영구적으로 단말에 할당하는 것이 아니고 임대기간(IP Lease Time)을 명시하여 그 기간 동안만 단말이 IP 주소를 사용하도록 하는 것
DNS = Domain Name System
도메인 네임을 IP 주소로 Mapping
DNS 메시지를 전달하기 위해 하위 트랜스포트 계층의 프로토콜을 이용하므로 어플리케이션 계층 프로토콜이다
동작 예시 - naver.com을 찾는다고 가정
- DNS Client(웹 브라우저등) 로컬 DNS에게 www.naver.com을 질의한다
- 로컬 DNS가 Root DNS에게 www.naver.com을 묻는다
- Root DNS가 com을 인식하고 com을 관리하는 최상위 도메인 DNS 서버의 IP를 로컬 DNS에게 알려준다
- 다시 로컬 DNS가 com도메인을 관리하는 최상위 도메인 DNS서버에게 www.naver.com을 질의한다
- 최상위 도메인 DNS서버가 naver.com을 인식하고 naver.com을 관리하는 책임DNS 서버의 IP를 로컬 DNS에게 알려준다
- 로컬 DNS는 책임 DNS서버에게 www.naver.com을 질의하고
- 책임 DNS서버에서 www.naver.com 호스트에 대한 IP를 알려준다
- 로컬 DNS가 DNS Client에게 www.naver.com의 IP를 알려준다
데이터가 전달하는 과정에서 여러 네트워크들을 통과해야하는 경우 가장 빠른 길을 찾아주는 기능
- Routing table : 목적지까지 갈 수 있는 모든 가능성있는 경로들을 따로 모아둔 테이블
- Static Routing, Dynamic Routing
| Static Routing | Dynamic Routing | |
|---|---|---|
| 개념 | 네트워크 관리자가 패킷의 경로를 임의로 결정하여 수동으로 구성, 항상 같은 경로로만 패킷 라우팅 경로를 설정, 유지 | 인접한 라우터들 사이에서 라우팅 프로토콜을 이용하여 네트워크 정보를 상호 교환하며 라우팅 테이블을 상시 자동적으로 생성하고 유지하는 라우팅 방식 |
네트워크 상태를 체크할 때 쓰이는 ICMP중 하나
- ICMP : TCP/IP에서 IP 패킷을 처리할 때 발생되는 문제를 알려주는 프로토콜.
ICMP는 해당 호스트가 없거나, 해당 포트에 대기중에 서버 프로그램이 없는 등의 에러 상황이 발생할 경우 IP헤더에 기록되어 있는 출발지 호스트로 이러한 에러에 대한 상황을 보내주는 역할을 수행함
header : stdarg.h
- va_list : 가변 인자 목록
- va_start : 가변 인자를 가져올 수 있도록 가변 인자 시작 주소 참조하는 포인터 설정
- va_arg : 가변 인자를 참조하는 포인터를 통해 역참조 후, 해당 데이터의 크기만큼 밀어 다음 인자를 참조
- va_end : 가변 인자를 모두 처리 후, 가변인자를 가리키는 포인터를 NULL로 초기화
- va_copy : 가변 인자 목록을 복사
(ex)
#include <stdarg.h>

int printf(const char *fmt, ...)
{
	char printf_buf[1024];
	va_list args; // 가변인자 목록  (포인터 선언)
	int printed;

	va_start(args, fmt);
    // 가변인자 시작 주소를 참조하는 포인터의 위치 설정
    // (포인터는 fmt의 시작주소를 가리킴)

    printed = vsprintf(printf_buf, fmt, args);
    .
    .
    printf("%s", va_arg(args, char*));
    // 가변 인자를 char* 크기만큼 가져오기(역참조)
    .
    .
	va_end(args); // 포인터 NULL로 초기화

	puts(printf_buf);

	return printed;
}printf가 버퍼에 저장 후 출력을 한다. 따라서 write 와 printf 를 혼용할 경우 printf 를 먼저 호출했더라도 write 가 먼저 출력될 수 있다.
[ex]
#include <stdio.h>
#include <unistd.h>

int main(){
  write(1, "1 ", 2);
  printf("2 ");
  write(1, "3 ", 2);
  printf("4 ");
}
1 3 2 4
--------------------------------
-
초기 상태
- 스택 a, b로 이루어짐
- 스택 a 는 양수 또는 음수가 중복없이 들어있음
- 스택 b는 비어있음
-
목표
- 최소한의 개수의 명령어를 사용해 스택 a 에 주어진 수들을 오름차순 순으로 정렬 하는 것
- 사용 가능한 명령들
- sa : swap a - swap the first 2 elements at the top of stack a. Do nothing if there is only one or no elements).
- sb : swap b - swap the first 2 elements at the top of stack b. Do nothing if there is only one or no elements).
- ss : sa and sb at the same time. pa : push a - take the first element at the top of b and put it at the top of a. Do nothing if b is empty.
- pb : push b - take the first element at the top of a and put it at the top of b. Do nothing if a is empty.
- ra : rotate a - shift up all elements of stack a by 1. The first element becomes the last one.
- rb : rotate b - shift up all elements of stack b by 1. The first element becomes the last one.
- rr : ra and rb at the same time.
- rra : reverse rotate a - shift down all elements of stack a by 1. The last element becomes the first one.
- rrb : reverse rotate b - shift down all elements of stack b by 1. The last element becomes the first one.
- rrr : rra and rrb at the same time.
-
입출력 예시

- push_swap 프로그램 수행 후에, 스택 a의 숫자들이 정렬되어 있고 b는 비어 있는지 확인 → “OK” 출력
- 그 외에 “KO” 출력
- standard error(주어진 숫자가 정수가 아닌 경우, 정수범위를 넘어가는 경우, 정수에 중복이 있는 경우, 출력된 명령어의 형식이 잘못된 경우) → “ERROR” 출력

-
아이디어 : 하노이탑?
하노이 탑 게임은 아래와 같은 규칙에 따라야한다.
- 처음에는 모든 원반은 A기둥에 꽂혀있다.
- 모든 원반의 크기는 다르다.
- 원반은 세개의 기둥중 하나에 반드시 꽂혀야한다.
- 큰원반 밑에 작은원반이 있을 수 없다. 큰 원반이 아래에 있어야함.
- 한번에 가장 위에있는 원반 하나만을 옮길 수 있다.

-
크기 순으로 인덱싱 ex) 2 1 3 6 5 8
숫자 인덱스 2 1 1 0 3 2 6 4 5 3 8 5 -
Markup : 두 가지 방식 적용 후 더 좋은 결과 출력
print_commands((commands_index->size < commands_gt->size) ? commands_index : commands_gt);(스택 A에 가능한 많이 유지)
markup_head: markup의 시작 요소-
크기 순 : 스택 A에 들어 있는 이전 요소보다 크면 스택에 넣음
opt_markup_stack(stack_gt, &markup_stack_gt);ex)
markup_head= 2숫자 인덱스 스택 A에 유지 2 1 True 1 0 False 3 2 True 6 4 True 5 3 False 8 5 True ex)
markup_head= 1숫자 인덱스 스택 A에 유지 2 1 False 1 0 True 3 2 True 6 4 True 5 3 False 8 5 True -
(연속적인)인덱스 순 : 가장 최근에 스택 A에 넣은 요소와 인덱스가 연속인 경우 스택에 넣음
opt_markup_stack(stack_index, &markup_stack_index);ex)
markup_head= 2숫자 인덱스 스택 A에 유지 2 1 True 1 0 False 3 2 True 6 4 False 5 3 True 8 5 False
-
WHILE stack A has elements with "false" value in "Keep in Stack A" field
      IF sa (swap a) is needed
            perform sa (swap a) command
            update markup
      ELSE IF head element of stack A has "false" value in "Keep in Stack A" field
            perform pb (push b) command
      ELSE
perform ra (rotate a) command-
IF sa (swap a) is needed :
You have to perform
sa (swap a)and then remake markup. We only have to update markup with chosen at previous steps parameters (asmarkup_head).Then we have to compare how many elements will be kept in stack A with performed
sa (swap a)and without it.If after performing
sa (swap a)more elements will be kept, it means that there is a reason to do it.After all we have to unmake
sa (swap a)and return result of our calculations. -
swap a 가 필요한가: sa를 수행하여 기존의 markup에 갱신한다. 항상 갱신하는 것은 아니고 sa를 수행했을 때 (수행하지 않았을 때 보다) 스택에 들어있는 요소의 개수가 더 많은 경우에만 해당한다. 그렇지 않은 경우 기존의 markup으로 되돌린다.
WHILE stack B is not empty
      choose element in stack B for moving to stack A
      move stack A and stack B to prepare them for pa (push a) with chosen element
perform pa (push a) command-
How to choose element in stack B for moving to stack A?
We have to calculate how many commands we need to perform for moving element from stack B to the top of its stack and how many commands we need to perform for moving suitable element from stack A to the top of its stack.
We have to calculate this value for each element in stack B and then choose element with the smallest calculated value and move it to stack A.
-
스택 A로 옮길 요소를 어떻게 결정하는가: 스택 B에 있는 각 요소에 대해서 스택 A로 옮기는데에 필요한 명령어의 개수를 계산한다
가장 작은 요소가 스택의 가장 위에 올때까지 움직인다(회전) → ra / rra
-
메인함수(push_swap.c)
int		main(int argc,
			char **argv)
{
	t_stack				*stack_index;
	t_stack				*stack_gt;
	t_command_list		*commands_index;
	t_command_list		*commands_gt;

	if (argc >= 2)
	{
		check_dups((stack_index = parse(argc, argv)));

		index_stack(stack_index);
		opt_markup_stack(stack_index, &markup_stack_index);
		commands_index = **solve**(stack_index, &markup_stack_index);
		free_stack(stack_index);

		index_stack(stack_gt = parse(argc, argv));
		opt_markup_stack(stack_gt, &markup_stack_gt);
		commands_gt = **solve**(stack_gt, &markup_stack_gt);
		free_stack(stack_gt);

		print_commands((commands_index->size < commands_gt->size) ?
			commands_index : commands_gt);
		free_command_list(commands_index);
		free_command_list(commands_gt);
	}
	else
		ft_putendl(ERR_PS_USAGE);
	return (0);
}
-
알고리즘 수행 파트(solve.c)
t_command_list	*solve(t_stack *a_stack,
									size_t (*markup_stack)(t_stack *, t_stack_elem *))
{
	t_command_list	*command_list;
	t_stack			*b_stack;

	command_list = init_command_list();
	b_stack = init_stack();
	solve_a(a_stack, b_stack, markup_stack, command_list); //A -> B
	solve_b(a_stack, b_stack, command_list); // B->A
	align_a(a_stack, command_list); // A정렬
	free_stack(b_stack);
	return (command_list);
}
-
signal()
sigaction() 함수는 signal()보다 향상된 기능을 제공하는 시그널 처리를 결정하는 함수
- 헤더: signal.h
- 형태: int sigaction(int signum, const struct sigaction *act, struct sigaction *oldact)
- 인수 int signum 시그널 번호 struct sigaction *act 설정할 행동. 즉, 새롭게 지정할 처리 행동 struct sigaction *oldact 이전 행동, 이 함수를 호출하기 전에 지정된 행동 정보가 입력됩니다.
- 반환 int 0 == 성공, -1 == 실패
sigaction 함수를 사용하기 위해서 프로그램 코드 내부에 선언하여야 한다.
struct sigaction {
    void (*sa_handler)(int);    // 시그널을 처리하기 위한 핸들러.
                                // SIG_DFL, SIG_IGN 또는 핸들러 함수
    void (*sa_sigaction)(int, siginfo_t *, void *); // 밑의 sa_flags가 SA_SIGINFO일때
                                                    // sa_handler 대신에 동작하는 핸들러
    sigset_t sa_mask;             // 시그널을 처리하는 동안 차단할 시그널 집합의 마스크
    int sa_flags;
    void (*sa_restorer)(void);    // 사용해서는 안됨
}-
sa_flags
옵션 의미 SA_NOCLDSTOP signum이 SIGCHILD일 경우, 자식 프로세스가 멈추었을 때, 부모 프로세스에 SIGCHILD가 전달되지 않는다. SA_ONESHOT, SA_RESETHAND 시그널을 받으면 설정된 행도을 취하고 시스템 기본 설정인 SIG_DFL로 재설정된다. SA_RESTART 시그널 처리에 의해 방해 받은 시스템 호출은 시그널 처리가 끝나면 재시작한다. SA_NOMASK, SA_NODEFER 시그널을 처리하는 동안에 전달되는 시그널은 블록되지 않는다. SA_SIGINFO 이 옵션이 사용되면 sa_handler대신에 sa_sigaction이 동작되며, sa_handler 보다 더 다양한 인수를 받을 수 있습니다. sa_sigaction이 받는 인수에는 시그널 번호, 시그널이 만들어진 이유, 시그널을 받는 프로세스의 정보입니다.
https://jeongdowon.medium.com/unicode와-utf-8-간단히-이해하기-b6aa3f7edf96

• miniLibX • The use of images of the minilibX is strongly recommended.
-
map
- 0 = empty space
- 1 = wall
- C = a collectible
- E = map exit
- P = player’s starting position.
↔ "Error\n”

typedef struct s_game
{
	void	*mlx;
	void	*win;
	void	*img;
	int		win_h;
	int		win_w;
	int		x_player;
	int		y_player;
	int		movement;
	char	**map; // 읽어드린 map을 '\n'단위로 잘라서 저장
	int		coll;
} t_game;void game_init(t_game *game)
{
game->coll = 0;
game->movement = 0;
game->win_w = ft_strlen(game->map[0]);
game->win_h = load_height(game->map);
game->enemy.sign = 1;
game->enemy.count = 0;
game->enemy.move = 0;
game->enemy.sleep = 5;
game->enemy.s_move = 60;
}- 무한 루프를 돌려서 프로그램에서 임의로 정의한 이벤트가 발생하는 것을 기다린다.
- mlx_ptr에 mlx_init() 함수로 리턴 받은 MLX instance의 위치를 입력한다.
- 이벤트 발생 조건 없이 (*funct_ptr)()에 매개변수로 입력된 함수를 무한대로 실행함.
- mlx_ptr에 mlx_init() 함수로 리턴 받은 MLX instance의 위치를 입력한다.
- param : 함수 내에서 쓰일 변수들을 입력 (쓰일 변수가 많을 경우, 구조체로 묶어서 입력함)
-
X11은 간단히 말해서 MiniLibX 라이브러리 사용자가 쉽게 정의할 수 있는 event들을 활용하는 라이브러리이다.
-
x_event : X11 라이브러리에서 정의된 event이다. 발생시키고 싶은 이벤트를 mlx_hook 함수의 매개변수로서 int형으로 입력하면 된다.
- event list 02: KeyPress 03: KeyRelease 04: ButtonPress 05: ButtonRelease 06: MotionNotify 07: EnterNotify 08: LeaveNotify 09: FocusIn 10: FocusOut 11: KeymapNotify 12: Expose 13: GraphicsExpose 14: NoExpose 15: VisibilityNotify 16: CreateNotify 17: DestroyNotify 18: UnmapNotify 19: MapNotify 20: MapRequest 21: ReparentNotify 22: ConfigureNotify 23: ConfigureRequest 24: GravityNotify 25: ResizeRequest 26: CirculateNotify 27: CirculateRequest 28: PropertyNotify 29: SelectionClear 30: SelectionRequest 31: SelectionNotify 32: ColormapNotify 33: ClientMessage 34: MappingNotify 35: GenericEvent 36: LASTEvent -
x_mask : 보통 0을 입력함.
- mask list NoEventMask 0L KeyPressMask (1L<<0) KeyReleaseMask (1L<<1) ButtonPressMask (1L<<2) ButtonReleaseMask (1L<<3) EnterWindowMask (1L<<4) LeaveWindowMask (1L<<5) PointerMotionMask (1L<<6) PointerMotionHintMask (1L<<7) Button1MotionMask (1L<<8) Button2MotionMask (1L<<9) Button3MotionMask (1L<<10) Button4MotionMask (1L<<11) Button5MotionMask (1L<<12) ButtonMotionMask (1L<<13) KeymapStateMask (1L<<14) ExposureMask (1L<<15) VisibilityChangeMask (1L<<16) StructureNotifyMask (1L<<17) ResizeRedirectMask (1L<<18) SubstructureNotifyMask (1L<<19) SubstructureRedirectMask (1L<<20) FocusChangeMask (1L<<21) PropertyChangeMask (1L<<22) ColormapChangeMask (1L<<23) OwnerGrabButtonMask (1L<<24) -
mlx_key_hook과의 차이 : mlx_key_hook는 key를 누를때마다 이벤트가 일시적으로 발생하지만, mlx_hook는 누르고있는 상태에서 이벤트가 무한히 반복된다.
-
win_ptr에 mlx_new_window 함수로 리턴 받은 값을 입력한다.
-
param : 함수 내에서 쓰일 변수들을 입력 (쓰일 변수가 많을 경우, 구조체로 묶어서 입력함)
• Each philosopher should be a thread. • To prevent philosophers from duplicating forks, you should protect the forks state with a mutex for each of them.
-
argument
number_of_philosophers time_to_die time_to_eat time_to_sleep [number_of_times_each_philosopher_must_eat]
- number_of_philosophers: The number of philosophers and also the number of forks.
- time_to_die (in milliseconds): If a philosopher didn’t start eating time_to_die milliseconds since the beginning of their last meal or the beginning of the sim- ulation, they die.
- time_to_eat (in milliseconds): The time it takes for a philosopher to eat. During that time, they will need to hold two forks.
- time_to_sleep (in milliseconds): The time a philosopher will spend sleeping.
- number_of_times_each_philosopher_must_eat (optional argument): If all philosophers have eaten at least number_of_times_each_philosopher_must_eat times, the simulation stops. If not specified, the simulation stops when a philosopher dies.
-
philosophers do only one thing among eat, think, sleep
-
when eating - needs 2 forks
-
There is one fork between each pair of philosophers. Therefore, if there are several philosophers, each philosopher has a fork on their left side and a fork on their right side. If there is only one philosopher, there should be only one fork on the table.
-
-
eating → sleeping →thinking
-
-
Each philosopher has a number ranging from 1 to number_of_philosophers.
- philosophers sit at a round table. (Philosopher number 1 sits next to philosopher number number_of_philosophers, Any other philosopher number N sits between philosopher number N - 1 and philoso- pher number N + 1)
-
A message announcing a philosopher died should be displayed no more than 10 ms after the actual death of the philosopher.
-
philosophers should avoid dying!
-
program must not have any data races.
-
data race
병렬 프로그래밍 하는 경우 발생 오류
void update_int( int* data )
{
  *a = *a + 4;
}

/*
a를 읽어 %o1에 저장
%o1에 4를 더함
%o1를 a에 저장
*/
int a = 10; // a는 여러 쓰레드에서 공유가 되고있는 변수이다.

**Thread[0]**
a를 읽어 %o1에 저장
%o1에 4를 더함
%o1의 값을 a에 저장

**Thread[1]**
a를 읽어 %o1에 저장
%o1에 4를 더함
%o1의 값을 a에 저장

-> 결과 : 덧셈은 두 번 이루어졌지만 a의 값은 14
-
-
result

◦ timestamp_in_ms X has taken a fork
◦ timestamp_in_ms X is eating
◦ timestamp_in_ms X is sleeping
◦ timestamp_in_ms X is thinking
◦ timestamp_in_ms X died

*X : philosopher number*

프로세스 간 메시지를 전송하거나, 공유메모리를 통해 공유된 자원에 여러 개의 프로세스가 동시에 접근하면 Critical Section(여러 프로세스가 데이터를 공유하며 수행될 때, 각 프로세스에서 공유 데이터를 접근하는 프로그램 코드 블록) 문제가 발생할 수 있다. 이를 해결하기 위해 데이터를 한 번에 하나의 프로세스만 접근할 수 있도록 제한을 두는 동기화 방식을 취해야 한다. 동기화 도구에는 대표적으로 뮤텍스(Mutex)와 세마포어(Semaphore)가 있다. 이들은 모두 공유된 자원의 데이터를 여러 스레드/프로세스가 접근하는 것을 막는 역할을 한다.
-
mutex
-
semaphore


세마포어는 가용한 자원의 개수로 초기화 되며 wait() 연산 수행시 세마포어 값 은 감소한다. 이후 signal() 연산을 수행하면 세마포어 값 은 증가한다.
tv_sec : 초
tv_usec : 마이크로 초 (1 / 1000000초)
⇒ 단위를 ms(밀리 세컨드로 통일)
int pthread_create
(pthread_t *thread, // 생성된 스레드를 식별하기 위해 사용되는 스레드 식별자가 저장되는 위치 const pthread_attr_t *attr, // 특성 지정, 기본 스레드 특성 사용시 NULL void *(*start_routine)(void *), void *arg //스레드 함수에 전달되는 인자 )
- return : 성공적으로 생성되면 0을 리턴한다. 실패하면 thread가 설정되지 않고 에러 값을 리턴한다.
int pthread_detach(pthread_t thread)
특정 스레드를 분리한다. 스레드가 독립적으로 동작하기를 원할 때 사용한다. pthread_create()만 사용하면 스레드가 끝나도 자원이 자동으로 해제되지 않는다. pthread_join()을 같이 사용해야 자원이 해제된다. pthread_detach()는 pthread_join()을 사용하지 않아도 자동으로 자원을 해제한다.
- return : 성공하면 0을 리턴하고 실패하면 에러 넘버를 리턴
int pthread_join
(pthread_t thread, // 기다릴 스레드의 식별자
void **value_ptr // pthread_create()의 start_routine()이 리턴하는 값을 넣는다.호출 스레드가 지정된 스레드의 종료를 기다리도록 한다.
)
- return : 성공적으로 호출하면 0을 리턴한다. 실패하면 에러 넘버를 리턴한다.실패하면 좀비스레드가 되고, 이 좀비스레드는 자원을 소모해서 더 이상 스레드를 생성할 수 없게 된다.
pthread_mutex_lock, pthread_mutex_unlock : 성공시 0 리턴
sem_t * sem_open
(constchar * sem_name, int oflags, ... );
-
인자
sem_name
생성 또는 접근하고자 하는 세마포어의 이름
oflags
세마포어 생성시 플래그. 아래 두가지 조합으로 사용 가능:
- O_CREAT
- O_EXCL
!! O_RDONLY, O_RDWR, O_WRONLY 플래그는 undefined behavior를 일으킴. QNX 라이브러리는 이러한 플래그를 무시하긴 하지만 이들은 코드의 휴대성을 저하함
mode_t mode
플래그를 O_CREAT로 설정하면,
mode인자를 받을 수 있음.<sys/stat.h>를 인클루드 하면 아래 상수들을 활용할 수 있다.- S_IRWXR : 그룹 접근
- S_IRWXO : 타인 접근
- S_IRWXU : 개인 접근
unsigned int value
세마포어 초기 값으로 0 보다 큰 양수여야 함. unlock된 세마포어의 수를 의미한다. 이 값은 SEM_VALUE_MAX를 초과할 수 없다.
pid_t fork(void)
- return
- 성공 시 - 부모 프로세스에서는 자식 프로세스의 PID값을 반환 받음, 자식 프로세스에서는 0 값을 반환 받음
- 실패 시 : 음수 값(-1) 반환
https://eun-jeong.tistory.com/20
https://velog.io/@jongeun/Philosophers-Day-05
-
레퍼런스
https://parkseunghan.notion.site/born2beroot-afdb78d74995456d9c91a4ae1be9874f
https://velog.io/@tmdgks2222/42seoul-born2beroot-Linux-install
컴퓨팅 환경을 소프트웨어로 구현한 것, 즉 컴퓨터를 에뮬레이션하는 소프트웨어
- Hypervisor(=Virtual Machine Monitor, VMM) 가상 머신을 생성﹒구동
- 장점
- 다양한 OS를 제공하기 위해 멀티부팅의 어려움을 겪지 않아도 되고 각각은 서로 독립되어 있어 서로에게 영향을 미치지 않음 → 관리에 용이, 테스트 환경에 적합
- 비용 절감 인프라의 한 부분에서 여러 가상 환경을 실행하므로 실제 인프라 사용 공간을 크게 줄일 수 있습니다. 따라 대부분의 서버를 유지할 필요가 줄고 유지 관리 비용과 전기가 절약되어 수익이 향상됩니다.
물리적인 하드웨어(HW) 장치를 논리적인 객체로 추상화 하는것
= 하나의 하드웨어를 여러개 처럼 동작시키거나 반대로 여러 개의 장치를 묶어 하나의 장치인 것처럼 사용자에게 공유자원으로 제공
= 하나의 자원을 쪼개서 쓰거나, 여러개의 자원을 하나인것 처럼 묶어서 쓸 수 있도록 해주는 것
= 1개 이상의 운영체제를 가동

- 가상화의 대상이 되는 컴퓨팅 자원 : 프로세서(CPU), 메모리(Memory), 스토리지(Storage), 네트워크(Network)
차이 : CentOS 가 더 유저친화적, 라이브러리가 더 많음, 커스터마이징이 더 수월, CentOs는 기업차원적인 기능이나 지원이 더 많음
-
영문 설명
Debian : Easier to install and configure so better for personal servers.
Debian is a lot easier to update then CentOS when a new version is released. Debian is more user-friendly and supports many libraries, filesystems and architecture. It also has more options for customisation. If you are a larger business CentOS offers more Enterprise features and excellent support for the Enterprise software.
= Logical Volume Manager (논리 볼륨 관리자)
-
디스크를 효율적으로 관리하고 사용하는 방법
-
리눅스 안에서 하나의 디스크를 여러 파티션으로 분할해서 파일 시스템을 사용해 특정 디렉터리와 연결시켜 사용하게 된다. 하드디스크를 파티션으로 나눌 경우 물리적인 개념이 강해서 고정적인 용량으로 사용하게 된다.
→ 따라서 디스크의 추가/제거 시에 별도로 복잡한 작업이 필요하게 되고 데이터 관리가 불편할 수 있다.
-
LVM은 파티션을 논리적인 개념인 볼륨으로 나눠서 더 유동적으로 디스크의 용량을 관리할 수 있다. 볼륨은 기본적으로 단일 파티션에 상주하게 되지만 다수의 파티션을 하나의 볼륨으로 관리할 수도 있다. →여러 파티션을 합치거나 분할하기에 용이해서 유용하게 사용할 수 있습니다.
-
추가 설명
-
논리 볼륨을 호율적이고 유연하게 관리하기 위한 커널(운영체제)의 한 부분이자 프로그램
-
기존 방식에서는 파일시스템(FAT, NTFS, EXT 시리즈…)이 블록 장치에 직접 접근해서 읽고/쓰고를 했다.
-
LVM을 사용하면 파일 시스템이 LVM이 만든 가상의 블록 장치에 읽고/쓰기 수행
-
유연한 용량, 크기 조정 가능한 스포리지 풀(Pool), 온라인 데이터 재배치
-
편의에 따라 장치 이름 지정, 디스크 스트라이핑, 미러 볼륨, 불륨 스냅샷
-
영문 설명
Logical Volume Manager – allows us to easily manipulate the partitions or logical volume on a storage device.
-
= Advanced Packaging Tool “우분투 패키지 관리 툴”
- APT (오픈소스 툴)
- 소프트웨어 설치 및 제거 관리
- command-line tool = GUI 없음
- package는 ‘/etc/apt/sources.list’ 안에 소스를 가져야 함, dependencies list도 포함해야 관련 패키지를 자동으로 설치함
- Aptitude
- user-interface
- 주요 패키지 작업 과정을 자동화 → 쉽게 사용 가능
- dpkg
- Cd룸이나 다른 디스크장치에 있는 .deb 파일을 제어하는 경우에 일반적으로 사용됨
- apt보다는 낮은 수준에서 작업이 수행된다. apt는 우분투의 소프트웨어를 관리하기 위해 내부적으로 dpkg를 이용한다. 보통 apt명령 만으로 충분하지만 시스템에 있는 특정 파일이 어떤 패키지에 포함되는지 등의 확인 작업을 수행하기 위해 dpkg명령이 필요
접근 통제 : DAC, MAC
DAC(임의접근제어, Discretionary Access Control) : 소유자가 판단에 의해 권한을 줄 수 있음
MAC(강제접근통제, Mandatory Access Control) : 미리 정해진 정책과 보안 등급에 기반하여 접근을 통제하는 모델, 소유자여도 정책에 어긋나면 접근 불가
- SELinux (Security Enhanced Linux)
- 관리자가 시스템 액세스 권한을 효과적으로 제어할 수 있게 하는 Linux 시스템용 보안 아키텍처다.
- MAC - 시스템 전체에 보안 설정
- 모든 걸 차단하고 필요한 것만 허용한다.
- SELinux는 setuid 비트가 켜져 있거나 루트로 실행되는 데몬 프로세스 프로그램들은 샌드박스안에서 별도의 도메인으로 격리되어 낮은 등급으로 실행되므로 루트 권한을 탈취해도 해당 도메인에만 영향을 미치고 전체 시스템에 미치는 영향을 최소화 한다.
- AppArmor (Application Armor)
- 시스템 관리자가 프로그램 프로필 별로 프로그램의 역량을 제한할 수 있게 해주는 리눅스 커널 보안 모듈이다.
- MAC - 개별 응용프로그램을 보호. 응용프로그램 단위 보안.
유닉스 계열 컴퓨터 운영 체제의 시간 기반 잡 스케줄러
crontab (cron table) 파일에 의해 구동됨 - 셸 명령어들이 주어진 일정에 주기적으로 실행하도록 규정해놓은 것
 # ┌───────────── min (0 - 59)
 # │ ┌────────────── hour (0 - 23)
 # │ │ ┌─────────────── day of month (1 - 31)
 # │ │ │ ┌──────────────── month (1 - 12)
 # │ │ │ │ ┌───────────────── day of week (0 - 6) (0 to 6 are Sunday to Saturday, or use names; 7 is Sunday, the same as 0)
 # │ │ │ │ │
 # │ │ │ │ │
 # * * * * *  command to execute

(ex)
0 20 * * * /home/oracle/scripts/export_dump.sh
# 매일 20시 (오후 8시)에 export_dump.sh 실행
-
cd /usr/local/bin– to show monitoring.sh -
sudo crontab -u root -e– to edit the cron job -
change script to */1 * * * * sleep 30s && script path– to run it every 30 seconds, delete the line to stop the job from running.
데비안 계열 및 다양한 리눅스 환경에서 작동되는 사용하기 쉬운 방화벽 관리 프로그램
- 사용하기 쉽게 설계된 넷필터 방화벽을 관리하는 프로그램
- 간단한 명령 및 명령수가 적은 명령줄 인터페이스를 사용하는것이 특징
네트워크 보안 도구 중 하나로 원격접속을 안전하게 할 수 있게 해주는 프로토콜
shasum Born2BeRoot.vdi
-
lsblkto display the partitions sudo ufw statussudo systemctl status sshgetent group sudogetent group user42sudo adduser new username-
sudo groupadd groupname– add new user group; -
sudo usermod -aG group username- add user to user group -
sudo chage -l username- check password expire rules hostnamectl-
hostnamectl set-hostname new_hostname- to change the current hostname -
sudo nano /etc/hosts- change current hostname to new hostname -
dpkg -l | grep sudo –to show that sudo is installed sudo ufw status numberedsudo ufw allow port-idsudo ufw delete rule number-
ssh your_user_id@127.0.0.1 -p 4242- do this in terminal to show that SSH to port 4242 is working -
chage -l your_new_username- check if the password rules are working in users**** - Password Rules : For the password rules, we use the password quality checking library and there are two files the common-password file which sets the rules like upper and lower case characters, duplicate characters etc and the login.defs file which stores the password expiration rules (30 days etc). Sudo nano /etc/login.defs Sudo nano /etc/pam.d/common-password
sudo aa-status : apparmor 상태 확인
- sudo 설치 & 사용자 그룹 설정
- dpkg -l sudo : sudo 설치 여부 확인
- groups [유저명] : 유저의 그룹 확인
- groupdel [그룹명] : [] 그룹 삭제
- groupadd [그룹명] : [ ] 그룹 추가
- usermod -aG [그룹명,그룹명, ... ] [사용자명] : 사용자를 그룹에 추가
- usermod -g [그룹명] [사용자명] : primary group 설정
- adduser new_username : user추가
- id/groups [사용자명] : 사용자의 gruop 확인
- userdel [사용자명] : 사용자 삭제
- cat /etc/passwd : 모든 사용자 출력
- grep /bin/bash /etc/passwd : root과 useradd 또는 adduser를 통해 생성한 사용자 계정을 출력합니다.
- cat /etc/group :그룹 목록 조회
- ufw(Uncomplicated Firewall)
- sudo ufw status verbose : 상태 확인
- sudo ufw status : 포트 확인
- SSH(Secure Shell Protocol) 설정
- systemctl status ssh : openserver 가 실행중인지 여부 확인
- vi /etc/ssh/sshd_config
- Password 정책
- sudo vi /etc/login.defs
- sudo vi /etc/pam.d/common-password
retry=3         : 암호 입력 3회까지

minlen=10    : 암호 최소 길이 10

difok=7         : 기존 암호와 달라야 하는 문자 수 7

ucredit=-1    : 대문자 1개 이상

dcredit=-1    : 숫자 1개 이상

reject_username  : username이 그대로 또는 뒤집혀서 패스워드에 들어있는지 검사, 들어있으면 거부

enforce_for_root : root 사용자가 암호를 바꿔도 위의 조건들 적용- sudo 관련 설정
/etc/sudoers
- hostname
-
hostnamectl -
hostnamectl set-hostname new_hostname- to change the current hostname -
진행과정
- First type
su -to login in as the root user. - Then type
apt-get update -y - Then type
apt-get upgrade -y - Then type
apt install sudo - Then type
su - - Then type
usermod -aG sudo your_usernameto add user in the sudo group (To check if user is in sudo group, typegetent group sudo) - Type
sudo visudoto open sudoers file - Lastly find - # User privilege specification, type
your_username ALL=(ALL) ALL
- First type
apt-get update -y - Then type
apt-get upgrade -y - Then type
apt-get install git -yto install Git - Then type
git --versionto check the Git Version - Then Type
sudo apt-get install wgetto get wget, a free and open source tool for downloading files from web repositories - Lastly type
sudo apt-get install vimto install Vim
- First type
sudo apt-get update - Type
sudo apt install openssh-server - Type
sudo systemctl status sshto check SSH Server Status - Type
service ssh restartto restart the SSH Service - Type
sudo nano /etc/ssh/sshd_config - Find this line
#Port22 - Change the line to
Port 4242without the # (Hash) in front of it - Save and Exit Vim
- Then type
sudo grep Port /etc/ssh/sshd_configto check if the port settings are right - Lastly type
sudo service ssh restartto restart the SSH Service
- First type
apt-get install ufwto install UFW - Type
sudo ufw enableto inable UFW - Type
sudo ufw status numberedto check the status of UFW - Type
sudo ufw allow sshto configure the Rules - Type
sudo ufw allow 4242to configure the Port Rules - Lastly Type
sudo ufw status numberedto check the status of UFW 4242 Port
-
To exit your Virtual Machine and use your mouse, press
commandon your Apple Keyboard and your mouse should appear -
Go to your Virtual Box Program
-
Click on your Virtual Machine and select
Settings -
Click
NetworkthenAdapter 1thenAdvancedand then click onPort Forwarding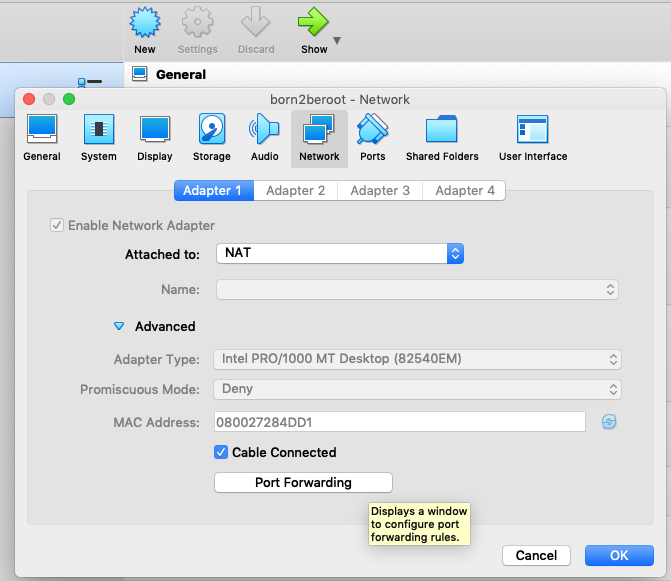
-
Change the Host Port and Guest Port to
4242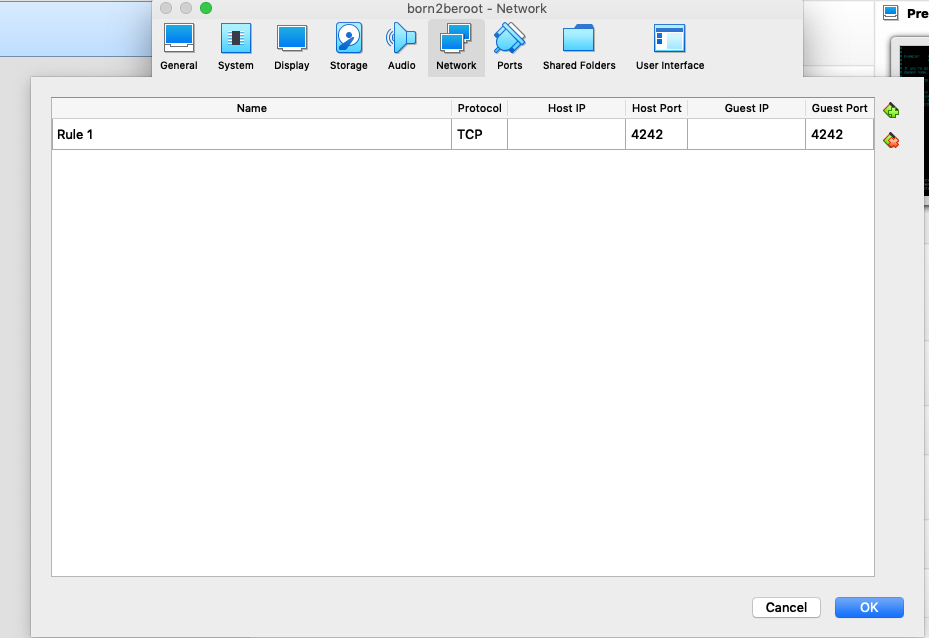
-
Then head back to your Virtual Machine
-
Type
sudo systemctl restart sshto restart your SSH Server -
Type
sudo service sshd statusto check your SSH Status -
Open an iTerm and type the following
ssh your_username@127.0.0.1 -p 4242 -
Lastly type
exitto quit your SSH iTerm Connection
- First type
sudo apt-get install libpam-pwqualityto install Password Quality Checking Library - Type
sudo vim /etc/pam.d/common-password - Find the following line - password [success=2 default=ignore] pam_unix.so obscure sha512 or something similar
- Go to the end of that line and add in
minlen=10
- 4.1 The line should now look like this
password [success=2 default=ignore] pam_unix.so obscure sha512 minlen=10
- Now find this line - password requisite pam_pwquality.so retry=3
- 5.1 Edit that line to look like this -
password requisite pam_pwquality.so retry=3 lcredit =-1 ucredit=-1 dcredit=-1 maxrepeat=3 usercheck=0 difok=7 enforce_for_root
Your /etc/pam.d/common-password file should look like this:
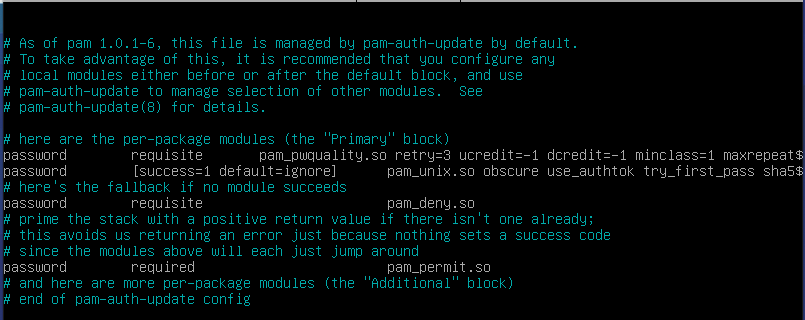
- Save and Exit Vim
- Next type in your Virtual Machine
sudo vim /etc/login.defs - Find this part
PASS_MAX_DAYS 9999PASS_MIN_DAYS 0PASS_WARN_AGE 7 - Change that part to
PASS_MAX_DAYS 30andPASS_MIN_DAYS 2keepPASS_WARN_AGE 7as the same - Lastly type
sudo rebootto reboot the change affects
- First type
sudo groupadd user42to create a group - Then type
sudo groupadd evaluatingto assign user42 to the evaluating group - Lastly type
getent groupto check if the group has been created
- First type
cut -d: -f1 /etc/passwdto check all local users - Type
sudo adduser new_usernameto create a username - write down your new_username, as you will need this later on.
- 2.1 Type
sudo usermod -aG user42 your_username - 2.2 Type
sudo usermod -aG evaluating your_new_username
- Type
getent group user42to check if the user is the group - Type
getent group evaluatingto check the group - Type
groupsto see which groups the user account belongs to - Lastly type
chage -l your_new_usernameto check if the password rules are working in users
- Type
cd var/log/touch sudo.logto create a sudo.log file - Then type
cdto head back to root
-
First type
sudo vim /etc/sudoersto go the sudoers file -
Now edit your sudoers file to look like the following by adding in all of the defaults in the image below -
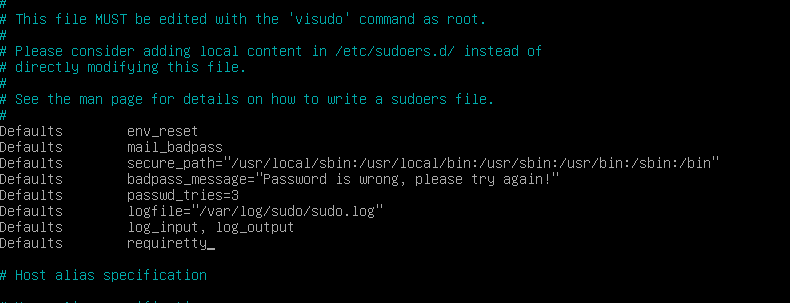
Defaults env_reset Defaults mail_badpass Defaults secure_path="/usr/local/sbin:/usr/local/bin:/usr/bin:/sbin:/bin" Defaults badpass_message="Password is wrong, please try again!" Defaults passwd_tries=3 Defaults logfile="/var/log/sudo.log" Defaults log_input, log_output Defaults requiretty- First type
sudo apt-get update -y - Then type
sudo apt-get install -y net-toolsto install the netstat tools - Then type `cd /usr/local/bin/
- Then type
touch monitoring.sh - Lastly type
chmod 777 monitoring.sh
- Copy this text (To copy the text below, hover with your mouse to the right corner of the text below and a copy icon will appear).
#!/bin/bash arc=$(uname -a) pcpu=$(grep "physical id" /proc/cpuinfo | sort | uniq | wc -l) vcpu=$(grep "^processor" /proc/cpuinfo | wc -l) fram=$(free -m | awk '$1 == "Mem:" {print $2}') uram=$(free -m | awk '$1 == "Mem:" {print $3}') pram=$(free | awk '$1 == "Mem:" {printf("%.2f"), $3/$2*100}') fdisk=$(df -BG | grep '^/dev/' | grep -v '/boot$' | awk '{ft += $2} END {print ft}') udisk=$(df -BM | grep '^/dev/' | grep -v '/boot$' | awk '{ut += $3} END {print ut}') pdisk=$(df -BM | grep '^/dev/' | grep -v '/boot$' | awk '{ut += $3} {ft+= $2} END {printf("%d"), ut/ft*100}') cpul=$(top -bn1 | grep '^%Cpu' | cut -c 9- | xargs | awk '{printf("%.1f%%"), $1 + $3}') lb=$(who -b | awk '$1 == "system" {print $3 " " $4}') lvmu=$(if [ $(lsblk | grep "lvm" | wc -l) -eq 0 ]; then echo no; else echo yes; fi) ctcp=$(ss -neopt state established | wc -l) ulog=$(users | wc -w) ip=$(hostname -I) mac=$(ip link show | grep "ether" | awk '{print $2}') cmds=$(journalctl _COMM=sudo | grep COMMAND | wc -l) wall " #Architecture: $arc #CPU physical: $pcpu #vCPU: $vcpu #Memory Usage: $uram/${fram}MB ($pram%) #Disk Usage: $udisk/${fdisk}Gb ($pdisk%) #CPU load: $cpul #Last boot: $lb #LVM use: $lvmu #Connections TCP: $ctcp ESTABLISHED #User log: $ulog #Network: IP $ip ($mac) #Sudo: $cmds cmd"- Then open up a iTerm2 seperate from your Virtual Machine and type in iTerm
ssh your_host_name42@127.0.0.1 -p 4242and then type your password, when it asks for it. - Then type
cd /usr/local/bin/vim monitoring.shand paste the text below in the vim monitoring.sh by doingcommand+von your Apple keyboard. - Save and Exit your
monitoring.sh
- 4.1 - Then type
exitto exit the iTerm SSH Login. - 4.2 - Then go back to your Virtual Machine (not iTerm) and continue on with the steps below.
-
Then type
sudo visudoto open your sudoers file -
Add in this line
your_username ALL=(ALL) NOPASSWD: /usr/local/bin/monitoring.shunder where its written %sudo ALL=(ALL:ALL) ALL -
It should look like this
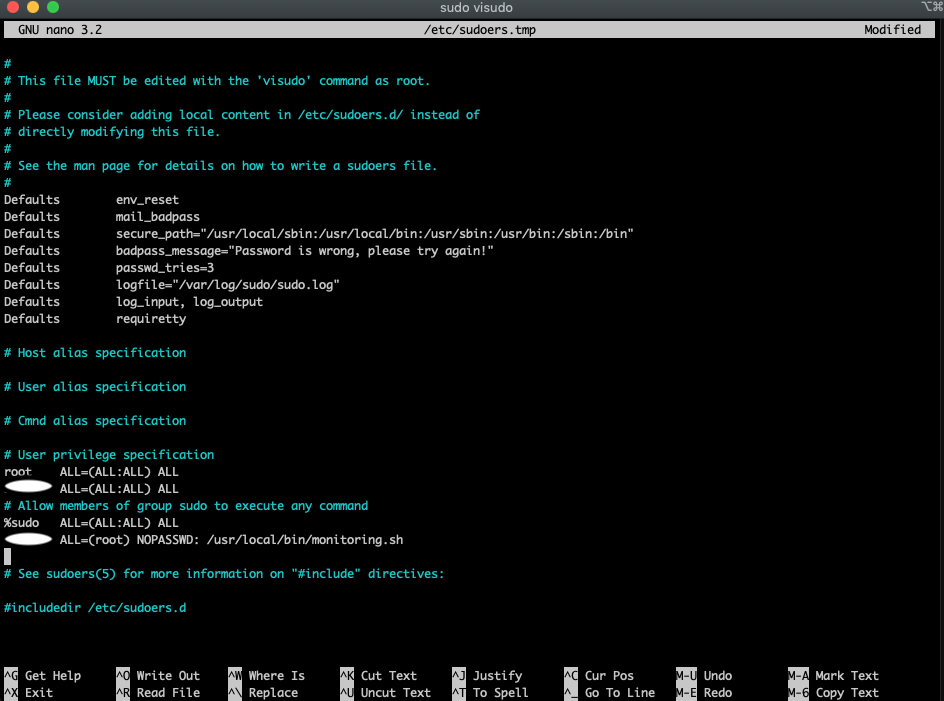
-
Then exit and save your sudoers file
-
Now type
sudo rebootin your Virtual Machine to reboot sudo -
Type
sudo /usr/local/bin/monitoring.shto execute your script as su (super user) -
Type
sudo crontab -u root -eto open the crontab and add the rule -
Lastly at the end of the crontab, type the following
/10 * * * * /usr/local/bin/monitoring.shthis means that every 10 mins, this script will show
To generate a
signature.txtnumber (Warning: before you generate a signature.txt, please turn off your Virtual Machine, as your signature number will be altered during the evaluation).- Open iTerm and type the following
cd /goinfre/VirtualBox VMs - Then type
shasum VirtualBox.vdior whatever your Virtual Machine .vdi file is called. - After a few mins, you should see an output similar to this - 6e657c4619944be17df3c31faa030c25e43e40af
- Copy your signature number and create a .txt file and paste it in there, ready for submission.
- First type
-
테스트 케이스
// echo 테스트
echo $?
echo $?
echo ??
echo ?
echo $??
echo $USERname
echo $USER name
echo "$USER na"me
echo '$USER na'me
echo "$$USER"
echo hi$USER
echo hi"$USER"
echo $USEEER
echo ?$USER
echo hell"o"" "from " 42"
echo "$USER ?"
// ls 테스트
ls
ls -l
ls -al
// quit, 반환값 테스트
./minishell
quit 113
echo $?
wrongcmd
echo $?
ls
echo $?
// 잡다하게 섞은거
< infile cat
< infile cat | grep a
< infile cat | grep a | wc
< infile cat | grep a | wc -l
cat < infile
// 환경변수, export, unset
env
env | grep SHLVL
./minishell
env | grep SHLVL -> SHLVL 값 바껴야됨.
export a=b b=c c=d
export a=aa b=cc
export A=B B=C
unset a
unset b c A B
// cd
cd ~
cd
cd -
echo $OLDPWD -> OLDPWD가 변경되야됨.
// ctrl + [d, c, \] 테스트
// pwd 테스트
pwd
// heredoc + append
<< eof cat >> infile -> infile 뒤에 추가됨

``
<< HERE_DOC > a.txt | cat a.txt | wc -l
<< HERE_DOC > a.txt | cat a.txt
ls -al | > a.txt
ls -al | cat
``
http://web.cse.ohio-state.edu/~mamrak.1/CIS762/pipes_lab_notes.html
int main(int argc, char *argv[], char *envp[])
{
    while(*envp)
        printf("%s\n",*envp++);
}
char** envp : 프로세스가 실행될 때 받아온 최초의 환경 변수를 개발자가 확인할 수 있도록 제공되는 것, 저장 형식은 argv와 동일
USER=seungwon
MallocNanoZone=0
__CFBundleIdentifier=com.microsoft.VSCode
COMMAND_MODE=unix2003
LOGNAME=seungwon
PATH=/Users/seungwon/.nvm/versions/node/v10.16.3/bin:/Users/seungwon/bin:/usr/local/bin:/usr/local/bin:/usr/bin:/bin:/usr/sbin:/sbin:/Library/Apple/usr/bin:/Users/seungwon/.zsh/misc:/Users/seungwon/.nvm/versions/node/v10.16.3/bin:/Users/seungwon/bin
SSH_AUTH_SOCK=/private/tmp/com.apple.launchd.v5FAUjREl6/Listeners
SHELL=/bin/zsh
HOME=/Users/seungwon
__CF_USER_TEXT_ENCODING=0x1F5:0x0:0x0
TMPDIR=/var/folders/3p/h73tfmps7ts7_6p3h2sr_2rc0000gn/T/
XPC_SERVICE_NAME=0
XPC_FLAGS=0x0
ORIGINAL_XDG_CURRENT_DESKTOP=undefined
SHLVL=1
PWD=/Users/seungwon/Desktop/42Seoul_cadet/minishell/최종
OLDPWD=/Users/seungwon/Desktop/42Seoul_cadet/minishell/최종
ZSH=/Users/seungwon/.oh-my-zsh
PAGER=less
LESS=-R
LSCOLORS=Gxfxcxdxbxegedabagacad
P9K_SSH=0
EDITOR=/usr/local/bin/nvim
NVM_DIR=/Users/seungwon/.nvm
NVM_CD_FLAGS=-q
NVM_BIN=/Users/seungwon/.nvm/versions/node/v10.16.3/bin
NVM_INC=/Users/seungwon/.nvm/versions/node/v10.16.3/include/node
TERM_PROGRAM=vscode
TERM_PROGRAM_VERSION=1.69.2
LANG=en_US.UTF-8
COLORTERM=truecolor
GIT_ASKPASS=/Applications/Visual Studio Code.app/Contents/Resources/app/extensions/git/dist/askpass.sh
VSCODE_GIT_ASKPASS_NODE=/Applications/Visual Studio Code.app/Contents/Frameworks/Code Helper.app/Contents/MacOS/Code Helper
VSCODE_GIT_ASKPASS_EXTRA_ARGS=--ms-enable-electron-run-as-node
VSCODE_GIT_ASKPASS_MAIN=/Applications/Visual Studio Code.app/Contents/Resources/app/extensions/git/dist/askpass-main.js
VSCODE_GIT_IPC_HANDLE=/var/folders/3p/h73tfmps7ts7_6p3h2sr_2rc0000gn/T/vscode-git-42e7251c13.sock
TERM=xterm-256color
P9K_TTY=old
_P9K_TTY=/dev/ttys000
_=/usr/bin/env- exit status value
-
main함수 매개변수로 최초의 환경변수 저장(char** env)shlvl(쉘 레벨) = 현재 bash가 얼마나 깊이 중첩되어 있는지2. env에서 shlvl= 부분을 찾고 1증가 시킴
-
명령에 대한거 처리(prompt)
-
ctrl-c, ctrl-\
-
env에서 PWD가 있는지 체크(=첫실행인지 확인) -> 있으면 char*** prompt변수에 경로를 /기주능로 나누어 저장
-
현재 위치 출력해서 '$>' 출력 만들기
- 실행할 명령은 char* line에 readline 함수 이용해서 저장됨
처음엔 "minishell>"
- 그 이후에 파싱해서 |>$~<에 대한 각 작업(ft_parse_args()), 각 명령에 대한 작업(do_builtin()) 수행
cf.
readline(char* str) == str을 터미널에 저장하고 저장한 메모리주소 반환
add_history()를 통해 저장된 명령은 이후에 터미널에서 위아래 방향키로 확인 가능
-
내장 함수
-
char *getcwd(char *buf, size_t size)- <unistd.h>
- buf에 현재 작업 디렉토리 문자열을 저장, size는 버퍼의 크기
- 리턴 : 성공하면 현재 작업 디렉토리를, 실패하면 -1 반환
- **
void** (*signal(**int** signum, **void** (*handler)(**int**)))(**int**)- <signal.h>
-
-
직접 만든 함수 설명
-
void *ft_gc_calloc(size_t elementCount, size_t elementSize): 배열포인터 생성하여 calloc(elementCount, elementSize) + 명렁어들 목록 담은 linked list에 추가 → 배열 리턴 -
int ft_destlen(char **s): 2차원 배열 s의 행개수 리턴 -
int find_in_env(t_minishell *data, char *var_env)- var_env : 찾고자 하는 환경 변수
- 리턴값 : 환경변수 목록(new_env) 중 몇 번째에 저장되어 있는지 인덱스 값, 없다면 0
-
char **replace_exist_line_2(t_minishell *data, char *args, char **dest)- 환경변수 목록(new_env)에서 SHLVL에 해당하는 값을 찾아 1 더한값으로 갱신
- SHLVL에 해당하는 환경변수가 없는 경우 현재 작업 디렉토리에 대한 환경 변수를 new_nev에
PWD=/Users/seungwon와 같이 추가(getcwd 이용)
-
int is_in_env(t_minishell *data, char *arg)-
find_in_env와 동일, 단, 환경변수 목록에 있는지 여부만 확인→경우 1, 없는경우 0 리턴
-
-
void prompt(t_lst_cmd *lst_cmd, t_minishell *data)- shell 역할(while 함수를 통해 프로그램 종료시까지 계속 실행)
-
-
구조체
typedef struct s_minishell
{
	struct s_lst_cmd	*cmd;
	char				**new_env; // 환경변수 목록 저장
	char				**path;
	char				*cd_pwd;
	char				*pwd;
	char				*path_temp;
	t_lst_cmd			*start_cmd;
	char				*line;
	int					error;
	int					shell_lvl;
}t_minishell;

**t_minishell data**
typedef struct s_lst_redir
{
char *file;
int append;
struct s_lst_redir *next;
}t_lst_redir;typedef struct s_lst_cmd
{
t_lst_redir *first_out;
t_lst_redir *first_in;
t_lst_redir *first_here;
pid_t pid;
char **args;
char *path;
char *relativ_path;
int id;
int pipe_fd[2];
t_lst_redir *lst_out;
t_lst_redir *lst_in;
t_lst_redir *lst_herdoc;
struct s_minishell *data;
int fd_in;
int fd_out;
struct s_lst_cmd *next;
struct s_lst_cmd *prev;
}t_lst_cmd;
**t_lst_cmd lst_cmd**- display(prompt) - switch_play : 현재 경로 ex) seungwon>, Users>\
- line : 입력된 명령어 전체 ex) cd testfolder/
- data→new_env : 2차원 배열 (환경변수들)
// ft_set_ouput_in(var);
if (!var->lst_cmd->lst_in)
	{
		var->lst_cmd->lst_in = ft_create_tab(NULL);
		var->lst_cmd->first_in = var->lst_cmd->lst_in;
	}

var->output = 1;
//////////////////////////////////////////

else if (var->output == 1)
	{
		var->lst_cmd->lst_in->file = ft_add_char(
				var->lst_cmd->lst_in->file, line[var->i]);
		var->i++;
}var->lst_cmd->args : 명령어 parsing해서(ex. cat)