ImPS is a simple one-file module wrapper to use WPF components in your script without writing massive amounts of UI code or using XML layouts. It is heavily inspired by ImGUI/DearPyGui to make it as easy as possible to use while keeping the configurability.
Please have in mind that this is in active development and, while usable, should not be used in any kind of production environment.
This does not work with PowerShell 7.X due to bugs and limitations with the way things are imported, hoisted and initialized. There are workarounds but they are whacky hacks that i dont want to go into. To give a precise example:
add-type -AssemblyName "System.Windows.Forms"
class myClass {
    [System.Windows.Forms.Form] $Drawable
}
Due to [System.Windows.Forms.Form] being inside a class, it gets hoisted and accessed before add-type actually imports the nessesary things.
This issue is open since 2016 and will most likely stay open for another 7 years.
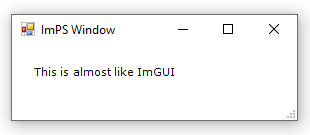
Here is the code you would need to write this basic window + label:
Add-Type -AssemblyName System.Windows.Forms

$Window = New-Object System.Windows.Forms.Form
$Window.ClientSize = "285,75"
$Window.Text = "ImPS Window"
$Window.BackColor = "#ffffff"
$Window.StartPosition = [System.Windows.Forms.FormStartPosition]::CenterScreen

$Label = New-Object System.Windows.Forms.label
$Label.Text = "This is almost like ImGUI"
$Label.AutoSize=$true
$Label.Font="Verdana,8,style=Regular"
$Label.Location=New-Object System.Drawing.Point(20,20)

$Window.Controls.Add($Label)

$Window.ShowDialog()
$Window.Dispose()
Here is ImPS's code for the exact same:
using module ".\ImPS.psm1"

$ImPS = [ImPS]::new()
$window = $ImPS.add_window("ImPS Window", 285, 75)
$window.Elements.add_Label("This is almost like ImGUI", 20,20)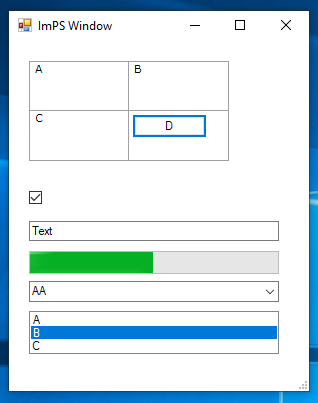
$window.show()- Label
- Button
- Checkbox
- ListBox (And its ListItem)
- TextBox
- ProgressBar
- ComboBox
- TableLayoutPanel
More elements will get added.
ImPS is written for you to easily chain methods if desired:
$window.Elements.add_Label("My bold label", 20, 20).set_font("Verdana,8,style=Bold")
# or
$label = $window.Elements.add_Label("My italic label", 20, 40)
$label.set_font("Verdana,8,style=Italic")
Button onClick-handler work inline or as defined function:
$btn = $window.Elements.add_Button("Click me", 20, 20).onClick({
    write-host "Got clicked"
})
# or
$myfunc = { write-host "Got clicked" }
$btn = $window.Elements.add_Button("Click me", 20, 20).onClick($myfunc)
[ImPS_Window].Drawable exposes a System.Windows.Forms.Form Object, so you can combine ImPS with the normal method of creating UIs (for example if a UI element does not exist yet):
$window = [ImPS]::new("ImPS Window", 285, 200)
$objLabel = New-Object System.Windows.Forms.label
$objLabel.Location = New-Object System.Drawing.Size(7,10)
$objLabel.Size = New-Object System.Drawing.Size(130,15)
$objLabel.Text = "Enter Computer Name"
$window.Drawable.Controls.Add($objLabel)
Every UI Element by ImPS exposes its "native" Object at [Object].Drawable, which means you can change attributes even if there is no getter/setter by ImPS:
$texbox = $window.Elements.add_TextBox("password", 100, 20)
$texbox.Drawable.PasswordChar = '*'
Note: This is discouraged and should not be done. I plan on supporting the most used attribute getter/setter.