- Introduction
- Main Components
- PresentationExtensions Methods
- Basic usage example
- JavaScript/CSS Animated Slide PowerPoint Transitions Support
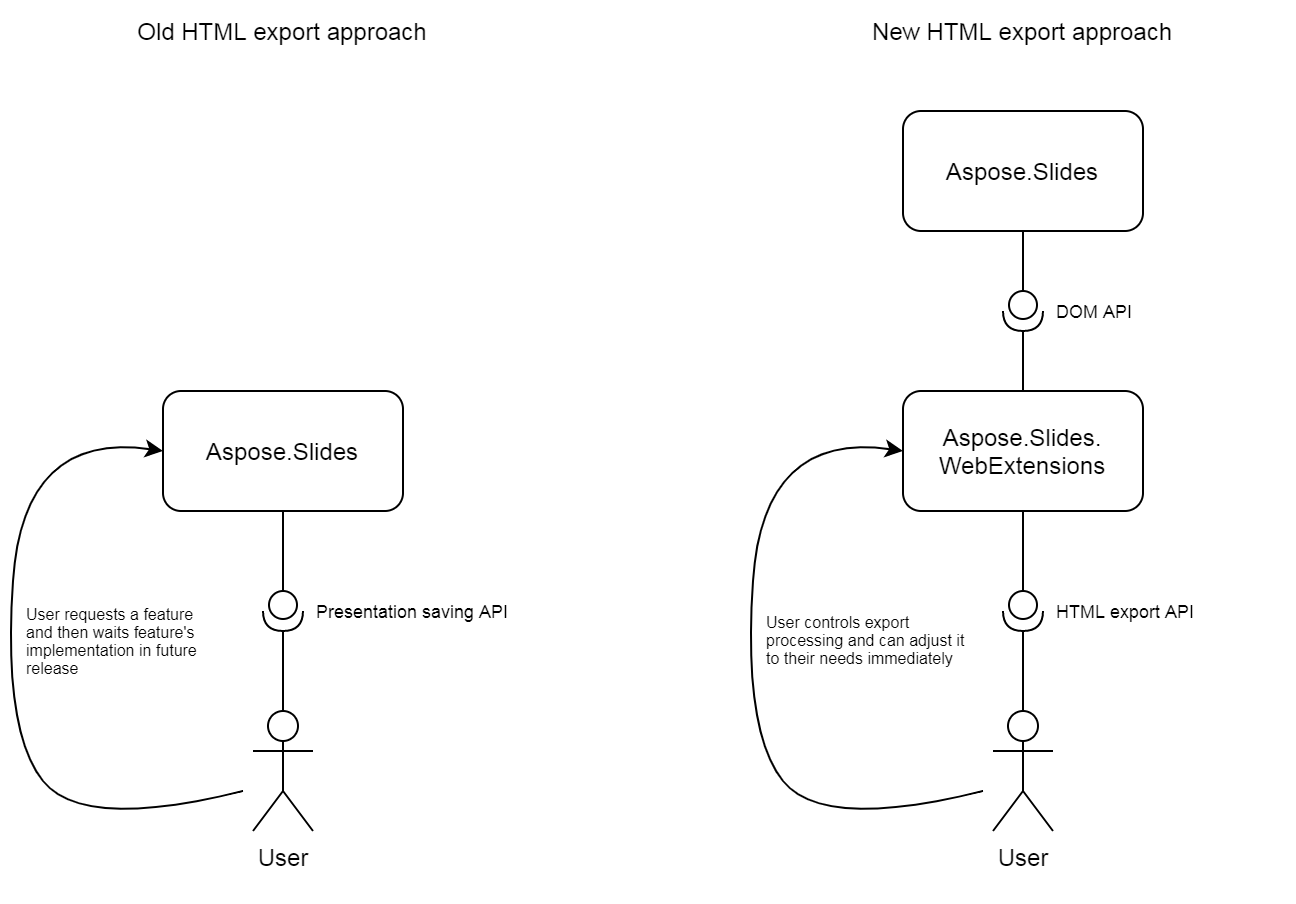
Since the beginning of Aspose.Slides development, HTML export was one of the features provided by the API. Implementation of this feature was hide inside the library though. Export output was primarily in vector (SVG). Since there was no HTML markup and DOM, it is not possible to apply custom CSS styles and manipulate a document elements (e.g. via JavaScript). Also, that created a lag between HTML output adjustment/fix request and its releasing as well as certain issues caused by different browsers and HTML variability and changeable nature. And with growing amount of Aspose.Slides users those problems grew too.
Now those problems are in the past! Aspose.Slides team has decided to give the developers a full control of adjusting HTML output according to their needs. We extracted HTML export system to separate open-source library – Aspose.Slides.WebExtensions. Initial release version provides main functional, which can be additionally extended later to generate the output that fits user specific requirements.
Benefits of the new approach:
- Flexibility – by design there’s almost no limits for desired output;
- Customizability – the outpu may be changed in any way by applying custom CSS styles or DOM manipulation (like animation via JavaScript);
- Availability of quick changes by developers without waiting for a new Aspose.Slides release;
- Individual result – no need to deal with other users markup/parameters artifacts.
Info: Besides enhancing HTML export capabilities, Aspose also improved its free online web apps, especially the PowerPoint to Word, PowerPoint to PDF, and PowerPoint to JPG converters.
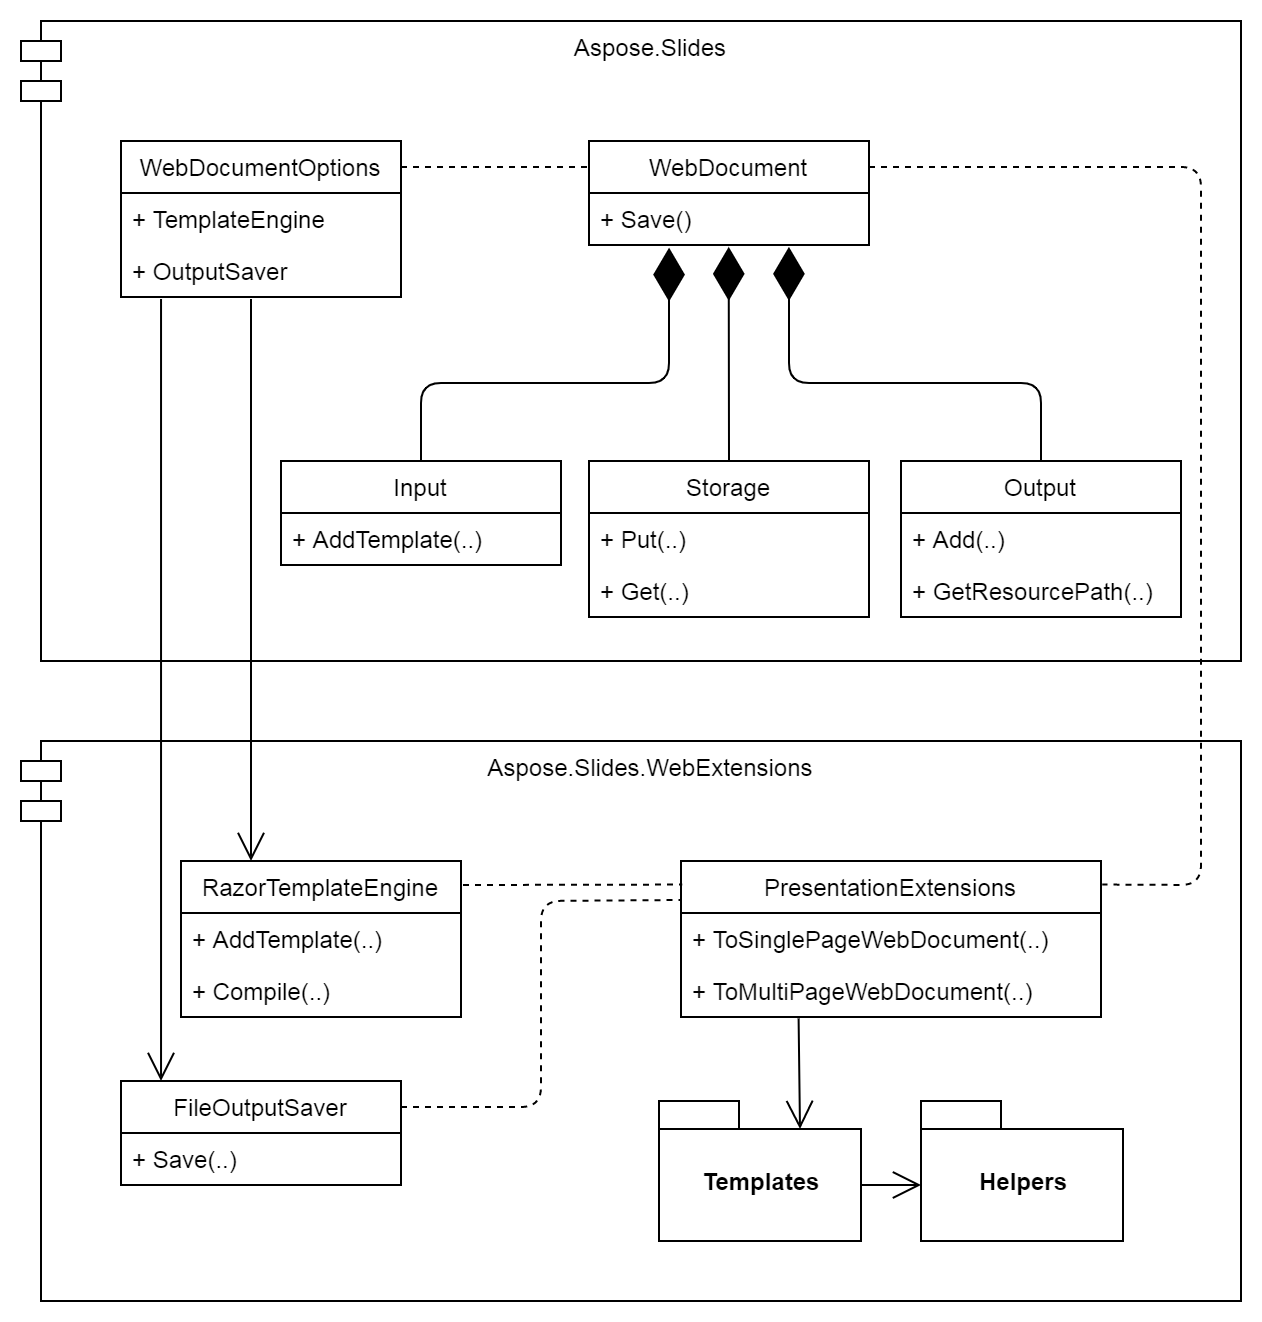
The first base part of new approach is IWebDocument interface, which aggregates few other interfaces (IInput, IOutput, IStorage) – they allow to control input and output objects, storage management and saving results. Classes implementing these interfaces are encapsulated into Aspose.Slides itself.
The second base part is ITemplateEngine interface. Implementation of this interface defines how presentation data (got from Aspose.Slides API) transform into resulting HTML. ITemplateEngine interface is implemented by RazorTemplateEngine class in release version of Aspose.Slides.WebExtensions – it uses ASP.NET Razor template system to generate HTML output.
See fig.2 for detailed diagram.
Release version of Aspose.Slides.WebExtensions uses ASP.NET Razor template engine as main implementation of ITemplateEngine interface as it is well known among .NET developers community and quite intuitive to understand for new users. Basically, each template is a piece of HTML markup with C# code extensions filling dynamic parts of this markup.
Because of both repetitive and standard nature of base presentation elements, templates set is built in the way where transformation of each DOM element to HTML element is represented by a single template file. Again, it is up to developer’s will to extend it corresponding to desired result.
Here are the main templates:
- pres.css
- master.css
- index.html
- slide.html
- shape.html
- autoshape.html
- table.html
- textframe.html
- paragraph.html
- bullet.html
- portion.html
- pictureFrame.html
- videoFrame.html
It is quite short list. Nevertheless, it allows to describe a transformation of presentation to HTML document for most of the cases.
Dynamic part of templates consists mostly of calls to helpers classes’ methods, which are located in Aspose.Slides.WebExtensions open-source project and can be edited/extended together with the templates set. It helps to lighten template files making them more readable as well as opens easier way to debug the process of preparing dynamic objects-specific result.
Helpers classes are organized by their functional meaning:
- SlideHelper
- ShapeHelper
- TextHelper
- FillHelper
- LineHelper
- FontHelper
- ImageHelper
- PatternGenerator
Release version provides two possible presentation HTML export result:
- Single page document – presentation is formed as continuous HTML page with slides visual separation. In this case there is single index.html file is exported.
- Multi page document – presentation is shown in PowerPoint style with previews on the left side and separate slide shown on the right side of the page. In this case index.html aggregates preview list and slide displaying area by using HTML frames. Multiple HTML files are exported.
Both ways need specific setup of Input/Output/Storage/Template elements. This setup is encapsulated in extension methods ToSinglePageWebDocument(..) and ToMultiPageWebDocument(..)
Let’s go through ToSinglePageWebDocument(..) extension method to understand what happens there.
public static class PresentationExtensions
{
    public static WebDocument ToSinglePageWebDocument(
                                this Presentation pres,
                                WebDocumentOptions options,
                                string templatesPath,
                                string outputPath)
    {
        CheckArguments(options, templatesPath, outputPath);

        WebDocument document = new WebDocument(options);

        SetGlobalStorageValues(document, options, outputPath);

        document.Global.Put("slidesPath", outputPath);
        document.Global.Put("stylesPath", outputPath);

        document.AddCommonInputOutput(options, templatesPath, outputPath, pres);

        return document;
    }
    private static void SetGlobalStorageValues(
                            WebDocument document,
                            WebDocumentOptions options,
                            string outputPath)
    {
        string imagesPath = Path.Combine(outputPath, "images");
        string fontsPath = Path.Combine(outputPath, "fonts");
        string mediaPath = Path.Combine(outputPath, "media");

        document.Global.Put("slideMargin", 10);
        document.Global.Put("embedImages", options.EmbedImages);
        document.Global.Put("imagesPath", imagesPath);
        document.Global.Put("fontsPath", fontsPath);
        document.Global.Put("mediaPath", mediaPath);
    }
    private static void AddCommonInputOutput(
                            this WebDocument document,
                            WebDocumentOptions options,
                            string templatesPath,
                            string outputPath,
                            Presentation pres)
    {
        string stylesPath = document.Global.Get<string>("stylesPath");

        document.Input.AddTemplate<Presentation>("styles-pres", Path.Combine(templatesPath,
                                                                        @"styles\pres.css"));
        document.Input.AddTemplate<MasterSlide>("styles-master", Path.Combine(templatesPath,
                                                                        @"styles\master.css"));

        document.Input.AddTemplate<Presentation>("index", Path.Combine(templatesPath,
                                                                        "index.html"));
        document.Input.AddTemplate<Slide>("slide", Path.Combine(templatesPath, "slide.html"));
        document.Input.AddTemplate<AutoShape>("autoshape", Path.Combine(templatesPath,
                                                                        "autoshape.html"));
        document.Input.AddTemplate<TextFrame>("textframe", Path.Combine(templatesPath,
                                                                        "textframe.html"));
        document.Input.AddTemplate<Paragraph>("paragraph", Path.Combine(templatesPath,
                                                                        "paragraph.html"));
        document.Input.AddTemplate<Paragraph>("bullet", Path.Combine(templatesPath,
                                                                        "bullet.html"));
        document.Input.AddTemplate<Portion>("portion", Path.Combine(templatesPath,
                                                                        "portion.html"));

        document.Input.AddTemplate<VideoFrame>("videoframe", Path.Combine(templatesPath,
                                                                        "videoframe.html"));

        document.Input.AddTemplate<PictureFrame>("pictureframe", Path.Combine(templatesPath,
                                                                        "pictureframe.html"));
        document.Input.AddTemplate<Table>("table", Path.Combine(templatesPath, "table.html"));
        document.Input.AddTemplate<Shape>("shape", Path.Combine(templatesPath, "shape.html"));

        document.Output.Add(Path.Combine(outputPath, "index.html"), "index", pres);
        document.Output.Add(Path.Combine(stylesPath, "pres.css"), "styles-pres", pres);
        document.Output.Add(Path.Combine(stylesPath, "master.css"), "styles-master",
                                                    (MasterSlide)pres.Masters[0]);

        document.AddEmbeddedFontsOutput(document.Global.Get<string>("fontsPath"), pres);
        document.AddVideoOutput(document.Global.Get<string>("mediaPath"), pres);

        if (!options.EmbedImages)
        {
            string imagesPath = document.Global.Get<string>("imagesPath");
            document.AddImagesOutput(imagesPath, pres);
            document.AddShapeAsImagesOutput<Chart>(imagesPath, pres);
            document.AddShapeAsImagesOutput<SmartArt.SmartArt>(imagesPath, pres);
            document.AddShapeAsImagesOutput<AutoShape>(imagesPath, pres);
            document.AddShapeAsImagesOutput<Connector>(imagesPath, pres);
        }
    }

    // ... other methods

    private static void AddImagesOutput(this WebDocument document, string outputPath, Presentation pres)
    {
        // .. see implementation in PresentationExtensions class
    }

    private static void AddShapeAsImagesOutput<T>(this WebDocument document, string outputPath, Presentation pres)
    {
        // .. see implementation in PresentationExtensions class
    }

    private static void CheckArguments(WebDocumentOptions options, string templatesPath, string outputPath)
    {
        // .. see implementation in PresentationExtensions class
    }

    private static void AddEmbeddedFontsOutput(this WebDocument document, string outFontsFolder, Presentation pres)
    {
        // .. see implementation in PresentationExtensions class
    }

    private static void AddVideoOutput(this WebDocument document, string outputPath, Presentation pres)
    {
        // .. see implementation in PresentationExtensions class
    }
}
As you can see, all this code does three things:
- Defines global storage data, which contain mostly of path references;
- Matches DOM elements (Slide, Shape, Paragraph, etc.) to specific templates;
- Sets up output files and specifies object to use as templates model for them.
So making any changes to templates/helpers, do not forget to adjust these setup if it is necessary.
As we already prepared everything for basic HTML export, using new export approach is quite simple.
To make it work, follow these steps:
- Add to your project a reference to Aspose.Slides.WebExtension together with reference to Aspose.Slides itself;
- Import Aspose.Slides, Aspose.Slides.Export.Web, and Aspose.Slides.WebExtensions namespaces;
- Make a call to extension method for loaded Presentation object depending on result type you need (single page document or multi page document);
- Make a call to Save method for resulting WebDocument object.
The code below demonstrates possible application code that performs HTML export using Aspose.Slides.WebExtensions.
using System;
using Aspose.Slides;
using Aspose.Slides.Export.Web;
using Aspose.Slides.WebExtensions; // required to use PresentationExtensions extension methods

namespace ConsoleStarter
{
    class Program
    {
        public static void Main(string[] args)
        {
            Presentation pres = new Presentation("input.pptx");

            WebDocument document = pres.ToSinglePageWebDocument("templates\\single-page",
              @"single-page-output");
            document.Save();

            Console.WriteLine("HTML export is complete...");
        }
    }
}
If you need something more complex, you can use WebDocumentOptions class object or edit / create your own extension methods, templates and helpers (see the next section).
Imagine that desired result must have a copyright watermark on each slide. That is quite easy to implement by adding changes to slide.html and pres.css templates.
Slide.html changes (additional span with copyright data):
@model TemplateContext<Slide>

@{
    Slide contextObject = Model.Object;
}

<div class="slide master-bg">

    <span class="watermark">
           Copyright © 2020 Copyright Owner
    </span>

    [THE REST OF THE MARKUP/CODE]
</div>
Pres.css changes (additional style for watermark class):
    [EXISTED STYLES DEFINITIONS]

    .watermark {
         position: relative;
         top: 220px;
         left: 100px;
         opacity: 0.3;
         z-index: 99;
         color: coral;
         font-size: 50px;
         -webkit-transform: rotate(-30deg);
         display: inline-block;
    }
After making these adjustments result HTML output will contain text watermark on each slide.
In this case, templates can stay the same, but image output files processing and image helper should be changed.
PresentationExtensions class contains static method AddImagesOutput, controlling images coming to export result. To add watermark, it could be changed these way:
private static void AddImagesOutput(this WebDocument document, string outputPath, Presentation pres)
{
    for (int index = 0; index < pres.Images.Count; index++)
    {
        IPPImage image = pres.Images[index];
        string path;
        string ext;

        if (image.ContentType == "image/x-emf"
            || image.ContentType == "image/x-wmf") //save metafile as PNG to make it supported by various browsers
        {
            ext = "png";
            path = Path.Combine(outputPath, string.Format("image{0}.{1}", index, ext));

            var bitmap = ImageHelper.MetafileToBitmap(image);
            document.Output.Add(path, new ThumbnailOutputFile(bitmap), image);

            continue;
        }

        ext = MimeTypesMap.GetExtension(image.ContentType);
        path = Path.Combine(outputPath, string.Format("image{0}.{1}", index, ext));

        document.Output.Add(path, image);
    }
}
Required ImageHelper changes contain adding new method AddWatermark and adjusting GetImageURL method with adding watermark on-the-fly for case of using embedded images option.
This case requires specific changes to templates and helpers, and go beyond the scope of this introduction. But the main benefit worth mentioning once again that developers can implement these changes by themselves, faster and more complete using new Aspose.Slides.Webextensions project rather than old presentation saving-to-HTML way.
-
Subtle
- Fade
- Push
- Wipe
- Split
- Reveal
- Random Bars
- Cover
- Flash
-
Exciting
- Dissolve
- Switch
- Flip
- Gallery
- Box
- Zoom
-
Dynamic Content
- Pan
- Ferris Wheel
- Conveyor
- Rotate
- Orbit
- Fly Through
-
Other
- Pull
- Wheel
- WheelReverse
- Wedge
- Circle
- Diamond
- Plus
- Cube
- Warp
Home | Product Page | Docs | Demos | API Reference | Blog | Search | Free Support | Temporary License