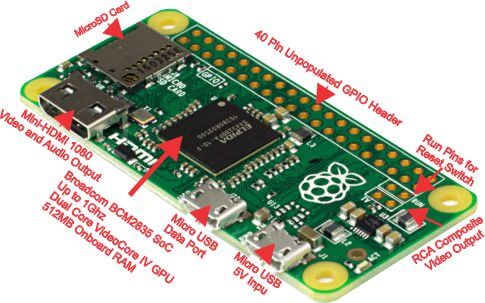
This repo is mostly a collection of tutorials built around the raspberry pi zero.
- MPU-9255 Tutorial - 9-Axis Accelerometer w/Compass via i2c from Python.
- BME280 Tutorial - Pi Zero IO Platform using RRDTool and AWS S3 to log and graph Temperature, Pressure, and Humidity using the BME280 sensor with the i2c protocol.
- DHT11 Tutorial - Pi Zero IO Platform using RRDTool and AWS S3 to log and graph Temperature, and Humidity using the DHT11 sensor with the 1-wire protocol.
- Camera Tutorial - A series of snippets to using the pi zero camera module including motion detection and a 3d printer monitor.
- 3D Models - A set of handly stl files that you can 3d print to create cases for the various project tutorials in this repo.
Like most people, I'm a fan of the Raspberry Pi Foundation and what they are trying to do, but also like most people... I'm forever wanting more from the Pi. I actually think its rather cripiling that they don't include wifi in every model given how connected our world has become...but thats a topic for another time.
- Power Consumption can be as low as 80mah idle.
- Plentiful GPIO
- $5 bucks!!!, though you'll need some peripherals to get started.
- Full-ish Linux Ecosystem, unlike Arduino or EPS8266 (though that isn't a fair comparison)
- Excellent form factor
- Requires a few peripherals, so its not really $5 but more like $15 - $20.
- No built in wifi
- Requires a mico-sd card, no built in storage
- Really tough to find, though MicroCenter seems to have plenty if you are lucky enough to have one near by like me. :)
Here you can find all the parts used throughout these tutorials, I've tried to mark the ones that are required for the basics vs ones for special projects.
- A USB OTG Cable (~$5) - Required For All Tutorials
- A USB Hub (~$7) - Required For All Tutorials but may not be needed after initial configuration.
- USB Wifi Dongle (~$9) - Networked Projects Only
- USB Keyboard (~$17) - Required for initial setup. I prefer this small one because I use it for many projects just to get SSH up and running then I use my regulard computer.
- Mini HDMI to Female HDMI (~$10) - Required for initial setup unless the project drives a display continually.
- 9-Axis Accelorometer / Gyroscope / Compage (~$15) - Used for Robotic Telemetry Tutorial
- BME280 Temperature, Pressure, and Humidity (~$9) - Used for BME280 Tutorial, a Pi Zero IOT Platform w/AWS
This section will walk you through installing an OS on your PiZero. This instalation procedure is based on Adafruit's guide, their wiki has imensely helpful to many of my projects. I encourage everyone to check it out and support them.
Download Raspberry-PI-SD-Installer-OS-X from this git repo.
Ray Vijoen has created a useful script to handle much of the sdcard formating and initial installation for you on MACthat makes it really easy to make an SD card using a Mac.
Alteranatively, you can use a Apple Pi Baker to setup your SD card, and make backups once you have your Pi setup the way you like.
Connect a USB Hub to an OTG Cable that goes to your Pi's Micro USB OTG Port. The plug your USB Wifi Dongle and Keyboard into the hub. Now you are ready to power up your Pi via the other micro USB port. Lastly, plug in your mini-HDMI to HDMI adapter as well as your HDMI cable for your monitor/tv.
Power on your Pi and once the loging prompt appears log in using the username: pi and the password: raspberry. You'll want to change the password at some point but I'll leave that up to you to decide. Once you are at the command prompt you'll want to setup the wifi so we can switch to using SSH instead of having the pi cabled directly to our monitor and keyboard.
You can do this by editing /etc/network/interfaces via the following command:
sudo nano /etc/network/interfaces
You may need to edit your keyboard mappings if you notice that the double quotes you type show up as @-signs. This can be done by running sudo dpkg-reconfigure keyboard-configuration and following the instructions to switch to a US keyboard. This will mostly likely require a reboot to take affect fully (it did for me).
Now that you have your keyboard working, you can edit your interfaces file to look something like the below.
source-directory /etc/network/interfaces.d

auto lo
iface lo inet loopback

iface eth0 inet manual

allow-hotplug wlan0
auto wlan0

iface wlan0 inet static
        wpa-ssid "your_ssid_here"
        wpa-psk "your_password_here"
        address 192.168.1.139
        netmask 255.255.255.0
        gateway 192.168.1.1
Now you can reload your networking services to see if the changes worked. You can do this by running the following command sudo service networking reload
Now lets see if your network interface came up as expected. You can do this by running ifconfig, if it worked your should see wlan0 with a valid IP Address like the one below.
lo        Link encap:Local Loopback
          inet addr:127.0.0.1  Mask:255.0.0.0
          inet6 addr: ::1/128 Scope:Host
          UP LOOPBACK RUNNING  MTU:65536  Metric:1
          RX packets:0 errors:0 dropped:0 overruns:0 frame:0
          TX packets:0 errors:0 dropped:0 overruns:0 carrier:0
          collisions:0 txqueuelen:1
          RX bytes:0 (0.0 B)  TX bytes:0 (0.0 B)

wlan0     Link encap:Ethernet  HWaddr 74:da:38:83:c1:47
          inet addr:192.168.1.139  Bcast:192.168.1.255  Mask:255.255.255.0
          inet6 addr: fe80::76da:38ff:fe83:c147/64 Scope:Link
          UP BROADCAST RUNNING MULTICAST  MTU:1500  Metric:1
          RX packets:14071 errors:0 dropped:148 overruns:0 frame:0
          TX packets:1602 errors:0 dropped:1 overruns:0 carrier:0
          collisions:0 txqueuelen:1000
          RX bytes:7283899 (6.9 MiB)  TX bytes:200898 (196.1 KiB)
Now lets install ssh by running sudo apt-get install ssh. Once this completes, you should be able to ssh to your pi from another machine.