

 This project compares three algorithms that are all built on the basis of the first algorithm and they are Autoencoder - which is a compression algorithm consisting of two parts - Encoder - the part that compresses and Decoder - the part that extracts. The next two algorithms also consist of these parts. The second is the Variational Autoencoder - the difference between it and the AE is that the VAE makes sure that the compressed information - Z is all distributed in a standard normal way. The third is Vector Quantized Variational Autoencoder, the difference between it and VAE and AE is that VQ-VAE makes sure that the compressed information is all distributed discretely and not continuously.
The project compares the methods using four tests.
This project compares three algorithms that are all built on the basis of the first algorithm and they are Autoencoder - which is a compression algorithm consisting of two parts - Encoder - the part that compresses and Decoder - the part that extracts. The next two algorithms also consist of these parts. The second is the Variational Autoencoder - the difference between it and the AE is that the VAE makes sure that the compressed information - Z is all distributed in a standard normal way. The third is Vector Quantized Variational Autoencoder, the difference between it and VAE and AE is that VQ-VAE makes sure that the compressed information is all distributed discretely and not continuously.
The project compares the methods using four tests.
The first method is AE-Autoencoder:

Autoencoder is an algorithm that uses deep learning and automatically compresses and decodes information - in our project the information is images. Autoencoder consists of two parts, the first part is called "encoder" (Encoder) its input is an image - X and the output - Z. The encoder compresses the image-X from a representation by a matrix of size (C,W,H) to a representation by a vector \ matrix-Z, so that Z is smaller (significantly) than the original size of the image. The second part is called "Decoder" its input is image - Z and output - X. Its function is to decode Z back to the original image, the restoration of the original image is marked with X.
The second method is VAE-Variational Autoencoder:

The algorithm is almost the same as AE except that this algorithm tries to improve the distribution of Z in space and make the Z space that creates meaningful images have a standard normal distribution so that if we draw Z numbers in a standard normal distribution and pass the Z we drew in Decoder we will get a meaningful image.
The third method is VQ-VAE - Vector Quantized Variational Autoencoder:

The VQ-VAE algorithm tries to improve VAE and prevent the loss of its features (caused by the approximation of the distribution) and it offers an alternative to the continuous distribution of Z in the VAE algorithm with a discrete distribution in VQ-VAE

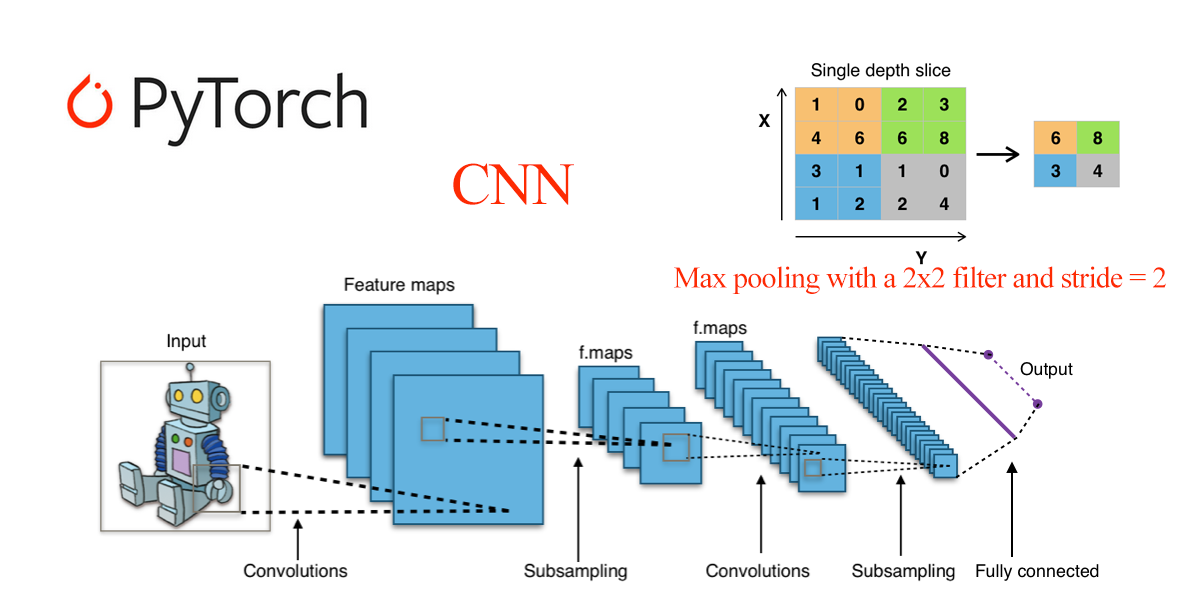
- learn basic pytorch by inplement CNN on MNIST
- first we copy and learn pyturch code from https://medium.com/@nutanbhogendrasharma/pytorch-convolutional-neural-network-with-mnist-dataset-4e8a4265e118
- we add document to the code and run the code and get success of 99% of the test group
- we change the convolition from kernal 5 to 2 convolution of kernal 3 run the code and get success of 95% of the test group
- we serch on the web for cnn with convolution kernal of 3 we found the cnn in
https://towardsdatascience.com/mnist-handwritten-digits-classification-using-a-convolutional-neural-network-cnn-af5fafbc35e9
and we implement it on the previos code and get success of 100% of the test group

- Implementing an Autoencoder in PyTorch
- first we copy and learn pyturch code from https://medium.com/pytorch/implementing-an-autoencoder-in-pytorch-19baa22647d1
- We made a comparison between the TRAIN LOSS vs TEST LOSS for EPOCH 1-100:


- We made a comparison between the minimum LOSS of each "LATENT SIZE" from the group {2,4,8,16,32} :

- We compared the images created by the networks of each "Latent Size" :


- We created a table of type cvs containing all the results of all sections 1 to 4, the link of Latent sizes statistic: https://docs.google.com/spreadsheets/d/1uFwPMJs6VD79z750eAqqNCx-qtuPh9zmGxM_9ECyZoQ/edit#gid=0
- Adding a vector of random values to encoder output in autoencoder:
- For example Latent SIZE 64

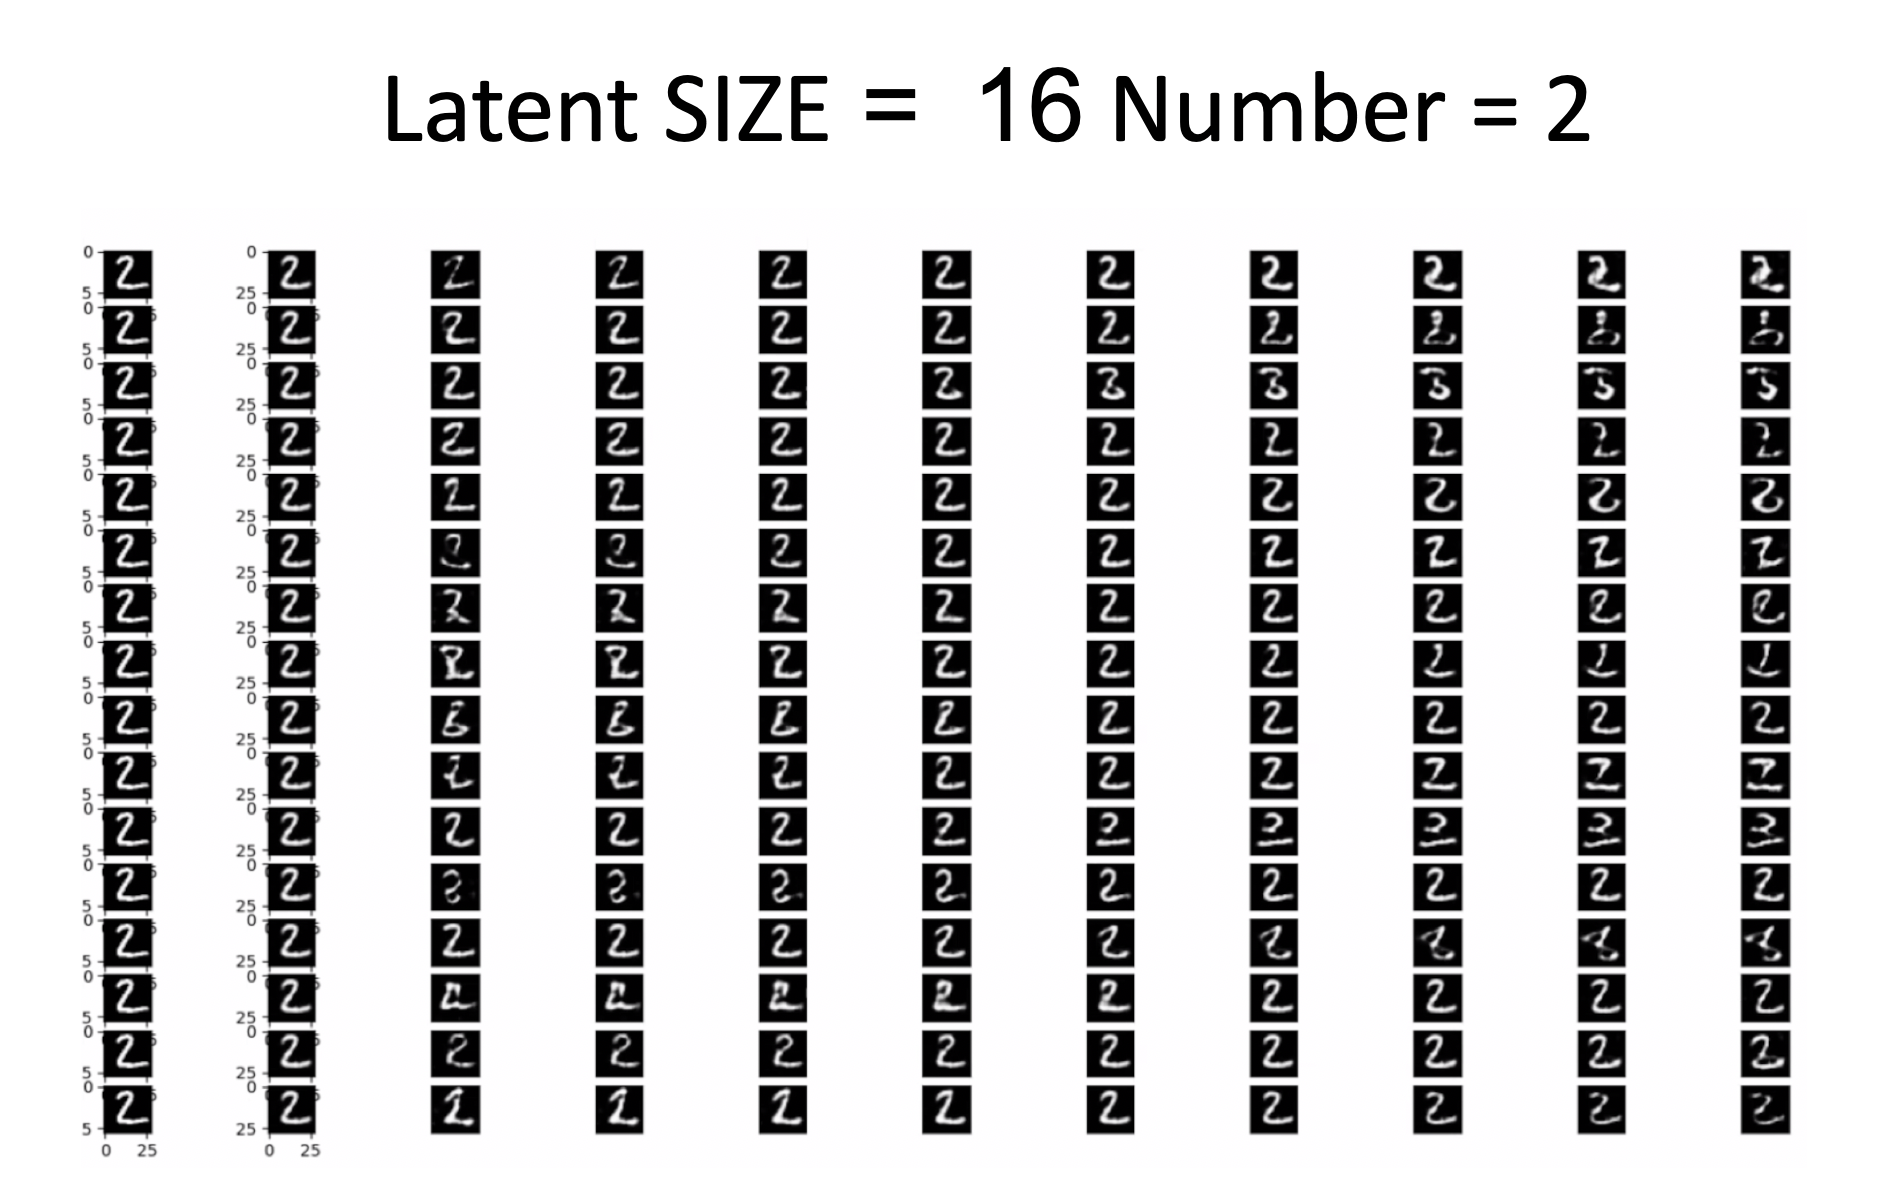
- Testing the effect of changing coordinates in the Latent vector on the image created by the Decoder:
- In each image we changed each of its coordinates in the range of (1,1-) in increments of 0.25 So that you can see how changing each of the coordinates affects the image, For example Latent SIZE is 16 and Number is 2
- We have converted an image to another image, Let's take an example when Latent SIZE is 64 and conversion from 2 to 7 :


- implemant vq-vae 2
- Stage 1 - reconstruct image
- This algorithm get an image X passing X through "bottom encoder" and get the output Z_bottom
- Then passing Z_b through "top encoder" and get the output Z_top
- Replacing Z_top with the matching code book vectors from the "top code book" and get the output E_top
- passing E_top through "top decoder" and get the output dec_top
- Adding Z_b + dec_top and replacing them with the matching code book vectors from the "bottom code book" and get the output E_bottom
- Adding E_bottom + E_top and passing then through the bottom encoder and getting X_rec
- Stage 2 - generate image
- Convert all the dataset from image X to Z_bottom, Z_top and label (if we have label) using the trained "bottom encoder" and "top encoder" from the reconstruction task.
- Choose a "pixel cnn" model.
- Train pixel_cnn_top with (Z_top, label) from the new dataset
- Train pixel_cnn_bottom with (Z_bottom, label) from the new dataset
- Generate E_top using our trained pixel_cnn_top
- Generate E_bottom conditionally on E_top using our trained pixel_cnn_bottom
- Adding E_top + E_bottom and passing then through the trained "bottom encoder" and getting X_rec as our generate image
- train the model
- Our loss function combine of three parts:
- Reconstruct loss - Simple L2 between the original image X end reconstruct imag X_REC
This loss will propagate the bottom decoder then it will skip the code book directly to the encoder because code book is not continuous 2. Encoder loss - subtract Z from E 3. Code book loss - subtract E from Z There is more advanced loss for the code book. Its call "moving average", this loss save the average loss for each vector e in the "code book" and the average times vector e appear in E. Then calculate the current loss and appearance of each vector e. Then adding the total appearance and total loss (with sum decay) and calculate the loss by dived the total loss on the total appearance.

After we finished implementing all the methods and ran all the tests and experiments on them, we started comparing the methods
We implemented all the algorithms, trained them on MNIST, and ran our four experiments on them.
MNIST:

image reconstruction:

Conclusions of the experiment: You can see that the (X) of the VAE algorithm comes out as fuzzy as we expected, because of the approximation it makes to make Z normally distributed. The AE algorithm manages to extract (X) in a better way and the (X) of VQ-VAE comes out much better, even what AE and even look better than the original, you can see that in the image of the zero it corrects the sharpness of a digit and in the image of the 8 it is. Arranges the closure of the book in the upper right part.
changing coordinates in Z and checking the effect of the change on the image:

Conclusions of the experiment: You can see that in VAE the coordinate we memorized here (the fourth coordinate) changes the brightness of the digit and from a very dark image with low values we arrive at a very bright image with the high values. In VAE, the coordinate we have memorized here (the fifth coordinate) changes the direction of the number and causes the number to lean to the right and its alignment as the values increase. In VQ-AE the coordinate we memorized here (the seventh coordinate) changes the top line in the image - its position and its length and you can see here that the vector in this position affects a very specific feature in a very specific part of the image and not on the entire image or object.
Linear transformation between 2 images:

Conclusions of the experiment: The AE algorithm during the transition combines the two images, neither passing through junk values nor through other images The VAE algorithm goes through other images during the transition The VQ-VAE algorithm passes through other images and through garbage values, something we have not seen even in AE and this shows that the distribution of the VQ-VAE is different from AE and a change of vectors causes a sharp change in the entire image.
Success percentages in classifying the Zs using a classification algorithm:
The AE algorithm reaches a 93% success rate in the Z classification according to the labeling of the original image.
The VAE algorithm reaches 87.5% success rate in the Z classification according to the labeling of the original image.
The VQ-VAE algorithm reaches 81% success rate in the Z classification according to the labeling of the original image.
Generoot images on MNIST and now we will also add CIFAR10:

Lottery of Z's and image generator by the computer:

Conclusions of the experiment: Here the differences are very significant, you can clearly see that AE's genroot outputs garbage values The VAE genroot outputs values that are meaningful but very fuzzy And the genroot of VQ-VAE outputs images in very good quality and also according to labeling.


Conclusions of the experiment: You can see that when we get to the genrot of color images with more complex objects than the numbers, the genrot of AE generates completely random pixels, the VAE generator is very blurry and since we generate images of 32 x 32 it seems at first glance to be garbage values But if you look at the reconstruction of VAE you clearly see that the genroot is very similar to the reconstruction but there is almost no chance to understand what objects are in the images. On the other hand, the VQ-VAE generator gives impressive results in relation to the previous algorithms and in relation to the fact that the data on which the algorithm is trained is low-resolution data with pre-blurred images. Indeed it is possible to understand what object we see in the picture, not always clearly but definitely possible.