A Quick Look at the User Interface
The user interface consists of four main parts: Menubar, Dashboard, Sidebar, and Footer. These all have special task which will be explained here.
- New: opens a new tab, when in editor mode it creates a new empty scene.
- Open: opens and reads a scene saved in X3D and related formats.
- Open Recent: opens a tab with the recently opened files.
- Open Location: opens a web location and reads a scene.
- Import: imports objects from a specified file.
- Save: saves the scene in X3D format (.x3dv or .x3d).
- Save As: saves the current scene under a new filename.
- Save A Copy: saves the current scene under a new filename without affecting the current file.
- Export: exports the current scene as image. Specify image width and height in the options dialog.
- Revert: opens the last saved version of the current file.
- Remove Unused Prototypes: removes all extern prototypes and prototypes that have no instances created in the scene.
- Properties: edit scene properties like units and world information.
- Close: closes the current scene.
- Exit: exits Titania.
- Undo: undoes each previous operation in a linear succession. You may "rewind" back any number of steps until you opened the file.
- Redo: redoes what was just undone, if applicable.
- Undo History: opens the Undo History editor where every single undo step is listed.
- Cut: removes the selected objects from the scene, and retains it in the clipboard for further use.
- Copy: copies the selected items into the clipboard for further use.
- Paste: pastes a new copy of objects from the clipboard into the scene.
- Delete: removes the selected items from the scene
-
Clone:
- Create Clone: replaces the selected nodes by the the master selection.
- Unlink Clone: unlinks the clone relationship of the selected nodes. The nodes can then be edited separately.
- Group: collects selected objects under a new parent group node, making a hierarchy.
- Ungroup: disbands a selected parent object. The selected node is removed and its constituent children become top-level objects in the scene.
- Add to Group: inserts the selected object into the selected group.
- Detach from Group: removes a selected object from its parent group and add it as a top-level object to the scene without ungrouping the rest of that group. Hold down Shift-key to detach a node from its layer.
- Create Parent Group: creates a new parent group over the selected object, retaining its place in the scene hierarchy. This is a good way to insert a dedicated transform node, for example, in applying a jointed animation.
- Menubar: toggle menubar on/off
- Toolbar: toggle toolbar on/off
- Sidebar: toggle sidebar with the Viewpoint List, History, Library and Outline Editor on/off
- Footer: toggle footer area with the Console on/off
-
Environment
- Browser: switch to browser mode to view and test your application
- Editor: switch to editor mode to edit arange and compose your content
- Motion Blur: opens a dialog where motion blur can be enabled to display the scene more realistic.
-
Shading
- Phong: switch to phong shading (supported in X_ITE Compatibility Mode)
- Gouraud: switch to Gouraud shading, this is the default shading when opening a world
- Flat: switch to flat shading
- Wireframe: switch to wireframe
- Pointset: switch to pointset
-
Primitive Quality
- High: switch to highest primitive quality
- Medium: switch to medium primitive quality
- Low: switch to lowest primitive quality
-
Texture Quality
- High: switch to highest texture quality
- Medium: switch to medium texture quality
- Low: switch to lowest texture quality
-
Show/Hide Environmental Effects
- Backgrounds: toggles between showing and hiding background nodes added to the scene.
- Fogs: toggles between showing and hiding fog nodes added to the scene.
- Show/Hide Object Icons: toggles between hiding or showing all object icons in the scene; these include objects like proximity sensors and visibility sensors.
- Display Rubberband: toggle the display of the rubberband when the Walk Viewer is active.
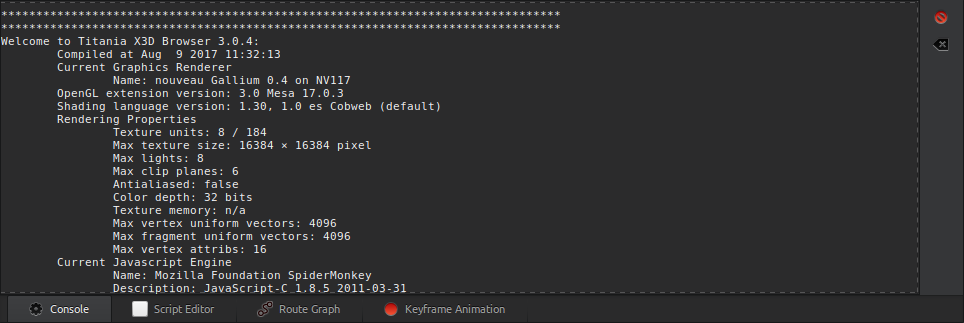
- Rendering Properties: toggle the display of the rendering properties on/off. This provides you with useful information about your system.
- Fullscreen: toggle fullscreen, you can leave the full screen mode again by pressing the F11 key
- Select All: selects all top-level objects in the scene.
- Deselect All: deselects all objects in the scene.
- Hide Selected Objects: hides selected objects from view.
- Hide Unselected Objects: hides all unselected objects from view.
- Show Selected Objects: shows all selected objects that were hidden by choosing »Hide Selected Objects«.
- Show All Objects: displays any objects that were hidden using »Hide Selected Objects«.
- Select Lowest: toggle between the selection of the lowest level object picked or the selection of the highest level parent group that contains the picked objects.
- Follow Primary Selection: automatically expand the tree in the Outline Editor to what is currently selected.
- Static Transform Tool: toggles between static and dynamic Transform Tool. The dynamic Transform Tool has fixed axes. If static is enabled the the axes are scaled depending on the distance of the currently bound viewpoint.
- Union: unites one ore more IndexedFaceSet nodes together leaving one visible polygons.
- Difference: subtracts one ore more IndexedFaceSet nodes from the first selection.
- Intersection: combines one ore more IndexedFaceSet nodes together leaving only the intersection of the selected nodes.
- Combine: combines all selected geometries into one object.
- Transform To Zero: sets all field of the Transform nodes in the selected hierarchy to their default values and applies the transformation to the coordinate points.
- Browser Size: set aspect ratio of browser size.
- Background Image: opens a dialog to set a background images for multi view browsers (top, right, front, …). This can be helpful for constructing a polygon object.
- Activate Grid Layout Tool: displays a rectangular grid as construction aid.
- Activate Angle Layout Tool: displays a circular grid as construction aid.
- Grid Properties: opens a dialog with advanced properties where either Grid and Angle Layout Tool can be adjusted to fit your needs.
- Activate Snap Target: places the yellow Snap Target in the scene.
- Activate Snap Source: places the green Snap Source arrow in the scene.
-
Center Snap Target in Selection: centers snap target in the middle of the nearest plane of the
selected object. - Move Selection to Snap Target: moves a face of the selected object to the Snap Target.
-
Move Selection Center to Snap Target: moves the selected object's center to the Snap
Target.
- This menu shows you all opened scenes. An asterix after the file name indicates that the scene does have changes that are not saved.
- X_ITE Compatibility: enable this feature to force Titania to provide at least exactly the same functionality and rendering effects as in X_ITE.
- Info: shows version information about Titania.


Note: X3D authors can control the visibility of the dashboard.
With the Project Editor you can manage folders from your hard disk for quick access of your files. You can add and remove folders to be managed. Right click to open a context menu while hovering a file or folder with the mouse.
The History displays a complete chronologically list of your recently opened worlds. You can view your complete browsing history here. Double click one item to open it again.
With the library you have quick access to predefined objects, node types, primitives like Sphere and Box, Prototypes, special shaders, materials and textures.
Double clicking one item in the Library imports the item as root node to your current scene. Switch to the Outline Editor to group the imported nodes. Not all imported nodes are visible in the browser surface, especialy when the node is a sensor node or a grouping node like Switch or LOD.
You can directly apply a material or texture to objects in your scene:
- Select the object where you want to change the material or texture.
- Go to the Material or Texture folder in the Library.
- Double-click one item.
The selected material or texture appears now on your objects.
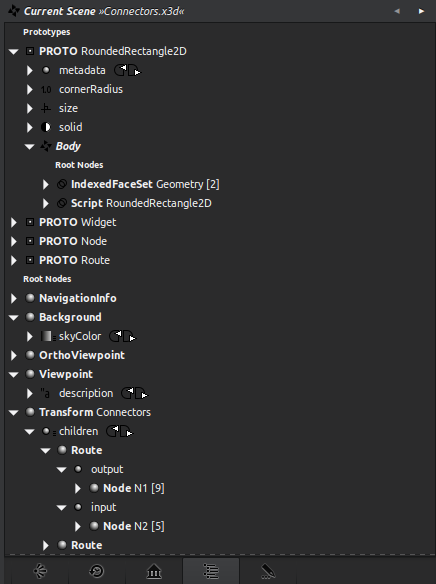
The Outline Editor is a very powerfull editor, it lets you edit nodes and field, you can create routes and clones, manage prototypes and imported and exported nodes. Have a look at Using the Outline Editor for more information.
Outline Editor with Scene Graph
Displays the X3D console. In the console are errors or warnings shown when encountered in the world. The console also shows JavaScript debugging output from the »print« command.
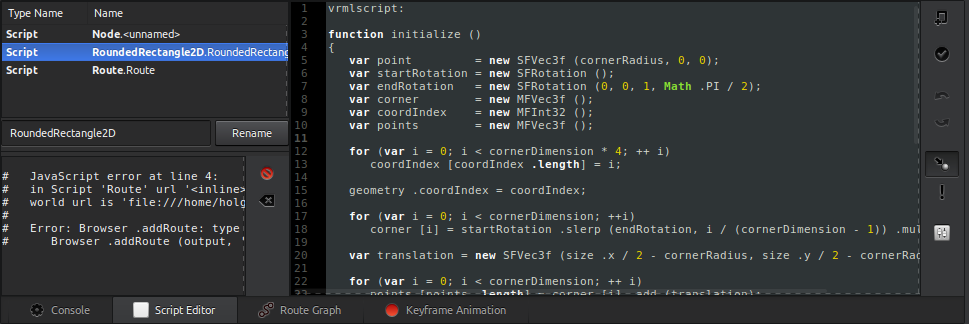
The Script Editor allows you to create and edit scripts that run within your scene. With the Script Editor you can easily edit Script and shader source code. Tip: Add, remove and edit Script and shader fields in the Node Properties Editor.
Scripts are written in ECMAScript, a lightweight, platform-independent programming language that is very similar to JavaScript. ECMAScript provides functions that are called when events come into the script, access to fields within the script, logic to operate on the fields, and the ability to send events from the script.
Shaders are written in OpenGL Shading Language (GLSL), a high-level shading language based on the syntax of the C programming language. With GLSL you can code (right up to) short programs, called shaders, which are executed on the GPU. With Shaders you are able for instance to write your own lighting model. But that's only one feature of shaders. There are thousands of other really nice possibilities: Shadows, Environment Mapping, Per-Pixel Lighting, Bump Mapping, Parallax Bump Mapping, HDR, and much more!
Have a look at Using the Script Editor for more information.
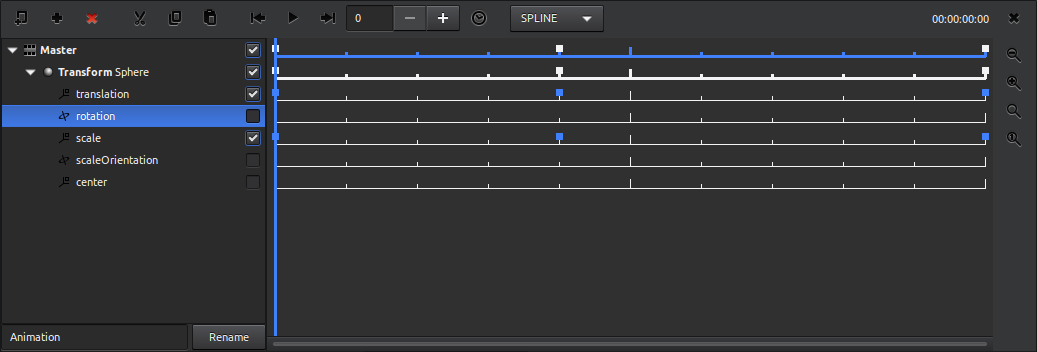
You can easily create animation using the new Keyframe Animation Editor. Keyframes can be of type Spline, Linear or Constant and can be arranged while playing the animation. You can play the whole animation or only a selected range. Have a look at Animating Objects to see how the Keyframe Animation Editor works.
- New = Ctrl+n
- Open = Ctrl+o
- Import = Ctrl+i
- Save = Ctrl+s
- Save As = Ctrl+Shift+s
- Quit = Ctrl+q
- Temporarily switch from selection mode to view mode = Ctrl+Shift
- Rotate camera around objects in scene = Click-drag
- Pan to slide camera left, right, up, down = Click-middle-drag
- Dolly = Scroll
- Move forward or back, turn left or right = Click-drag
- Look around = Ctrl-drag
- Pan to slide camera left, right, up, down = Click-middle-drag
- Tilt up or down = Scroll
- Move faster = Shift-click-drag
- Dolly = Scroll
- Pan = Click-middle-drag
- Undo = Ctrl+z
- Redo = Ctrl+Shift+z
- Cut = Ctrl+x
- Copy = Ctrl+c
- Paste copy = Ctrl+v
- Delete = Delete
- Select all = Ctrl+a
- Deselect all = Ctrl+Shift+a
- Select multiple = Shift-click
- Group = Ctrl+g
- Ungroup = Ctrl+Shift+g
- Place yellow Snap Target = click middle on object; also drag to place, Shift-drag makes
target "stick" to features - Constrain Snap Target to vertices, edges, centers = Shift-click middle on object
- Place green Snap Source = Ctrl-click middle; also drag to place, Shift-drag makes source
"stick" to features - Move selection to snap target = Ctrl+m
- Move selection center to snap target = Ctrl+Shift+m
- Move grid freely = drag yellow handles
- Switch between Translate Tool, Rotate Tool, and Scale Tool = double click Transform Tool
- Temporarily disable snapping = Shift-drag handles
- Move along one axis = drag arrow handles
- Move in plane of surface = drag bounding box face
- Constrain move in plane of surface = Ctrl-drag bounding box face
- Nudge along x-axis = arrow keys left and right, click Shift to nudge faster
- Nudge along y-axis = arrow keys up and down, click Shift to nudge faster
- Nudge along z-axis = arrow keys Ctrl+up and Ctrl+down, click Ctrl+Shift to nudge faster
- Rotate one axis = drag circle handle
- Constrain rotate one axis = Ctrl+drag circle handle
- Uniform scale = drag
- Uniform scale from one corner = Ctrl-drag corner box
- Squish & stretch = drag axis handles
- Squish & stretch from one side = Ctrl-drag axis handles
- Fully expand node = Shift-click node expander arrow
- Select node = Double-click node name
- Create a route = Click on two mating connectors
- Remove a route = Ctrl-click on connector
- Follow a route = Click small circle next to connector
- View info on route = Shift-click field expander arrow
-
Ctrl+Shift+u means to press at the same time the Ctrl, Shift, and u keys on your keyboard. Keys
always appear in italics. - Click means to quickly press and release the left mouse button.
- Click-middle means to quickly press and release the middle mouse button.
- Drag means to press and hold down the left mouse button while dragging the mouse.
-
Drag-middle means to press and hold down the middle mouse button while dragging the
mouse.
X3D GitHub Projects
X3D International Standards
Titania and X_ITE are based on the X3D International Standards and this standard is available online at web3d.org.
X3D Examples
Titania X3D Editor
Ease On Out!
- Installation Instructions
- Whats's new
- Supported Nodes
- Documentation
- Explaining the Editors
- Advanced Usage


