[译] [203] 在 VS Code 中使用 Copilot #33
Description
2.3 Working with Copilot in Visual Studio Code
2.3 在 VS Code 中使用 Copilot
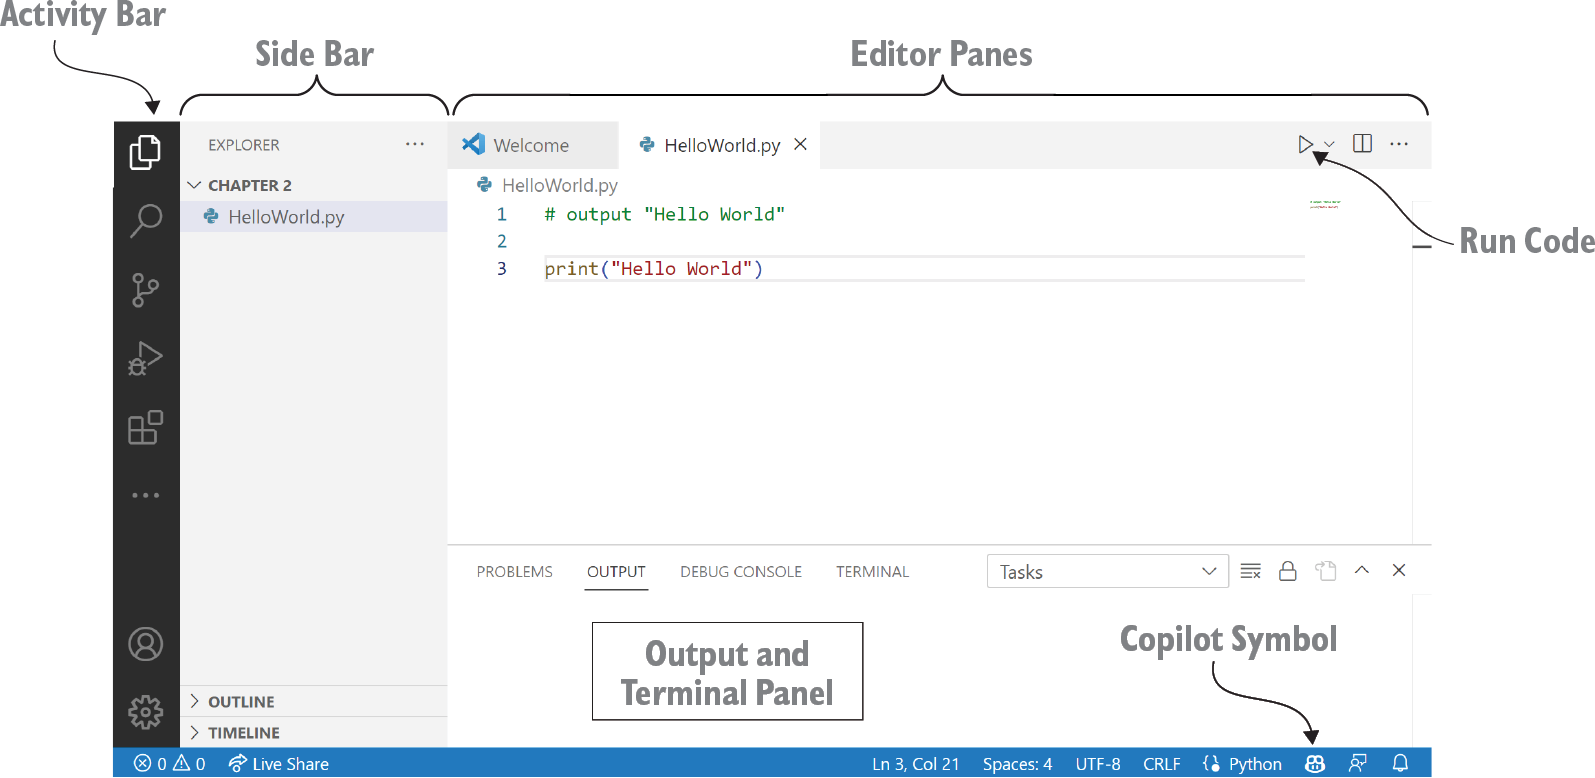
Now that you have your system set up, let’s get acquainted with the VS Code interface shown in figure 2.1. (You may need to click the Explorer icon in the middle/top left to have this same view.) The following regions are identified in figure 2.1:
现在你的系统已经设置完毕,让我们熟悉一下图 2.1 所示的 VS Code 界面。(你可能需要点击左上角的“Explorer”图标来获得相同的视图。)这张图标记出了以下区域:
-
Activity Bar—On the far left is the Activity Bar where we can open file folders (also known as directories) or install extensions (as you did to install the GitHub Copilot extension in the previous section).
-
活动栏。界面最左侧的是活动栏,在这里我们可以打开文件夹(也称作“目录”)或安装插件(就像你在上一节中安装 GitHub Copilot 插件一样)。
-
Side Bar—The side bar shows what is presently open in the Activity Bar. In figure 2.1, the Activity Bar has the Explorer selected, so the Side Bar is showing the files in the present folder.
-
侧边栏。侧边栏显示了活动栏中当前打开的内容。在图 2.1 中,活动栏选择了“资源管理器”,因此侧边栏展示的就是当前文件夹中的内容。
-
Editor Pane(s)—These are the primary areas we will use to create our software. The editor in the Editor Pane is similar to any other text editor in that you can write, edit, copy, and paste text using the clipboard. What is special about it, however, is that it is designed to work well with code. As we’ll see in the next example, you will primarily work in this window by asking Copilot to generate code and then testing that code.
-
编辑区。这里是我们主要用来编写软件的地方。编辑区的编辑功能与其他文本编辑器相似,允许你进行文本的撰写、编辑、复制和粘贴等操作。不过它的特别之处在于它对代码编辑做了充分优化。正如接下来的示例所示,你主要在这个窗口中向 Copilot 发出指令来生成代码,随后对这些代码进行测试。
-
Output and Terminal Panel—This is the area of the interface for seeing the output of your code or any errors that have occurred. It has the tabs Problems, Output, Debug Console, and Terminal. We will primarily use the Problems tab, where we can see potential errors in our code, and the Terminal tab, which allows us to interact with Python and see the output of our code.
-
输出和终端面板。这是界面上用于展示代码执行结果或捕捉错误信息的区域。它配备了“问题”、“输出”、“调试控制台”和“终端”等多个标签页。在日常工作中,问题标签页是我们最常访问的地方,因为它能够展示代码中可能出现的问题;而终端标签页则允许我们与 Python 进行交互,并实时查看代码的执行结果。
We highlighted the Copilot logo in the bottom right of figure 2.1 because you should see this symbol (or similar) if you set up Copilot properly in the previous section.
在图 2.1 的右下角,我们特别标出了 Copilot 的图标。如果你在上一节正确配置了 Copilot,那么你应该会看到这个图标(或类似的标志)。
Figure 2.1 The VS Code interface [3]
图2.1 VS Code 的界面 [3]
| 原文 | 译文 | 备注 |
|---|---|---|
| Activity Bar | 活动栏 | |
| Side Bar | 侧边栏 | |
| Editor Panes | 编辑区 | |
| Run Code | “运行代码”功能 | |
| Output and Terminal Panel | 输出和终端面板 | |
| Copilot Symbol | “Copilot”图标 |
2.3.1 Set up your working folder
2.3.1 配置你的工作目录
In the top of the Activity Bar on the left in VS Code, you will find Explorer as the top icon. After you click Explorer, it should say “No Folder Open”. Click the button to open folder and select a folder on your computer (or make a new one—we like the folder name fun_with_Copilot). Once you’ve opened this folder, your workspace will be the folder you opened, which means you should have your code and any data files, like the one we’ll use later this chapter, in that folder.
在 VS Code 的左侧活动栏的顶部,你会看到“资源管理器”图标位于最顶端。当你点击资源管理器后,应该会显示“尚未打开文件夹”。接下来,点击“打开文件夹”按钮,然后在你的电脑上选择一个文件夹(或者创建一个新文件夹——我们倾向于将文件夹命名为 fun_with_Copilot)。一旦你选中这个文件夹,它就会成为你的工作目录。也就是说,你的代码和所有数据文件,比如本章稍后会用到的文件,都应该存放在这个文件夹内。
File not found or file missing errors
文件未找到或文件缺失错误
If you ever receive an error that says you are missing a file, take heart: these are the kinds of errors that everyone makes. They can be really annoying when writing software. It could be that you just didn’t put the file in your working folder—this happens. That’s an easy fix by copying or moving the file into the correct folder. However, sometimes, you’ll look in the folder and the file will be there, but when you run your code in VS Code, Python can’t seem to find it. If this happens to you (it happened to us when writing the book!), be sure to have the folder with the code and the desired file open using Explorer in VS Code (as shown in the Side Bar in figure 2.1).
当你遇到一个“缺少文件”的错误时,不必沮丧:这是编程过程中每个人都可能遇到的问题。这类错误虽然令人烦恼,但通常都很容易解决。有时,这仅仅是因为你忘记将文件放入工作目录。解决这个问题的方法很简单,只需将文件复制或移动到正确的文件夹即可。不过有时即使文件明明存在于文件夹中,当你在 VS Code 中执行代码时,Python 却似乎无法识别。这种情况在我们撰写本书的过程中也发生过。如果遇到这种情况,请确保你已经通过 VS Code 的“资源管理器”功能(如图 2.1 所示的侧边栏)打开了包含代码和所需文件的文件夹。
2.3.2 Check to see if your setup is working properly
2.3.2 验证你的配置是否运行正常
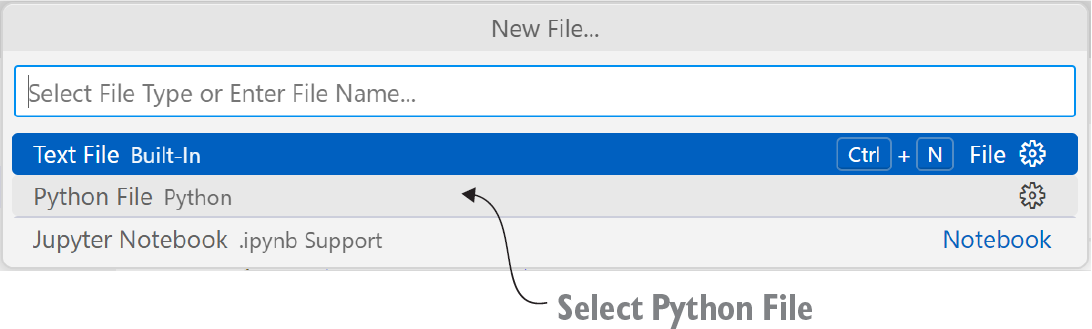
Let’s check to see if we’ve set up everything properly and that Copilot is working. To do this, start by creating a new file to hold our program. You do this by going to File > New File (figure 2.2), then selecting Python File (figure 2.3).
让我们检查一下所有配置是否已正确生效,以及 Copilot 是否正常运行。首先,创建一个新文件来存放我们的程序。你可以通过点击“文件”→“新建文件”菜单(参见图 2.2),随后选择“Python文件”(参见图 2.3)来完成这一操作。
Figure 2.2 How to create a new file in VS Code
图2.2 如何在 VS Code 中创建新文件
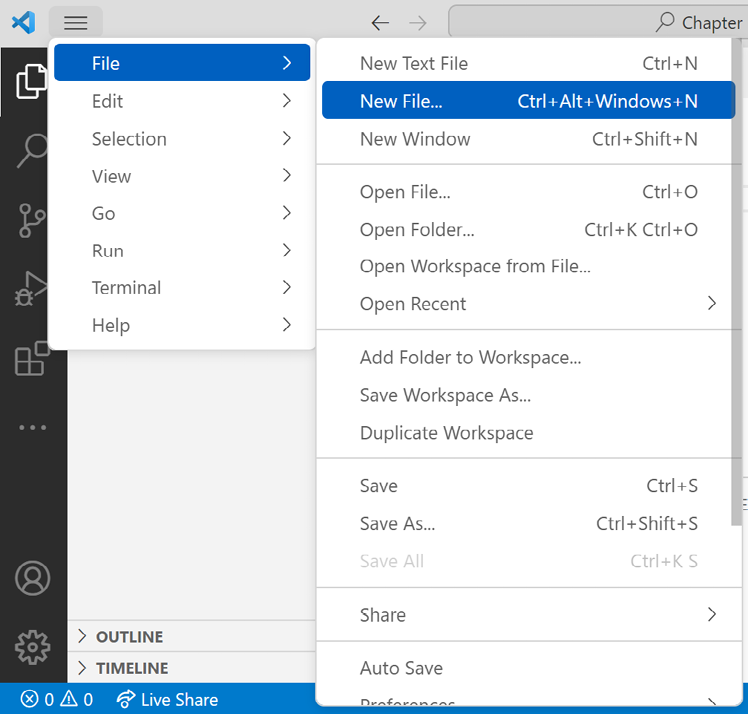
Figure 2.3 Select to create the New File as a Python File
图2.3 选择创建一个新的 Python 文件
| 原文 | 译文 | 备注 |
|---|---|---|
| Select Python File | 选择 Python 文件 |
After creating it, we like to make sure that we’ve saved the file. Go to File > Save As and let’s name this file first_Copilot_program.py.
创建文件后,我们建议立即进行保存。点击“文件”→“另存为”菜单,并将文件命名为 first_Copilot_program.py。
Next, in the text editor, type
接下来,在编辑区输入以下内容:
# output "Hello Copilot" to the screenThe prompts and code we write will be in bold font to help distinguish between what we write, and the code and comments Copilot may give us. The # sign at the start is important (and you should include it in what you typed). It means that what you wrote is a comment (depending on your VS Code color palette, it’ll be a different color than the code we’re about to produce). Comments are not code: the computer executes code and does not execute comments. Comments are used by programmers to provide a human-readable summary of what the code did to help other software engineers read the code. Today, its purpose has expanded to also prompt Copilot. After writing a comment (and sometimes even while writing comments), Copilot will attempt to give us suggestions. You can think of this as a much more sophisticated autocomplete, like when you type “New York T” in your search engine, and it autocompletes with “New York Times.”
在本书中,我们编写的提示词和代码将以加粗的字体呈现,以便区分我们自己编写的内容以及 Copilot 给出的代码和注释。输入时请务必包含开头的 # 符号,它标志着你写的内容是一行注释(根据你的 VS Code 配色方案,注释的颜色将与随后生成的代码有所区别)。注释并不是代码:计算机会执行代码,但不会执行注释。注释是程序员用来描述代码功能的总结性文字,它应该写得简洁易懂,以便其他软件工程师快速理解代码。如今,注释的作用进一步扩展,它还能触发 Copilot 提供建议。你可以将其理解为一种更为先进的自动完成功能,类似于在搜索引擎中输入“New York T”,随即自动补全为“New York Times”。
To trigger Copilot to start giving us code (or more comments), press Enter at the end of the line, and you’ll be at the start of a new line. Pause for a moment, and you should see something appear. Until accepted, Copilot’s suggestions are in light gray italics. If you do not get a suggestion yet, you may need to hit Enter a second time to trigger Copilot to suggest the code. Here’s what happened for us:
要触发 Copilot 为我们生成代码(或更多的注释),只需在行尾按下回车键,便能移至新行的起始位置。稍作等待,你将看到建议内容显现出来。在未被采纳前,Copilot 的建议将以浅灰色斜体字呈现。如果尚未收到任何建议,可能需要再次按下 Enter 键来激发 Copilot 给出代码建议。以下是我们实际操作时的情况:
# output "Hello Copilot" to the screen
print("Hello Copilot")
If you still do not see a suggestion from Copilot, try pressing Ctrl–Enter (hold Ctrl while pressing Enter). When you press Ctrl–Enter, a new window on the right-hand side of the screen should appear. The window will be to the right of your editor window with the program and will be called GitHub Copilot. If that window does not appear, there may be something wrong with your setup, and we encourage you to go to the book website to double-check that you followed all the steps correctly or to find (or ask for) help.
如果你仍然没有看到来自 Copilot 的建议,可以尝试按下 Ctrl+回车(按住 Ctrl 键的同时按下回车键)。当你按下这组快捷键时,屏幕右侧应该会出现一个新的面板。这个面板将位于编辑区的右侧,它的名称就叫 “GitHub Copilot”[译者注]。如果这个面板没有出现,可能是你的设置出现了问题。我们建议你访问本书英文版的官方网站,再次确认你是否正确遵循了所有步骤,或者寻求进一步的帮助。
译者注:这个面板相对于编辑区中的代码建议功能来说,是一个“加强版”。Copilot 会在这个面板中提供不止一条代码补全建议,你可以逐条浏览并选择接受最理想的那一条。
If you saw the suggestion from Copilot, Tab to accept Copilot’s suggestion. Once you do this, the suggestion that was previously in light gray italics should now be in a standard font:
如果你看到了 Copilot 的建议,按 Tab 键即表示采纳这个建议。一旦采纳,原本以浅灰色斜体呈现的建议将转变成常规字体:
# output "Hello Copilot" to the screen
print("Hello Copilot")| 原文 | 译文 | 备注 |
|---|---|---|
| The prompt we wrote | 我们编写的提示词 | |
| The code produced by Copilot | Copilot 生成的代码 |
If you are seeing different code than this, it’s because of something we mentioned in the introduction: Copilot is nondeterministic so you may see different code than us. We mention this because sometimes Copilot makes a minor mistake with the code here and may give you code similar to this:
如果你看到的代码与上面的示例不同,那正是因为我们在书开头提到的:Copilot 的行为具有不确定性,因此你可能会得到与我们不同的代码。我们指出这一点,是因为 Copilot 在生成代码时偶尔可能会有小疏漏,导致你得到类似这样的代码:
print "Hello Copilot"You might think this slight difference (no parentheses around "Hello Copilot") wouldn’t matter, but it does. Before Python 3, this was the correct syntax for a print statement and when Python 3 was introduced, it switched to the code with parentheses. Since we’re running Python 3, you need to have the parentheses for the code to work. You might ask why Copilot gets this wrong: the problem is Copilot was trained on some old Python code as part of its training. If this seems annoying, we agree. But it’s a hint of the frustration novice programmers went through before Copilot. Most of what Copilot suggests is syntactically correct. But if you are a novice writing the code from scratch, missing parentheses or a missing colon somewhere might cost you a lot of time.
你或许认为这种小差别("Hello Copilot" 外面少了一层括号)无关紧要,然而实际上它至关重要。在 Python 3 问世之前,打印语句的正确写法是不加括号的。但随着 Python 3 的推出,语法规则改为必须使用括号。既然我们使用的是 Python 3,那么代码中就必须包含括号才能正常运行。你可能会好奇,为什么 Copilot 会犯这样的错误:这是因为 Copilot 在训练过程中接触过一些老旧的 Python 代码。如果这让你感到困扰,我们完全理解。但这也是新手程序员在没有 Copilot 帮忙时同样要经历的磨难。虽然 Copilot 提供的大多数建议在语法上都是正确的,但对于初学者来说,如果代码中缺少了括号或在某个地方漏掉了冒号,可能会让你浪费不少时间。
Now that we have the correct code,
还好我们得到的代码是正确的:
# output "Hello Copilot" to the screen
print("Hello Copilot")
which, as you might guess, prints “Hello Copilot” to the screen, we should test it. First, you’ll want to save your file by going to File > Save.
你可能已经猜到,这行代码将在屏幕上打印出“Hello Copilot”,那我们就来试试看。首先,你需要点击“文件”→“保存”菜单来确保文件已经保存。
Be sure to save your file before you run it. We’re embarrassed to admit the amount of time we’ve spent trying to fix code that was correct but hadn’t been saved.
在执行程序前,请务必确保文件已经保存。我们不得不尴尬地承认,我们曾花费大量时间,试图解决那些原本无误却因为没有保存而导致的代码问题。
To run your program, go to the top right corner of the text editor and click the Run Code icon as shown in figure 2.1. After pressing the icon, in the Terminal section at the bottom, you should see something like this:
如果要运行程序,请将鼠标光标移至编辑区的右上角,并点击“运行”图标,如图 2.1 所示。点击该图标后,在界面底部的“终端”区域,你应该会看到类似于这样的内容:
> & C:/Users/YOURNAME/AppData/Local/Programs/Python/Python311/Python.exe c:/Users/YOURNAME/Copilot-book/first_Copilot_program.py

Hello Copilot
The top line starting with > is the command for the computer to run your code, and all it says is to run your first_Copilot_program.py using Python. The second line is the output from running the command, and it says, “Hello Copilot,” which is what we’d hoped to see.
最顶部以 > 开始的那一行是计算机运行代码的命令,它的意思是使用 Python 来执行你的 first_Copilot_program.py 文件。紧随其后的第二行是执行该命令后的输出结果,它打印出 Hello Copilot,这正是我们预期的结果。
Congratulations! You’ve written your first program! We now know that your programming environment is set up correctly and we can move onto our first programming task. But before we do, we’d like to go over tips for how to deal with some common problems we’ve encountered when working with Copilot, so you have these tips available to you when working through the next example.
恭喜你!你已经写出了你的第一个程序!现在,我们确认你的编程环境已经配置无误,接下来可以迈向你的第一个编程任务。不过在开始之前,我们想跟你分享一些与 Copilot 协作时可能遇到的常见问题以及应对技巧,让你在进行下一个案例时更加得心应手。