A step-by-step tutorial showing you how to
build a Todo List App from scratch in JavaScript.


Before you continue, try the demo: https://dwyl.github.io/javascript-todo-list-tutorial/
Add a few items to the list. Double-click/tap the item to edit it. Check-off your todos and navigate the footer to filter for Active/Completed. Try and "break" it! Refresh the page and notice how your todo items are "still there" (they were saved to
localStorage!). Once you have had a "play" with the demo, come back and build it!!
The purpose of this Todo List mini project is to practice your "VanillaJS" skills and consolidate your understanding of The Elm Architecture (TEA) by creating a real world useable App following strict Documentation and Test Driven Development.
This will show you that it's not only possible
to write docs and tests first,
you will see first hand that code is more concise,
well-documented and thus easier to maintain
and you will get your work done much faster.
These are foundational skills that will
pay immediate returns on the time invested,
and will continue to return "interest"
for as long as you write (and people use your) software!
It's impossible to "over-state" how vital writing tests first is to both your personal effectiveness and long-term sanity. Thankfully, by the end of this chapter, you will see how easy it is.
Build a fully functional "Todo List" Application!
Along the way we will cover:
- Building an App using a pre-made CSS Styles/Framework!
- The Document Object Model (DOM) + JSDOM
- Browser Routing/Navigation
- Local Storage for Offline Support
- Keyboard event listeners for rapid todo list creation and editing!
We will be abstracting all "architecture" related ("generic") code into a "mini frontend framework" called "elmish". (elmish is inspired by Elm but only meant for educational purposes!)
The journey to creating elmish is captured in
elmish.md
and fully documented code is in elmish.js.
This means our Todo List App can be as concise
and "declarative" as possible.
If you are unfamiliar with Todo lists, simply put:
they are a way of keeping a list of the tasks that need to be done.
see: https://en.wikipedia.org/wiki/Time_management#Setting_priorities_and_goals
Todo Lists or "Checklists" are the best way of tracking tasks.
Atul Gawande wrote a superb book on this subject:
https://www.amazon.com/Checklist-Manifesto-How-Things-Right/dp/0312430000
Or if you don't have time to read,
watch: https://www.youtube.com/results?search_query=checklist+manifesto
If you have not come across TodoMVC before,
it's a website that showcases various "frontend" frameworks
using a common user interface (UI): a Todo List Application.

We highly recommend checking out the following links:
- Website: https://todomvc.com
- GitHub project: https://github.com/tastejs/todomvc
For our purposes we will simply be re-using the TodoMVC CSS
to make our TEA Todo List look good
(not have to "worry" about styles so we can focus on functionality).
All the JavaScript code will be written "from scratch"
to ensure that everything is clear.
This tutorial is for anyone/everyone who wants to develop their "core" JavaScript skills (without using a framework/library) while building a "real world" (fully functional) Todo List Application.
As always, if you get "stuck", please open an issue: https://github.com/dwyl/javascript-todo-list-tutorial/issues by opening a question you help everyone learn more effectively!
Most beginners with basic JavaScript and HTML knowledge should be able to follow this example without any prior experience. The code is commented and the most "complex" function is an event listener. With that said, if you feel "stuck" at any point, please consult the recommend reading (and Google) and if you cannot find an answer, please open an issue!
- Test Driven Developement: https://github.com/dwyl/learn-tdd
- Tape-specific syntax: https://github.com/dwyl/learn-tape
- Elm Architecture: https://github.com/dwyl/learn-elm-architecture-in-javascript
Start by cloning this repository to your localhost
so that you can follow the example/tutorial offline:
git clone https://github.com/dwyl/javascript-todo-list-tutorial.gitInstall the devDependencies so you can run the tests:
cd javascript-todo-list-tutorial && npm installNow you have everything you need to build a Todo List from scratch!
In order to simplify the code for our Todo List App,
we abstracted much of the "generic" code
into a "front-end micro framework" called Elm(ish).
The functions & functionality of Elm(ish) should be familiar to you
so you should be able to build the Todo List using the Elm(ish)
helper functions e.g: mount, div, input and route.
You can opt to either:
a) read the Elm(ish) docs/tutorial
elmish.md
before building the Todo List App -
this will give you both TDD practice
and a deeper understanding of building a micro framework.
i.e. "prospective learning"
b) refer the Elm(ish) docs/tutorial
elmish.md
while building the Todo List App when you "need to know"
how one of the helper functions works. i.e. "contextual learning"
c) only consult the Elm(ish) docs/tutorial
elmish.md
if you are "stuck" while building the Todo List App.
i.e. "debug learning"
The choice is yours; there is no "right" way to learn.
Before diving into building the Todo List App, we need to consider how we are going to test it. By ensuring that we follow TDD from the start of an App, we will have "no surprises" and avoid having to "correct" any "bad habits".
We will be using Tape and JSDOM for testing
both our functions and the final application.
If you are new to either of these tools,
please see:
github.com/dwyl/learn-tape
and
front-end-with-tape.md
We will be using JSDOC for documentation. Please see our tutorial if this is new to you.
Create a new directory e.g: /todo-app
So that you can build the Todo List from scratch!
In your editor/terminal create the following files:
test/todo-app.test.jslib/todo-app.jsindex.html
These file names should be self-explanatory, but if unclear,
todo-app.test.js is where we will write the tests for our
Todo List App.
todo-app.js is where all the JSDOCs and functions
for our Todo List App will be written.
In order to run our test(s), we need some "setup" code that "requires" the libraries/files so we can execute the functions.
In the test/todo-app.test.js file, type the following code:
const test = require('tape');       // https://github.com/dwyl/learn-tape
const fs = require('fs');           // to read html files (see below)
const path = require('path');       // so we can open files cross-platform
const html = fs.readFileSync(path.resolve(__dirname, '../index.html'));
require('jsdom-global')(html);      // https://github.com/rstacruz/jsdom-global
const app = require('../lib/todo-app.js'); // functions to test
const id = 'test-app';              // all tests use 'test-app' as root element
Most of this code should be familiar to you if you have followed previous tutorials. If anything is unclear please revisit https://github.com/dwyl/learn-tape and front-end-with-tape.md
If you attempt to run the test file: node test/todo-app.test.js
you should see no output.
(this is expected as we haven't written any tests yet!)
The model for our Todo List App is boringly simple.
All we need is an Object with a
todos key which has an Array of Objects as it's value:
{
  todos: [
    { id: 1, title: "Learn Elm Architecture", done: true },
    { id: 2, title: "Build Todo List App",    done: false },
    { id: 3, title: "Win the Internet!",      done: false }
  ]
}
todos is an Array of Objects and each Todo (Array) item
has 3 keys:
id: the index in the list.title: the title/description of the todo item.done: abooleanindicating if the item is complete or still "todo".
The TodoMVC Specification requires us to display a
counterof the items in the Todo list: https://github.com/tastejs/todomvc/blob/main/app-spec.md#counter

In order to display the count of items in the Todo list,
we could store 3 values in the model:
total_items- the total number of items, in this case 3.completed_items- the number of completed items. in this case 1.incomplete_items- the number of items still to be done; 2.
Each time a new item is added to the list
we would need to update
both the total_items
and the incomplete_items
values in the model.
And each time an item gets checked off as "done",
we would need to update both the incomplete_items
and the completed_items.
This is unnecessary effort we can avoid.
We can simply compute these values based on the data in the todos Array
and display them for the user without storing any additional data.
Instead of storing any additional data for a counter in the model
(the count of active and completed Todo items),
we will compute the count and display the count at "runtime".
We don't need to store any additional data in the model.
This may use a few CPU cycles computing the count
each time the view is rendered but that's "OK"!
Even on an ancient Android device
this will only take a millisecond to compute and
won't "slow down" the app or affect UX.
See below for how the three counts are computed.
e.g: in the model above there are 3 todo items in the todos Array;
2 items which are "active" (done=false)
and 1 which is "done" (done=true).
Given that the model is "just data"
(
it has no "methods" because Elm(ish) is
"Functional"
not
"Object Oriented"
),
there is no functionality to test.
We are merely going to test for the "shape" of the data.
In the test/todo-app.test.js file, append following test code:
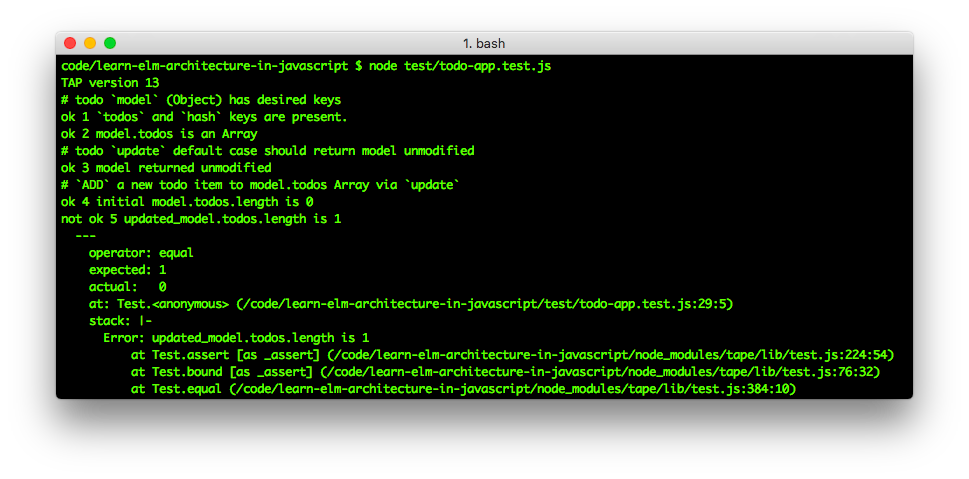
test('todo `model` (Object) has desired keys', function (t) {
  const keys = Object.keys(app.model);
  t.deepEqual(keys, ['todos', 'hash'], "`todos` and `hash` keys are present.");
  t.true(Array.isArray(app.model.todos), "model.todos is an Array")
  t.end();
});
If you run this test in your terminal:
node test/todo-app.test.jsYou should see both assertions fail:

Write the minimum code required to pass this test in todo-app.js.
e.g:
/**
 * initial_model is a simple JavaScript Object with two keys and no methods.
 * it is used both as the "initial" model when mounting the Todo List App
 * and as the "reset" state when all todos are deleted at once.
 */
var initial_model = {
  todos: [], // empty array which we will fill shortly
  hash: "#/" // the hash in the url (for routing)
}

/* module.exports is needed to run the functions using Node.js for testing! */
/* istanbul ignore next */
if (typeof module !== 'undefined' && module.exports) {
  module.exports = {
    model: initial_model
  }
}
Once you save the todo-app.js file and re-run the tests.
node test/todo-app.test.jsYou should expect to see both assertions passing:

We're off to a great start! Let's tackle some actual functionality next!
The update function is the
"brain"
of the App.
The JSDOC for our update function is:
/**
 * `update` transforms the `model` based on the `action`.
 * @param {String} action - the desired action to perform on the model.
 * @param {Object} model - the App's data ("state").
 * @return {Object} new_model - the transformed model.
*/As with the update in our counter example
the function body is a switch statement
that "decides" how to handle a request based on the action
(also known as the "message").
Given that we know that our update function "skeleton"
will be a switch statement
(because that is the "TEA" pattern)
a good test to start with is the default case.
Append the following test code in test/todo-app.test.js:
test('todo `update` default case should return model unmodified', function (t) {
  const model = JSON.parse(JSON.stringify(app.model));
  const unmodified_model = app.update('UNKNOWN_ACTION', model);
  t.deepEqual(model, unmodified_model, "model returned unmodified");
  t.end();
});
If you run this test in your terminal:
node test/todo-app.test.jsYou should see the assertion fail:

Write the minimum code necessary to pass the test.
Yes, we could just write:
function update (action, model) { return model; }And that would make the test pass.
But, in light of the fact that we know the update
function body will contain a switch statement,
make the test pass by returning the model unmodified in the default case.
e.g:
/**
 * `update` transforms the `model` based on the `action`.
 * @param {String} action - the desired action to perform on the model.
 * @param {Object} model - the App's (current) model (or "state").
 * @return {Object} new_model - the transformed model.
 */
function update(action, model) {
 switch (action) {                  // action (String) determines which case
   default:                         // if action unrecognised or undefined,
     return model;                  // return model unmodified
 }    // default? https://softwareengineering.stackexchange.com/a/201786/211301
}
When you re-run the test(s) in your terminal:
node test/todo-app.test.jsYou should see this assertion pass:

Now that we have a passing test
for the default case in our update function,
we can move on to
thinking about the first (and most fundamental) piece
of functionality in the Todo List App: Adding an item to the list.
This is both the first "feature" a "user" will encounter and
by far the most used feature of a Todo List.
(by definition people add more items to their list than they finish,
to finish everything we would have to
live forever!)
Adding a new todo item's text should
append the todo item Object to the model.todos Array.
Such that the model is transformed (data is added) in the following way:
BEFORE:
{
  todos: [],
  hash: "#/"
}AFTER:
{
  todos: [
    {id: 1, "Add Todo List Item", done: false }
  ],
  hash: "#/"
}
While considering the "Acceptance Criteria"
for adding an item to the Todo List,
we notice that our update JSDOC
and corresponding function "signature" (defined above) as:
/**
 * `update` transforms the `model` based on the `action`.
 * @param {String} action - the desired action to perform on the model.
 * @param {Object} model - the App's (current) model (or "state").
 * @return {Object} updated_model - the transformed model.
 */
function update(action, model) {
 switch (action) {                  // action (String) determines which case
   default:                         // if action unrecognised or undefined,
     return model;                  // return model unmodified
 }    // default? https://softwareengineering.stackexchange.com/a/201786/211301
}
does not have a parameter for passing in the Todo List item Text (title),
i.e. how do we add "data" to the model...?
That's "Oh kay"! (don't panic!)
If we try to think about implementation up-front,
we would invariably be "over-thinking" things
and get "stuck" in the
"analysis paralysis"
of
"waterfall"
As you are about to see, we can easily change the function signature, in the next test without affecting our exiting (passing) test!
As you practice "DDD" & "TDD" you will begin to appreciate and even embrace the mental agility that comes from not "over-thinking" things.
Whenever you encounter a "New Requirement"
(or realise that you didn't fully consider the original requirements),
you know that your suite of tests has
"
got your
back
".
You can "refactor" a function's implementation to your heart's content,
safe in the knowledge that all your existing tests still pass.
i.e. the rest of the app "still works" exactly as expected.
We don't want to "mess with" either of the other two (existing) parameters,
both action and model have clearly defined purposes,
but we need a way to pass "data" into the update function!
With that in mind, let's amend the update JSDOC comment
and function signature to:
/**
 * `update` transforms the `model` based on the `action`.
 * @param {String} action - the desired action to perform on the model.
 * @param {Object} model - the App's (current) model (or "state").
 * @param {String} data - data we want to "apply" to the item. e.g: item Title.
 * @return {Object} updated_model - the transformed model.
 */
function update(action, model, data) {
  switch (action) {                  // action (String) determines which case
    default:                         // if action unrecognised or undefined,
      return model;                  // return model unmodified
  }    // default? https://softwareengineering.stackexchange.com/a/201786/211301
}
Without making any other changes, re-run the tests:
node test/todo-app.test.jsEverything should still pass:
Congratulations! You just extended a function (signature) without affecting any existing tests.
Append the following test code to your test/todo-app.test.js file:
test('`ADD` a new todo item to model.todos Array via `update`', function (t) {
  const model = JSON.parse(JSON.stringify(app.model)); // initial state
  t.equal(model.todos.length, 0, "initial model.todos.length is 0");
  const updated_model = app.update('ADD', model, "Add Todo List Item");
  const expected = { id: 1, title: "Add Todo List Item", done: false };
  t.equal(updated_model.todos.length, 1, "updated_model.todos.length is 1");
  t.deepEqual(updated_model.todos[0], expected, "Todo list item added.");
  t.end();
});
If you run this test in your terminal:
node test/todo-app.test.jsYou should see the assertion fail:
With the above test as your "guide", write the bare minimum code necessary to make all assertions pass.
Sample implementation:
/**
 * `update` transforms the `model` based on the `action`.
 * @param {String} action - the desired action to perform on the model.
 * @param {Object} model - the App's (current) model (or "state").
 * @param {String} data - the data we want to "apply" to the item.
 * @return {Object} updated_model - the transformed model.
 */
function update(action, model, data) {
  var new_model = JSON.parse(JSON.stringify(model)) // "clone" the model
  switch(action) {                   // and an action (String) runs a switch
    case 'ADD':
      new_model.todos.push({
        id: model.todos.length + 1,
        title: data,
        done: false
      });
      break;
    default: // if action unrecognised or undefined,
      return model; // return model unmodified
  }   // see: https://softwareengineering.stackexchange.com/a/201786/211301
  return new_model;
}
the case 'ADD' is the relevant code.
Was your implementation similar...?
If you were able to make it simpler, please share!
Once you have the test(s) passing e.g:
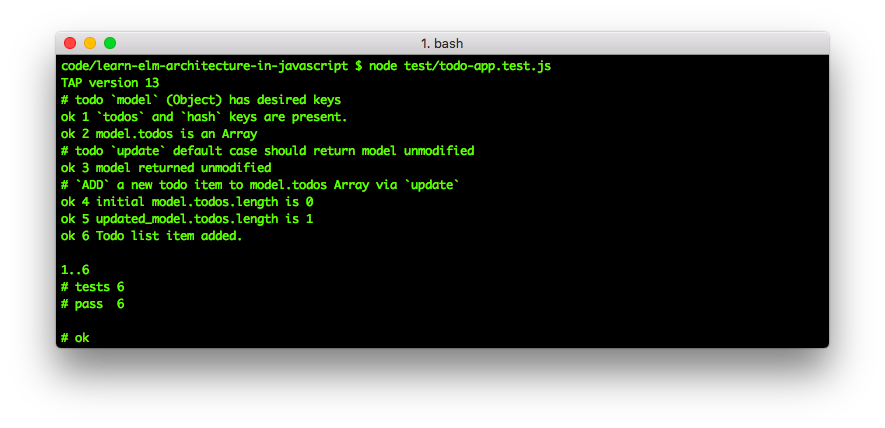
Let's move on to the next functionality!

Checking off a todo item involves changing the value of the done property
from false to true. e.g:
FROM:
{
  todos: [
    {id: 1, "Toggle a todo list item", done: false }
  ]
}TO:
{
  todos: [
    {id: 1, "Toggle a todo list item", done: true }
  ]
}
Given that we have already defined our update function above,
we can dive straight into writing a test:
Append the following test code to your test/todo-app.test.js file:
test('`TOGGLE` a todo item from done=false to done=true', function (t) {
  const model = JSON.parse(JSON.stringify(app.model)); // initial state
  const model_with_todo = app.update('ADD', model, "Toggle a todo list item");
  const item = model_with_todo.todos[0];
  const model_todo_done = app.update('TOGGLE', model_with_todo, item.id);
  const expected = { id: 1, title: "Toggle a todo list item", done: true };
  t.deepEqual(model_todo_done.todos[0], expected, "Todo list item Toggled.");
  t.end();
});
execute the test:
node test/todo-app.test.jsYou should see something similar to the following:
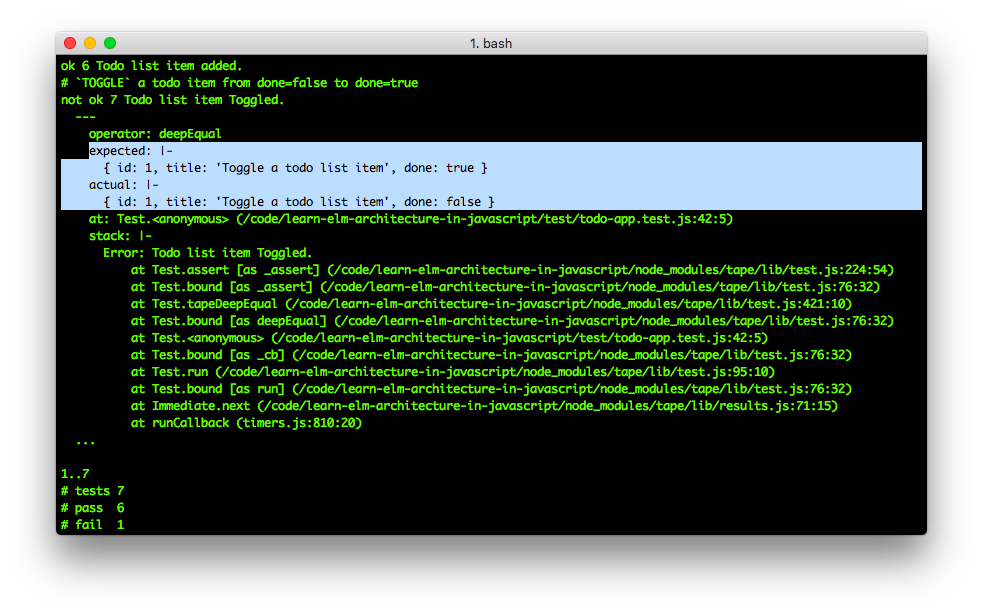
With the above test as your "guide",
write the minimum code necessary to make the test pass.
(ensure that you continue to make a "copy" of the model
rather than "mutate" it)
Once you make it pass you should see:

Try to make the test pass alone (or with your pairing partner). If you get "stuck" see:
todo-app.js
Yes, you guessed it!
Choosing to name the action as "TOGGLE"
is precisely because we don't need
to have a separate function
to "undo" an item if it has been "checked off".
Append the following test code to your test/todo-app.test.js file:
test('`TOGGLE` (undo) a todo item from done=true to done=false', function (t) {
  const model = JSON.parse(JSON.stringify(app.model)); // initial state
  const model_with_todo = app.update('ADD', model, "Toggle a todo list item");
  const item = model_with_todo.todos[0];
  const model_todo_done = app.update('TOGGLE', model_with_todo, item.id);
  const expected = { id: 1, title: "Toggle a todo list item", done: true };
  t.deepEqual(model_todo_done.todos[0], expected, "Toggled done=false >> true");
  // add another item before "undoing" the original one:
  const model_second_item = app.update('ADD', model_todo_done, "Another todo");
  t.equal(model_second_item.todos.length, 2, "there are TWO todo items");
  // Toggle the original item such that: done=true >> done=false
  const model_todo_undone = app.update('TOGGLE', model_second_item, item.id);
  const undone = { id: 1, title: "Toggle a todo list item", done: false };
  t.deepEqual(model_todo_undone.todos[0],undone, "Todo item Toggled > undone!");
  t.end();
});
You should not need to modify any of the code in the update function.
The above test should just pass based on the code you wrote above.
If it does not, then revise your implementation
of the TOGGLE case in update until all tests pass:

It won't have "escaped" you that so far we have not written any code that a user can actually interact with.
So far we have successfully added two case blocks in the switch statement
of our update function. We now have the two basic functions required
to both ADD a new todo list item to the model.todos Array
and check-off a todo list item as "done" using the TOGGLE action.
This is "enough" functionality to start using the todo list (ourselves)
and UX-testing it with prospective "users".
If you followed through the "Elm(ish)" tutorial
elmish.md
you will have seen that we created a sample view in the last few tests
to "exercise" the DOM element creation functions.
This means that we already know how to build a view for our Todo List App!
We "just" need to adapt the view we made in Elm(ish) to display
the data in our model.
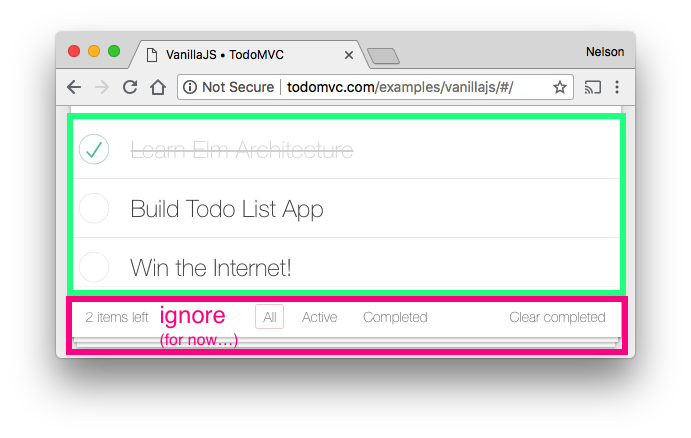
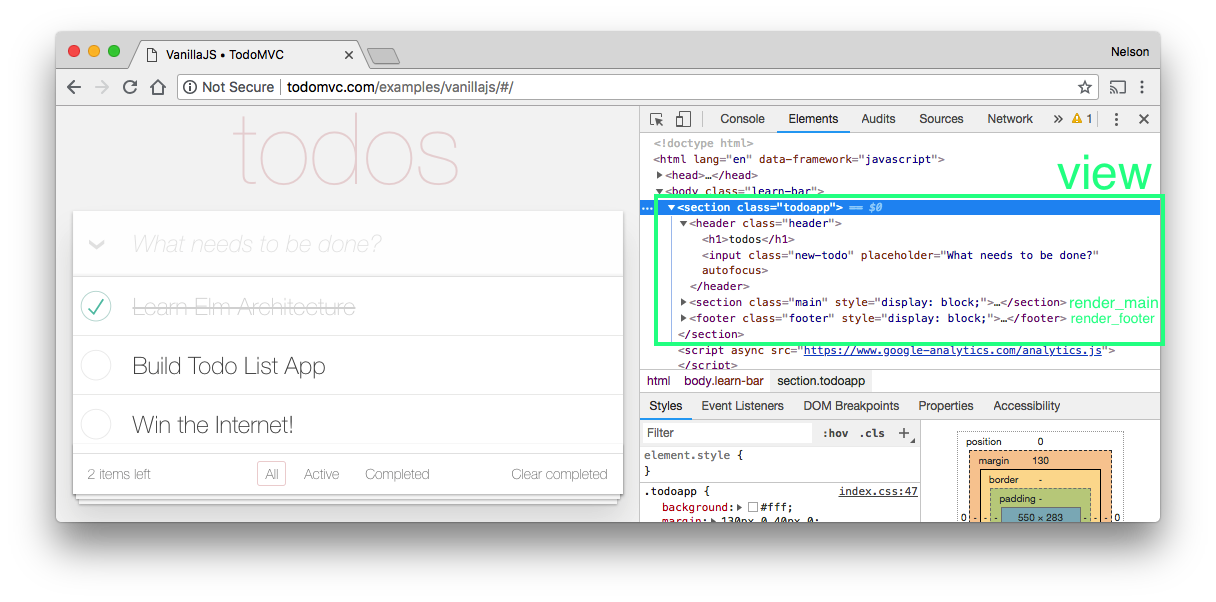
Let's return to the sample model from above:
{
  todos: [
    { id: 1, title: "Learn Elm Architecture", done: true },
    { id: 2, title: "Build Todo List App",    done: false },
    { id: 3, title: "Win the Internet!",      done: false }
  ],
  hash: '#/' // the "route" to display
}
The model contains three items in the todos Array.
The first is complete (done=true)
whereas the second and third items are still "todo" (done=false).
This is what this model looks like in the "VanillaJS"
TodoMVC:

Our quest in the next "pomodoro" is to re-create this
using the DOM functions we created in Elm(ish)!
For now, ignore the <footer> (below the Todo List)
and just focus on rendering the list itself.
In your web browser, open Developer Tools and inspect the HTML for the Todo list: https://todomvc.com/examples/vanillajs/

This is the HTML copied directly from the browser:
<section class="main" style="display: block;">
  <input class="toggle-all" type="checkbox">
  <label for="toggle-all">Mark all as complete</label>
  <ul class="todo-list">
    <li data-id="1533501855500" class="completed">
      <div class="view">
        <input class="toggle" type="checkbox">
        <label>Learn Elm Architecture</label>
        <button class="destroy"></button>
      </div>
    </li>
    <li data-id="1533501861171" class="">
      <div class="view">
        <input class="toggle" type="checkbox">
        <label>Build Todo List App</label>
        <button class="destroy"></button>
      </div>
    </li>
    <li data-id="1533501867123" class="">
      <div class="view"><input class="toggle" type="checkbox">
        <label>Win the Internet!</label>
        <button class="destroy"></button>
      </div>
    </li>
  </ul>
</section>Note: there is "redundant" markup in this HTML in the form of a
<div>inside the<li>, for now we are just replicating the HTML "faithfully", we can "prune" it later.
From this HTMl we can write our "Technical Acceptance Criteria":
- Todo List items should be displayed as list items
<li>in an unordered list<ul>. - Each Todo List item
<li>should contain a<div>with aclass="view"which "wraps":-
<input class="toggle" type="checkbox">- the "checkbox" that people can "Toggle" to change the "state" of the Todo item from "active" to "done" (which updates the model From:model.todos[id].done=falseTo:model.todos[id].done=true) -
<label>- the text content ("title") of the todo list item -
<button class="destroy">- the button the person can click/tap todeletea Todo item.
-
Given the model (above),
- There is a
<ul class="todo-list">with 3<li>(list items) rendered in theview. - The first
<li>has an<input type="checkbox">which is checked (done=true) - The remaining
<li>'shave<input type="checkbox">that are unchecked (done=false)
Let's "tackle" the first assertion first:
It's always a good idea to "break apart" a test into smaller tests
because it means we will write smaller
(and thus more maintainable) "composable" functions.
With that in mind, let's add the following test to test/todo-app.test.js:
test.only('render_item HTML for a single Todo Item', function (t) {
  const model = {
    todos: [
      { id: 1, title: "Learn Elm Architecture", done: true },
    ],
    hash: '#/' // the "route" to display
  };
  // render the ONE todo list item:
  document.getElementById(id).appendChild(app.render_item(model.todos[0]))

  const done = document.querySelectorAll('.completed')[0].textContent;
  t.equal(done, 'Learn Elm Architecture', 'Done: Learn "TEA"');

  const checked = document.querySelectorAll('input')[0].checked;
  t.equal(checked, true, 'Done: ' + model.todos[0].title + " is done=true");

  elmish.empty(document.getElementById(id)); // clear DOM ready for next test
  t.end();
});
After saving the test/todo-app.test.js file, if you attempt to run it:
node test/todo-app.test.jsyou will see something like this:
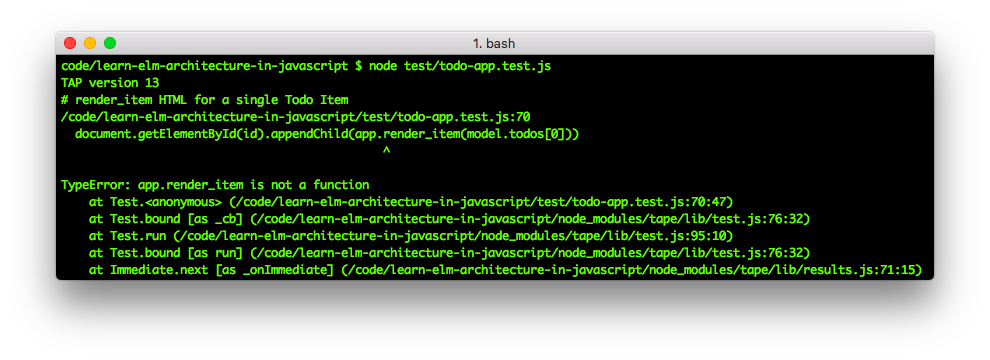
Given the test above, I added the following code to my todo-app.js file:
/* if require is available, it means we are in Node.js Land i.e. testing! */
/* istanbul ignore next */
if (typeof require !== 'undefined' && this.window !== this) {
  var { a, button, div, empty, footer, input, h1, header, label, li, mount,
    route, section, span, strong, text, ul } = require('./elmish.js');
}

/**
 * `render_item` creates an DOM "tree" with a single Todo List Item
 * using the "elmish" DOM functions (`li`, `div`, `input`, `label` and `button`)
 * returns an `<li>` HTML element with a nested `<div>` which in turn has the:
 *   `<input type=checkbox>` which lets users to "Toggle" the status of the item
 *   `<label>` which displays the Todo item text (`title`) in a `<text>` node
 *   `<button class="destroy">` lets people "delete" a todo item.
 * see: https://github.com/dwyl/learn-elm-architecture-in-javascript/issues/52
 * @param  {Object} item the todo item object
 * @return {Object} <li> DOM Tree which is nested in the <ul>.
 * @example
 * // returns <li> DOM element with <div>, <input>. <label> & <button> nested
 * var DOM = render_item({id: 1, title: "Build Todo List App", done: false});
 */
function render_item(item) {
  return (
    li([
      "data-id=" + item.id,
      "id=" + item.id,
      item.done ? "class=completed" : ""
    ], [
      div(["class=view"], [
        input(["class=toggle", "type=checkbox",
          (item.done ? "checked=true" : "")], []),
        label([], [text(item.title)]),
        button(["class=destroy"])
      ]) // </div>
    ]) // </li>
  )
}
Add the render_item to the module.exports at the end of the file:
if (typeof module !== 'undefined' && module.exports) {
  module.exports = {
    model: initial_model,
    update: update,
    render_item: render_item, // export so that we can unit test
  }
}
This will make the test pass:

Now that we have a render_item function
that renders a single <li> (todo list item),
we can create another function which uses the render_item in a "loop",
to create several <li> nested in a <ul>.
Append the following test code to your test/todo-app.test.js file:
test('render "main" view using (elmish) HTML DOM functions', function (t) {
  const model = {
    todos: [
      { id: 1, title: "Learn Elm Architecture", done: true },
      { id: 2, title: "Build Todo List App",    done: false },
      { id: 3, title: "Win the Internet!",      done: false }
    ],
    hash: '#/' // the "route" to display
  };
  // render the "main" view and append it to the DOM inside the `test-app` node:
  document.getElementById(id).appendChild(app.render_main(model));
  // test that the title text in the model.todos was rendered to <label> nodes:
  document.querySelectorAll('.view').forEach(function (item, index) {
    t.equal(item.textContent, model.todos[index].title,
      "index #" + index + " <label> text: " + item.textContent)
  })

  const inputs = document.querySelectorAll('input'); // todo items are 1,2,3
  [true, false, false].forEach(function(state, index){
    t.equal(inputs[index + 1].checked, state,
      "Todo #" + index + " is done=" + state)
  })
  elmish.empty(document.getElementById(id)); // clear DOM ready for next test
  t.end();
});
If you attempt to run this test:
node test/todo-app.test.jsyou will see something like this:

Given your knowledge of implementing the render_item function above,
and your skills with JavaScript loops, create your render_main function,
to make the tests pass.
If you get "stuck" there is a reference implementation in:
todo-app.js
All our tests pass and we have 100% test coverage:
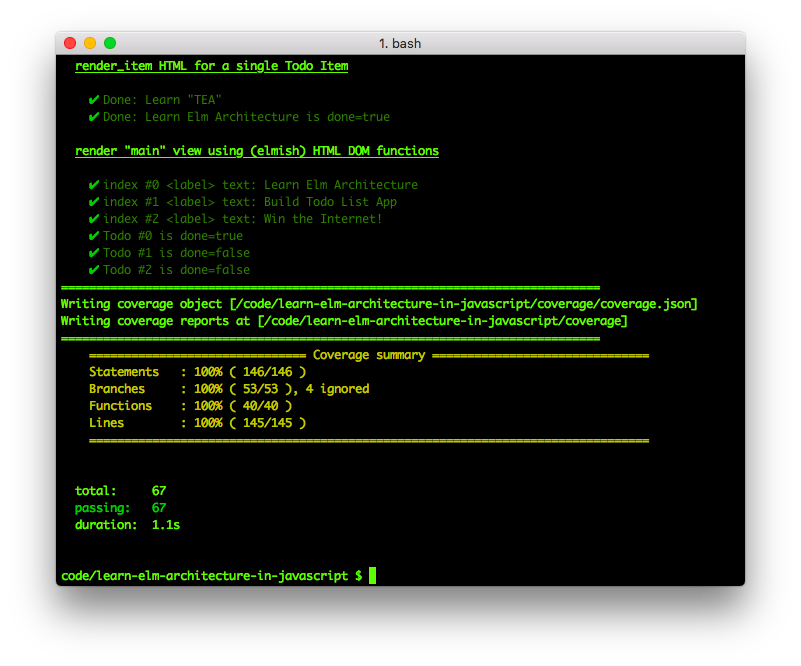
This means we are writing the "bare minimum" code necessary
to meet all acceptance criteria (requirements),
which is both faster and more maintainable!
Onwards!
<footer> Element issues/53
Referring again to the rendered HTML on https://todomvc.com/examples/vanillajs as our "guide":


"copy-pasted" of the rendered HTML from the Dev Tools:

<footer class="footer" style="display: block;">
  <span class="todo-count">
    <strong>2</strong> items left
  </span>
  <ul class="filters">
    <li>
      <a href="#/" class="selected">All</a>
    </li>
    <li>
      <a href="#/active">Active</a>
    </li>
    <li>
      <a href="#/completed">Completed</a>
    </li>
  </ul>
  <button class="clear-completed" style="display: block;">
    Clear completed
  </button>
</footer>These are the criteria (checklist) as described in issues/53:
-
render_footerreturns a<footer>DOM element which can be rendered directly to thedocumentor nested in another DOM element. -
<footer>contains:-
<span class="todo-count">which contains- a
textnode with: "{count}item(s) left". pseudocode:{model.todos.filter( (i) => { i.done==false })}item{model.todos.length > 1 ? 's' : '' }left
- a
-
<ul>containing 3<li>with the following links (<a>):- Show
All:<a href="#/" class="selected">All</a>-
class="selected"should only appear on the selected menu/navigation item. this should be "driven" by themodel.hashproperty.
-
- Show
Active:<a href="#/active">Active</a> - Show
Completed:<a href="#/completed">Completed</a>
- Show
-
<button class="clear-completed" style="display: block;">will Clear allCompleteditems. sample code:
new_model.todos = model.todos.filter(function(item) { return item.done === false })
-
"armed" with the acceptance criteria checklist
and the
"informative prior"
(the experience we have already gained)
from building the previous view functions
render_item and render_main
we estimate with reasonable confidence
that it will take us
25 minutes (one "pomodoro)
to:
- Craft the
JSDOCcomment documenting therender_footerfunction so that all future developers will easily understand what the function does. - Write a (unit) test covering the acceptance criteria (test first!)
- Write the (bare minimum) code to pass the test assertions.
Note On Time Estimates: if it takes longer than 25 mins "budget", don't panic or feel like you have "failed", it's not a "problem" ... it's just "more data" (knowledge/experience) that you can incorporate into improving future estimates! over time you will get really good at estimating, this is just a starting point
Here is a sample comment which documents the render_footer function:
/**
 * `render_footer` renders the `<footer class="footer">` of the Todo List App
 * which contains count of items to (still) to be done and a `<ul>` "menu"
 * with links to filter which todo items appear in the list view.
 * @param {Object} model - the App's (current) model (or "state").
 * @return {Object} <section> DOM Tree which containing the <footer> element.
 * @example
 * // returns <footer> DOM element with other DOM elements nested:
 * var DOM = render_footer(model);
 */
Write your own JSDOC or add these lines to your todo-app.js file.
Here is a sample test you can add to your test/todo-app.test.js file:
(if you feel confident in your TDD skills,
you could try to write your own test/assertions...)
test.only('render_footer view using (elmish) HTML DOM functions', function (t) {
  const model = {
    todos: [
      { id: 1, title: "Learn Elm Architecture", done: true },
      { id: 2, title: "Build Todo List App",    done: false },
      { id: 3, title: "Win the Internet!",      done: false }
    ],
    hash: '#/' // the "route" to display
  };
  // render_footer view and append it to the DOM inside the `test-app` node:
  document.getElementById(id).appendChild(app.render_footer(model));

  // todo-count should display 2 items left (still to be done):
  const left = document.getElementById('count').innerHTML;
  t.equal(left, "<strong>2</strong> items left", "Todos remaining: " + left);

  // count number of footer <li> items:
  t.equal(document.querySelectorAll('li').length, 3, "3 <li> in <footer>");

  // check footer link text and href:
  const link_text = ['All', 'Active', 'Completed'];
  const hrefs = ['#/', '#/active', '#/completed'];
  document.querySelectorAll('a').forEach(function (a, index) {
    // check link text:
    t.equal(a.textContent, link_text[index], "<footer> link #" + index
      + " is: " + a.textContent + " === " + link_text[index]);
    // check hrefs:
    t.equal(a.href.replace('about:blank', ''), hrefs[index],
    "<footer> link #" + index + " href is: " + hrefs[index]);
  });

  // check for "Clear completed" button in footer:
  const clear = document.querySelectorAll('.clear-completed')[0].textContent;
  t.equal(clear, 'Clear completed', '<button> in <footer> "Clear completed"');

  elmish.empty(document.getElementById(id)); // clear DOM ready for next test
  t.end();
});
Run this test:
node test/todo-app.test.jsyou will see something like this:

Given the docs and test above, attempt to write the render_footer function.
Note: for now we are not "concerned" with what happens when the "Clear completed"
<buton>is clicked/tapped. We will "cover" that below. For now, focus on rendering the DOM.
If you get "stuck" trying to make the tests pass, first keep trying!
Then "ask a friend" and finally, consult the reference implementation in:todo-app.js
For good measure, we add a second test to check our "pluarisation":
test('render_footer 1 item left (pluarisation test)', function (t) {
  const model = {
    todos: [
      { id: 1, title: "Be excellent to each other!", done: false }
    ],
    hash: '#/' // the "route" to display
  };
  // render_footer view and append it to the DOM inside the `test-app` node:
  document.getElementById(id).appendChild(app.render_footer(model));

  // todo-count should display "1 item left" (still to be done):
  const left = document.getElementById('count').innerHTML;
  t.equal(left, "<strong>1</strong> item left", "Todos remaining: " + left);

  elmish.empty(document.getElementById(id)); // clear DOM ready for next test
  t.end();
});
This test should pass without any further code needing to be written.
Once you have written the code to pass the tests, you should see something like this:

Now that we have the individual ("lower order") functions
render_main
#51,
render_item
#52,
and render_footer
#53
for rendering the sections of the todo app,
we can write the view function to render the entire app!
With the main and footer "partial" views built,
the overall view is quite simple:
To save on repetition, and illustrate just how simple
the view is,
this is the "HTML" with the
<section class"main"> and <footer class="footer">
partials replaced by invocations
to the respective functions
render_main and render_footer:
<section class="todoapp">
  <header class="header">
    <h1>todos</h1>
    <input class="new-todo" placeholder="What needs to be done?" autofocus="">
  </header>
  render_main(model)
  render_footer(model)
</section>The view displays:
-
<section class="todo-app">inside which the app is rendered. -
<h1>containing the title text "todos". -
<input class="new-todo">has placeholder text "What needs to be done?" -
<ul class="todo-list">list of todo items haszeroitems by default (based on theinitial_model) -
<footer>count is Zero when the app is first rendered with no todos in themodel.
Here is a sample JSDOC comment you can add to your todo-app.js file:
/**
 * `view` renders the entire Todo List App
 * which contains count of items to (still) to be done and a `<ul>` "menu"
 * with links to filter which todo items appear in the list view.
 * @param {Object} model - the App's (current) model (or "state").
 * @return {Object} <section> DOM Tree which containing all other DOM elements.
 * @example
 * // returns <section class="todo-app"> DOM element with other DOM els nested:
 * var DOM = view(model);
 */
These should be pretty familiar to you by now. If you feel comfortable extending it with more detail, go for it!
A sample test for the view function
you can add to your test/todo-app.test.js file:
(if you feel confident in your TDD skills,
you could try to write your own test/assertions...)
test.only('view renders the whole todo app using "partials"', function (t) {
  // render the view and append it to the DOM inside the `test-app` node:
  document.getElementById(id).appendChild(app.view(app.model)); // initial_model

  t.equal(document.querySelectorAll('h1')[0].textContent, "todos", "<h1>todos");
  // placeholder:
  const placeholder = document.getElementById('new-todo')
    .getAttribute("placeholder");
  t.equal(placeholder, "What needs to be done?", "paceholder set on <input>");

  // todo-count should display "0 items left" (based on initial_model):
  const left = document.getElementById('count').innerHTML;
  t.equal(left, "<strong>0</strong> items left", "Todos remaining: " + left);

  elmish.empty(document.getElementById(id)); // clear DOM ready for next test
  t.end();
});
Run this test:
node test/todo-app.test.jsyou will see something like this ("Red"):

You should have the knowledge & skill
to write the view function and make the test pass.
If you get "stuck" trying to make the tests pass, first keep trying!
Then "ask a friend" and finally, consult the reference implementation in:todo-app.js
When you run npm test you should see something like this:

So far we have made a lot of progress with our Todo List App quest, however if we were to stop working on this now we would have nothing to show a "user". Users can't interact with functions, even those with great test coverage!
What we need is to start putting all the pieces together into a functioning app!
Open your index.html file
and ensure that the following lines are in the <body>:
<body>
  <div id="app"></div>
  <!-- CSS Styles are 100% optional. but they make it look *much* nicer -->
  <link rel="stylesheet" href="todomvc-common-base.css">
  <link rel="stylesheet" href="todomvc-app.css">

  <script src="elmish.js"></script>
  <script src="todo-app.js"></script>
  <script>
    var model = {
      todos: [
        { id: 1, title: "Learn Elm Architecture", done: true },
        { id: 2, title: "Build Todo List App",    done: false },
        { id: 3, title: "Win the Internet!",      done: false }
      ],
      hash: '#/' // the "route" to display
    };
    mount(model, update, view, 'app');
  </script>

  <!-- Below this point is all related to the Tests for the App -->
  <div id="test-app"></div> <!-- Create a test-app div to mount the app -->
</body>
For a complete "snapshot" of the index.html file here,
see: index.html
If you run the project with command npm start
and navigate to: http://127.0.0.1:8000/
You should see:
So the view looks like a TodoMVC Todo List
(mostly thanks to the imported CSS),
however we still cannot interact with the app.
Next we're going to move to "wiring-up" the functionality to construct the UX.
With all the "foundation" well defined and tested, we can confidently move on to building out the features people using the app will interact with!
Take a look at this list of test output: https://github.com/tastejs/todomvc/tree/main/tests#example-output
TodoMVC
  1. No Todos
    ✓ should hide #main and #footer (201ms)
  2. New Todo
    ✓ should allow me to add todo items (548ms)
    ✓ should clear text input field when an item is added (306ms)
    ✓ should trim text input (569ms)
    ✓ should show #main and #footer when items added (405ms)
  3. Mark all as completed
    ✓ should allow me to mark all items as completed (1040ms)
    ✓ should allow me to clear the completion state of all items (1014ms)
    ✓ complete all checkbox should update state when items are completed (1413ms)
  4. Item
    ✓ should allow me to mark items as complete (843ms)
    ✓ should allow me to un-mark items as complete (978ms)
    ✓ should allow me to edit an item (1155ms)
    ✓ should show the remove button on hover
  5. Editing
    ✓ should hide other controls when editing (718ms)
    ✓ should save edits on enter (1093ms)
    ✓ should save edits on blur (1256ms)
    ✓ should trim entered text (1163ms)
    ✓ should remove the item if an empty text string was entered (1033ms)
    ✓ should cancel edits on escape (1115ms)
  6. Counter
    ✓ should display the current number of todo items (462ms)
  7. Clear completed button
    ✓ should display the number of completed items (873ms)
    ✓ should remove completed items when clicked (898ms)
    ✓ should be hidden when there are no items that are completed (893ms)
  8. Persistence
    ✓ should persist its data (3832ms)
  9. Routing
    ✓ should allow me to display active items (871ms)
    ✓ should allow me to display completed items (960ms)
    ✓ should allow me to display all items (1192ms)
    ✓ should highlight the currently applied filter (1095ms)

27 passing (1m)
We are going to write each one of these tests and then
Add the following test to your test/todo-app.test.js file:
test.only('1. No Todos, should hide #footer and #main', function (t) {
  // render the view and append it to the DOM inside the `test-app` node:
  document.getElementById(id).appendChild(app.view({todos: []})); // No Todos

  const main_display = window.getComputedStyle(document.getElementById('main'));
  t.equal('none', main_display._values.display, "No Todos, hide #main");

  const main_footer= window.getComputedStyle(document.getElementById('footer'));
  t.equal('none', main_footer._values.display, "No Todos, hide #footer");

  elmish.empty(document.getElementById(id)); // clear DOM ready for next test
  t.end();
});
Run the test with:
node test/todo-app.jsYou should see the following output:

Simply replace the instances of "style=display: block;" in the view code
with a reference to a "computed style" e.g:
// Requirement #1 - No Todos, should hide #footer and #main
var display = "style=display:"
  + (model.todos.length > 0 ? + "block" : "none");
You should see:

Testing it in your web browser you should see the desired result:

If you get stuck trying to make the test pass, see: todo-app.js
Recommended reading on CSS visibility:hidden vs. display:none
the difference is important for UI:
https://stackoverflow.com/questions/133051/what-is-the-difference-between-visibilityhidden-and-displaynone
The second batch of tests involves adding a new todo item to the list:
2. New Todo
  ✓ should allow me to add todo items (548ms)
  ✓ should clear text input field when an item is added (306ms)
  ✓ should trim text input (569ms)
  ✓ should show #main and #footer when items added (405ms)
Let's create a test with these 4 assertions.
Add the following code/test to your test/todo-app.test.js file:
// Testing localStorage requires "polyfil" because:
// https://github.com/jsdom/jsdom/issues/1137 ¯\_(ツ)_/¯
// globals are usually bad! but a "necessary evil" here.
global.localStorage = global.localStorage ? global.localStorage : {
  getItem: function(key) {
   const value = this[key];
   return typeof value === 'undefined' ? null : value;
 },
 setItem: function (key, value) {
   this[key] = value;
 },
 removeItem: function (key) {
   delete this[key]
 }
}
localStorage.removeItem('elmish_store');

test('2. New Todo, should allow me to add todo items', function (t) {
  elmish.empty(document.getElementById(id));
  // render the view and append it to the DOM inside the `test-app` node:
  elmish.mount({todos: []}, app.update, app.view, id, app.subscriptions);
  const new_todo = document.getElementById('new-todo');
  // "type" content in the <input id="new-todo">:
  const todo_text = 'Make Everything Awesome!     '; // deliberate whitespace!
  new_todo.value = todo_text;
  // trigger the [Enter] keyboard key to ADD the new todo:
  new_todo.dispatchEvent(new KeyboardEvent('keyup', {'keyCode': 13}));
  const items = document.querySelectorAll('.view');

  t.equal(items.length, 1, "should allow me to add todo items");
  // check if the new todo was added to the DOM:
  const actual = document.getElementById('1').textContent;
  t.equal(todo_text.trim(), actual, "should trim text input")

  // subscription keyCode trigger "branch" test (should NOT fire the signal):
  const clone = document.getElementById(id).cloneNode(true);
  new_todo.dispatchEvent(new KeyboardEvent('keyup', {'keyCode': 42}));
  t.deepEqual(document.getElementById(id), clone, "#" + id + " no change");

  // check that the <input id="new-todo"> was reset after the new item was added
  t.equal(new_todo.value, '',
    "should clear text input field when an item is added")

  const main_display = window.getComputedStyle(document.getElementById('main'));
  t.equal('block', main_display._values.display,
    "should show #main and #footer when items added");
  const main_footer= window.getComputedStyle(document.getElementById('footer'));
  t.equal('block', main_footer._values.display, "item added, show #footer");

  elmish.empty(document.getElementById(id)); // clear DOM ready for next test
  localStorage.removeItem('elmish_store'); // clear "localStorage" for next test
  t.end();
});
Run the test with:
node test/todo-app.jsYou should see the following output:

So far in the Todo List App
we have not implemented any subscriptions,
however, in order to "listen" for the [Enter] key "event"
(to add a Todo List item), we need to dive into event listeners.
Thankfully, we touched upon this while building Elm(ish),
if you need a recap, see:
elmish.md#subscriptions-for-event-listeners
Try to make the "2. New Todo" batch of tests pass
by creating (and exporting) a subscriptions function
in your lib/todo-app.js file.
If you get "stuck", checkout the sample code:
todo-app.js > subscriptions
Once you see the tests passing:

Let's add some interaction!
The third batch of tests involves "Toggling" all todos as "done=true":
3. Mark all as completed
  ✓ should allow me to mark all items as completed
  ✓ should allow me to clear the completion state of all items
  ✓ complete all checkbox should update state when items are completed
Luckily, given that we know how to use a boolean value, these three assertions can be "solved" with minimal code. Let's create a test with these 3 assertions.
Add the following code/test to your test/todo-app.test.js file:
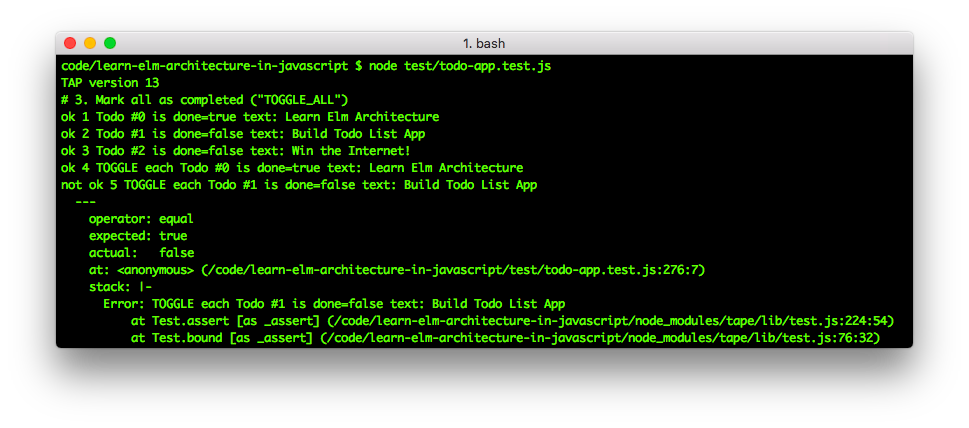
test.only('3. Mark all as completed ("TOGGLE_ALL")', function (t) {
  elmish.empty(document.getElementById(id));
  localStorage.removeItem('elmish_' + id);
  const model = {
    todos: [
      { id: 0, title: "Learn Elm Architecture", done: true },
      { id: 1, title: "Build Todo List App",    done: false },
      { id: 2, title: "Win the Internet!",      done: false }
    ],
    hash: '#/' // the "route" to display
  };
  // render the view and append it to the DOM inside the `test-app` node:
  elmish.mount(model, app.update, app.view, id, app.subscriptions);
  // confirm that the ONLY the first todo item is done=true:
  const items = document.querySelectorAll('.view');

  document.querySelectorAll('.toggle').forEach(function(item, index) {
    t.equal(item.checked, model.todos[index].done,
      "Todo #" + index + " is done=" + item.checked
      + " text: " + items[index].textContent)
  })

  // click the toggle-all checkbox to trigger TOGGLE_ALL: >> true
  document.getElementById('toggle-all').click(); // click toggle-all checkbox
  document.querySelectorAll('.toggle').forEach(function(item, index) {
    t.equal(item.checked, true,
      "TOGGLE each Todo #" + index + " is done=" + item.checked
      + " text: " + items[index].textContent)
  });
  t.equal(document.getElementById('toggle-all').checked, true,
    "should allow me to mark all items as completed")


  // click the toggle-all checkbox to TOGGLE_ALL (again!) true >> false
  document.getElementById('toggle-all').click(); // click toggle-all checkbox
  document.querySelectorAll('.toggle').forEach(function(item, index) {
    t.equal(item.checked, false,
      "TOGGLE_ALL Todo #" + index + " is done=" + item.checked
      + " text: " + items[index].textContent)
  })
  t.equal(document.getElementById('toggle-all').checked, false,
    "should allow me to clear the completion state of all items")

  // *manually* "click" each todo item:
  document.querySelectorAll('.toggle').forEach(function(item, index) {
    item.click(); // this should "toggle" the todo checkbox to done=true
    t.equal(item.checked, true,
      ".toggle.click() (each) Todo #" + index + " which is done=" + item.checked
      + " text: " + items[index].textContent)
  });
  // the toggle-all checkbox should be "checked" as all todos are done=true!
  t.equal(document.getElementById('toggle-all').checked, true,
    "complete all checkbox should update state when items are completed")

  elmish.empty(document.getElementById(id)); // clear DOM ready for next test
  localStorage.removeItem('elmish_store');
  t.end();
});
Yes, it's a "big" test with several assertions. We prefer to keep them "clustered" together because they test the functionality as a "block". Some people prefer to split the assertions out into individual unit tests, our advice to the "practical developer" is: be pragmatic! If you are testing the functionality and the test is legible, there's no "harm" in having several assertions.
If you attempt to run the test file:
node test/todo-app.test.jsYou will see something like this:
While there may appear to be "many" assertions in this test, in reality there are only two bits of functionality.
Firstly, we need a new case
in the update switch statement: TOGGLE_ALL.
and second we need to add a couple of lines to our TOGGLE
block to check if all todos are done=true or done=false.
In the case where all todos are done=true we should reflect
this in the "state" of the toggle-all checkbox.
The easiest way of representing this in the model is
with a new property, e.g: model.all_done=true
when all todos are done=true.
The only other thing we need to update is the render_main
function to include signal('TOGGLE_ALL') in the attributes array.
Try and make this test pass by yourself before consulting the
sample code:
lib/todo-app.js
4. Item
  ✓ should allow me to mark items as complete (843ms)
  ✓ should allow me to un-mark items as complete (978ms)
  ✓ should allow me to edit an item (1155ms)
  ✓ should show the remove button on hover
Of these requirements, we already have the first two "covered"
because we implemented the TOGGLE feature (above).
We can add another "proxy" test just for "completeness":
test.only('4. Item: should allow me to mark items as complete', function (t) {
  elmish.empty(document.getElementById(id));
  localStorage.removeItem('elmish_' + id);
  const model = {
    todos: [
      { id: 0, title: "Make something people want.", done: false }
    ],
    hash: '#/' // the "route" to display
  };
  // render the view and append it to the DOM inside the `test-app` node:
  elmish.mount(model, app.update, app.view, id, app.subscriptions);
  const item = document.getElementById('0')
  t.equal(item.textContent, model.todos[0].title, 'Item contained in model.');
  // confirm that the todo item is NOT done (done=false):
  t.equal(document.querySelectorAll('.toggle')[0].checked, false,
  'Item starts out "active" (done=false)');


  // click the checkbox to toggle it to done=true
  document.querySelectorAll('.toggle')[0].click()
  t.equal(document.querySelectorAll('.toggle')[0].checked, true,
  'Item should allow me to mark items as complete');

  // click the checkbox to toggle it to done=false "undo"
  document.querySelectorAll('.toggle')[0].click()
  t.equal(document.querySelectorAll('.toggle')[0].checked, false,
  'Item should allow me to un-mark items as complete');
  t.end();
});
You should not need to write any additional code in order to make this test pass; just run it and move on.

should show the remove button on hover
- should show the
<button class="destroy">on hover (over the item) ... thankfully the TodoMVC CSS handles this for us, we just need ourviewto render the<button> - Clicking/tapping the
<button class="destroy">sends thesignal('DELETE', todo.id, model) - The
DELETEupdate case receives thetodo.idand removes it from themodel.todosArray.
Append the following test code to your test/todo-app.test.js file:
test.only('4.1 DELETE item by clicking <button class="destroy">', function (t) {
  elmish.empty(document.getElementById(id));
  localStorage.removeItem('elmish_' + id);
  const model = {
    todos: [
      { id: 0, title: "Make something people want.", done: false }
    ],
    hash: '#/' // the "route" to display
  };
  // render the view and append it to the DOM inside the `test-app` node:
  elmish.mount(model, app.update, app.view, id, app.subscriptions);
  // const todo_count = ;
  t.equal(document.querySelectorAll('.destroy').length, 1, "one destroy button")

  const item = document.getElementById('0')
  t.equal(item.textContent, model.todos[0].title, 'Item contained in DOM.');
  // DELETE the item by clicking on the <button class="destroy">:
  const button = item.querySelectorAll('button.destroy')[0];
  button.click()
  // confirm that there is no loger a <button class="destroy">
  t.equal(document.querySelectorAll('button.destroy').length, 0,
    'there is no loger a <button class="destroy"> as the only item was DELETEd')
  t.equal(document.getElementById('0'), null, 'todo item successfully DELETEd');
  t.end();
});
If you run the tests node test/todo-app.test.js
you should now see:

The first two assertions are optional and should (always) pass given that they rely on functionality defined previously. The second two will only pass once you make them pass!
The first step is to add an invocation of signal('DELETE' ...)
to the render_item view rendering function. Specifically the
button line:
button(["class=destroy"])Add the signal function invocation:
button(["class=destroy", signal('DELETE', item.id)])simply adding this function invocation as an Array element will set it
as an onclick attribute for the <button>
therefore when the user clicks the button it will
"trigger" the signal function with the appropriate arguments.
There is no "magic" just code we tested/wrote earlier.
Second we need to add a case statement
to the update function.
You should attempt to "solve" this yourself.
There is no "right" answer, there are at least
5 ways of solving this, as always, you should write the code
that you feel is most readable.
If you get "stuck" or want to confirm your understanding
of the implementation of the DELETE functionality,
check the code in todo-app.js > update
function.
Rather bizarrely the edit functionality is mentioned both in the Item and Editing sections.
should allow me to edit an item
This is kinda meaningless as an assertion. What does "edit an item" actually mean?
(we have expanded the acceptance criteria below...)
Editing a Todo List item is (by far) the most "advanced" functionality in the TodoMVC app because it involves multiple steps and "dynamic UI".
Don't panic! Just because something has "more steps" than we have seen before, doesn't mean we should be "overwhelmed" by its' complexity. We just need to "break it down" into "bitesize chunks"!
Note: the most "difficult" part of implementing the "edit an item" functionality is having a "mental picture" of the UX so that we can write the tests first and isolate the required functions (update actions) from the keyboard/mouse interactions. i.e. breaking down the steps into distinct "units".
First let's review the TodoMVC "Editing" test assertions:
5. Editing
  ✓ should hide other controls when editing (718ms)
  ✓ should save edits on enter (1093ms)
  ✓ should save edits on blur (1256ms)
  ✓ should trim entered text (1163ms)
  ✓ should remove the item if an empty text string was entered (1033ms)
  ✓ should cancel edits on escape (1115ms)
Further reading of the TodoMVC Spec: https://github.com/tastejs/todomvc/blob/main/app-spec.md#item reveals the following acceptance criteria:
- Double-click on Item
<label>title</label>to begin editing (that item) - Render an
<input class="edit">if in "editing mode" (see screenshot and markup below)- Add
class="editing"to<li>when editing - Remove (don't add)
class="editing"from<li>when no longer editing.
- Add
- Set the
item.idas theidof the<input class="edit">so that we know which item is being edited. - Add
caseinkeyupEvent Listener for[Enter]keyup (seesubscriptionsabove) if we are in "editing mode", get the text value from the<input class="edit">instead of<input id="new-todo">so that we update the existing Todo Item title (text). - When
[Enter]is pressed while in "editing mode", "dispatch" theSAVEaction:signal('SAVE')- If the
<input class="edit">is blank,deletethe todo item.
- If the
By inspecting the DOM for the VanillaJS TodoMVC example:
https://todomvc.com/examples/vanillajs
we can see that two things change in the DOM when in "editing mode":
<li class="editing">the CSSclass="editing"is added to the todo list item being edited.<input class="edit">is inserted into the DOM inside the<li>so the item title can be edited.
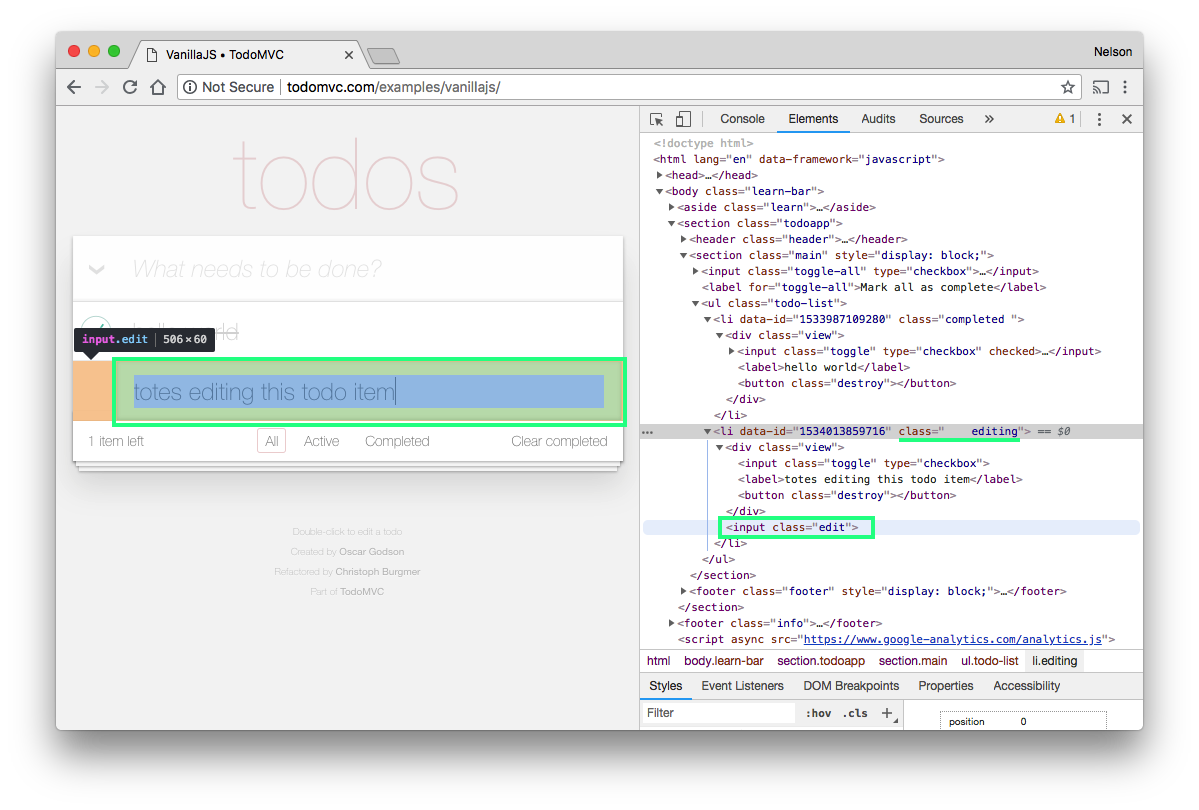
Here is the sample HTML in "editing mode"
(copy-pasted) from the VanillaJS TodoMVC implementation
the <li> is being edited (as per screenshot above):
<ul class="todo-list">
  <li data-id="1533987109280" class="completed ">
    <div class="view">
      <input class="toggle" type="checkbox" checked="">
      <label>hello world</label>
      <button class="destroy"></button>
    </div>
  </li>
  <li data-id="1534013859716" class="editing">
    <div class="view"><input class="toggle" type="checkbox">
      <label>totes editing this todo item</label>
      <button class="destroy">
      </button>
    </div>
    <input class="edit">
  </li>
</ul>
From the HTML/DOM we can see that "editing" a Todo item is deceptively simple from a markup perspective, we just need to know which item we are editing and render the appropriate tags/classes.
There are three steps to Editing a Todo List item:
- Trigger the "double-click" event listener/handler
1.1. Receiving the
singal('EDIT', item.id)activates "editing mode". - Edit the todo list item's
titleproperty - Save the updated item
title:singal('SAVE', item.id)
For these three steps there are two update actions: EDIT and SAVE
which will require two new case statements in the update function.
Note: there is a "fourth" step which is "Cancelling" an edit, which we will cover in section 5.5 below, but for now we are only considering the "happy path" which results in a successful edit.
In order to edit an item the render_item function
will require 3 modifications:
- Add the
signal('EDIT', item.id)as anonclickattribute to<label>so that when a<label>is (double-)clicked themodel.editingproperty is set by theupdatefunction (see below). - Apply the
"class=editing"to the list item which is being edited. - Display the
<input class="edit">with the Todo list item title as it'svalueproperty.
For the above modifications (requirements) we can write a single test
with four assertions. Append the following code to test/todo-app.test.js:
test.only('5. Editing: > Render an item in "editing mode"', function (t) {
  elmish.empty(document.getElementById(id));
  localStorage.removeItem('elmish_' + id);
  const model = {
    todos: [
      { id: 0, title: "Make something people want.", done: false },
      { id: 1, title: "Bootstrap for as long as you can", done: false },
      { id: 2, title: "Let's solve our own problem", done: false }
    ],
    hash: '#/', // the "route" to display
    editing: 2 // edit the 3rd todo list item (which has id == 2)
  };

  // render the ONE todo list item in "editing mode" based on model.editing:
  document.getElementById(id).appendChild(
    app.render_item(model.todos[2], model, mock_signal),
  );
  // test that signal (in case of the test mock_signal) is onclick attribute:
  t.equal(document.querySelectorAll('.view > label')[0].onclick.toString(),
    mock_signal().toString(), "mock_signal is onclick attribute of label");

  // test that the <li class="editing"> and <input class="edit"> was rendered:
  t.equal(document.querySelectorAll('.editing').length, 1,
    "<li class='editing'> element is visible");
  t.equal(document.querySelectorAll('.edit').length, 1,
    "<input class='edit'> element is visible");
  t.equal(document.querySelectorAll('.edit')[0].value, model.todos[2].title,
    "<input class='edit'> has value: " + model.todos[2].title);
  t.end();
});
There is quite a lot to "unpack" here, but the main gist is that
based on the model.editing key being set to 2, our render_item function,
will add the editing CSS class to the <li> element and render an
<input> with CSS class edit.
The TodoMVC style sheet (todomvc-app.css) will take care of displaying
the input correctly.
Setting the onclick attribute of the <label> element
to whatever is passed in as the third argument of redner_item
i.e. the signal will mean that a specific action will be dispatched/triggered
when the <label> element is clicked.
SPOILER ALERT: If you want to try to make the "Edit Mode" Test assertions pass without reading the "solution", do it now before proceeding to the reading the implementation section.
Given that there are 4 assertions that need to pass
and we know there are 3 changes that need to be made
to the render_item function,
rather than leaving you (the reader) wondering "where do I start?!",
here is the code that makes the tests pass:
Before:
function render_item (item, model, signal) {
  return (
    li([
      "data-id=" + item.id,
      "id=" + item.id,
      item.done ? "class=completed" : ""
    ], [
      div(["class=view"], [
        input([
          item.done ? "checked=true" : "",
          "class=toggle",
          "type=checkbox",
          typeof signal === 'function' ? signal('TOGGLE', item.id) : ''
          ],[]), // <input> does not have any nested elements
        label([], [text(item.title)]),
        button(["class=destroy",
        typeof signal === 'function' ? signal('DELETE', item.id) : ''])
      ]) // </div>
    ]) // </li>
  )
}After:
function render_item (item, model, signal) {
  return (
    li([
      "data-id=" + item.id,
      "id=" + item.id,
      item.done ? "class=completed" : "",
      model && model.editing && model.editing === item.id ? "class=editing" : ""
    ], [
      div(["class=view"], [
        input([
          item.done ? "checked=true" : "",
          "class=toggle",
          "type=checkbox",
          typeof signal === 'function' ? signal('TOGGLE', item.id) : ''
          ], []), // <input> does not have any nested elements
        label([ typeof signal === 'function' ? signal('EDIT', item.id) : '' ],
          [text(item.title)]),
        button(["class=destroy",
          typeof signal === 'function' ? signal('DELETE', item.id) : ''])
        ]
      ), // </div>
    ].concat(model && model.editing && model.editing === item.id ? [ // editing?
      input(["class=edit", "id=" + item.id, "value=" + item.title, "autofocus"])
    ] : [])) // </li>
  )
}
Let's walk through the three code changes made:
- Adding
"class=editing"to the<li>based onmodel.editingis the simplest code modification, similar to the conditional attributeclass=completedon the previous line.
model && model.editing && model.editing === item.id ? "class=editing" : ""We include the check for model && model.editing because if either of these
two are undefined there's no need to keep checking.
Only if the model.editing matches the item.id
(the todo list item being rendered) do we render the "class=editing".
Only one todo list item title will be edited at once,
so this will only match (at most) one item in the model.todos array.
- Setting the
signal('EDIT', item.id)
Why do we need the typeof signal (type-checking)...?
label([ typeof signal === 'function' ? signal('EDIT', item.id) : '' ],
  [text(item.title)]),
Why can't we just write this:
label([signal('EDIT', item.id)], [text(item.title)]),Given that signal is the final argument to the render_item function,
it is considered an optional argument.
If for any reason the render_item function is invoked without the singal
parameter, then attempting to invoke signal('EDIT', item.id)
will result in a ReferenceError: signal is not defined which will
"crash" the app fatally.
If you are the only person who is going to write code that will invoke
render_item, you don't need to "worry" about the typeof signal
because there is "no need" for type-checking the signal;
surely you won't forget to invoke it with a valid signal ...
however we always approach our JavaScript code a
"defensive programming"
perspective
because we know from experience
that banking on the
"happy path"
in JS code
is like driving without a seatbelt;
you might be "fine" most of the time, but when something "bad" happens,
you will go flying through the windscreen and have a really bad day!

If you want to avoid having to do manual "type-checking",
use Elm, it does all this for you transparently.
- Append the
<input class="edit">to the<li>if in "editing mode":
].concat(model && model.editing && model.editing === item.id ? [ // editing?
  input(["class=edit", "id=" + item.id, "value=" + item.title, "autofocus"])
] : [])) // </li>
The reason we use .concat is to allow us to
optionally render the element or nothing then append it to the
Array of child elements nested in the <li>.
An alternative to using .concat() could be an empty div node:
model && model.editing && model.editing === item.id ? // editing?
  input(["class=edit", "id=" + item.id, "value=" + item.title, "autofocus"])
  : div() // empty element.
This is because attempting to return anything other than a DOM element will result in the following error:
TypeError: Argument 1 of Node.appendChild does not implement interface NodeWe are not "fans" of having "empty" elements in the DOM, it's "sloppy".
Hence the concat() approach which results in "clean" DOM.
At this point our test assertions all pass:
node test/todo-app.test.js
But we are building a visual application and are not seeing anything ...
Let's take a brief detour to visualise the progress we have made.
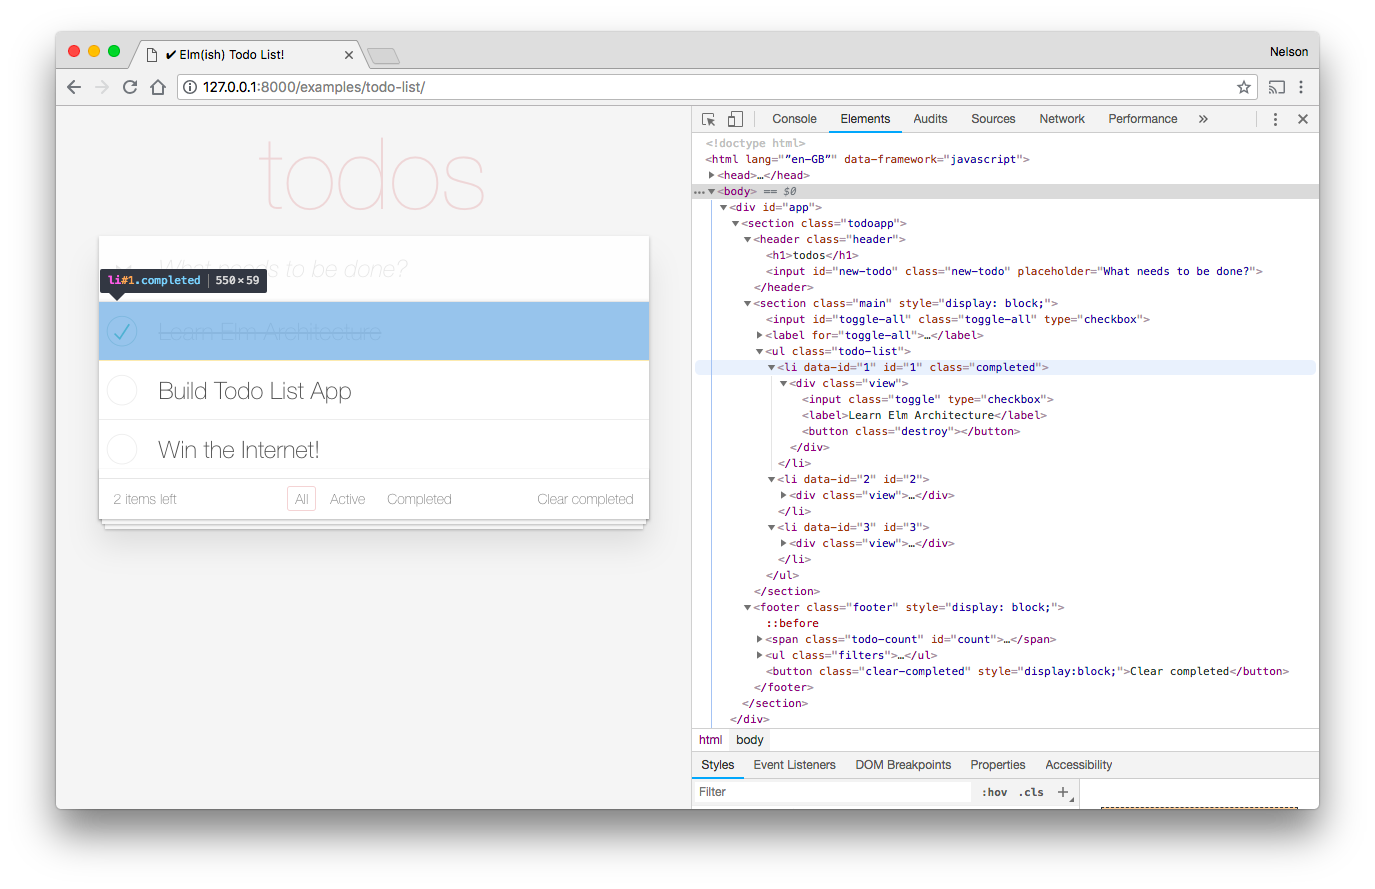
Open the index.html file
and alter the contents of the <script> tag:
<script>
  var model = {
    todos: [
      { id: 0, title: "Make something people want.", done: false },
      { id: 1, title: "Bootstrap for as long as you can", done: false },
      { id: 2, title: "Let's solve our own problem", done: false }
    ],
    hash: '#/', // the "route" to display
    editing: 2 // edit the 3rd todo list item (which has id == 2)
  };
  mount(model, update, view, 'app', subscriptions);
</script>
Then in your terminal, start the live-server:
npm startIn your browser, vist: http://127.0.0.1:8000/
You should see that the third todo list item is in "editing mode":

Nothing will happen (yet) if you attempt to "save" any changes.
Let's work on the case (handler) for signal('EDIT', item.id)
which will handle the "double-click" event and set model.editing.
The TodoMVC spec for item https://github.com/tastejs/todomvc/blob/main/app-spec.md#item includes the line:
Double-clicking the <label> activates editing mode, by toggling the .editing class on its <li>Note: the sample TodoMVC Browser Tests: https://github.com/tastejs/todomvc/tree/main/tests#example-output does not include a test-case for double-clicking. We are going to add one below for "extra credit".
Since Double-clicking/tapping is the only way to edit a todo item, we feel that it deserves a test.
When we don't know how to do something, a good place to start is to search for the keywords we want, e.g: "JavaScript detect double-click event" for which the top result is the following StackOverflow Q/A: https://stackoverflow.com/questions/5497073/how-to-differentiate-single-click-event-and-double-click-event
Reading though all the answers, we determine that the most relevant (to us) is: https://stackoverflow.com/a/16033129/1148249 (which uses "vanilla" JS):

Note: when you find a StackOverflow question/answer helpful, upvote to show your appreciation!
<div onclick="doubleclick(this, function(){alert('single')}, function(){alert('double')})">click me</div>
<script>
  function doubleclick(el, onsingle, ondouble) {
    if (el.getAttribute("data-dblclick") == null) {
      el.setAttribute("data-dblclick", 1);
      setTimeout(function () {
        if (el.getAttribute("data-dblclick") == 1) {
          onsingle();
        }
        el.removeAttribute("data-dblclick");
      }, 300);
    } else {
      el.removeAttribute("data-dblclick");
      ondouble();
    }
  }
</script>
Given that we are using the Elm Architecture to manage the DOM,
we don't want a function that alters the DOM.
So we are going to borrow the logic from this example but simplify it.
Since we are not mutating the DOM by setting data-dblclick attributes,
we won't need to remove the attribute using a setTimeout,
In keeping with our TDD approach,
our first step when adding the case expression
for 'EDIT' in the update function is to write a test.
Append following test code to your test/todo-app.test.js file:
test.only('5.2 Double-click an item <label> to edit it', function (t) {
  elmish.empty(document.getElementById(id));
  localStorage.removeItem('todos-elmish_' + id);
  const model = {
    todos: [
      { id: 0, title: "Make something people want.", done: false },
      { id: 1, title: "Let's solve our own problem", done: false }
    ],
    hash: '#/' // the "route" to display
  };
  // render the view and append it to the DOM inside the `test-app` node:
  elmish.mount(model, app.update, app.view, id, app.subscriptions);
  const label = document.querySelectorAll('.view > label')[1]
  // "double-click" i.e. click the <label> twice in quick succession:
  label.click();
  label.click();
  // confirm that we are now in editing mode:
  t.equal(document.querySelectorAll('.editing').length, 1,
    "<li class='editing'> element is visible");
  t.equal(document.querySelectorAll('.edit')[0].value, model.todos[1].title,
    "<input class='edit'> has value: " + model.todos[1].title);
  t.end();
});
If you attempt to run this test: node test/todo-app.test.js
you will see output similar to the following:

Let's write the code necessary to make the test assertions pass! If you want to try this yourself based on the StackOverflow answer (above), go for it! (don't scroll down to the "answer" till you have tried...)
Given our "research" (above) of how to implement a "double-click" handler,
we can write the 'EDIT' case as the following:
case 'EDIT':
  // this code is inspired by: https://stackoverflow.com/a/16033129/1148249
  // simplified as we are not altering the DOM!
  if (new_model.clicked && new_model.clicked === data &&
    Date.now() - 300 < new_model.click_time ) { // DOUBLE-CLICK < 300ms
      new_model.editing = data;
      console.log('DOUBLE-CLICK', "item.id=", data,
      "| model.editing=", model.editing,
      "| diff Date.now() - new_model.click_time: ",
      Date.now(), "-", new_model.click_time, "=",
      Date.now() - new_model.click_time);
  }
  else { // first click
    new_model.clicked = data; // so we can check if same item clicked twice!
    new_model.click_time = Date.now(); // timer to detect double-click 300ms
    new_model.editing = false; // reset
    console.log('FIRST CLICK! data:', data);
  }
  break;
If you ignore/remove the console.log lines (which we are using for now!),
the code is only a few lines long:
case 'EDIT':
  // this code is inspired by: https://stackoverflow.com/a/16033129/1148249
  // simplified as we are not altering the DOM!
  if (new_model.clicked && new_model.clicked === data &&
    Date.now() - 300 < new_model.click_time ) { // DOUBLE-CLICK < 300ms
      new_model.editing = data;
  }
  else { // first click
    new_model.clicked = data; // so we can check if same item clicked twice!
    new_model.click_time = Date.now(); // timer to detect double-click 300ms
    new_model.editing = false; // reset
  }
  break;
The main "purpose" of this code is to detect if a <label> was clicked
twice in the space of 300 milliseconds and apply the item.id to
the model.editing property so that we know which <li> to render in
"editing mode".
Run the test and watch it pass: node test/todo-app.test.js
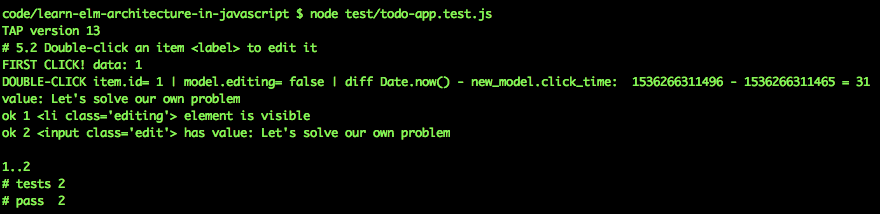
In this case the time between the two clicks was 31 milliseconds, so they will count as a "double-click"!
If a <label> is clicked slowly, the model.editing will not be set,
and we will not enter "editing mode".
Let's add a quick test for the scenario
where two clicks are more than 300ms apart.
Append following test code to your test/todo-app.test.js file:
test.only('5.2.2 Slow clicks do not count as double-click > no edit!', function (t) {
  elmish.empty(document.getElementById(id));
  localStorage.removeItem('todos-elmish_' + id);
  const model = {
    todos: [
      { id: 0, title: "Make something people want.", done: false },
      { id: 1, title: "Let's solve our own problem", done: false }
    ],
    hash: '#/' // the "route" to display
  };
  // render the view and append it to the DOM inside the `test-app` node:
  elmish.mount(model, app.update, app.view, id, app.subscriptions);
  const label = document.querySelectorAll('.view > label')[1]
  // "double-click" i.e. click the <label> twice in quick succession:
  label.click();
  setTimeout(function (){
    label.click();
    // confirm that we are now in editing mode:
    t.equal(document.querySelectorAll('.editing').length, 0,
      "<li class='editing'> element is NOT visible");
    t.end();
  }, 301)
});
There is no need to write any code to make this test pass, this is merely an additional test to confirm that our check for the time between clicks works; clicks spaced more than 300ms will not count as "double-click".

Once you are done editing a todo list item title, you want to save your changes!
Append following test code to your test/todo-app.test.js file:
test.only('5.3 [ENTER] Key in edit mode triggers SAVE action', function (t) {
  elmish.empty(document.getElementById(id));
  localStorage.removeItem('todos-elmish_' + id);
  const model = {
    todos: [
      { id: 0, title: "Make something people want.", done: false },
      { id: 1, title: "Let's solve our own problem", done: false }
    ],
    hash: '#/', // the "route" to display
    editing: 1 // edit the 3rd todo list item (which has id == 2)
  };
  // render the view and append it to the DOM inside the `test-app` node:
  elmish.mount(model, app.update, app.view, id, app.subscriptions);
  // change the
  const updated_title = "Do things that don\'t scale!  "
  // apply the updated_title to the <input class="edit">:
  document.querySelectorAll('.edit')[0].value = updated_title;
  // trigger the [Enter] keyboard key to ADD the new todo:
  document.dispatchEvent(new KeyboardEvent('keyup', {'keyCode': 13}));
  // confirm that the todo item title was updated to the updated_title:
  const label = document.querySelectorAll('.view > label')[1].textContent;
  t.equal(label, updated_title.trim(),
      "item title updated to:" + updated_title + ' (trimmed)');
  t.end();
});
If you attempt to run this test: node test/todo-app.test.js
you will see output similar to the following:

The first step in the implementation is to create the 'SAVE' case
in update function:
case 'SAVE':
  var edit = document.getElementsByClassName('edit')[0];
  var value = edit.value;
  var id = parseInt(edit.id, 10);
  // End Editing
  new_model.clicked = false;
  new_model.editing = false;

  if (!value || value.length === 0) { // delete item if title is blank:
    return update('DELETE', new_model, id);
  }
  // update the value of the item.title that has been edited:
  new_model.todos = new_model.todos.map(function (item) {
    if (item.id === id && value && value.length > 0) {
      item.title = value.trim();
    }
    return item; // return all todo items.
  });
  break;
The second step is triggering this case in the subscriptions
event listener for keyup:
Before:
document.addEventListener('keyup', function handler (e) {
  switch(e.keyCode) {
    case ENTER_KEY:
      var new_todo = document.getElementById('new-todo');
      if(new_todo.value.length > 0) {
        signal('ADD')(); // invoke singal inner callback
        new_todo.value = ''; // reset <input> so we can add another todo
        document.getElementById('new-todo').focus();
      }
      break;
  }
});After:
document.addEventListener('keyup', function handler (e) {
  switch(e.keyCode) {
    case ENTER_KEY:
      var editing = document.getElementsByClassName('editing');
      if (editing && editing.length > 0) {
        signal('SAVE')(); // invoke singal inner callback
      }

      var new_todo = document.getElementById('new-todo');
      if(new_todo.value.length > 0) {
        signal('ADD')(); // invoke singal inner callback
        new_todo.value = ''; // reset <input> so we can add another todo
        document.getElementById('new-todo').focus();
      }
      break;
  }
});
When you run the tests: node test/todo-app.test.js
they should now pass:

Our mini-mission is to make the following TodoMVC test assertion pass:
✓ should remove the item if an empty text string was entered (1033ms)
Append following test code to your test/todo-app.test.js file:
test.only('5.4 SAVE should remove the item if an empty text string was entered',
  function (t) {
  elmish.empty(document.getElementById(id));
  localStorage.removeItem('todos-elmish_' + id);
  const model = {
    todos: [
      { id: 0, title: "Make something people want.", done: false },
      { id: 1, title: "Let's solve our own problem", done: false }
    ],
    hash: '#/', // the "route" to display
    editing: 1 // edit the 3rd todo list item (which has id == 2)
  };
  // render the view and append it to the DOM inside the `test-app` node:
  elmish.mount(model, app.update, app.view, id, app.subscriptions);
  t.equal(document.querySelectorAll('.view').length, 2, 'todo count: 2');
  // apply empty string to the <input class="edit">:
  document.querySelectorAll('.edit')[0].value = '';
  // trigger the [Enter] keyboard key to ADD the new todo:
  document.dispatchEvent(new KeyboardEvent('keyup', {'keyCode': 13}));
  // confirm that the todo item was removed!
  t.equal(document.querySelectorAll('.view').length, 1, 'todo count: 1');
  t.end();
});
If you attempt to run this test: node test/todo-app.test.js
you will see output similar to the following:

To make this test pass we just need to add a couple of lines to the
'SAVE' case in the update function:
if (!value || value.length === 0) { // delete item if title is blank:
  return update('DELETE', new_model, id);
}
when you re-run the tests, they will pass:
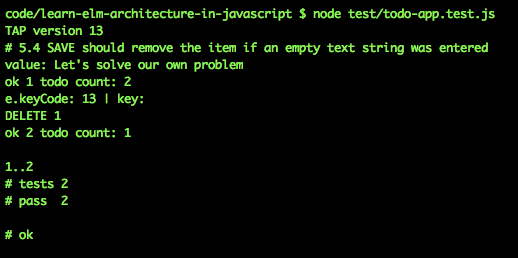
When a user presses the [esc] ("escape") key, editing should be "cancelled" without saving the changes:
✓ should cancel edits on escape
Append following test code to your test/todo-app.test.js file:
test.only('5.5 CANCEL should cancel edits on escape', function (t) {
  elmish.empty(document.getElementById(id));
  localStorage.removeItem('todos-elmish_' + id);
  const model = {
    todos: [
      { id: 0, title: "Make something people want.", done: false },
      { id: 1, title: "Let's solve our own problem", done: false }
    ],
    hash: '#/', // the "route" to display
    editing: 1 // edit the 3rd todo list item (which has id == 2)
  };
  // render the view and append it to the DOM inside the `test-app` node:
  elmish.mount(model, app.update, app.view, id, app.subscriptions);
  t.equal(document.querySelectorAll('.view > label')[1].value,
    model.todos[1].title, 'todo id 1 has title: ' + model.todos[1].title);
  // apply empty string to the <input class="edit">:
  document.querySelectorAll('.edit')[0].value = 'Hello World';
  // trigger the [esc] keyboard key to CANCEL editing
  document.dispatchEvent(new KeyboardEvent('keyup', {'keyCode': 27}));
  // confirm the item.title is still the original title:
  t.equal(document.querySelectorAll('.view > label')[1].value,
      model.todos[1].title, 'todo id 1 has title: ' + model.todos[1].title);
  t.end();
});
If you attempt to run this test: node test/todo-app.test.js
it should fail.
To make this test pass we first need to add a 'CANCEL'
case to the update function:
case 'CANCEL':
  new_model.clicked = false;
  new_model.editing = false;
  break;
Second we need to trigger the 'CANCEL' action
when the [esc] key is pressed, so we need to add a case
to the switch(e.keyCode) { in the subscriptions event listener:
Before:
document.addEventListener('keyup', function handler (e) {
switch(e.keyCode) {
  case ENTER_KEY:
    var editing = document.getElementsByClassName('editing');
    if (editing && editing.length > 0) {
      signal('SAVE')(); // invoke singal inner callback
    }

    var new_todo = document.getElementById('new-todo');
    if(new_todo.value.length > 0) {
      signal('ADD')(); // invoke singal inner callback
      new_todo.value = ''; // reset <input> so we can add another todo
      document.getElementById('new-todo').focus();
    }
    break;
}
});After:
document.addEventListener('keyup', function handler (e) {
  console.log('e.keyCode:', e.keyCode, '| key:', e.key);

  switch(e.keyCode) {
    case ENTER_KEY:
      var editing = document.getElementsByClassName('editing');
      if (editing && editing.length > 0) {
        signal('SAVE')(); // invoke singal inner callback
      }

      var new_todo = document.getElementById('new-todo');
      if(new_todo.value.length > 0) {
        signal('ADD')(); // invoke singal inner callback
        new_todo.value = ''; // reset <input> so we can add another todo
        document.getElementById('new-todo').focus();
      }
      break;
    case ESCAPE_KEY:
      signal('CANCEL')();
      break;
  }
});
when you re-run the tests, they will pass:

✓ should display the current number of todo items
Append following test code to your test/todo-app.test.js file:
test.only('6. Counter > should display the current number of todo items',
  function (t) {
  elmish.empty(document.getElementById(id));
  const model = {
    todos: [
      { id: 0, title: "Make something people want.", done: false },
      { id: 1, title: "Bootstrap for as long as you can", done: false },
      { id: 2, title: "Let's solve our own problem", done: false }
    ],
    hash: '#/'
  };
  // render the view and append it to the DOM inside the `test-app` node:
  elmish.mount(model, app.update, app.view, id, app.subscriptions);
  // count:
  const count = parseInt(document.getElementById('count').textContent, 10);
  t.equal(count, model.todos.length, "displays todo item count: " + count);

  elmish.empty(document.getElementById(id)); // clear DOM ready for next test
  localStorage.removeItem('todos-elmish_' + id);
  t.end();
});
Thankfully, the counter was already implemented above so this test already passes:

Just keep on movin'
When items are complete we should be able to delete them in bulk.
✓ should display the number of completed items
✓ should remove completed items when clicked
✓ should be hidden when there are no items that are completed
Append following test code to your test/todo-app.test.js file:
test.only('7. Clear Completed > should display the number of completed items',
  function (t) {
  elmish.empty(document.getElementById(id));
  const model = {
    todos: [
      { id: 0, title: "Make something people want.", done: false },
      { id: 1, title: "Bootstrap for as long as you can", done: true },
      { id: 2, title: "Let's solve our own problem", done: true }
    ],
    hash: '#/'
  };
  // render the view and append it to the DOM inside the `test-app` node:
  elmish.mount(model, app.update, app.view, id, app.subscriptions);
  // count todo items in DOM:
  t.equal(document.querySelectorAll('.view').length, 3,
    "at the start, there are 3 todo items in the DOM.");

  // count completed items
  const completed_count =
    parseInt(document.getElementById('completed-count').textContent, 10);
  const done_count = model.todos.filter(function(i) {return i.done }).length;
  t.equal(completed_count, done_count,
    "displays completed items count: " + completed_count);

  // clear completed items:
  const button = document.querySelectorAll('.clear-completed')[0];
  button.click();

  // confirm that there is now only ONE todo list item in the DOM:
  t.equal(document.querySelectorAll('.view').length, 1,
    "after clearing completed items, there is only 1 todo item in the DOM.");

  // no clear completed button in the DOM when there are no "done" todo items:
  t.equal(document.querySelectorAll('clear-completed').length, 0,
    'no clear-completed button when there are no done items.')

  elmish.empty(document.getElementById(id)); // clear DOM ready for next test
  localStorage.removeItem('todos-elmish_' + id);
  t.end();
});First we need to update the button section in the render_footer function
to include the done count:
Before:
button(["class=clear-completed", "style=display:" + display_clear],
  [
    text("Clear completed")
  ]
)
After:
button(["class=clear-completed", "style=display:" + display_clear,
  signal('CLEAR_COMPLETED')
  ],
  [
    text("Clear completed ["),
    span(["id=completed-count"], [
      text(done)
    ]),
    text("]")
  ]
)
Seconde we need to add a 'CLEAR_COMPLETED' case to the update function:
case 'CLEAR_COMPLETED':
  new_model.todos = new_model.todos.filter(function (item) {
    return !item.done; // only return items which are item.done = false
  });
  break;
The tests should pass:
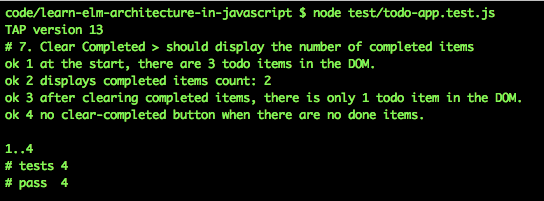
✓ should persist its data
We have already covered saving the model
to localStorage in detail (above),
we are adding a "proxy" test for completeness:
test.only('8. Persistence > should persist its data', function (t) {
  elmish.empty(document.getElementById(id));
  const model = {
    todos: [
      { id: 0, title: "Make something people want.", done: false }
    ],
    hash: '#/'
  };
  // render the view and append it to the DOM inside the `test-app` node:
  elmish.mount(model, app.update, app.view, id, app.subscriptions);
  // confirm that the model is saved to localStorage
  console.log('localStorage', localStorage.getItem('todos-elmish_' + id));
  t.equal(localStorage.getItem('todos-elmish_' + id),
    JSON.stringify(model), "data is persisted to localStorage");

  elmish.empty(document.getElementById(id)); // clear DOM ready for next test
  localStorage.removeItem('todos-elmish_' + id);
  t.end();
});
Again, this test should already pass:

The following assertions:
✓ should allow me to display active items
✓ should allow me to display completed items
✓ should allow me to display all items
✓ should highlight the currently applied filter
'SHOW_ALL'the default view.'SHOW_ACTIVE'item.done === false'SHOW_COMPLETED'item.done === true
Append following test code to your test/todo-app.test.js file:
test.only('9. Routing > should allow me to display active/completed/all items',
  function (t) {
  elmish.empty(document.getElementById(id));
  const model = {
    todos: [
      { id: 0, title: "Make something people want.", done: false },
      { id: 1, title: "Bootstrap for as long as you can", done: true },
      { id: 2, title: "Let's solve our own problem", done: true }
    ],
    hash: '#/active' // ONLY ACTIVE items
  };
  // render the view and append it to the DOM inside the `test-app` node:
  elmish.mount(model, app.update, app.view, id, app.subscriptions);
  t.equal(document.querySelectorAll('.view').length, 1, "one active item");
  let selected = document.querySelectorAll('.selected')[0]
  t.equal(selected.id, 'active', "active footer filter is selected");

  // empty:
  elmish.empty(document.getElementById(id));
  localStorage.removeItem('todos-elmish_' + id);
  // show COMPLTED items:
  model.hash = '#/completed';
  elmish.mount(model, app.update, app.view, id, app.subscriptions);
  t.equal(document.querySelectorAll('.view').length, 2,
    "two completed items");
  selected = document.querySelectorAll('.selected')[0]
  t.equal(selected.id, 'completed', "completed footer filter is selected");

  // empty:
  elmish.empty(document.getElementById(id));
  localStorage.removeItem('todos-elmish_' + id);
  // show ALL items:
  model.hash = '#/';
  elmish.mount(model, app.update, app.view, id, app.subscriptions);
  t.equal(document.querySelectorAll('.view').length, 3,
    "three items total");
  selected = document.querySelectorAll('.selected')[0]
  t.equal(selected.id, 'all', "all footer filter is selected");

  elmish.empty(document.getElementById(id)); // clear DOM ready for next test
  localStorage.removeItem('todos-elmish_' + id);
  t.end();
});Given that we are using "hash" based routing, where the content of the app changes in response to the hash portion of the URL implementing routing is a matter of filtering the Todo List items in response to the hash.
There 3 steps to implementing this:
-
Create an Event Listener for the
window.onhashchangeevent which invokessignal('ROUTE'). -
Create a
'ROUTE'case in theupdatefunction which sets themodel.hashvalue. -
Based on the
model.hashvalue defined above, filter themodel.todos.
Since this is the final quest in the TodoMVC/Todo List App, the we encourage you to attempt to write this before/without looking at the "solution".
Remember that you only want to write the minimum code necessary to make the test assertions pass.
If you get "stuck" consult the code in todo-app.js.
Add the following event listener to your subscriptions
to "listen" for when the URL hash changes:
window.onhashchange = function route () {
  signal('ROUTE')();
}Add the 'ROUTE' case
to your update function:
case 'ROUTE':
  new_model.hash = (window && window.location && window.location.hash) ?
    window.location.hash : '#/';
break;OR, if you are confident that your app
will always run in a Web Browser with a window.location.hash property:
case 'ROUTE':
  new_model.hash = window.location.hash;
break;Question: Why do we "copy" the window.location.hash
to model.hash instead of just "getting" it from window.location.hash
each time we need to know what the hash is?
Answer: technically, we could avoid having
the 'ROUTE' case in update completely
and just use the window.location.hash
instead of model.hash,
the reason we add this "step"
is that we want to have a "single source of truth" in the model.
This is a good habit to have
as it makes debugging your application
much easier because you know exactly
what the "full state" of the application is/was at any point in time.
You will often read/hear the expression "easier to reason about", all this means is that you can "work through" something in your head without getting "confused" by having "too many things to keep track of".
We need to do the filtering "non-destructively",
so it needs to happen in the view function render_main
(just before rendering).
render_main function Before (without filter):
function render_main (model, signal) {
  // Requirement #1 - No Todos, should hide #footer and #main
  var display = "style=display:"
    + (model.todos && model.todos.length > 0 ? "block" : "none");
  // console.log('display:', display);
  return (
    section(["class=main", "id=main", display], [ // hide if no todo items.
      input(["id=toggle-all", "type=checkbox",
        typeof signal === 'function' ? signal('TOGGLE_ALL') : '',
        (model.all_done ? "checked=checked" : ""),
        "class=toggle-all"
      ], []),
      label(["for=toggle-all"], [ text("Mark all as complete") ]),
      ul(["class=todo-list"],
        (model.todos && model.todos.length > 0) ?
        model.todos.map(function (item) {
          return render_item(item, model, signal)
        }) : null
      ) // </ul>
    ]) // </section>
  )
}
render_main function After (with model.hash filter):
function render_main (model, signal) {
  // Requirement #1 - No Todos, should hide #footer and #main
  var display = "style=display:"
    + (model.todos && model.todos.length > 0 ? "block" : "none");
  // console.log('display:', display);
  return (
    section(["class=main", "id=main", display], [ // hide if no todo items.
      input(["id=toggle-all", "type=checkbox",
        typeof signal === 'function' ? signal('TOGGLE_ALL') : '',
        (model.all_done ? "checked=checked" : ""),
        "class=toggle-all"
      ], []),
      label(["for=toggle-all"], [ text("Mark all as complete") ]),
      ul(["class=todo-list"],
        (model.todos && model.todos.length > 0) ?
        model.todos
        .filter(function (item) {
          switch(model.hash) {
            case '#/active':
              return !item.done;
            case '#/completed':
              return item.done;
            default: // if hash doesn't match Active/Completed render ALL todos:
              return item;
          }
        })
        .map(function (item) {
          return render_item(item, model, signal)
        }) : null // if there are no todos, don't show anything.
      ) // </ul>
    ]) // </section>
  )
}
The important lines are:
.filter(function (item) {
  switch(model.hash) {
    case '#/active':
      return !item.done;
    case '#/completed':
      return item.done;
    default: // if hash doesn't match Active/Completed render ALL todos:
      return item;
  }
})
Array.filter returns a new Array
(it does not "mutate" the Array it is filtering)
so we will only see the todo items that match the hash in the URL.
'#/active' means any todos which are not yet done i.e. !done
and '#/completed' are the items which are done=true.
If the URL hash does not match either of these two filters,
then simply "show everything".
Question: is this "logic in the view"...?
Answer: Yes, it is presentation logic. Theviewfunction, **render_mainin this case is merely filtering the data non-destructively before rendering it. UsingArray.filteris a "fancy" (concise) way of writing anifstatement.ifstatements are "OK" in views because they are "conditional presentation logic" i.e. only show this sectionifa certain variable is set.
By usingArray.filterfollowed byArray.mapwe render a subset of themodel.todoswithout "mutating" themodel.todosArray. In other words if the URL hash is'#/completed'the user only wants to see the "completed" items, we don't want to "lose" the todos that are not yet complete, we just want to "hide" them temporarily, if we were to apply this filter in theupdatefunction it would "lose" the other todos (i.e. destroy the data!) the best way to filter data non-destructively is in the view
In your terminal, run:
npm startYou should have a fully-featured Todo list App!
Try out your Todo List App!
If you found this tutorial useful, please "star" the project on GitHub ⭐️ to show your appreciation and share it with others in the community who might find it useful! Thanks! ✨
Consider sharing your creation with your friends by deploying it to GitHub Pages! https://github.com/dwyl/learn-github-pages