Given a scene from an episode of Naruto, track major character's faces, and identify the symbol on their headband.

Compilation of various demos and models
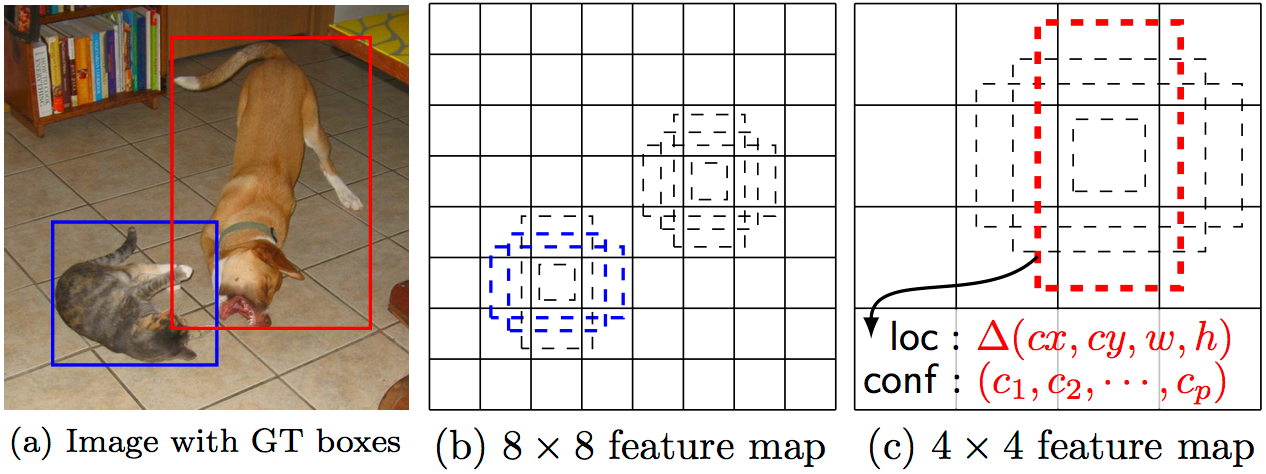
RetinaNet:
Faster R-CNN:
YOLO:
SSD:
Some options:
- While in the
dataset/folder, to retrieve the dataset images and setup the dataset for usage in training, runmake - To clean up the dataset, run
make clean
- While in the
detection/folder, after creating the dataset, to setup all models for training and detecting, runsudo make
Detection
- From within
detection/, runpython3 detect_video.py naruto_chill --detector frcnnto detect a video from the list below, with any of the detectors:frcnn,ssd,yolo,retina.naruto_chill: Kakashi's Masknaruto_v_sasuke: Naruto vs Sasukesasuke_oroch: Sasuke vs Orochimarunaruto_hinata_wedding: Naruto and Hinata Weddingn_op2: Naruto Opening 2ns_op18: Naruto Shippuden Opening 18
- If you want to add more videos, add them as specified within
detect_video.py. - If you wish to run detection on an image, run
python3 detect_image.py image.jpg --detector frcnn, with the same options as video.
Training
- Modify the paths in
dataset/training/*.configto use your current path todetection/where/home/jacob/Desktop/code/csc420/naruto-cv/detectionexists.
This assumes you've created the dataset by the step above.
RetinaNet
- To train, run the following from within
detection/retinanet-
python3 train.py ../../dataset/retimages/train_labels.csv
  ../../dataset/retimages/characters.csv --val-annotations
  ../../dataset/retimages/test_labels.csv --epochs 20000 --steps 100
-
- After, to get a usable model for detections, run
-
python3 convert_model.py <latest_snapshot in snapshots/> <out_name>
-
Faster R-CNN
- To train, run the following from within
detection/-
sudo make train-frcnn
-
- After, to get a usable model for detections, run
-
sudo ./export-graph.sh <epoch> - where epoch is the latest checkpoint in
HOME/TF_FOLDER/models/research/object_detection/training
-
SSD
- To train, run the following from within
detection/-
sudo make train-ssd
-
- After, to get a usable model for detections, run
-
sudo ./export-graph.sh <epoch> - where epoch is the latest checkpoint in
HOME/TF_FOLDER/models/research/object_detection/training
-
YOLO
- To train, run the following from within
detection/-
sudo make train-yolo
-
Finally
- To clean up only the migrated datafiles from the dataset, run
sudo make clean-data - To entirely clean up the training + detection setup, run
sudo make clean
Detection
-
To run symbol detection, you may run
main.pylocated in the root directory of the project (seemainfolder for details). Run it in image mode and ensure that all the images you wish to test it on contain as the first character of their filename, the id of the symbol you wish to detect in it.- e.g.
python main.py --vid-file <image-folder> --mode images
- e.g.
-
You may also run it on a single image as so,
- e.g.
python main.py --vid-file <image-path> --mode images
- e.g.
These are the currently supported symbols and their id's:
- Leaf - 0
- Sand - 1
- Cloud - 2
- Stone - 3
- Mist - 4
There is a test folder detect_symbols/test_images which contains examples of the types of images on which the detector may run. You may use this to test the detector as it stands now, or you may find your own images as well.
Note that even with the time improvements, it still takes 5-10 seconds to run detection on any given image.
Initialization
- To recreate the R-tables used in the Hough transform, you may run the script
init_symbols.pylocated in thedetect_symbolsfolder (see "Readme" indetect_symbolsfor details).
- Create a dataset of character faces with tags, pulling character images from Jikan, and cropping faces using the detector lbpcascade_animeface (Note: this detector will only be used during the generation of the dataset, and only to crop faces).
- If more character pictures are needed, we’ll manually pick them to be added from Google Images.
- Train a network with the created dataset to detect and classify character faces.
- Draw a bounding box around the character faces, with their name as the tag.
- Locate and identify village symbols within each scene. (Task modified - algorithm will locate village symbols, given their respective village, and detection is done on images with the characters face only.)
- Determine the orientation of the found symbols and draw the corresponding box around them.
- (Optional) If the headband symbol lays within a character bounding box, we can determine which village they are from.
- (Optional) Detect if the village symbol on a headband has been crossed out (i.e. character is an ex-member of the village).
- (Optional) Track characters with their respective headbands.
- Some characters look really similar (e.g. Minato Namikaze, Naruto Uzumaki, Boruto Uzumaki)
- Some characters wear their headbands in odd ways (e.g. Sakura Haruno)
- Some characters largely change in appearance throughout the show
- Some characters have un-unique faces (e.g. Yamato, Shino Aburame), this can increase the chance of mis-identification.
- Modern CNNs for multiple object detection are really complex
- Data input/output is a challenge given the custom dataset
- Anime itself presents an interesting challenge with fight scenes with lots of movements. Both tracking and detection in "middle frames" is hard since the characters' faces are often distorted for effect.
- I found that lpbcascade_animeface didn't work too well on Naruto characters, so I'd have to annotate them manually.
- I decided on using labelImg to annotate the images I'd retrieved.
- While creating the dataset, when I found characters with rather "normal" faces I would include their hair as a way to add more keypoints to their classification.
- There was around 290 pictures after using only MyAnimeList.
- As the images from MyAnimeList probably aren't enough, I'm going to use google_image_download to download using keywords, and validate the links manually.
- The image validator is necessary since google images has some fail cases:

- I found that there was some duplication and a large amount of unusable images past around 30 images on google images - so I set the limit as such. If I really need more I can try another resource.
- There was a couple URLs the validator could see but requests couldn't download, and as such, these were blacklisted in the download shell script.
- There's currently 765 different pictures of characters in the dataset after this.
- After successfully running the below Faster R-CNN network on the dataset created, I've come to the conclusion that we're going to need more pictures.
- I'll be using pytube to download a playlist I've put together (excluding the sample videos above, since those are our test set and we ideally don't want to overlap - although some overlap is inevitable) of clips of each character, then use a slightly modified validator to pick out frames I like and output them to a csv file
validated_frames.csv. This file will be able to be fed into the youtube video downloader to extract only the frames we've validated.- When putting the playlist together, fan-made "AMVs" (Anime Music Videos) came in handy since there was a large amount of color correction, warps and other augmentations already embedded into the videos. They also allowed easier splitting of training and eval data.
- The Validator ended up looking as follows. Choose frame will add the frame and filename to a CSV file
validated_frames.csv.
- I went with Tkinter here since Matplotlib is actually super slow at rendering images. If I have time I'll "modernize" the google-image validator to use Tkinter UI and CSV output.
- At this point there's a lot of stuff to set up and do to get the dataset running, so I'm going to create some Makefiles to get everything going easier.
- The dataset now has another 488 images, to total up to 1253 images so far. It should be fairly easy to expand on this number especially with the improved framework for YouTube videos. Some characters may need more images in particular.
- Some of the bounding boxes I made are too small for tensorflow/models, so I'm going to filter out those with an area less than
16 * 16.- This didn't work, so I'm going to download larger videos instead (720p instead of 360p). Need to write a quick script to convert annotations.
- Note*: Downloading the dataset can result in corrupt data on occasion, I need to look into a better way of keeping track of the validated google images


Note: All training done in this section was performed on a GTX 1070 Ti.
- Initially planned on using a YOLO CNN to detect and track characters.
- I've done quite a bit of reading into the details of YOLO. The papers and articles of which are listed below.
- YOLO seems like a good solution.
- I'm going to take a look at some other networks.
- After reading the above resources, SSD and YOLO seem like the obvious choices.
- I need to figure out how to input the data into these networks however, since we're using a hand-built dataset.
- I'd assume our best bet will be to mimick the PASCAL VOC dataset's format and use it as such.
- I'm toying with the idea of simply following a tutorial or using a framework since the networks are quite complex (compared to U-Net, for example) when it comes down to not only the data input but their exact implementation (their layers can get quite complex) and decoding their output. I'm going to need a little more help on it. There's a number of implementations of both YOLO and SSD on github:
- YOLO
- eriklindernoren/PyTorch-YOLOv3 (3k ⭐)
- ayooshkathuria/pytorch-yolo-v3 (2.3k ⭐)
- allanzelener/YAD2K (2.1k ⭐)
- ayooshkathuria/YOLO_v3_tutorial_from_scratch (1.5k ⭐)
- SSD
- Others
- After looking into the different variants of Object detection neural networks, I've settled with the fact that it's probably better if I don't do the implementation myself. These networks are incredibly complex, with some interesting training routines, convolutional layers, input encoding, and output decoding - all of which could be points of error, let alone the architecture of the network itself.
- After quite a bit of looking, I ended up using the following resources to move forward with the development of our face detector:
- I chose to implement it this way since frameworks like Detectron don't allow for as much customization (i.e. trying out different networks easily).
- I wrote a quick script to format the dataset for use with
tensorflow/models(folder re-organization, CSV generation), and used thegenerate_tfrecordscript fromdatitran/raccoon_datasetto generate tfrecords. - Some commands from the first youtube link were really helpful in getting tensorflow/models set up.
- I had to revert tensorflow to v1.15 for some of this stuff to cooperate fully - tensorflow v2.0 is pretty new and has more limited help online than v1.x.
- I'm going to try running a few different networks (starting with
faster_rcnn_inception_v2) for as long as I can - it looks like we might need more than ~30 images per character however. I'm thinking we could try and aim for 100, but that's quite the time commitment for the time we have. - After 3 hours of training (around 12k epochs) I ran the model on the first video provided under "Source Clips" (Naruto Shippuden Opening 18)

- Some pretty decent facial recognition was present, spare a few faces that showed up too often, which I would assume means there isn't enough training data for the network to appropriately determine their appearance.
- Some characters which showed proper recognition were
naruto_uzumaki,kakashi_hatake,shikamaru_nara,killer_bee,gaara, andneji_hyuuga.- Each of these characters had some false positives, for example, naruto would get recognized as
minato_namikazeon occasion, and kakashi would be recognized as the body of some ninjas.
- Each of these characters had some false positives, for example, naruto would get recognized as
- Characters which showed up in some ambiguous cases were:
might_guy:: generic face,yamato:: generic face,shino_aburame:: hidden face,konan:: generic girl face.
- I believe the next step should be expanding the dataset, then trying other networks.
- I'm going to also write a different script to run the object detector, and rather than simply output frame by frame, process the video and output that (with sound!)
- To intake some of these (the bounding boxes can get pretty small/large), i needed to change one of the parameters of
to_absolute_coordinatesto check_range=False. - To properly get sound processing working, i'm using FFmpeg to detatch the audio from the YouTube video and attach it to the processed video.
- To intake some of these (the bounding boxes can get pretty small/large), i needed to change one of the parameters of

Improvements
-
Now this works - but it's not perfect. I'd like to implement OpenCV's tracking alongside the detection, and that's where a new problem arises
- I'm going to run the detector every X frames, experimenting with what works best. I'll update the OpenCV tracker with new boxes when the detector is run. So the process for generating a video will be:
- Detect every X frames, replace tracking boxes
- Track for the next frames until detector is run
-
After adding tracking we get much better results!! A large number of the faces are correct, with about 70% label acurracy.
- Detecting every 5 frames yields some decent results, although the detector will remove the boxes incorrectly on occasion.
- For production purposes, I'm going to detect every 2 frames. This doubles the FPS while still retaining some detection strength
-
The other options now are a) try another more modern neural net, and b) try modifying the data (which I'm going to go with first)
- There's a couple characters previously noted that have large fail rates, that being:
shino_aburame,pain, andneji_hyuuga. I'm going to retainneji_hyuugasince I think there's enough data of him such that I can improve his detection, but I'm going to remove the other two.
- There's a couple characters previously noted that have large fail rates, that being:
-
The results are pretty good at this point:

-
Two things can still be done to improve results - trimming the character count and non-maximum supression. (And potentially data augmentation, since normal characters in light situations get recognized as other more pale characters)
-
Might have to clean out sasuke's curse mark recognition.

After omitting the problem characters, everything is looking quite a bit better. Now that we know the dataset is valid, we can work on writing a network from the ground up. Based on the notes before, I'm probably going to implement an SSD network.
- Understanding SSD MultiBox — Real-Time Object Detection In Deep Learning
- Region based CNNs
- R-CNN, Fast-R-CNN, Faster-R-CNN
- Uses an RPN (Region proposal network) to determine potential regions, then performs classification.
- This is highly accurate but:
- Training takes quite long (since there's multiple phases (RPN and Classifier)).
- Network is slow when detecting after it's trained.
- It took roughly 15 minutes to run detection on half the frames of a 2 minute 24fps video.
- Prefferably, we'd use one network: YOLO / SSD introduce this
- Unfortunately, using one network means we'll be looking at a substantially large number of "failure" proposals since the proposals are consistent, rather than trained (as with an RPN.)
- SSD has higher accuracy but is a bit slower than YOLO.
- I find that accuracy will be more important in my case, since there's quite a bit of "expression" characters can make
- SSD (Single Shot MultiBox Detector)
- based on the VGG-16 architecture, which is normally used for classification.
- where fully connected layers would exist, SSD adds auxiliary convolutional layers, to enable extraction of features of multiple scales.
- uses a modified "MultiBox" which is a bounding box regressino technique based on Inception net.
- has a loss function
multibox loss = confidence loss + alpha * location loss(objectness + location) - starts with priors (aka "anchors") (and 1420 of them per image) which are bounding boxes that are pre-computed (so they have an IOU of over 0.5) so as to regress closer than with random boxes.
- It retains only the top predictions with minimized location and confidence loss.
- has a loss function
- SSD modifies MultiBox as such:
- for a feature map, there are manually chosen priors, with so many (the paper chose to have 6, but more will increase accuracy (while decreasing speed)) for each cell..
- for a feature map, there are manually chosen priors, with so many (the paper chose to have 6, but more will increase accuracy (while decreasing speed)) for each cell..
- SSD uses a smooth L1-Norm for Location loss.
- employs "Hard Negative Mining": a strategy where it keeps negative predictions at a ratio of 3:1 to the positive predictions so the network knows what isn't to be detected.
- Random horizontal flipping and cropping (while including the target) is performed to augment the dataset.
- In the end, Non maximum supression is performed to prune the boxes with a confidence less than some value and an IOU less than anotother (say 0.01 and 0.5 respectively) so the most likely predictions are kept.
- Apparently SSD struggles with objects that have a similar category - such as animals.
- That said, SSD may not actually be the best choice.
- I'm going to look at something I've not yet looked at: RetinaNet | Paper
- RetinaNet proposes around 100k boxes as opposed to SSD's roughly 15k and YOLO's roughly 1k.
- RetinaNet, while maintaining a relatively simple architecture compared to its comparatives, uses a novel loss function: Focal Loss.
- A ResNet is used for deep feature extraaction, with an FPN on top of ResNet for varying scales.
- So at it's base, RetinaNet has two improvements to SSD and YOLO: the FPN and Focal Loss.
- I'm going to look at something I've not yet looked at: RetinaNet | Paper
Implementation
- I'm going to be basing my implementation largely off the well documented keras-retinanet
- It's got a lot of extra modularity that ends up helping a lot when training models, but we won't need any of that modularity. The documentation really helps when dissecting the repo.
- I'm going to try and reformat the repo to a simpler format:
model.pytrain.pypredict.py
- with this, the major scope of the network should be easier to realize. (ResNet -> FPN -> Regression + Classification)
- I'm going to use pretrained ImageNet weights for the ResNet backbone. Unfortunately since I'm going to be using tensorflow's ResNet50 implementation over the keras-resnet repo, the model will end up being slightly different. This means I can't use the original repo's (keras-retinanet) pretrained weights. This probably has a big impact on the next point.
- I'm going to try and reformat the repo to a simpler format:
- After completing this, the first thing that sticks out is the slow training time.
- tensorflow/FRCNN @ 0.3s/step vs. keras/RetinaNet @ 2.5s/step
- This isn't horrible, but it will impact how long we have to train RetinaNet to recieve similar results.
- Since our results from FRCNN were from 30,000 training steps, ideally i'd like to reach the same amount of training for RetinaNet. As such, I'll be training it for around ~15 hours.
- Speed Comparison
- It actually seems after a couple of hours of training RetinaNet it's heavily overfitting. As regression converges, classification spikes super hard - this kind of makes sense since the characters look pretty similar. Will have to look into that. For now, the best implementation is that which exists in our usage of tensorflow's Faster R-CNN implementation. I might look into implementing that if this is still acting weird after another few hours.
- Further through the epoch, it seems to be re-balancing - this might be similar to the top right graph from tensorboard in the FRCNN model.
- If I do implement Faster R-CNN, I'm likely going to use pytorch, since it tends to run faster.
- After 30 epochs of 1000 steps each, training for around 15 hours, my RetinaNet implementation seems to prefer just classifying everything as Naruto himself - since there's a pretty large portion of images with him, it will get decent validation results from doing so. It's box locations are pretty good, the classification is just super off.


- The losses seem to indicate something must be wrong re-classification
- If the classification isn't the problem, my thoughts about fixing this would be to back propogate more, i.e. less steps, more epochs, rather than the 1000 steps * 30 epochs it's at currently.
- Thinking about it... I froze ResNet weights before training... that would explain why classification is whacky. 🤦♂️
- Unfortunately, this means our training will take even longer! Keras predicts each epoch will take 1 hour, so I'm going to need to train for 30 hours. I'll keep an eye on it for the first few to make sure it's worth it.
- After running this for a while (30*100=3000) I was experiencing some memory issues while training. I stopped since it had converged pretty quickly anyways and was starting to overfit. The new loss graphs are as follows:

 This points out a major problem with writing Object detection models from scratch (for custom datasets) in general - training will be a big challenge without pre-trained weights.


The retinanet implementation looks fine from a model summary standpoint, but all the weights are random on our FPN, while the ResNet layers are pre-trained to imagenet. This results in a LOT of required training and data - both of which are scarce with a deadline 😛.
So, building on my usage of tensorflow's modelzoo, we're going to be looking at the implementation of each of these networks as a case study into their efficacy in detecting animated faces (which hasn't actually been expored all too thoroughly - probably due to its "uselessness", haha.).
SSD Loss

Final Notes
- Faster R-CNN (Inception v2, COCO weights) Tensorflow source
- 30,000 steps, 3 hours
- Naruto Vs. Sasuke: Dropbox
- Kakashi's Mask: Dropbox
- Notes:
- As expected, high accuracy all around.
- Has some trouble with characters which look similar.
- Does really well when characters make weird faces.
- Slow training rate (2.7s/step)
- Slow inference time (10 mins to run inference for Kakashi's mask)
- As expected, high accuracy all around.
- SSD (Inception v2, COCO weights) Tensorflow source
- 30,000 steps, 1.5 hrs
- Naruto vs. Sasuke: Dropbox
- Kakashi's Mask: Dropbox
- Notes:
- Good accuracy with close characters.
- Really struggles when they're further away, or if they're making weird faces
- This would suggest that it's not the greatest for this use case, since Anime characters often make weird faces 😛
- Very fast training rate (0.2s/step)
- Very fast inference rate (Real time for Kakashi's mask)
- Good accuracy with close characters.
- YOLOv3 (Darknet) PyTorch source
- Notes:
- Very fast training rate (0.05s/step)(273 epoch x 1156 step in 3.869 hours).
- Very fast inference rate (Real time for everything)
- Notes:
- RetinaNet (ResNet50) Keras source
- Notes:
- Slow training (~5s/step)
- Slow inference
- Notes:
- Initially, I plan on using a Generalized Hough Transform with voting based on SIFT feature points and descriptors. Voting will be used to determine the position, scale and rotation of the symbols, along with detecting the symbol itself. Once the locations, sizes, and rotations of the symbols are known, we can re-gather the points that were used for each symbol during voting and calculate any homographies or bounding boxes using these points.
- I have created an initial dataset of symbols using https://www.deviantart.com/makibo031226/art/NARUTO-village-symbols-521654313.
Approach 1 - Generalized Hough Transform (SIFT Based)
- I have now implemented a rough version of detection using interest points, however, I have come to realize some of the issues in the approach I have taken thus far:
- The symbols I am trying to detect are too simple to gather enough feature point to do detection solely on these points, unless the symbols are quite large.
- Using SIFT as a base for detection and matching feature descriptors is extremely slow and I will not likely be able to make it run at 24 fps even if I implement a "codebook of words" to speed up matching as SIFT itself does not run at 24 fps.
- The results I was getting, however, were promising on images with large symbols and not too many features (i.e. a symbol on a simple background). A certain amount of visual proofs and geometric calculations were required to get the interest points to act as predictors for the Hough transform and the results were all sound. Following is a visual representation of how new interest points were matched to the stored interest points of a symbol and the corresponding prediction for each point:
-
- Here each of the red circles are detected interest points and each of the corresponding blue circles are the predicted symbols, where the prediction includes location, relative scale, and rotation (scale and rotation not shown).
- As you can see, there are very few interest points, even on such a large symbol, therefore when this is done on a smaller scale image, not enough interest points are detected.
- For these reasons, I will be moving to a more standard approach, I will first try using edges as the predictors (as in the usual general Hough transform), then if that doesn't work (e.g. there may not be enough edges when the symbols are small), I will try using an approach simiar to the implicit shape model by Bastian Leibe, Ales Leonardis, and Bernt Schiele - Paper.

Approach 2 - Generalized Hough Transform (Edges)
- I implemented my own generalized Hough transform algorithm from scratch, using OpenCV's
SobelandCannyto get edge information. The algorithm follows closely with the methods and terms in the paper, except for a few optimizations which I will elaborate more on in the following notes. - The first thing I noticed when I implemented the Hough transform was how slow it was. I needed the detections to be both scale and rotation invariant, but using the standard loop for the Hough transform (see Wikipedia) was way too slow and even small images (appr. 200x200) would take up to a minute plus if there were a lot of edges to consider.
- These are the optimizations I made:
- Modified the "R-table" to include the entire set of indeces needed for each edge orientation so that I wouldn't have to loop over the scale and rotation in order to calculate them. That is, the R-table now maps the edge gradient to the indeces in the accumulator that need to be incremented (as offsets from the location of the edge). In the paper, the R-table maps edge orientation to the offset of the location only, not inlcuding the scale and rotation.
- Limited the range of rotation to be from -45 degrees to 45 degrees as it is unlikely that we would need to detect beyond that.
- Some of the problems I was facing:
- The algorithm is still relatively slow, even after making the above optimizations as there are many edges in a single image and an extremely large number of possible positions that the symbol could be in given only that we know a single edge pixel.
- Some of the symbols are very generic, thus making them hard to distinguish from other objects in the image (e.g. the Mist Village symbol is simply 4 of the same slightly curved line).
- The symbols change from one scene/image to another - that is, they are drawings and thus are not depicted exectly the same way all the time.
- I have concluded that the scope of the inital problem was too large for a feature detection algorithm to be able to complete, at least in the amount of time we are given for this project. We initially said that the goal of this part of the project was to detect all symbols in the scene, and then match them to their corresponding characters if possible. However, given that the object we wish to detect vary in both of scale and rotation (and homography in general), and that they are not constant, it seems more reasonable to limit the scope of this problem to detecting symbols within a smaller region of the image where we know that the symbol exists. That is, from now on, the goal of symbol detection is to take a cropped image output from the face detector, and then, given the character and village, determine where and at what orientation the symbol on the headband of that character is, then place a bounding box around it.
- This reduces the problem from detecting which village a character is from, to only detecting the location, orientation, and size of the character's headband symbol (but doing this for multiple symbols, in a generic way). This is a better problem for feature detection to solve, as finding non-constant symbols, along with distinguishing them from each other, is not only unnecessary (given that we know the character and where their face is), but is also much more representative of a problem for deep learning to solve.
- After experimenting with optimizations and methods on improveing detections for an extended amount of time, these what the results look like:
-
- There are still a lot of misses, especially when the frame is large, but with some tuning of the symbols (the original symbols used as templates are quite different from the actual symbols for most of the show), I think it is reasonable.
- On average, it takes between 5 and 10 seconds for the algorithm to process one image (compared to minutes before). Also, if the input is larger than 200x200, it is resized before processing.
- In summary, the Hough transform using edges for voting performs well enough and fast enough so that we can continue working with this as our symbol detection algorithm. It detects symbols at different scales, rotations, and can even detect them when partially occluded as well. Given that any one symbol varies from image to image, I believe these are appropriate results.

- Goal was to create a simple gui which would display a video as we processed it, as well as help the debugging process once we get to testing using videos.
- Tried to implement the gui using Qt, but this ended up requiring more work to install and learn their video player widgets than it did to create my own OpenCV based version
- Also tried a MatPlotLib version, but live plotting is not well supported in MatPlotLib, and the solution was too slow to be feasible.
- Currently there is a working OpenCV based gui and backend which sends video frames to the algo as needed and provides some simple commands via keyboard shortcuts to play/pause the video, etc. The gui can also easily be extended.
- Noticed a flaw in the synchronization of the gui so I restructured it somewhat - i.e. there are now separate threads for reading and displaying the video.
- As is, we should be able to add any algo to the application and it will recieve frames as needed, while the frame reading and gui operate in a separate thread. The algo, reading, and displaying should now all be completely in sync.