Create Alexa Skills through WordPress
VoiceWP is a WordPress plugin that integrates with Amazon Alexa to create and enable the creation of Alexa skills.
VoiceWP creates REST endpoints using the WordPress REST API. These endpoints handle all of the logic of your Alexa skills. When a user interacts with your skill, it sends a Request to an endpoint, which is processed by this plugin, and sends the Response back to the user.
Your skills and settings can easily be created and configured within the WordPress admin dashboard via the provided settings screen and meta fields.
For more on how Alexa skills work in general, see here.
- Fieldmanager.
- SSL certificate.
- Minimum version of PHP: 5.3.
- Minimum version of WordPress: 4.4.
- Install and activate Fieldmanager.
- Download the .zip file of this repo and upload to your WordPress site by going to WP Admin and navigating to Plugins -> Add New. Select the 'Upload Plugin' button near the top of the top of the screen to upload the .zip file.
- 3 different types of skills can be created out of the box
- Flash Briefings: Deliver original content to users as part of their flash briefing. For more on Flash Briefings, see here.
- News: Allow users to listen to your content/posts
- Fully editable 'Welcome', 'Help', and 'Stop' messaging
- Presents users with a list of posts from which to select
- Selected content/post is read in full
- Users can ask for content from a specific category/taxonomy
- Full SSML support within post content
- Full utterances/intent schema provided as starting point to easily copy/paste into the Amazon Developer console
- Does your site use acronyms or other abbreviations? Settings screen provides an interface for defining items Alexa should pronounce a certain way (For example, a site may want all instances of 'DoT' within text to be read as 'Department of Transportation' )
- Facts/Quotes: Create simple skills for serving facts or quotes on your favorite topics. For example, 'Cat Facts', or 'Developer Quotes'.
- Ability to include custom images as part of the app cards.
- Ability to include this as a subset of functionality within the main News skill.
- Developers can create completely new types of skills or customize the existing functionality of the plugin via provided hooks, filters and functions. Documentation outlined here.
All development of VoiceWP happens transparently on Github. Github Issues are used for identifying and discussing bugs and features. Code contributions, whether fixes or enhancements, should be submitted as pull requests.
Join us on Gitter for general discussions or questions.
A Briefings post type is created which is intended to be used for the Flash Briefing skill.
The endpoint for this will be at:
https://yourdomain.com/wp-json/voicewp/v1/skill/briefing
A Skills post type is created for generic skill creation. Out of the box, Fact/Quote skills can be created.
The endpoint for this will be at:
https://yourdomain.com/wp-json/voicewp/v1/skill/(post_id)
This news/content skill will currently read the 5 latest headlines from your WordPress posts and allows the user to choose a post to be read in full.
The endpoint for this will be at:
https://yourdomain.com/wp-json/voicewp/v1/skill/news
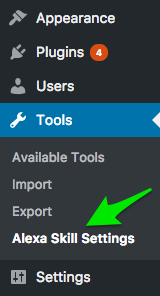
The main Alexa Skill Settings screen is located at Tools -> Alexa Skill Settings
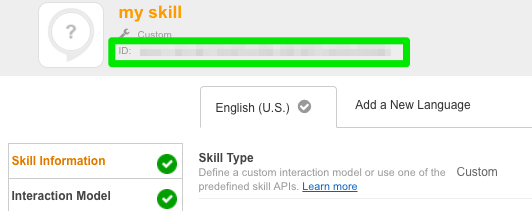
The most important field that needs to be filled in for the news functionality to work is the News skill ID field. The Skill ID can be retrieved from the Amazon Developer Console:
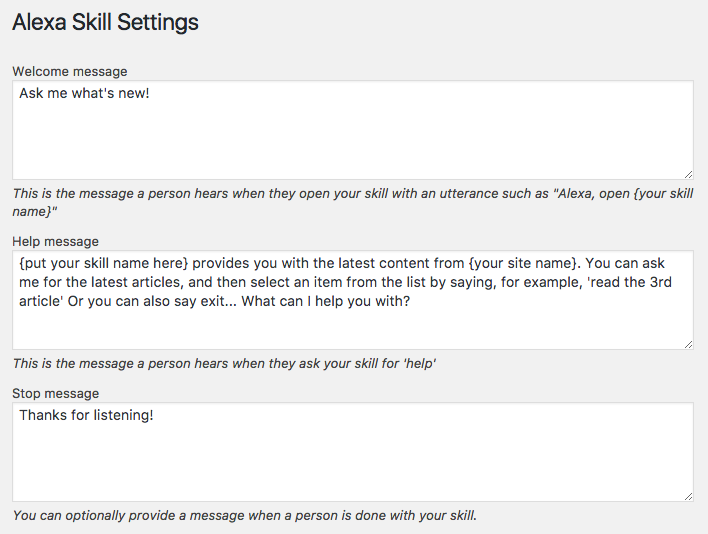
The top of the settings screen provides the ability to set and customize a number of messages used in the skill. The welcome message is triggered when a user opens your skill, for example 'Alexa, open Developer Quotes'. (This occurs by Alexa sending a 'LanchIntent' to your skill). The welcome message can prompt the user to take a certain action, or give them a brief intro to the skill.
The Help message should provide information for the different actions a user can take and occurs when the user asks for help. This occurs by Alexa sending a 'AMAZON.HelpIntent' to your skill. e The Stop message is completely optional. When a user asks the skill to stop or cancel, you can provide a parting message.
Many sites have a set of abbreviations, acronyms, etc. That should be spoken differently by Alexa than how they appear in text. For example, the state abbreviation 'TN' should be pronounced as 'Tennessee'. A meta box with repeating field is available for you to define these words and phrases. Simply add the item in the first field, and how it should be read by Alexa in the second field.
The tedious phase of creating your interaction model has been made simple by our plugin. To get you up and running quickly, the settings screen provides utterances, custom slot types, and an intent schema. The content of these fields can be quickly copied and pasted into the 'Interaction Model' tab for your skill in the Amazon Developer Console.
First, head over to [https://developer.amazon.com] and sign in or create an account.
Then click on the Alexa item in the navigation
Then Alexa Skills Kit
On the right side, click the 'Add New Skill' button
For the Skill Type, if you're setting up a Flash Briefing skill, select 'Flash Briefing Skill API', otherwise select 'Custom Interaction Model'.
Now, go to the next tab, Interaction Model. This is where, if creating a custom skill, you add your intents, custom slots and utterances. For the News skill, this is where the info we've included in the plugins' Alexa Skill Settings page come in, you can copy/paste the items into these field like so:
Next up is the Configuration tab. Choose HTTPS as the endpoint type. Select the appropriate region (North America or Europe), and then paste the endpoint URL. (For the news skill, this is https://yourdomain.com/wp-json/voicewp/v1/skill/news).
Last up is the SSL certificate tab:
Now you're ready to test! Head over to the 'Test' tab, switch the toggle so that testing is enabled. Within the Service Similator, you can type in some utterances to make sure everything is working. For the news skill, try asking what're the latest stories?. Then hit the 'Listen' button in the lower right to hear Alexa deliver that response.
That's it, fill out the Publishing Information and Privacy & Compliance tabs as desired, and you're ready to rock.
A final note, when in this screen, the Skill ID is conveniently located at the top, for custom skills make sure you've added this to your settings within WordPress.
To create your own completely custom types of skills, there are two parts. First, register an endpoint. Second, have a function that gets called when the endpoint is reached.
Below is a simple Hello World skill to demonstrate how this can be accomplished.
function hello_world_register_routes() {
	register_rest_route( 'voicewp/v1', '/hello-world', array(
		'callback' => 'hello_world_skill',
		'methods' => array( 'POST', 'GET' ),
	) );
}
add_action( 'rest_api_init', 'hello_world_register_routes' );
This registers the REST endpoint, defining the URL that our skill lives at. Our hello_world_register_routes() function is hooked on the rest_api_init action.
- The URL of this skill would be
https://{yourdomain.com}/wp-json/voicewp/v1/hello-world - When a request is made by Alexa to this URL, a function named
hello_world_skillis called.
Now let's define our hello_world_skill() function:
function hello_world_skill( WP_REST_Request $request ) {
	// Begin boilerplate
	// Allows us to leverage the core plugin to handle the grunt work
	$voicewp_instance = Voicewp::get_instance();

	// Prevents people from being able to hit the skill directly in browser. Only requests from Alexa are allowed.
	$voicewp_instance->voicewp_maybe_display_notice();

	// Validates that the request is coming from Alexa.
	// Gets the Alexa Request and Response objects for us to use in our skill
	list( $request, $response ) = $voicewp_instance->voicewp_get_request_response_objects( $request, 'add_your_amazon_app_ID_here' );
	// End boilerplate

	// This is the main functionality of your skill,
	// it formats the response that will be sent.
	$response
		// Alexa will read this out
		->respond( __( 'Hello world!', 'voicewp' ) )
		// The app card will say 'Hello from {your site name}'
		->with_card( sprintf( __( 'Hello from %s', 'voicewp' ), get_bloginfo( 'name' ) ) )
		// End the session since a user response is not being waited on.
		// Just say hello and then exit the skill.
		->end_session();

	// Send the result to the user
	return new WP_REST_Response( $response->render() );
}
The hello_world_skill() function begins with a few lines of boilerplate, each line above is commented to describe what it is doing. Don't forget to replace add_your_amazon_app_ID_here with your own app ID.
After the boilerplate is the main functionality of the skill. In this simple example, it is included directly here, but you may wish to break this out into a separate function in your own code.
The response is sent back to the user. Alexa will say 'Hello World!', in the users' app, there will be an app card that says 'Hello from {your site name}'. That's it, simple!
apply_filters( 'voicewp_briefing_source_options', array $sources );Allows for filtering the available sources that can be used for populating a flash briefing. Each source is a radio button option. This filter is only for adding an option to the radio buttons, it does not add a new field to the interface, see voicewp_default_briefing_source.
Parameters
$sources (array) Flash briefing source options. Array key is field name, value is text label.
Example:
function my_voicewp_briefing_source_options( $sources ) {
    // To remove an existing source option
    unset( $sources['attachment_id'] );
    // To add a new source option
    $sources['my_url'] = __( 'My URL', 'voicewp' );
    return $sources;
}
add_filter( 'voicewp_briefing_source_options', 'my_voicewp_briefing_source_options' );apply_filters( 'voicewp_default_briefing_source', string $default_source );String defining the default content source of a flash briefing. The text area is the default source.
Parameters
$sources (string) The default selected content source for a flash briefing. The string is the array key of the source option.
Example:
function my_voicewp_default_briefing_source( $default_source ) {
    return 'my_url';
}
add_filter( 'voicewp_default_briefing_source', 'my_voicewp_default_briefing_source' );apply_filters( 'voicewp_briefing_fields', array $children );Allow addition, removal, or modification of briefing fields. The name of the meta field will be prefixed with voicewp_briefing_, so in the below example, the my_url_field will be saved as voicewp_briefing_my_url_field.
Parameters
$children (array) An array of Fieldmanager fields. The array of fields is a child of a Fieldmanager Group.
Example:
function my_voicewp_briefing_fields( $children ) {
    $children['my_url_field'] = new Fieldmanager_Link( __( 'HTTPS URL to my audio file', 'voicewp' ), array(
        'attributes' => array(
            'style' => 'width: 100%;',
        ),
        'display_if' => array(
            'src' => 'source',
            'value' => 'my_url',
        ),
    ) );
    return $children;
}
add_filter( 'voicewp_briefing_fields', 'my_voicewp_briefing_fields' );apply_filters( 'voicewp_pre_get_briefing', array $array );Allows briefing content to be overridden for customization purposes.
Parameters
$array (array) An empty array. If not empty, it will be immediately returned as the response to the user.
apply_filters( 'voicewp_briefing_source', array $response, string $source, int $post_id, Object $post );Parameters
$response (array) The formatted briefing item.
$source (string) The defined source of the briefing content. If this filter is reached, it's because a custom source is being used.
$post_id (int) Post ID
$post (object) Post object
Example:
function my_voicewp_briefing_source( $response, $source, $post_id ) {
    $response['streamUrl'] = get_post_meta( $post_id, 'voicewp_briefing_my_url_field', true );
    return $response;
}
add_filter( 'voicewp_briefing_source', 'my_voicewp_briefing_source', 10, 3 );apply_filters( 'voicewp_briefing_response', array $response, int $post_id, Object $post );Allows for filtering a flash briefing item before it is sent to the user.
Parameters $response (array) A single briefing item $post->ID (int) ID of post object $post (Object) Post object
apply_filters( 'voicewp_post_types', array $post_types );Allows for filtering the post-types used within the news functionality. By default, the 'Post' post-type is used. Used for adding custom post types, and/or removing the default Post post-type.
Example:
function my_voicewp_post_types( $post_types ) {
    $post_types[] = 'article';
    return $post_types;
}
add_filter( 'voicewp_post_types', 'my_voicewp_post_types' );See credits.txt


