约束布局ConstraintLayout面世已有很长一段时间了,但我一直没有关注这个Android 中继五大布局后的新布局的使用。近日在网友讨论中的强烈推荐下,尝试了ConstraintLayout。使用之后的最大感触就是:为什么我不早点在项目中尝试ConstraintLayout!!!
本篇文章,旨在记录ConstraintLayout的使用,方便日后查阅和学习,我的博客地址。
首先我们概括的说一下ConstraintLayout的优点。
从开发者的使用上来说:约束布局就是一个强力升级版的
RelativeLayout,RelativeLayout能实现的ConstraintLayout也能实现,RelativeLayout不能实现的ConstraintLayout也能实现。从性能上来说:使用
ConstraintLayout的布局基本上不存在ViewGroup的多层级嵌套,我们知道View的绘制是从顶层开始,以遍历的形式完成整个界面的measure、layout、draw。所以在复杂布局的绘制上ConstraintLayout具有一定的性能优势。
ConstraintLayout不仅功能更强大而且性能也比使用其他布局更好,我想这就是为什么Google强烈推荐使用ConstraintLayout的原因吧。而对我们开发者来说,有好用的东西就要积极拥抱。
我们先从绘制一个简单布局来开始ConstraintLayout的实战应用(如果你对约束布局一点也不了解可以先看看这篇Android新特性介绍,ConstraintLayout完全解析。)
在这个布局中共有5个控件,我们一个个的来拖拽。
1.先拖一个ImageView
创建布局将底部tab切换到Design,拖出一个ImageView放到左上角给他设置constraint和大小。
2.拖拽中间的三个TextView
设置最上面的TextView约束:其top和ImageView的top对齐,其left和ImageView的right对齐,并设置margin_left。
中间的TextView约束:其top和最上面的TextView的bottom对齐设置margin,其right和最上面的TextView的right对齐。
底部TextVeiw的约束:其bottom和ImageView的bottom对齐,其right和最上面的TextView的right对齐。
3.最右边“立即申请”TextView
我们观察到“立即申请”位于parent右侧且纵向居中的位置,所以我们要设置它的约束如图所示:
其top和bottom分别于ImageView的top和bottom对齐,表示在ImageView纵向范围内垂直居中;
此外,还要将*中间第2个TextView的右边和该控件的左边对齐,然后设置中间第二个TextView的width为match_constraint,否则中间第二个TextView*将会位于ImageView和该控件横向中间的位置。
此部分代码如下所示:
<?xml version="1.0" encoding="utf-8"?>
<android.support.constraint.ConstraintLayout xmlns:android="http://schemas.android.com/apk/res/android"
    xmlns:app="http://schemas.android.com/apk/res-auto"
    xmlns:tools="http://schemas.android.com/tools"
    android:layout_width="match_parent"
    android:layout_height="match_parent"
    tools:context=".SecondActivity">

    <TextView
        android:id="@+id/textView3"
        android:layout_width="wrap_content"
        android:layout_height="wrap_content"
        android:layout_marginStart="16dp"
        android:layout_marginLeft="16dp"
        android:text="哈哈哈"
        android:textColor="#333333"
        android:textSize="18sp"
        app:layout_constraintStart_toEndOf="@+id/imageView"
        app:layout_constraintTop_toTopOf="@+id/imageView" />

    <TextView
        android:id="@+id/tv_content"
        android:layout_width="0dp"
        android:layout_height="wrap_content"
        android:layout_marginTop="8dp"
        android:layout_marginEnd="4dp"
        android:layout_marginRight="4dp"
        android:ellipsize="end"
        android:maxLines="2"
        android:text="哈哈哈,你是不是傻子么呀。哈哈哈,你是不是傻子么呀"
        android:textSize="16sp"
        app:layout_constraintEnd_toStartOf="@+id/tv_apply"
        app:layout_constraintStart_toStartOf="@+id/textView3"
        app:layout_constraintTop_toBottomOf="@+id/textView3" />

    <TextView
        android:id="@+id/tv_apply"
        android:layout_width="wrap_content"
        android:layout_height="wrap_content"
        android:layout_marginEnd="10dp"
        android:layout_marginRight="10dp"
        android:paddingBottom="@dimen/dp_10"
        android:paddingTop="@dimen/dp_10"
        android:text="立即申请"
        android:textColor="#f34000"
        android:textSize="18sp"
        app:layout_constraintBottom_toBottomOf="@+id/imageView"
        app:layout_constraintEnd_toEndOf="parent"
        app:layout_constraintTop_toTopOf="@+id/imageView" />

    <TextView
        android:id="@+id/tv_bottom"
        android:layout_width="wrap_content"
        android:layout_height="wrap_content"
        android:text="2000人已成功申请"
        android:textSize="12sp"
        app:layout_constraintBottom_toBottomOf="@+id/imageView"
        app:layout_constraintStart_toStartOf="@+id/textView3" />

    <ImageView
        android:id="@+id/imageView"
        android:layout_width="100dp"
        android:layout_height="100dp"
        android:layout_marginStart="8dp"
        android:layout_marginLeft="8dp"
        android:layout_marginTop="8dp"
        app:layout_constraintStart_toStartOf="parent"
        app:layout_constraintTop_toTopOf="parent"
        app:srcCompat="@mipmap/ic_launcher" />
</android.support.constraint.ConstraintLayout>看到没有,RelativeLayout能完成的ConstraintLayout也可以完成,当你习惯了使用ConstraintLayout后你能比使用RelativeLayout更快的完成这些布局。
接下来我们要开始介绍一些RelativeLayout无法实现的功能。
1、设置控件的宽高比例
以前如果我们想要设置控件的宽高比,只能在代码中去设置。现在我们只需要使用layout_constraintDimensionRatio就能完成。
<TextView
            android:id="@+id/tv_banner"
            android:layout_width="0dp"
            android:layout_height="0dp"
            android:background="@color/colorPrimaryDark"
            android:gravity="center"
            android:text="@string/banner_test"
            app:layout_constraintDimensionRatio="H,16:6"
            app:layout_constraintLeft_toLeftOf="parent"
            app:layout_constraintRight_toRightOf="parent"
            app:layout_constraintTop_toTopOf="parent" />
在layout布局文件中我们设置了
app:layout_constraintDimensionRatio="16:6"
即表示 宽:高=16:9。另外需要注意的是此时我们不能设置控件的高度,只能设置0dp(match_constraint)。
2、设置一组控件之间的宽或者高的比例
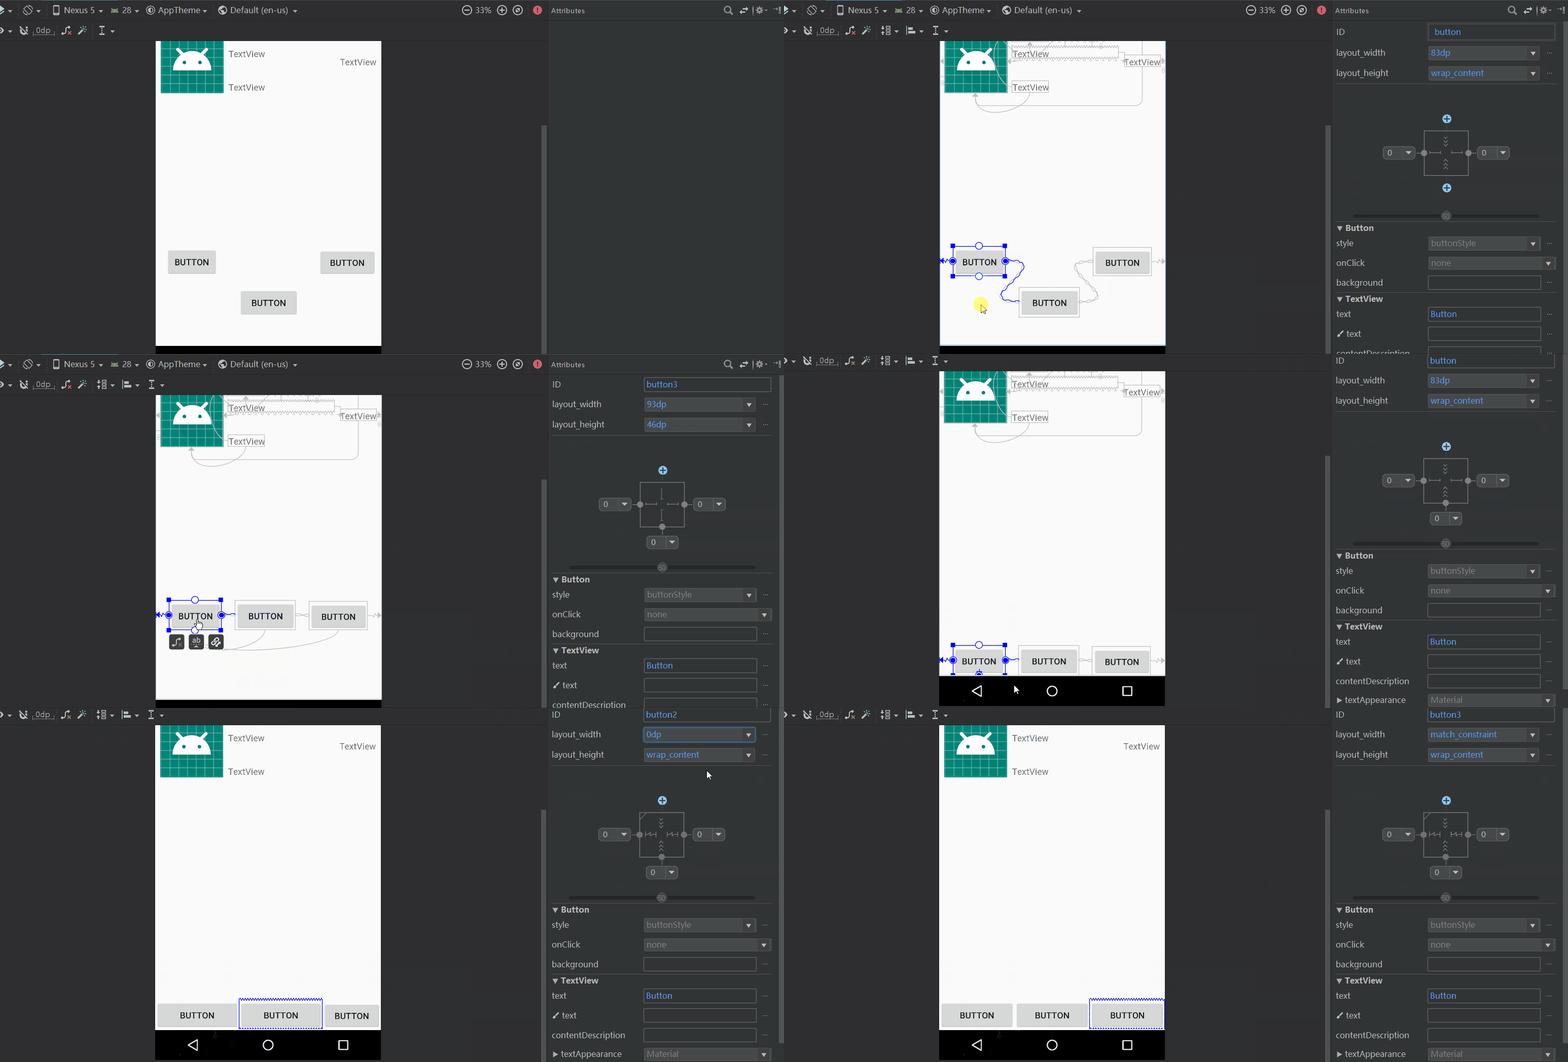
我们可以通过chain(链)来实现这个功能。我们先选中一组控件,然后右键选择chain,在选择方向。这一组控件便组成了一个chain,如果我们要设置他们在链的方向上充满屏幕,则需要把这一组控件的对应width或height设置为match_contraint。
这位说了“我不想要等比的,我要2:1:1你能行么”。
肯定能行的嘛,请看下面这个属性:
app:layout_constraintHorizontal_weight="1"
看到没有,你可以设置任意的比例。
此段代码如下:
 <Button
        android:id="@+id/button"
        android:layout_width="0dp"
        android:layout_height="wrap_content"
        android:text="Button"
        app:layout_constraintBottom_toBottomOf="parent"
        app:layout_constraintEnd_toStartOf="@+id/button2"
        app:layout_constraintHorizontal_bias="0.5"
        app:layout_constraintHorizontal_chainStyle="spread"
        app:layout_constraintHorizontal_weight="1"
        app:layout_constraintStart_toStartOf="parent" />

    <Button
        android:id="@+id/button2"
        android:layout_width="0dp"
        android:layout_height="wrap_content"
        android:text="Button"
        app:layout_constraintBottom_toBottomOf="@+id/button"
        app:layout_constraintEnd_toStartOf="@+id/button3"
        app:layout_constraintHorizontal_weight="1"
        app:layout_constraintStart_toEndOf="@+id/button" />

    <Button
        android:id="@+id/button3"
        android:layout_width="0dp"
        android:layout_height="wrap_content"
        android:text="Button"
        app:layout_constraintBottom_toBottomOf="@+id/button"
        app:layout_constraintEnd_toEndOf="parent"
        app:layout_constraintHorizontal_weight="1"
        app:layout_constraintStart_toEndOf="@+id/button2" />
3、Group的使用
这位又说了“你这控件都是一个一个分开的,我怎么实现一组控件的隐藏和显示?”。
嗯... 这时候就轮到Group登场了。我们先要创建一个group,然后直接将同一组控件拖进去就行了:
代码如下所示:
 <android.support.constraint.Group
        android:id="@+id/group5"
        android:layout_width="wrap_content"
        android:layout_height="wrap_content"
        android:visibility="visible"
app:constraint_referenced_ids="button,button2,button3" />4、GuideLines辅助线的应用
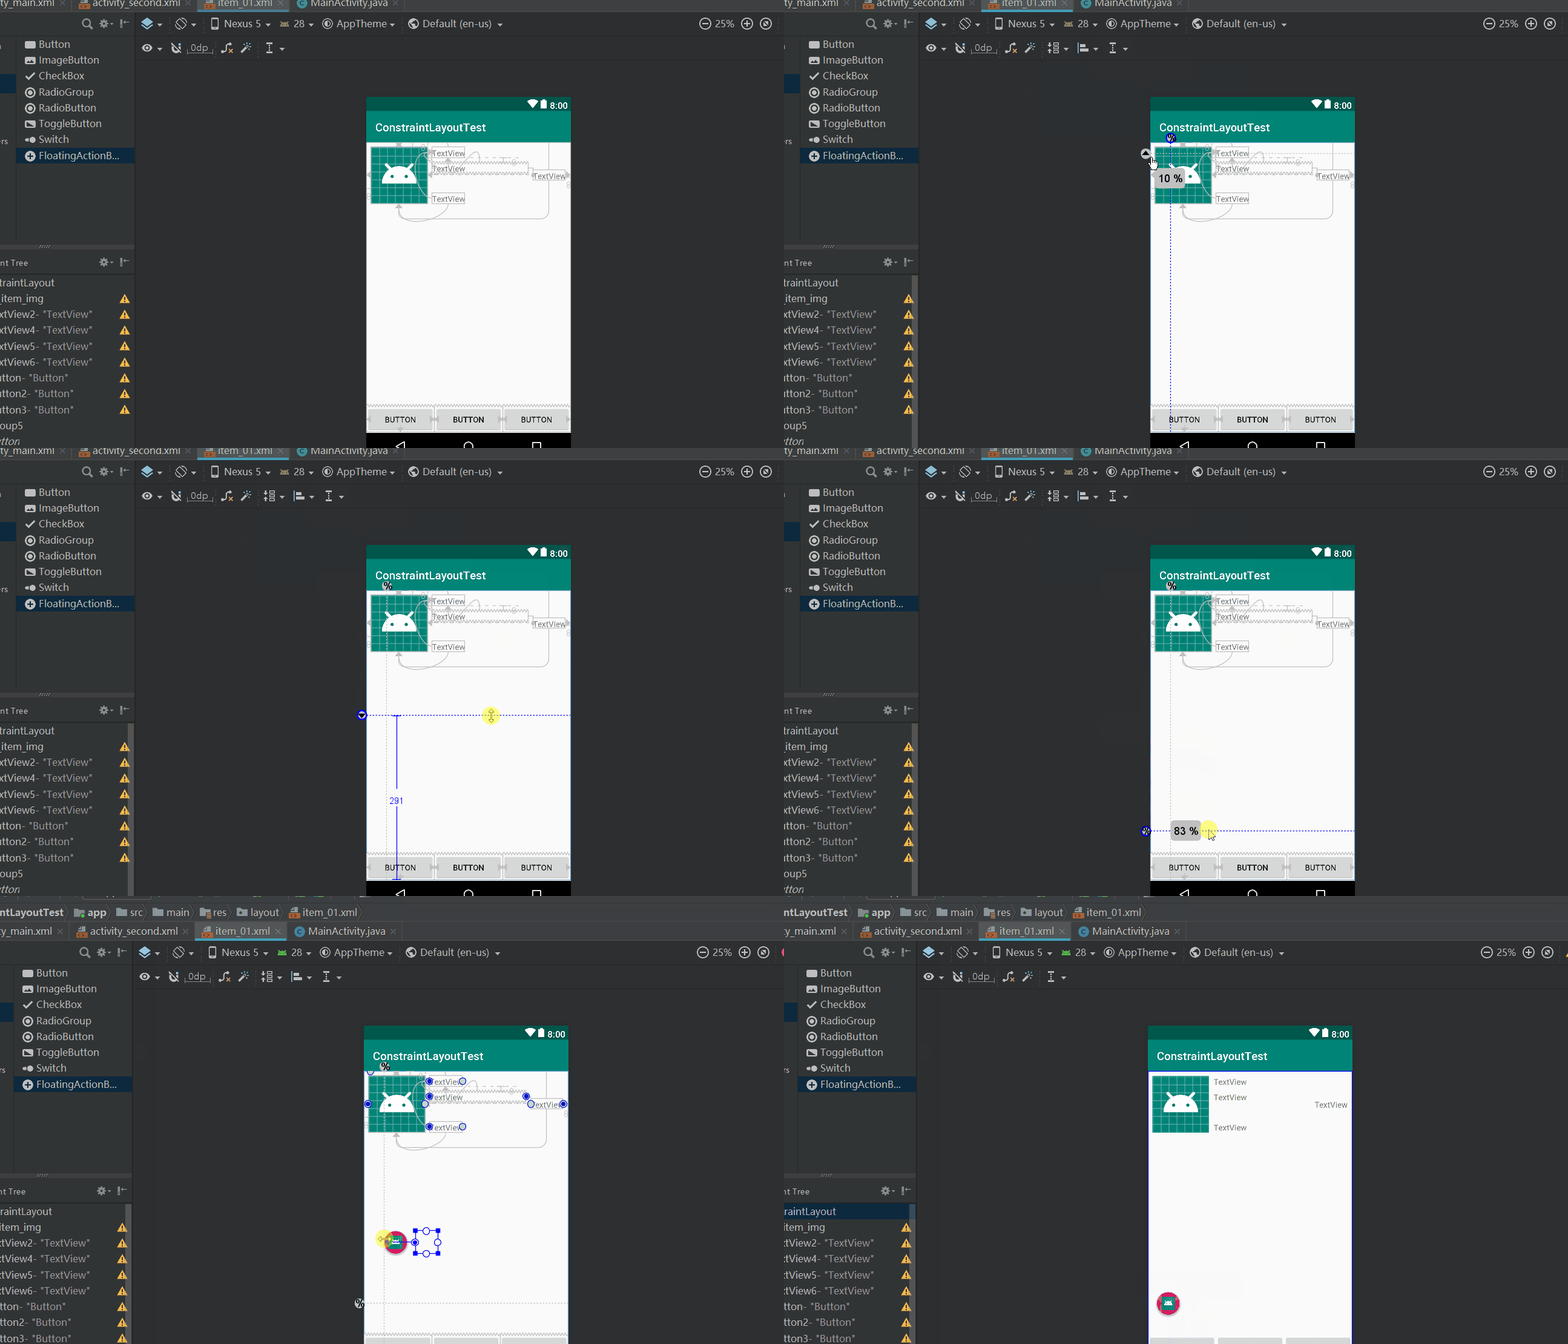
GuideLines实际上是一条不存在的线,仅用来辅助我们的布局。我们可以把控件的约束条件放到GuideLines上来实现我们的布局。
生成的布局代码如下所示:
<android.support.constraint.Guideline
        android:id="@+id/guideline"
        android:layout_width="wrap_content"
        android:layout_height="wrap_content"
        android:orientation="vertical"
        app:layout_constraintGuide_percent="0.1" />

    <android.support.constraint.Guideline
        android:id="@+id/guideline3"
        android:layout_width="wrap_content"
        android:layout_height="wrap_content"
        android:orientation="horizontal"
        app:layout_constraintGuide_percent="0.8" />

    <android.support.design.widget.FloatingActionButton
        android:id="@+id/floatingActionButton2"
        android:layout_width="wrap_content"
        android:layout_height="wrap_content"
        android:clickable="true"
        app:layout_constraintBottom_toTopOf="@+id/guideline3"
        app:layout_constraintStart_toStartOf="@+id/guideline"
        app:layout_constraintTop_toTopOf="@+id/guideline3"
app:srcCompat="@mipmap/ic_launcher_round" />到此为止,ConstraintLayout的大部分特性都已经使用到了。相信你对约束布局也有了一定的理解,还等什么呢,赶快用起来吧!!!
感谢:


