You'll be using the Learn IDE to complete the coding labs in your courses. You'll be spending a lot of time with the IDE so let's take a few minutes to get to know it.
If you are currently on a mobile device, you need to switch to a computer in order to proceed.
First, we need to get set up with the Learn IDE. Follow the instructions below:
- Click here to Download the Learn IDE
- The Chrome browser may give you a warning upon downloading: "This type of file can harm your computer. Do you want to keep Learn IDE anyway?" Click "Keep" to continue the download; the Learn IDE is safe.
- Install the Learn IDE on your computer and then start it up
- Log in to the Learn IDE with your Learn account
If you have any trouble getting the Learn IDE installed, use the chat icon on the bottom right of the page to get help or see if your issue is listed in our Help Center. We know this part can be a pain, but you only have to do it once.
The Learn IDE is built on top of Atom, the text editor by the amazing people at GitHub. The Learn IDE uses the same open-source technologies that thousands of professional developers use everyday, so when you're using the Learn IDE, you're using the same real tools that developers use.
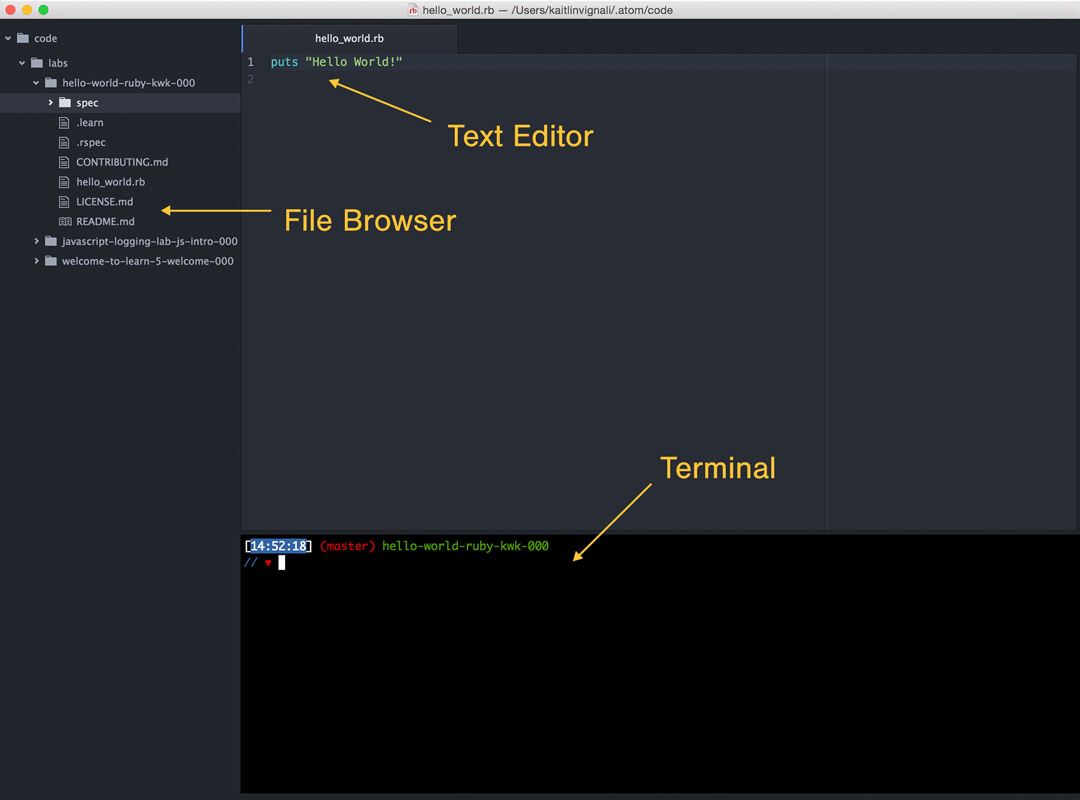
When you open the Learn IDE, you'll see three main components: the file browser, the text editor and the terminal. Let's talk about each of those.
Down the left side of the IDE, you'll find a file browser which lists the files and folders in your “code” workspace. Contained in your “code” workspace is a “labs” folder—this is the folder into which all of the code labs and projects you'll be working on will appear. New folders will be automatically copied here for you as you work through lessons on Learn . Clicking on a file in the file browser will load the contents of that file into the text editor window.
The text editor window is the central part of the IDE. This is where you'll actually be writing code. You can work on multiple files at once in the text editor, they'll appear as tabs across the top of your screen. Remember to save your work often—especially just before trying to run a program, so that the interpreter is always running the latest version of your code.
The Learn IDE's terminal—your command line and shell—can be found below the text editor. We want you to start coding as quickly as possible in the Learn IDE so we've pre-configured the terminal here with a complete development environment that has everything you need to get started. The magic that makes this possible is the fact that the Learn IDE's terminal is connected over the Internet to a remote server we've set up with that complete development environment. This will allow you to adopt the workflow of a professional software developer right out of the gates on Learn, with no fuss.
Didn't follow the instructions the first time above? No problem. Here they are again for you below.
- Click here to Download the Learn IDE
- The Chrome browser may give you a warning upon downloading: "This type of file can harm your computer. Do you want to keep Learn IDE anyway?" Click "Keep" to continue the download; the Learn IDE is safe.
- Install the Learn IDE on your computer and then start it up
- Log in to the Learn IDE with your Learn account
The final step to make sure everything about your IDE and Learn account are working is to type learn hello and press enter from your IDE terminal.
After you hit enter, wait until your terminal responds with Hello, as in the example below.
If you have any issues with this step, please use the chat icon on the bottom right.
Next up, we'll walk you through the process of how to use the Learn IDE to solve code labs on Learn. The real fun is about to begin!
View The Learn IDE on Learn.co and start learning to code for free.
View Environment Setup on Learn.co and start learning to code for free.

