Repository navigation
Tutorial
For this tutorial, we will be using a fake peer-to-peer payment application called Moolah. This application is not yet fully featured, but there is enough functionality in place for us to implement some automated scenarios.
You can download the source code here: https://github.com/lkhoward/moolah
To launch the application, cd to your moolah directory and:
bundle install
bundle exec rackup
The application will be running locally at: http://localhost:9292
The examples in this tutorial will be using RSpec for the testing framework. However, any testing framework will do and should have similar configuration setup. You may need to take additional steps based on your framework of choice (e.g. cucumber scenarios & step definitions).
In your editor of choice, setup a new project with the following directory structure:
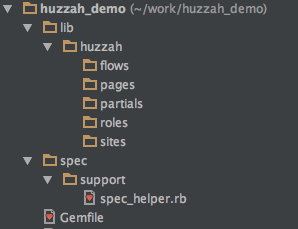
Update your Gemfile:
source 'https://rubygems.org' do
  gem 'rspec'
  gem 'huzzah'
  gem 'watir-webdriver'
end
NOTE: Although Huzzah is designed to be use with watir-webdriver, the two gems are decoupled. This allow you to choose the version of watir-webdriver that best suits your needs.
Perform a bundle install to get the gems.
Next, you will need create your Huzzah configuration. This should be done in the RSpec spec_helper.rb file.
require 'huzzah'
require 'watir-webdriver'

Huzzah.configure do |config|
  config.path = "#{your_project_path}/lib/huzzah"
  config.default_driver = ENV['BROWSER'] ||= 'firefox'
  config.environment = ENV['AUTO_ENV'] ||= 'dev'
end
See Configuration for details about the path, default_driver & environment attributes.
See Defining Custom Drivers for more information about using a browser other than Firefox.
Add a file name login_spec.rb under the spec/moolah directory and add the following code:
require_relative '../support/spec_helper'

describe 'Moolah: Login' do

  let(:user)  { Huzzah::Role.new }

  before(:each) do
    user.browser.goto('http://localhost:9292')
  end

  after(:each) do
    user.browser.close
  end

  it 'allows a user to login' do
    user.browser.text_field(name: 'email').set('dedric.auer@howe.com')
    user.browser.text_field(name: 'password').set('U9HhGbSp')
    user.browser.button(value: 'Login').click
    expect(user.browser.span(class: 'welcome').when_present.text).to include('Dedric Auer')
  end

end
Execute your spec and verify that is passes.
bundle exec rspec spec/moolahNext, let's add a second spec that tests a negative login attempt.
require_relative '../support/spec_helper'

describe 'Moolah: Negative Login' do

  let(:user)  { Huzzah::Role.new }

  before(:each) do
    user.browser.goto('http://localhost:9292')
  end

  after(:each) do
    user.browser.close
  end

  it 'displays error message on invalid login attempt' do
    user.browser.text_field(name: 'email').set('dedric.auer@howe.com')
    user.browser.text_field(name: 'password').set('password')
    user.browser.button(value: 'Login').click
    expect(user.browser.div(class: 'error').when_present.text).to eql('Username/Password incorrect. Please try again.')
  end

end
Execute your specs and verify that they pass.
So far we have only used a generic role, but Huzzah allows us to define data about the different roles (or users) that we will need to test our application. We do that by defining a YAML file. Create a new file named dedric.yml under the lib/huzzah/roles directory and add the following information:
---
dev:
  :email: 'dedric.auer@howe.com'
  :password: 'U9HhGbSp'
NOTE: The key dev matches up to the environment defined in our Huzzah.configure block in the spec_helper.rb file. You can define any number of environments in the YAML file by using a different key:
---
dev:
  :email: 'dedric.auer@howe.com'
  :password: 'U9HhGbSp'
qa:
  :email: 'dedric.auer@howe.com'
  :password: 'I34TyCxq'
Next, update your login_spec.rb file to use this file when we instantiate the role:
let(:user) { Huzzah::Role.new(:dedric) }NOTE: The symbol :dedric must match the name of the YAML file (minus the .yml).
Now we can reference the data from the YAML file in our scenario by accessing the role_data hash:
  it 'allows a user to login' do
    user.browser.text_field(name: 'email').set(user.role_data[:email])
    user.browser.text_field(name: 'password').set(user.role_data[:password])
    user.browser.button(value: 'Login').click
    expect(user.browser.span(class: 'welcome').when_present.text).to include('Dedric Auer')
  end
We can further improve the scenario by adding the expected result (the user's name) to the dedric.yml file:
---
dev:
  :email: 'dedric.auer@howe.com'
  :password: 'U9HhGbSp'
  :full_name: 'Dedric Auer'
And then update the scenario to reference it:
expect(role.browser.span(class: 'welcome').when_present.text).to include(user.role_data[:full_name])Execute login_spec.rb again and verify that your scenario still passes.
Next, let's update the negative scenario to also use Dedric:
require_relative '../support/spec_helper'

describe 'Moolah: Negative Login' do

  let(:user)  { Huzzah::Role.new(:dedric) }

  before(:each) do
    user.browser.goto('http://localhost:9292')
  end

  after(:each) do
    user.browser.close
  end

  it 'displays error message on invalid login attempt' do
    user.browser.text_field(name: 'email').set(user.role_data[:email])
    user.browser.text_field(name: 'password').set(user.role_data[:password])
    user.browser.button(value: 'Login').click
    expect(role.browser.div(class: 'error').when_present.text).to eql('Username/Password incorrect. Please try again.')
  end

end
If we run the spec, the scenario will fail. We want the scenario to have an invalid password, but Dedric has one that is valid. Huzzah provides the option of overwriting (or supplementing) the data from the YAML file. You simple pass a hash of data when you instantiate the Huzzah::Role object. So to provide a bad password we would simply:
let(:user) { Huzzah::Role.new(:dedric, password: 'password') }Run the spec again and it should pass.
There are a couple of important things to note about role_data. First, the data in frozen when a Huzzah::Role is instantiated. It cannot be modified while a scenario is running. This is to prevent data corruption which may cause flapping scenarios. Second, the role_data is available within the Role, Site, Flow, Page & Partial objects. Within your code you can directly reference the @role_data hash. An example of this is below.
The example we have built is a very simple (yet poorly implemented) test scenario. The first thing that needs to be addressed is the hard-coded watir locators. Let's take a look at Huzzah's implementation of the page-object model. Create a new file under your lib/huzzzah/pages driectory named login_page.rb and add the following code:
module Moolah
  class LoginPage < Huzzah::Page

    locator(:email_field)     { text_field(name: 'email') }
    locator(:password_field)  { text_field(name: 'password') }
    locator(:login_button)    { button(value: 'Login') }

  end
end
Huzzah uses a Module::Class pattern for organizing Sites & Pages. The module namespace (in this case Moolah) is the Site. The class name (LoginPage) is the Page. Your page-objects will inherit from the Huzzah::Page class, which gives you access to the locator method.
The locator method provides a shorthand way of defining and organizing how your test scenarios identify elements within the browser. It takes two arguments, a name and a block. The name is used to dynamically define a method with that name, which executes the block of code (the second argument).
For example, the locator:
locator(:email_field) { text_field(name: 'email') }Is equivalent to:
def email_field
  text_field(name: 'email')
end
Let's refactor the positive login scenario to use our new page-object:
  it 'allows a user to login' do
    user.moolah.login_page.email_field.set(user.role_data[:email])
    user.moolah.login_page.password_field.set(user.role_data[:password])
    user.moolah.login_page.login_button.click
    expect(role.browser.span(class: 'welcome').when_present.text).to include(user.role_data[:full_name])
  end
With the addition of the page-object, the syntax now becomes role.site.page.element.action. At this point, it is important to note that we have done nothing but define a class. Huzzah 'wires things together' for you auto-magically. In fact, the only object you ever have to instantiate is the Huzzah::Role. In the above example, the moolah and login_page methods are dynamically generated based on the module namespace and class name of your page object (converted to snake case).
Our expectation still has a watir locator in it, so let's add a second page-object to represent the Moolah User Account page. Create a new file named user_account.rb under you 'pages' directory.
module Moolah
  class UserAccount < Huzzah::Page

    locator(:welcome_message) { span(class: 'welcome') }

  end
end
And update the expectation to use the new page object.
expect(user.moolah.user_account.welcome_message.when_present.text).to include(user.role_data[:full_name])There are a few other important things to note about the locator method. First, within the block of code, you do not need to reference the browser. Huzzah knows that you are calling a method on the browser, which reduces boilerplate coding. Second, for clarity, Huzzah will NOT let you use a name for your locator that matches a name of any method found in the Watir::Container class (e.g. table, link, etc.). Lastly, the block of code can be used for anything (it's just Ruby code after all), but we highly recommend that you only use it for locating elements. If you need to do something else, write a method for it.
Our scenario is much cleaner and more readable now, but we can make it better. Let's add a method to login_page.rb that will handle the login attempt:
module Moolah
  class LoginPage < Huzzah::Page

    locator(:email_field)     { text_field(name: 'email') }
    locator(:password_field)  { text_field(name: 'password') }
    locator(:login_button)    { button(value: 'Login') }

    def login
      email_field.set(@role_data[:email])
      password_field.set(@role_data[:password])
      login_button.click
    end

  end
end
Refactored scenario:
  it 'allows a user to login' do
    user.moolah.login_page.login
    expect(user.moolah.user_account.welcome_message.when_present.text).to include(user.role_data[:full_name])
  end
Our scenario is now smart enough to use the @role_data to login into the application. We just need to ensure that we provide credentials for all of our Huzzah::Role objects.
As our scenario stands now, it is hard-coded to run against the live Bing production environment. However, it is a coomon problem that we need our scenarios to be able to run in multiple environments like dev, qa, pre-prod, etc. Huzzah solves that problem through site configs.
Site Configs are simply YAML files that contain information about your site and each environment you would like to be able to run your scenarios against. When you created your Huzzah config in your spec_helper.rb file, you set a variable named 'environment'. The value of that variable is used to load the data from the site for the specified environment.
Under your lib/huzzah/sites directory, create a new file named bing.yml and add the following code:
---
prod:
    :url: 'http://www.bing.com'
NOTE: In order for Huzzah to be able to 'wire up' things correctly, the file name of your YAML file must be the snake case version of the module namespace in your page-objects (e.g. module Bing == bing.yml).
In the above example, we only have one environment defined (prod) and only one attribute (url). You can have any number of environments defined and you can put any information that you need about your site in this file (e.g. database config), but the url attribute is special. It is used to navigate the browser to the site:
@role.visit(:bing)
  or
@role.visit('bing')
  or
@role.bing.visit
Any of the above method calls will navigate the browser to the URL of the environment specified in your Huzzah config.
Update your spec scenario to use the visit method:
  before(:each) do
    @role = Huzzah::Role.new
    @role.visit(:bing)
  end
or
  before(:each) do
    @role = Huzzah::Role.new.visit(:bing)
  end
See Sites for more information.
Flows are how Huzzah defines user interactions across multiple pages of your application or across page of multiple sites. Let's create a flow that will search Bing and then view the Wikipedia entry for the search keywords. Under your flows directory, create a new file named navigate.rb and add the flowing code:
class Navigate < Huzzah::Flow

  def from_bing_to_wikipedia_entry_for(keywords)
    bing.home_page.search_for(keywords)
    bing.search_results.wikipedia_result(keywords).when_present.click
  end

end
Usage:
@role.navigate.from_bing_to_wikipedia_entry_for('Huzzah')Create a new Scenario:
  it 'allows navigation to a search result' do
    @role.navigate.from_bing_to_wikipedia_entry_for('Huzzah')
    expect(@role.wikipedia.entry.page_title.text).to eql('Huzzah')
  end
Add a new page for Wikipedia:
module Wikipedia
  class Entry < Huzzah::Page

    locator(:page_title)   { h1(id: 'firstHeading') }

  end
end
See Flows for more information.
Partials are simply Pages that are created under the partials directory.
The idea is that partials will be used to keep you code DRY by defining locators that are common to multiple pages. They could also be used to break complex pages into more manageable components.
The syntax for defining a partial is exactly like a page:
module Bing
  class Header < Huzzah::Page

    locator(:sign_in_link)  { span(id: 'id_s') }

  end
end
The only difference is how they are referenced. You link a partial to a page using the partial method:
module Bing
  class HomePage < Huzzah::Page

    partial(Bing::Header)

    locator(:search_box)     { text_field(id: 'sb_form_q') }
    locator(:search_button)  { button(id: 'sb_form_go') }

    def search_for(keywords)
      search_box.set(keywords)
      search_button.click
    end

  end
end
Usage:
@role.bing.home_page.header.sign_in_link.clickSee Partials for more information.