Create a gpg key following steps of How to generate Two-Factor authentication code from your Linux CLI Install dependencies After the key creation create a file .env (from .env.sample) where
- uid: is the email you put in the key
- kid: is the number that appears when you run the command:
gpg --list-secret-keys --keyid-format LONGe.g.: ssb rsa4096/XX1X11XX11X1X11X kid would be XX1X11XX11X1X11X
create accounts using either:
./create.sh <accountid> <totp_key>
or
./create.sh <accountid> <qr-code-file>
Where qr-code-file is the png file that contains the QR code that application offers to scan the totp key.
use:
./decrypt.key.sh <accountid>
- oathtool (or oath-toolkit)
- gpgv2
- zbar (or zbar-tools)
I do not wish to use Google Authenticator or Authy app that generates 2 step verification (2FA) codes on my iOS/Android phone. Is there any way I can produce 2FA codes from Linux command line for popular sites such as Gmail, Twitter, Facebook, Amazon and more?
The mobile apps generate secure 2 step verification codes to protect your online accounts from hackers. You get an additional layer of security. In addition to your password, you need to input 2FA codes for each login. This page explains how to use oathtool OTPs (one-time password) on Linux to secure your Gmail and other online accounts. Instead of waiting for text messages, get verification codes for free from the oathtool Linux command.
oathtool is a command line tool for generating and validating OTPs and gpg2 is an OpenPGP encryption and signing tool for encrypting private keys used by oathtool. Type the commands as per your Linux distro to install the same.
Open the terminal application and type the following dnf command:
$ sudo dnf install oathtool gnupg2
First enable EPEL repo on RHEL or CentOS 7 and run the following yum command:
$ sudo yum install oathtool gnupg2
Simply use the apt command or apt-get command to install the same:
$ sudo apt update $ sudo apt upgrade $ sudo apt install oathtool gpgv2
Simply run the following [nixcmd name=”zypper”:
$ sudo zypper ref $ sudo zypper in oath-toolkit gpg2
The syntax to generate totp is as follows:
oathtool -b --totp 'private_key'
Typically private_key only displayed once when you enable 2FA with online services such as Google/Gmail, Twitter, Facebook, Amazon, Bank accounts and so on. You must keep private_key secrete and never share with anyone. Here is a sample session that creates code for my Twitter account.
$ oathtool -b --totp 'N3V3R G0nn4 G1v3 Y0u Up'
Sample outputs:
944092
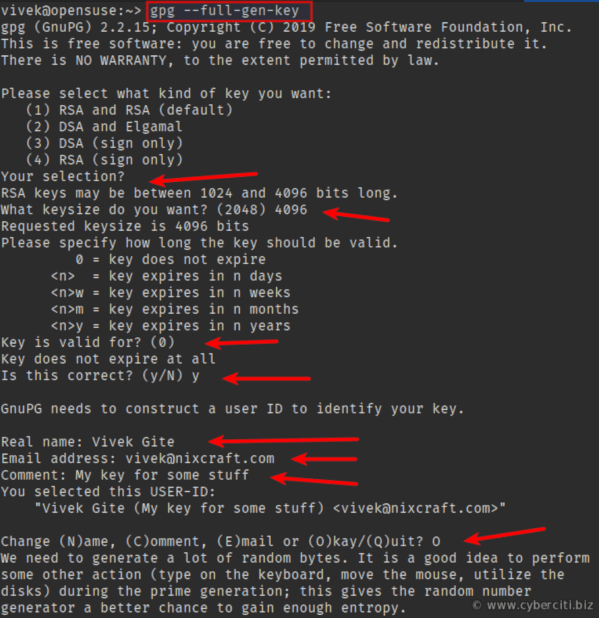
Generate a new key pair for encryption if you don’t have a gpg key, run:
$ gpg2 --full-gen-key
Next, create some directories and helper scripts:
$ mkdir ~/.2fa/ $ cd ~/.2fa/
You can list GPG keys including GnuPG user id and key id, run:
$ gpg --list-secret-keys --keyid-format LONG
Create a shell script named encrypt.key.sh:
#!/bin/bash
# Purpose: Encrypt the totp secret stored in $dir/$service/.key file
# Author: Vivek Gite {https://www.cyberciti.biz/} under GPL v 2.x or above
# ————————————————————————–
# Path to gpg2 binary
_gpg2=”/usr/bin/gpg2″ ## run: gpg –list-secret-keys –keyid-format LONG to get uid and kid ##
# GnuPG user id
uid=”YOUR-EMAIL-ID” # GnuPG key id
kid=”YOUR-KEY” # Directory that stores encrypted key for each service
dir=”$HOME/.2fa” # Now build CLI args
s=”$1″
k=”${dir}/${s}/.key”
kg=”${k}.gpg” # failsafe stuff
[ “$1” == “” ] && { echo “Usage: $0 service”; exit 1; }
[ ! -f “$k” ] && { echo “$0 – Error: $k file not found.”; exit 2; }
[ -f “$kg” ] && { echo “$0 – Error: Encrypted file “$kg” exists.”; exit 3; }
# Encrypt your service .key file
$_gpg2 -u “${kid}” -r “${uid}” –encrypt “$k” && rm -i “$k”
Create a shell script named decrypt.key.sh:
#!/bin/bash
# Purpose: Display 2FA code on screen
# Author: Vivek Gite {https://www.cyberciti.biz/} under GPL v 2.x or above
# ————————————————————————–
# Path to gpg2 binary
_gpg2=”/usr/bin/gpg2″
_oathtool=”/usr/bin/oathtool” ## run: gpg –list-secret-keys –keyid-format LONG to get uid and kid ##
# GnuPG user id
uid=”YOUR-EMAIL-ID” # GnuPG key id
kid=”YOUR-KEY” # Directory
dir=”$HOME/.2fa” # Build CLI arg
s=”$1″
k=”${dir}/${s}/.key”
kg=”${k}.gpg” # failsafe stuff
[ “$1” == “” ] && { echo “Usage: $0 service”; exit 1; }
[ ! -f “$kg” ] && { echo “Error: Encrypted file “$kg” not found.”; exit 2; } # Get totp secret for given service
totp=$($_gpg2 –quiet -u “${kid}” -r “${uid}” –decrypt “$kg”) # Generate 2FA totp code and display on screen
echo “Your code for $s is …”
$_oathtool -b –totp “$totp” # Make sure we don’t have .key file in plain text format ever #
[ -f “$k” ] && echo “Warning – Plain text key file “$k” found.”
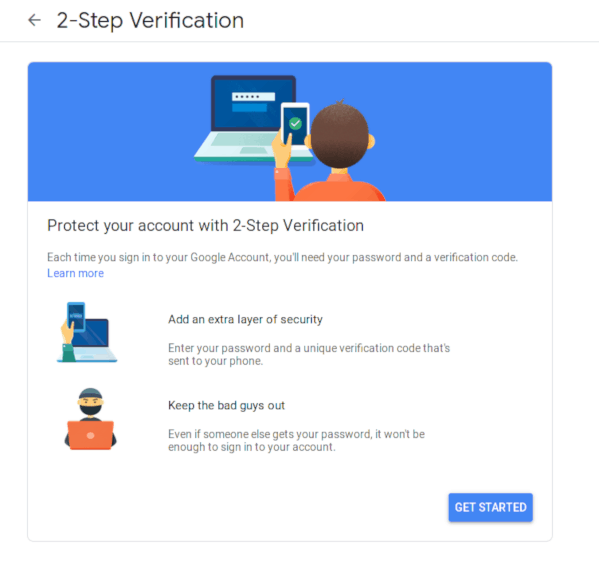
Let us see a complete example for Google/Gmail account. To enable 2FA visit and login:
https://www.google.com/landing/2step/
Visit 2-Step Verification > Get Started:
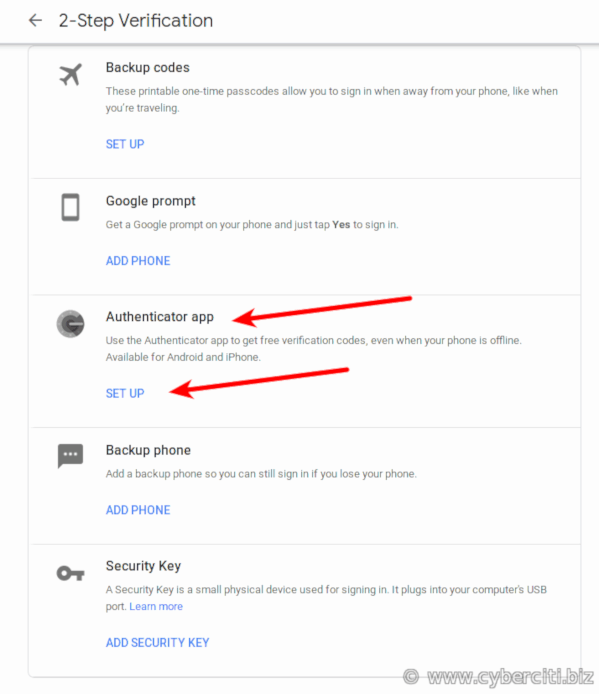
You may have to verify your mobile phone number. Once verified, scroll down and choose Authenticator app:
What kind of phone do you have? Choose iPhone or Android as we are going to use our CLI app and click Next:
Make sure you click on “CAN’T SCAN IT” to see totp secret key and copy it:
Cd into ~/.2fa/ directory and run the following commands:
`cd ~/.2fa/


vivek@gmail.com also act as service name for encrypt.key.sh
mkdir vivek@gmail.com
echo -n 'hilp zs6i c5qu bx7z akiz q75e wk5z z66b' > ~/.2fa/vivek@gmail.com/.key Encrypt the totp secret key file named ~/.2fa/vivek@gmail.com/.key with gpg and password protect it for security and privacy reasons using our **<kbd>encrypt.key.sh</kbd>** helper script: ### Step 3. Secure totp secret key for service named vivek@gmail.com ###
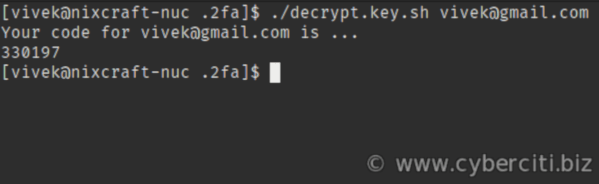
./encrypt.key.sh vivek@gmail.com  Finally click on the Next button: 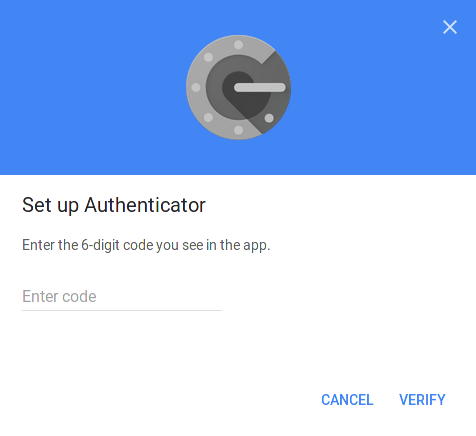 It is time to create your first 6-digit code using oathtool command. However, we automated this process using **<kbd>decrypt.key.sh</kbd>** shell script that decrypts the totp secret and generates the 6-digit 2FA code. Simply run: ./decrypt.key.sh vivek@gmail.com`
You need to type the gpg passphrase to unlock the secrete key for service named vivek@gmail.com:
Finally you will see the 6-digit code as follows on screen:
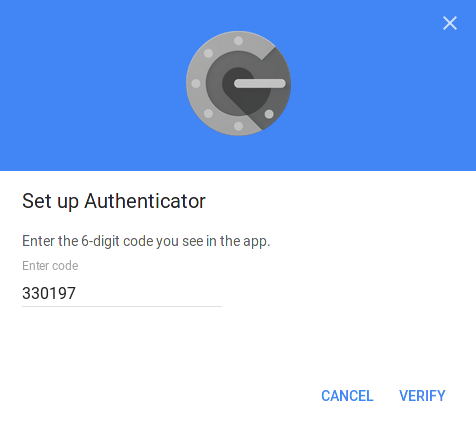
Withing 30 seconds you need to type the 330197 code and click on the verify button:
And you are done:


The syntax is pretty simple:
- Log in to online service such as Twitter, Facebook, Bank account and look for Authenticator 2FA app. For example, let us set up Twitter account 2FA using Linux command line app.
- Copy the totp secret from Twitter account.
- Create a new service directory: mkdir ~/.2fa/twitter.com/
- Make a new .key file: echo -n 'your-twitter-totp-secret-key' > ~/.2fa/twitter.com/.key
- Generate a new PGP encrypted file for security and privacy reasons: ~/.2fa/encrypt.key.sh twitter.com
- Decrypts the totp secret and generates the 6-digit 2FA code when you need to log in into Twitter: ~/.2fa/decrypt.key.sh twitter.com
You can repeat the above process for any services that display the totp secret along with QR code.
The main advantage of Linux command line is that you can easily backup your ~/.2fa/ directory and keys. Your totp secrets/keys are always encrypted and password protected by gpg2. Mobile apps such as Google Authenticator usually do not allow you to sync or copy secrets/keys for security reasons. So if you lost phone or switch phone, you wouldn’t be able to login into the account. This set up is simple and easy to backup/restore as long as you remember your gpg2 passphrase. I strongly recommend that you enable full disk encryption (FDE) too. Next time I will show you how to use GUI apps for the same purpose.