Source: How to deploy a machine learning model using Flask
In this project, we will understand the core logic of ML model deployments. We will use simple tools for better understanding of the core logic. Due to these reasons, some practices here can be marked as bad practice, but for learning purposes they are okay. If you are a new learner like me, you don't know the advanced tools well. If we used advanced tools on the functionality, this would make it hard to understand core logic. It would shift our focus from understanding core logic to understanding advanced tools.
This project focuses on deploying a machine learning model trained to predict Iris species. W In the machine learning area, deployments must be handled in two ways. The deployment covers two primary modes:
Deployment Modes in Machine Learning
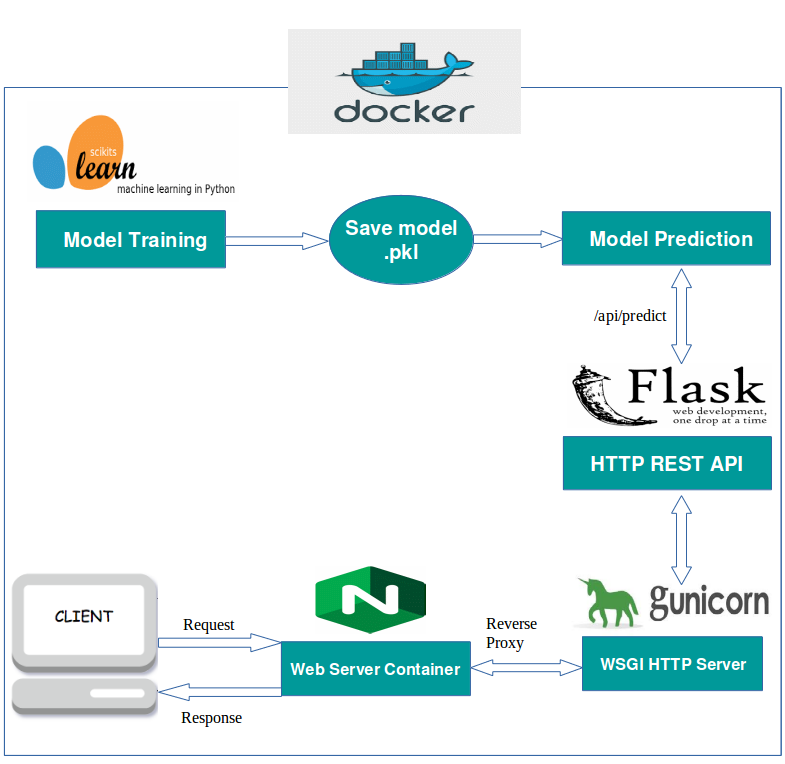
Online Deployment: A REST API built with Flask, containerized using Docker for easy reproducibility. Essential for low-latency scenarios requiring immediate responses with small data pieces. Ideal for:
- User-facing applications (like websites estimating prices)
- Real-time decision-making systems
- Small batch predictions
- Continuous data streams from IoT devices and sensors
Batch Processing: A command-line script for processing large volumes of data through scheduled pipeline execution. Beneficial when:
- Real-time results aren't necessary (nightly inventory scoring, bulk reports)
- Processing large datasets more efficiently than individual handling
- Optimizing resources by reducing repeated tasks (disk I/O, network calls)
- Balancing workload distribution (scheduling batch jobs at night when online systems have lower demand)
Both deployment methods help address model maintenance challenges.Additionally, there is a similar debate about the training methods of models. Models must be updated regularly to prevent degradation and combat model/data drift issues. Online learning models update incrementally and adapt to new data quickly, while batch learning handles larger updates on a schedule.
The right deployment strategy depends on your specific use case, data volumes, and resource constraints.

Source: Batch Learning vs Online (Omanshu Gaidhane)
Now let's talk about project deployment styles, but how about deploying and storing these projects? The project emphasizes packaging the entire application (model, preprocessing logic, API, batch script) into a standard Python package (iris_predictor) using pyproject.toml and Hatchling. It utilizes Python 3.9, Scikit-learn, Pandas, Flask, and Docker.
There are also many different methodologies, but we will use Python packages in this project.
Source: From Model Inception to Deployment
But why Flask? It is simple, effective, and well documented for learning purposes, but remember it cannot directly handle production workloads. You have to add a reverse proxy like Nginx or Apache web server, or use other options like Gunicorn.
And of course, there are many serverless options like Google Cloud Run, etc. But for learning purposes, working with everything manually will be helpful.
If you are curious about low-level details, it's good to check:
- Sync vs. async web servers
- ASGI vs. WSGI servers
Remember that threading ≠ true parallelism in Python (because of GIL).
Main tasks (Based on Work Assignment):
- Prepare a pre-trained Iris model for deployment.
- Implement an online prediction mode via a REST API (using Flask).
- Implement a batch prediction mode via a command-line script.
- Ensure both modes use the same model artifacts.
- Package the entire application code as a Python package.
- Containerize the REST API using Docker.
- Include at least one test for the code or data.
- Ensure the batch pipeline can produce the Docker image for the online prediction service.
Criteria (Based on Work Assignment):
- Straightforward Deployment: The processes for building the package, running batch predictions, and deploying the REST API (via Docker) should be clear and simple.
- Stable REST Endpoint: The Flask API should be stable under load, with response times significantly less than 1 second.
- Functional Batch Predictions: The batch script must execute correctly and produce predictions.
- Python Package: All code is structured and installable as a Python package (
iris_predictor). - Testing: At least one automated test (using Pytest) is included.
- Docker Image: The final output includes a
Dockerfilecapable of building an image for the REST API service
The core of this project is an Iris species predictor. Based on input features (sepal length/width, petal length/width), the model predicts the Iris species (Setosa, Versicolor, or Virginica). The project provides the infrastructure to serve these predictions both in real-time via an API and in bulk via a batch process. Both modes must use the same model artifacts - the same model and the same scaler.
- Reproducibility & Consistency: Packaging (
pyproject.toml) ensures that the exact dependencies are installed. Containerization (Docker) bundles the application, dependencies, and runtime environment, eliminating "works on my machine" issues across development, testing, and production.
The main difference between containerization and packaging: While containerization heavily isolates the project, packaging does not isolate it (maybe just through a virtual environment).
Also, packaging provides easy distribution. Docker can do this via Docker Hub, etc., but I think Python packages are easier to distribute - "pip install bla bla" and done (if everything is well configured).
If you are interested in Docker containerization, I highly suggest taking a look at: https://github.com/mtech00/containerized-mle-docker-tf-jupyter
-
Simplified Deployment: Docker containers encapsulate the application, making deployment as simple as running
docker run. Packaging allows easy installation and use of the batch script or integration into other Python projects. -
Isolation: Docker containers run in isolated environments, preventing conflicts with other applications or system libraries on the host machine.
-
Standardization: Using standard tools like
pip, Flask, and Docker follows industry best practices, making the project easier for others to understand and contribute to. -
Scalability: Containerized applications are generally easier to scale horizontally using orchestration tools. (Kubernetes :) )
I created this project manually but there are many templates and tools available like cookiecutter template [https://github.com/ionelmc/cookiecutter-pylibrary]
module-5-model-deployment/
├── artifacts/                  # Model artifacts storage
│   └── *.pkl                   # Model and scaler files (datestamped)
├── data/                       # Data files
│   └── input_batch_iris.csv    # Sample input data
│   └── predictions_*.csv       # Generated predictions (gitignored)
├── logs/
│   └── cron_batch_*.log        # Log files from cron
├── src/
│   └── iris_predictor/         # Main package
│       ├── __init__.py         # Package marker
│       ├── api.py              # REST API
│       └── batch.py            # Batch processing
├── tests/                      # Test files
│   ├── test_api.py             # API tests
│   ├── test_batch.py           # Batch tests
│   ├── test_data.py            # Data validation tests
│   └── test_data/
│       └── iris_test_input.csv # Mock data
├── .coverage                   # Coverage report
├── htmlcov/                    # HTML coverage report
├── .gitignore                  # Git ignore file
├── Dockerfile                  # Docker config
├── pyproject.toml              # Package config
├── README.md                   # Documentation
├── scripts/
│   └── run_batch_packaged.sh   # Batch script for scheduler
└── train_model.py              # Model training script
- Python: Version 3.8 or higher (as specified in
pyproject.toml). - Docker: Required for building and running the containerized REST API.
- pip: For installing the Python package and its dependencies.
- Git: For version control
- Cron: For scheduling the batch prediction script.job scheduler in Unix-like systems
- Build System:
hatchlingas the build backend. we choosed for its simplicty for small projects - Metadata: Defines the package name (
iris_predictor), version (0.1.1), description, license (MIT), authors, and Python requirement (>=3.8). - also we can define operation system
- Dependencies: Lists runtime dependencies needed for both batch and API modes:
flask,pandas,numpy,scikit-learn. It also includes development/testing dependencies:pytestandpytest-cov. - Scripts: Defines two command-line entry points:
run-iris-batch: Executes themainfunction iniris_predictor.batch.rest-api: Executes themainfunction iniris_predictor.api(likely for development purposes, as the Docker container usesflask run).
- Packaging Configuration: Specifies that the package source code resides in
src/iris_predictor.
This setup allows the project to be installed using pip install ., making the iris_predictor module and the defined scripts available in the environment.
# Hatchling as the build system
[build-system]
requires = ["hatchling"]
build-backend = "hatchling.build"

# metadata
[project]
name = "iris_predictor"
version = "0.1.1"
description = "Iris model batch prediction and API deployment package."
readme = "README.md"
requires-python = ">=3.8"
license = { text = "MIT" } # Or choose another license
# Add your name/email if desired
authors = [
    { name = "mtech00", email = "mtech00@example.com" },
]
classifiers = [
    "Programming Language :: Python :: 3",
    "License :: OSI Approved :: MIT License",
    "Operating System :: OS Independent",
    "Topic :: Scientific/Engineering :: Artificial Intelligence",
]
# Dependencies needed API and Batch)
dependencies = [
        "pytest>=7.0.0",
        "pytest-cov>=4.0.0",
    "flask>=2.0.0",
    "pandas>=1.3",
    "numpy>=1.20",
    "scikit-learn>=1.0",
]

# command-line scripts
[project.scripts]
run-iris-batch = "iris_predictor.batch:main"
rest-api = "iris_predictor.api:main"


# Tells Hatch where to find the package code within the 'src' directory
[tool.hatch.build.targets.wheel]
packages = ["src/iris_predictor"]


# Optional: Project URLs
# [project.urls]
# Homepage = "..."
# Repository = "..."
- Base Image:
FROM python:3.9-slim- Starts with an official, lightweight Python 3.9 image. - Working Directory:
WORKDIR /app- Sets the default directory inside the container. - Copy Project Files: Copies
pyproject.tomlandREADME.md. - Install Dependencies:
RUN pip install --no-cache-dir --trusted-host pypi.python.org .- Installs theiris_predictorpackage itself along with all dependencies defined inpyproject.tomldirectly from the current context (.).--no-cache-dirhelps keep the image layer smaller.--trusted-hostmight be needed in specific network environments but isn't always necessary. - Copy Application Code & Artifacts:
COPY ./src /app/src- Copies the source code into the container.COPY ./artifacts /app/artifacts- Copies the pre-trained model and scaler artifacts into the container.
- Environment Variables for Flask:
ENV FLASK_APP=src.iris_predictor.api:app- Tells Flask where to find the application instance (appobject within theapi.pymodule).ENV FLASK_RUN_HOST=0.0.0.0- Configures Flask to listen on all network interfaces within the container, making it accessible from outside.ENV FLASK_RUN_PORT=5000- Sets the port Flask will run on inside the container.
- Expose Port:
EXPOSE 5000- Informs Docker that the container listens on port 5000. This is documentation; the actual port mapping happens duringdocker run. - Run Command:
CMD ["flask", "run"]- The default command executed when the container starts. It launches the Flask development server using the environment variables defined earlier.
# official Python runtime image
FROM python:3.9-slim

# working directory in the container
WORKDIR /app


COPY pyproject.toml .
COPY README.md .


# Install the package and its dependencies defined in pyproject.toml
RUN pip install --no-cache-dir --trusted-host pypi.python.org .

#  Application Code and Artifacts
COPY ./src /app/src

# Copy artifacts
COPY ./artifacts /app/artifacts


# Points to the Flask app instance 'app' within the 'api.py' module
# inside the 'iris_predictor' package.
ENV FLASK_APP=src.iris_predictor.api:app
ENV FLASK_RUN_HOST=0.0.0.0
ENV FLASK_RUN_PORT=5000

# Expose the port
EXPOSE 5000

# Command to run the Flask development server
# 'flask run' will use the FLASK_APP, FLASK_RUN_HOST, FLASK_RUN_PORT variables
CMD ["flask", "run"]
On the Flask server, an important thing to remember is that we need to load artifacts before the app. The model must be ready to use; if we don't position it properly, it will try to load the model again and again: https://blog.keras.io/building-a-simple-keras-deep-learning-rest-api.html
- Online (REST API):
- Technology: Flask.
- Deployment: Docker container or python package
- Interface: HTTP endpoints (details would be in
api.py, likely accepting feature data and returning predictions). - Usage: Real-time predictions for single or small batches of instances.
- Batch:
- Technology: Python script (
batch.py). - Deployment: Run as a Python script after installing the package (
pip install .thenrun-iris-batch --input <file> --output <file>) or via the scheduled provided shell script (./scripts/run_batch_packaged.sh). - Interface: Command-line arguments (likely for input/output file paths).
- Usage: Processing large datasets offline, potentially scheduled via cron or a workflow orchestrator.
- This script is scheduled using
cron, but what is cron? Cron is a job scheduler in Unix-like systems. Here's an example crontab entry to run per minute for demo purposes:
- Technology: Python script (
* * * * * /usr/bin/bash $HOME/MLE-24-25/module-5-model-deployment/scripts/run_batch_packaged.sh >> $HOME/MLE-24-25/module-5-model-deployment/logs/cron_batch_$(date +\%Y\%m\%d).log 2>&1The project uses pyproject.toml to define the package iris_predictor.
We said we can distribute our package via PyPI, but in this demo we will use development mode for learning purposes. I've already installed the package to PyPI Test (different from PyPI; PyPI Test is for development and testing purposes) repository: https://test.pypi.org/project/iris-predictor/
After building the package, we get source code and wheel files. There's an important point here:
- If the wheel is pure Python (no compiled C/C++ extensions): → It is a universal wheel → works on all platforms → x86, ARM, Windows, Linux, Mac.
- If the wheel has compiled extensions (C/C++): → It is a platform-specific wheel → works only on specific OS + architecture.
If you want to know how to push your package to PyPI, look here: https://packaging.python.org/en/latest/tutorials/packaging-projects/
If you want to use packages from TestPyPI (this is just an example), you need to manage paths more carefully on this project :
pip install -i https://test.pypi.org/simple/ iris-predictor
Now we said we will use development mode. First, we will start by cloning this repository and switching to the project folder. I configured path files assuming the project is cloned in the user's home directory. If you clone directly to your home folder, You probably won’t have problems on Ubuntu:
git clone https://github.com/mtech00/MLE-24-25.git
cd MLE-24-25/module-5-model-deployment
Now we have to create an environment for this project. Some packages strictly need this. I will use venv from Python, but there are many tools like conda/miniconda, uv. I don't like conda as I think it's a heavy and slow option. Another option is using mamba, a faster version of conda if you especially need speed.
Now that we've cloned our repo, it's time to create a virtual environment:
python3 -m venv venv # created venv named venv
source venv/bin/activate # now we activated our venv we are inside this environment
Now we'll install our packages, but there's a tricky point here: we have to use the -e flag, which means "editable." This way, the package finds the source code path, and whenever there's an update, it's immediately synced rather than transferred to the package libraries folder:
pip install -e .
Now we've installed our package and its dependencies in our environment.
We didn't provide any model or scaler; I provided a train_model.py script for creating and testing that simply dumps models and scalers. Another good practice is that these artifacts are dumped with timestamps like iris_model_20250503.pkl. In production, many models will be upgraded daily or weekly. This tagging strategy is simple but effective. Let's create our artifacts. Remember, all scripts in this project use time-based artifacts - if you train your model on another day, your project won't work:
python train_model.pyNow we have day-stamped models and scaler.
Let's test our REST API via curl. First, we'll run:
rest-api
Now our REST server will start:
(venv) $ rest-api
API: Attempting to load model from: /home/ma/MLE-24-25/module-5-model-deployment/src/iris_predictor/../../artifacts/iris_model_20250503.pkl
API: Attempting to load scaler from: /home/ma/MLE-24-25/module-5-model-deployment/src/iris_predictor/../../artifacts/iris_scaler_20250503.pkl
API: Successfully loaded model and scaler.
 * Serving Flask app 'iris_predictor.api'
 * Debug mode: off
WARNING: This is a development server. Do not use it in a production deployment. Use a production WSGI server instead.
 * Running on http://127.0.0.1:5000
Our Flask service has a health check service. Let's check via curl:
curl -X GET http://localhost:5000/health
Response:
{
  "status": "ok",
  "message": "API is running and artifacts are loaded."
}
Now let's test REST prediction:
curl -X POST http://localhost:5000/predict -H "Content-Type: application/json" -d '{"sepal length (cm)": 4, "sepal width (cm)": 3.5, "petal length (cm)": 1.4, "petal width (cm)": 0.2}'
Example response (we also get processing time info):
{
  "prediction": 0,
  "class_name": "setosa",
  "processing_time_ms": 10.5
}
Let's check validations - what happens if we provide wrong inputs like deleting the last column or using strings for petal sizes:
{"error":"Invalid input data format"}
Or let's check another situation - failed to load model artifacts:
{"error":"Model or scaler failed to load during server initialization."}  # on predict request
{"message":"API is running BUT model/scaler artifacts failed to load.","status":"error"} # on health check
Now let's test our batch running script.
Workflow Steps:
- Activate virtual environment
- Define input/output paths and model locations
- Execute batch prediction via package entry point
- Process input data and generate predictions
- Save results to output CSV with time stamped
- Build Docker image for API (integration requirement)
- Tag Docker image with timestamp
- Command-line entry point (
run-iris-batch) defined in package - Shell script (
run_batch_packaged.sh) for execution workflow - Cron job configured to run hourly
- Virtual environment activation handled by script
- Input/output path configuration for batch processing
Before running the shell script, we need to make it executable:
cd scripts
sudo chmod +x run_batch_packaged.sh
We don't need to specify extra paths if we're using the default home structure, but this script can accept arguments:
./run_batch_packaged.sh
Results are saved properly with timestamps to the data folder:
...
BATCH: Preparing output data...
BATCH: Results successfully saved to: /home/ma/MLE-24-25/module-5-model-deployment/data/predictions_batch_20250503.csv
...
The script also creates a Docker image for REST, again tagged by day:
(venv) $ docker images
REPOSITORY           TAG        IMAGE ID       CREATED              SIZE
iris-predictor-api   20250503   5f7277f61d49   About a minute ago   469MB
iris-predictor-api   20250502   db80a81a5c7e   23 hours ago         469MB
If you want to use this image for REST, just use this (don't forget to change the date):
docker run -p 5000:5000 iris-predictor-api:20250503
After that, we can just use the same curl commands and address as above - everything is the same about the REST service.
Now we mentioned scheduling with cron jobs, but how? Cron has a manager file called crontab. We'll add a simple script to configure our scheduled runs:
crontab -e
This will open crontab. At the end of the text, add this. The first part is about the timer, the second part is the script that must be run, and the last part is about directing logs to a log file (again date-stamped). This one will run per minute, but the project is designed for daily runs - we're doing it per minute just to see immediate results for learning purposes.
# ┌ min (0‑59)
# │ ┌ hour (0‑23)
# │ │ ┌ day‑of‑month (1‑31)
# │ │ │ ┌ month (1‑12 or JAN‑DEC)
# │ │ │ │ ┌ day‑of‑week (0‑7 or SUN‑SAT, 0/7 = Sunday)
# │ │ │ │ │
# * * * * *  command-to-run
* * * * * /usr/bin/bash $HOME/MLE-24-25/module-5-model-deployment/scripts/run_batch_packaged.sh >> $HOME/MLE-24-25/module-5-model-deployment/logs/cron_batch_$(date +\%Y\%m\%d).log 2>&1Save and exit - everything works!
It dumped a log file like cron_batch_20250503.log. Whenever it runs, it will write to this log file. If The file already appears, and each new run adds the next logs inside this file.
The project includes tests within the tests/ directory. Based on the filenames (test_api.py, test_batch.py, test_data.py) and the pytest dependency, these are likely run using Pytest.
Testing is out of the scope of this project, but I'll try to explain some core concepts. There are many methodologies and methods for testing. In our context, we need a couple of extra things since we're not only testing software.
We can get help from this resource: https://github.com/ericmjl/data-testing-tutorial
When discussing testing in data-focused areas, it's important to remember that testing ≠ validation. In testing, we're trying to detect bugs. If we don't have a proper validation mechanism, software tests can still pass, but when wrong input comes, you'll get an error.
Testing is an important aspect of CI/CD pipelines. Whenever new code is pushed, tests must be triggered. For learning purposes, GitHub Actions will be helpful. Additionally, if you're using proper test methods, others can use your code without any doubt: "It facilitates code sharing as well, because my colleagues can now have the confidence that the code I write is reliable and works as expected."
In this project, we used pytest. Sometimes we created mock data, mock models, or mock Flask servers. An important point is handling cases in isolation from other errors - we need to manage this in isolation. Another important point about testing is different environment combinations, like different Python versions with different packages. In this guide, we're not using that approach, but there's a helpful tool called tox: https://tox.wiki/en/4.25.0/
If you want to run these tests, just run this command:
(venv) $ pytest tests/It will output like this:
tests/test_api.py ....                              [ 40%]
tests/test_batch.py ...                             [ 70%]
tests/test_data.py ...                              [100%]

=================== 10 passed in 0.88s ====================
(venv) $
In this project, I'm suggesting using debugger-level information for more detailed understanding of what's happening. You can run the tests with,This command will provide much more detailed output about test execution, showing you exactly what's happening in each test, including debug-level log messages and the full traceback of any errors.
(venv) $ pytest -vv --tb=long -s --log-cli-level=DEBUG
Also, we are testing the project, but are we testing all of the project?
Unfortunately not. We need to check the coverage of tests. You'll see our tests are not covering all of the code. Is it necessary? Many times, 80% coverage will be enough.
You can check the test coverage with:
(venv) $ pytest --cov=src/iris_predictor tests/
=================== test session starts ===================
platform linux -- Python 3.12.3, pytest-8.3.5, pluggy-1.5.0
rootdir: /home/ma/MLE-24-25/module-5-model-deployment
configfile: pyproject.toml
plugins: cov-6.1.1
collected 10 items

tests/test_api.py ....                              [ 40%]
tests/test_batch.py ...                             [ 70%]
tests/test_data.py ...                              [100%]

===================== tests coverage ======================
_____ coverage: platform linux, python 3.12.3-final-0 _____

Name                             Stmts   Miss  Cover
----------------------------------------------------
src/iris_predictor/__init__.py       0      0   100%
src/iris_predictor/api.py           96     30    69%
src/iris_predictor/batch.py        125     42    66%
----------------------------------------------------
TOTAL                              221     72    67%
=================== 10 passed in 1.31s ====================
(venv) $
If you want to see what parts of the code are covered or not, you can run a command that will show the line numbers of uncovered code:
(venv) $ coverage report -m
Name                             Stmts   Miss  Cover   Missing
--------------------------------------------------------------
src/iris_predictor/__init__.py       0      0   100%
src/iris_predictor/api.py           96     30    69%   24-29, 52-61, 98, 102, 105-106, 119-120, 159-167, 177, 180, 189-190
src/iris_predictor/batch.py        125     42    66%   47-54, 61-63, 68, 72-77, 108-110, 117-130, 143-144, 148-150, 182-186, 191
--------------------------------------------------------------
TOTAL                              221     72    67%
But this is hard to understand. What else do we have? An HTML version report! Much better.
(venv) $ coverage html
Wrote HTML report to htmlcov/index.html
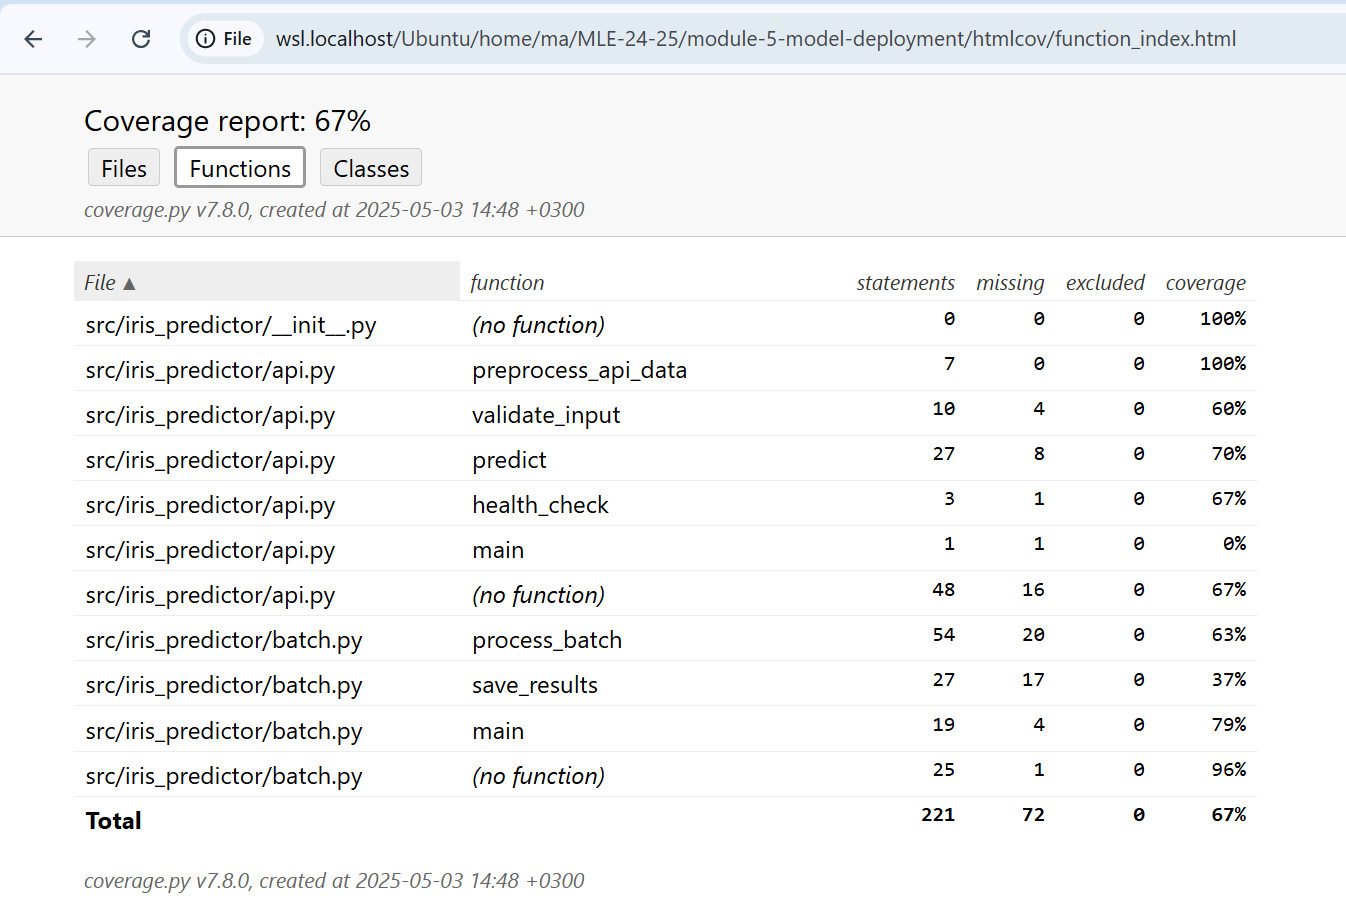
This HTML report is much better for visualization. We can see more detailed information including:
- Color-coded coverage of each file
- Line-by-line highlighting showing covered vs uncovered code
- Summary statistics and metrics
- Ability to navigate through different files
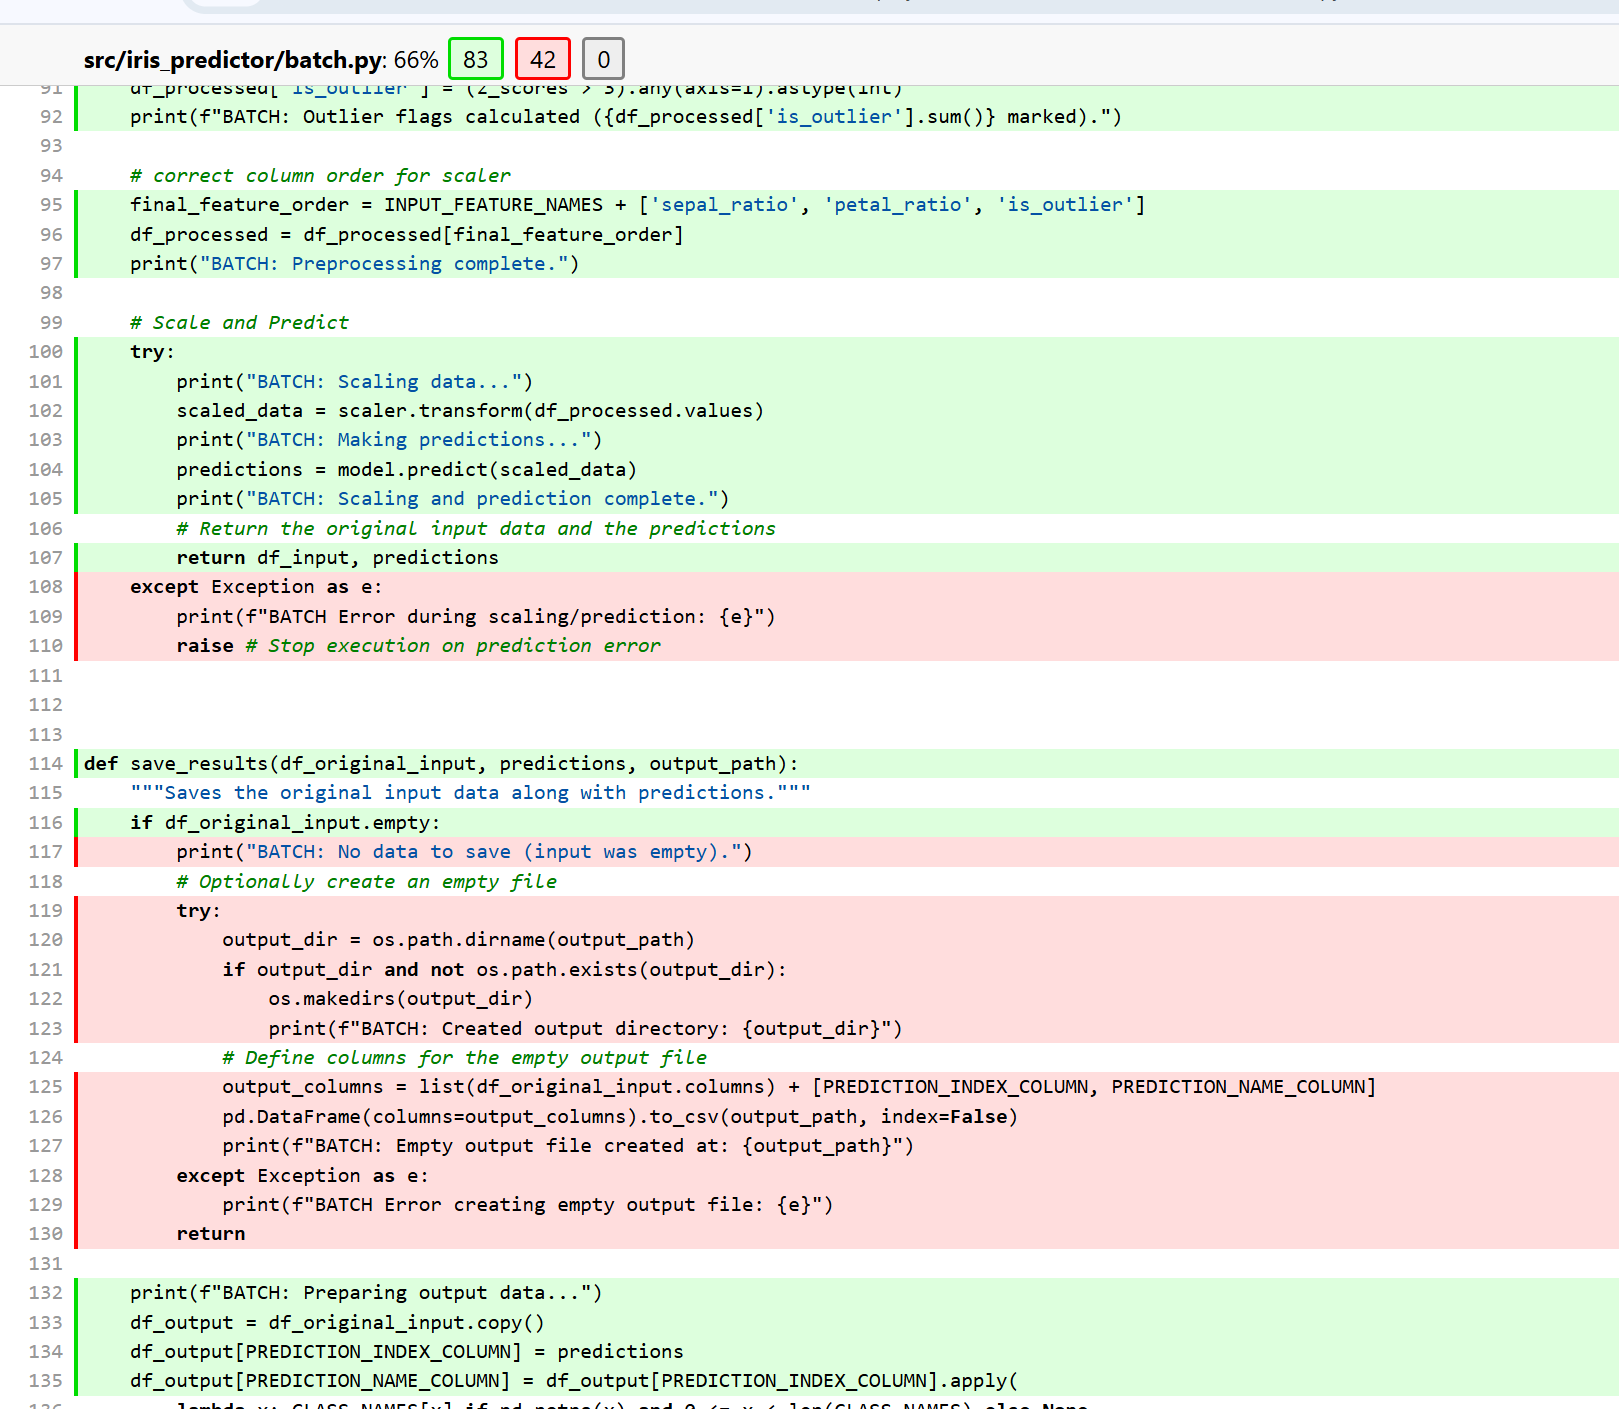
The HTML report provides an interactive way to explore test coverage, making it easier to identify which specific functions or code blocks need additional testing. When you open the HTML report in a browser, you can click on individual files to see exactly which lines are covered (usually highlighted in green) and which lines are not covered (usually highlighted in red).
- API Tests (
test_api.py):- Health endpoint functionality
- Prediction endpoint with valid data
- Error handling for missing features
- Error handling for empty requests
- Batch Processing Tests (
test_batch.py):- Batch processing functionality
- Results saving
- Command-line argument handling
- Data Tests (
test_data.py):
In data testing, there are several important reasons why we use mocking:
- Loading real files can be slow.
- The test might fail if the file is missing or corrupted, even if your code logic is correct.
- You want to control exactly what happens during the test.
Mocking is the technique of replacing these real dependencies with fake objects that simulate the behavior of the real ones.
In data tests, another important point is handling floating point comparisons. For high-precision comparisons, you need special approaches, otherwise tests might fail even if everything is functionally correct. This is because floating point numbers in computers have inherent precision limitations.
For visualizing missing data beyond classical visualization tools, I recommend checking out: https://github.com/ResidentMario/missingno
Other important aspects of data testing include:
- Input data column validation
- Value range validation
These validation steps ensure that your data meets expected format requirements and contains values within acceptable ranges, which is crucial for maintaining model performance and reliability.
- API Errors:
- Input validation with specific error messages
- Model loading failure detection
- Server error handling with appropriate status codes
- Batch Errors:
- File not found handling
- Model loading failure detection
- Data validation checks
The .gitignore file correctly excludes:
- Python bytecode (
*.pyc) and cache (__pycache__/). - Build artifacts (
dist/). - Virtual environments (
venv/,.venv/). - Most data files (
data/*.csv), except the explicitly included ! !input_batch_iris.csv. This is not ignored for demonstration purpose.- Pytest cache (
.pytest_cache/) and coverage reports (.coverage). - Model artifacts (
artifacts/*.pkl) - Important to avoid committing large binary files to Git. - Log files (
logs/*), except the.gitkeepfile. - OS-specific files (
.DS_Store). - Docker-related runtime files (
*.log,*.pid).
This keeps the repository clean and focused on source code and configuration.
- Packaging the application using
pyproject.toml. - Containerizing the web service with Docker.
- Including automated tests.
- Authentication & Security:API Authentication:
- Add API key or OAuth authentication
- Implement HTTPS for API
- Add rate limiting for protection
- Monitoring & Observability:
- Add Prometheus metrics for API
- Implement structured logging with JSON format
- Create dashboards for system monitoring
- Scalability Improvements:
- Use object storage for artifacts instead of local filesystem
- Implement horizontal scaling capability for API
- Add support for larger batch sizes with chunking
- Add CI/CD: Implement pipelines (e.g., using GitHub Actions, GitLab CI) to automatically build, test, package the Python code, and build the Docker image on code changes.
- Configuration Management: Externalize configuration (e.g., model paths, default thresholds) instead of hardcoding.
- More Robust API: Add input validation (e.g., using Pydantic within Flask), error handling, and potentially API documentation (e.g., Swagger/OpenAPI).
- Production-Ready WSGI Server: Replace the Flask development server (
flask run) in the Docker container with a production-grade WSGI server like Gunicorn or uWSGI for better performance and stability. - Monitoring & Logging: Integrate structured logging and monitoring into the API and batch processes.
- Workflow Orchestration: Integrate the batch script into a workflow manager (like Airflow, Prefect, Dagster) for scheduling, dependency management, and monitoring.
- https://miro.medium.com/v2/resize:fit:640/1*O0S2-UBv_Y1RRgHgRkg1yQ.png - Deployment diagram image
- https://medium.com/@qleedham/how-to-deploy-a-machine-learning-model-using-flask-922dc047ddd7 - How to deploy a machine learning model using Flask
- https://media.licdn.com/dms/image/v2/D4D12AQHnTsIGIZbeug/article-cover_image-shrink_720_1280/article-cover_image-shrink_720_1280/0/1682921796302?e=1751500800&v=beta&t=3Uzfrd7Rg7_013cTN9jiYoJafnJGuZ0HyAmlqAkvnZ8 - Batch vs Online Learning image
- https://www.linkedin.com/pulse/batch-learning-vs-online-omanshu-gaidhane/ - Article about Batch Learning vs Online Learning
- https://miro.medium.com/v2/resize:fit:785/1*E_EhpsbtvMXlEGGOkKpqVw.png - Model Inception to Deployment image
- https://medium.datadriveninvestor.com/from-model-inception-to-deployment-adce1f5ed9d6 - Article about Model Inception to Deployment
- https://github.com/mtech00/containerized-mle-docker-tf-jupyter - Repository for containerized machine learning environments
- https://github.com/ionelmc/cookiecutter-pylibrary - Cookiecutter template for Python library projects
- https://blog.keras.io/building-a-simple-keras-deep-learning-rest-api.html - Article about building a Keras deep learning REST API
- https://test.pypi.org/project/iris-predictor/ - TestPyPI repository for iris-predictor package
- https://packaging.python.org/en/latest/tutorials/packaging-projects/ - Python packaging tutorial
- https://github.com/mtech00/MLE-24-25 - Repository for the MLE 24-25 course
- https://github.com/ericmjl/data-testing-tutorial - Tutorial on data testing
- https://github.com/ResidentMario/missingno - Tool for visualizing missing data
- https://tox.wiki/en/4.25.0/ - Tox documentation for testing in different environments
- https://flask.palletsprojects.com/en/2.0.x/ - Flask Documentation
- https://packaging.python.org/tutorials/packaging-projects/ - Python Packaging Guide
- https://docs.docker.com/ - Docker Documentation
- https://docs.pytest.org/en/6.2.x/ - Pytest Documentation