A JupyterLab gallery extension for presenting and downloading examples from remote repositories
This extension is composed of a Python package named jupyterlab-gallery
for the server extension and a NPM package named jupyterlab-gallery
for the frontend extension.
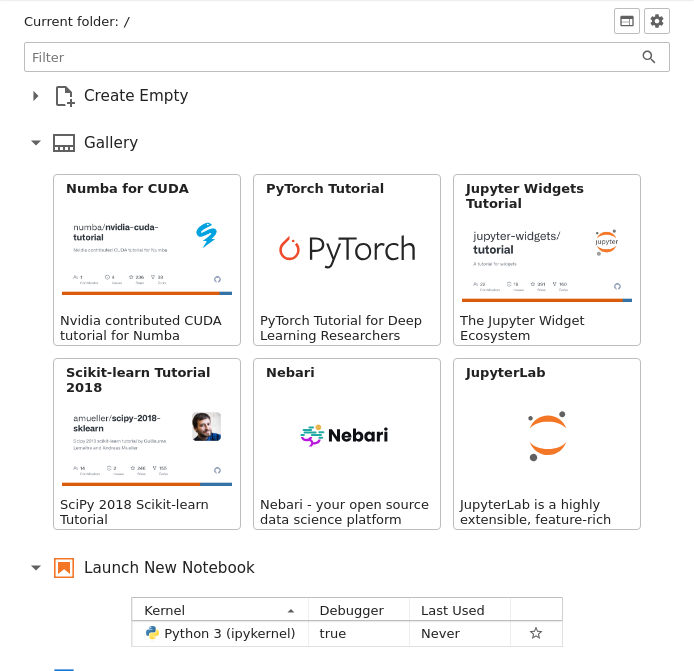
When jupyterlab-launchpad is installed, the gallery will be added as a "Gallery" section in the launcher:
Otherwise it will be shown in the left sidebar.
Hover over the tile with exhibit that you are interested in to reveal a "Download" button:
Clicking this button will start the download process, which you can monitor by tracking the progress bar that shows up in the tile.
After cloning has completed, hover over the tile again to reveal "Open Folder" and "Update" buttons:
The update button becomes active once a new version of the cloned repository becomes available (once new commits are pushed to the tracked branch):
You can configure the gallery with the following traitlets:
GalleryManager.exhibits: controls the tiles shown in the galleryGalleryManager.destination: defined the path into which the exhibits will be cloned (by default/gallery)GalleryManager.title: the display name of the widget (by default "Gallery")
These traitlets can be passed from the command line, a JSON file (.json) or a Python file (.py).
You must name the file jupyter_gallery_config.py or jupyter_gallery_config.json and place it in one of the paths returned by jupyter --paths under the config section.
An example Python file would include:
c.GalleryManager.title = "Examples"
c.GalleryManager.destination = "examples"
c.GalleryManager.exhibits = [
    {
        "git": "https://github.com/jupyterlab/jupyterlab.git",
        "homepage": "https://github.com/jupyterlab/jupyterlab/",
        "title": "JupyterLab",
        "description": "JupyterLab is a highly extensible, feature-rich notebook authoring application and editing environment.",
        "icon": "https://raw.githubusercontent.com/jupyterlab/jupyterlab/main/packages/ui-components/style/icons/jupyter/jupyter.svg"
    },
    {
        "git": "https://github.com/my_org/private-tutorial.git",
        "account": "name-of-the-account-or-app-owning-the-token",
        "token": "access-token-for-example-starting-with-github_pat_",
        "title": "My private tutorial",
        "description": "A tutorial which is not public.",
    },
    {
        "git": "https://github.com/my_org/public-tutorial.git",
        "title": "My tutorial",
        "branch": "v2024",
        "depth": 1
    }
]
Using the Python file enables injecting the personal access token (PAT) into the token stanza if you prefer to store it in an environment variable rather than in the configuration file (recommended).
The gallery application backend can be run as a standalone server app by executing:
jupyterlab-galleryTo run it as a single-user server in the JupyterHub context use:
jupyterhub-galleryFor additional help see the GalleryManager section in the output of:
jupyterlab-gallery --help-all- JupyterLab >= 4.0.0
To install the extension, execute:
pip install jupyterlab-galleryTo remove the extension, execute:
pip uninstall jupyterlab-galleryIf you are seeing the frontend extension, but it is not working, check that the server extension is enabled:
jupyter server extension listIf the server extension is installed and enabled, but you are not seeing the frontend extension, check the frontend extension is installed:
jupyter labextension listNote: You will need NodeJS to build the extension package.
The jlpm command is JupyterLab's pinned version of
yarn that is installed with JupyterLab. You may use
yarn or npm in lieu of jlpm below.
# Clone the repo to your local environment
# Change directory to the jupyterlab-gallery directory
# Install package in development mode
pip install -e ".[test]"
# Link your development version of the extension with JupyterLab
jupyter labextension develop . --overwrite
# Server extension must be manually installed in develop mode
jupyter server extension enable jupyterlab_gallery
# Rebuild extension Typescript source after making changes
jlpm build
You can watch the source directory and run JupyterLab at the same time in different terminals to watch for changes in the extension's source and automatically rebuild the extension.
# Watch the source directory in one terminal, automatically rebuilding when needed
jlpm watch
# Run JupyterLab in another terminal
jupyter lab
With the watch command running, every saved change will immediately be built locally and available in your running JupyterLab. Refresh JupyterLab to load the change in your browser (you may need to wait several seconds for the extension to be rebuilt).
By default, the jlpm build command generates the source maps for this extension to make it easier to debug using the browser dev tools. To also generate source maps for the JupyterLab core extensions, you can run the following command:
jupyter lab build --minimize=False# Server extension must be manually disabled in develop mode
jupyter server extension disable jupyterlab_gallery
pip uninstall jupyterlab-galleryIn development mode, you will also need to remove the symlink created by jupyter labextension develop
command. To find its location, you can run jupyter labextension list to figure out where the labextensions
folder is located. Then you can remove the symlink named jupyterlab-gallery within that folder.
This extension is using Pytest for Python code testing.
Install test dependencies (needed only once):
pip install -e ".[test]"
# Each time you install the Python package, you need to restore the front-end extension link
jupyter labextension develop . --overwrite
To execute them, run:
pytest -vv -r ap --cov jupyterlab-galleryThis extension is using Jest for JavaScript code testing.
To execute them, execute:
jlpm
jlpm testThis extension uses Playwright for the integration tests (aka user level tests). More precisely, the JupyterLab helper Galata is used to handle testing the extension in JupyterLab.
More information are provided within the ui-tests README.
See RELEASE


