#PiStack Version 0.4.2-beta
PiStack is a remote radio interface for FlightGear, that is designed to work with the Raspberry Pi Official thouch screen. However, it should run on other devices that can run Python3.
PiStack, a remote radio stack for FlightGear Copyright (C) 2020 Jeffrey Davis jeff@puffergas.com
This program is free software; you can redistribute it and/or modify it under the terms of the GNU General Public License as published by the Free Software Foundation; either version 2 of the License, or (at your option) any later version.
This program is distributed in the hope that it will be useful, but WITHOUT ANY WARRANTY; without even the implied warranty of MERCHANTABILITY or FITNESS FOR A PARTICULAR PURPOSE. See the GNU General Public License for more details.
You should have received a copy of the GNU General Public License along with this program; if not, write to the: Free Software Foundation, Inc., 59 Temple Place, Suite 330, Boston, MA 02111-1307 USA
- Python 3
- PySimpleGUI
- FlightGear needs to be configured and running before PiStack can run.
- PiStack will go out of sync if radio settings are changed from within FlightGear.
- PiStack was written for and tested on/for the DC-3
The below installation is written for the Raspberry Pi, however other devices that can run Python will be somewhat similar.
- Install the Python module PySimpleGUI.
- Create a folder called PiStack in your home directory. For example
home/pi. - Populate the above folder with pistack.py and telnet.py.
- Install PySimpleGUI. This can be copied into the below folder with the file found at https://pypi.org/project/PySimpleGUI/ Look for the Download files link.
- Or use
pip3. Or something likepython3 -m pip install PySimpleGUI
- Or use
- Create a folder called PiStack in your home directory. For example
home/pi/PiStack. - Go to https://github.com/puffergas/PiStack to find the needed PiStack files and place them into the PiStack folder that you created. The files pistack.py and telnet.py are needed.
- In order to make it easier to start PiStack, there is an icon and .desktop file to add PiStack to the launcher menu and or have a desktop shortcut. If used on a different device or if files are located somewhere else, the PiStack.desktop file will need edited.
- Place PiStack_Icon.png file in to the PiStack folder that you created.
- Place PiStack.desktop into
/home/pi/.local/share/applications - PiStack.desktop can also be placed on the Desktop, as an option.
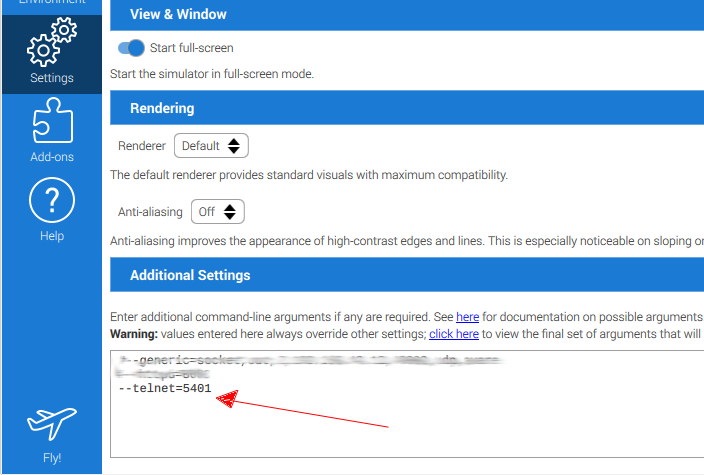
In the FlightGear launcher, place the command --telnet=####, where “####” is the port number.
At this time the file pistack.py needs edited, in order to configure PiStack. Use a text editor or an IDE to edit the file. Find the below two lines. They should be near line number 25 and 26.
25 fg = FlightGear('localhost', 5401)
26 # fg = FlightGear('192.168.##.#', 5401)
Notice that on line number 25 (above), that there is no # symbol. That means that line 25 is active (not committed out). In this case, PiStack is running on the same Raspberry (computer) as FlightGear, hence localhost. The number 5401 is the port number. This needs to be the same port number as configured in FlightGear.
Below we have configured PiStack to be used on a remote device, via your home network. Notice that line 25 has been committed out and now line 26 is now active. The address '192.168.##.#' will need to be edited to match the address of the Raspberry (computer) running FlightGear.
25 # fg = FlightGear('localhost', 5401)
26 fg = FlightGear('192.168.##.#', 5401)
Don’t forget to save the file. 😉
- At this time, PiStack has been tested and written for the DC-3.
- Some aircraft Nasal code may interfere with some of the PiStack’s settings. Possible examples may be the volume and On Off button.
There are four radio panels:
- Communication radio #1
- Communication radio #2
- Navigation radio #1
- Navigation radio #2
Each radio panel has:
- Active frequency (D)
- Standby frequency (F)
- Swap standy and active frequency (E)
- Power button
- Volume adjustment slider
Both Navigation radio panels have the degree readout that is adjusted with the keypad.
Both communication and navigation standby frequencies are adjusted with the keypad.
There is a number 1 auto populated in the frequency input box (1). This is used for the communication and navigation radios (B). The reason is that the hundreds place is not changed when adjusting those frequencies.
If either navigation degrees or inHg is choosen (C), then the auto populated number 1 is cleared, since it is unlikely that it would be used.
After inputting the new frequency, via the keypad, press the Enter button to complete changing the frequency.
The Clear button, clears the number that is in the frequency input box.
If you decide not to change a frequency, press the Cancel button.


