A DynRPG plugin to enable OpenGL rendering in older RPG Maker 2003 games
Features:
- Fast Fullscreen/Windowed mode switching
- Large window sizes (up to the desktop resolution's height... 4k etc.)
- Fullscreen mode set to the desktop resolution with pixel scaling options (or a "classic" 640x480 fullscreen mode)
- Interpolation
- Shader support (The possibilities are endless)
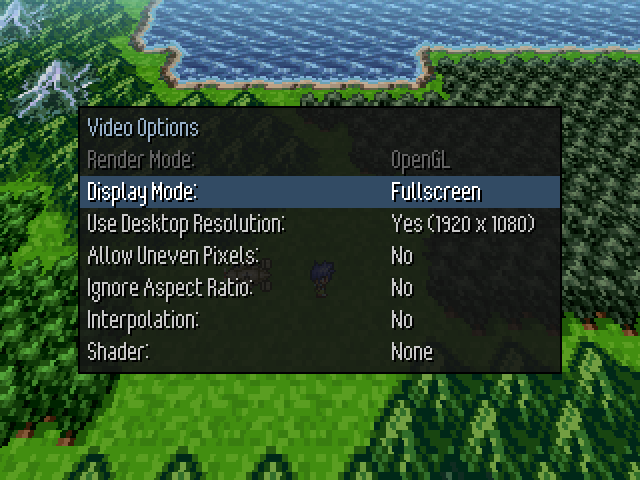
- Video Options menu similar to the Retail/Steam version of RM2003 (but drawn in OpenGL)
- TRANSLATIONS for the Video Options menu mentioned above
- An actual screenshot key that will capture a perfect 320x240 screenshot (without shaders) to a png file.
- SFML (See advanced section at the bottom of the page)
Note: If your game uses the "Play Movie" command, this plugin doesn't handle it well from a fullscreen context (since OpenGL's fullscreen mode is exclusive), so it has to switch back to a window. This is obviously not great, but it's the best I could do. If playing in a window, the video should play fine. Personally, I would suggest not using "Play Movie" at all since it's garbage to begin with (calling it twice in a row for example will show a black screen the second time). If that doesn't apply to you, then onward!
F4 key - now toggles between numerous window sizes supported by your monitor (1x, 2x, 3x, 4x etc)
F5 key - Launches into the "Video Options" menu, navigated with arrow keys. F5 again, or Escape will exit the menu.
1.1 - Updated SFML to v2.5.0 (update all *.dll files from this repo into your game)
1.0 - Initial release
game_settings - This plugin must be removed before installing this one. Take out any files related to "another fullscreen mode" as they won't be needed.
To install the plugin, make sure that you have patched your project with Cherry's DynRPG patch which can be found here:
http://share.cherrytree.at/showfile-30511/dynrpg_0_32_02_25_2017.rar (v0.32 Unofficial)
Additional Information:
http://cherrytree.at/dynrpg
http://www.rewking.com/dynrpg/
-
Remove the game_settings.dll plugin (if applicable), including any settings for it
-
Copy the contents of the "opengl" folder into a DynRPG project folder. You should now have:
- A "Shaders" folder
- A "Settings.ini" file
- SFML .dll files:
- libgcc_s_sjlj-1.dll
- libstdc++-6.dll
- openal32.dll
- sfml-audio-2.dll
- sfml-graphics-2.dll
- sfml-network-2.dll
- sfml-system-2.dll
- sfml-window-2.dll
- An "Add_to_DynRPG.ini.txt" file
- DynPlugins\miranda_nbp.ttf - The font used for the Video Options menu
- DynPlugin\system_opengl.dll
- DynPlugin\system_opengl_translation.ini (Contact me about adding translations)
-
Copy the contents of "Add_to_DynRPG.ini.txt" into your DynRPG.ini file. Review it below:
 [system_opengl]
 ; Game ini filename
 ; Default: Settings.ini
 GameIniFilename=Settings.ini
 ; Shader Syntax:
 ;   Shader#=filenameNoExt
 ;     (filenames should be formatted as Shader_Name (title case with underscores) for menus
 ;   Shader#frag=true  --defined as a .frag (pixel shader)
 ;   Shader#frag=true  --defined as a .vert (vertex shader)
 ;     (both can use combined if using both .frag & .vert)
 ;   Shader2useTexDims=true  --shader requires the use of the texture dimensions of the screen (320x240).
 ;     This value is hard-coded and looks for a uniform vec2 called "texture_dimensions"
 ;     If you need input/output size, just use texture_dimensions.xy for input and texture_dimensions.xy*# for output.
 ;   Shader2numFloatParams=#
 ;   Shader#paramFloat#name=paramvarname
 ;     (The parameter's value is set via comment command (by its name)
 ; Default: 2
 NumShaders=5
 DisableVideoMenu=false
 ;
 Shader1=Scale2x
 Shader1frag=true
 Shader1useTexDims=true
 ;
 Shader2=CRT
 Shader2frag=true
 Shader2useTexDims=true
 Shader2numFloatParams=2
 Shader2paramFloat1name=distortion
 Shader2paramFloat2name=zoom
 ;
 Shader3=Game_Boy
 Shader3frag=true
 ;
 Shader4=Game_Boy_Pocket
 Shader4frag=true
 ;
 Shader5=Virtual_Boy
 Shader5frag=true
 ;
 Shader6=Old_PC
 Shader6frag=true
 ;
 Shader7=Noir
 Shader7frag=true
 ;
 Shader8=Sepia
 Shader8frag=true
 ;
 Shader9=Invert
 Shader9frag=true
 ;
 Shader10=CB_Protanopia
 Shader10frag=true
 ;
 Shader11=CB_Deuteranopia
 Shader11frag=true
 ;
 Shader12=CB_Tritanopia
 Shader12frag=true
 ;
 Shader13=CB_Achromatopsia
 Shader13frag=true
 ;
 Shader14=CB_Protanomaly
 Shader14frag=true
 ;
 Shader15=CB_Deuteranomaly
 Shader15frag=true
 ;
 Shader16=CB_Tritanomaly
 Shader16frag=true
 ;
 Shader17=CB_Achromatomaly
 Shader17frag=true
Review the Shader syntax. It supports simple float parameters that be passed to the shader via comment command, as well as a predefined "texture_dimensions" parameter. You'll need to recompile the plugin from the source code if you want to do more with the shader capabilities.
Set NumShaders=17 to see all of the included ones, otherwise it defaults to the first 5. Feel free to re-arrange & re-number the shaders once you understand the syntax above.
By default, this plugin contains a new "Video Options" menu that appears after hitting F5 or being called via comment command. Set DisableVideoMenu to true to to disable it (if you plan on building one yourself)
-
Review the contents of the new Settings.ini:
 [Settings]
 ;=======General=======
 ScreenshotPath=C:\
 Translation=en
 ;
 ;=======Video=======
 ; 0=No, 1=Yes
 Fullscreen=0
 StartFullscreen=0
 ; DirectDraw
 ;   Set UseDirectDraw to "1" to disable OpenGL (for older PC's)
 UseDirectDraw=0
 ; OpenGL
 ;   Window Scale is constrained by the desktop resolution, so if you have a 1080p monitor, the max will be "4"
 ;   1 = 320x240, 2 = 640x480, 3 = 960x720, 4 = 1280x960, 5 = 1600x1200, 8 = 2560x1920, 9 = 2880x2160
 WindowScale=4
 EnableVSync=1
 UseDesktopResolution=1
 ;   Ensures pixels are not stretched out more than a 1:1 ratio in fullscreen mode
 ;   0=Scale to display's edges (retaining aspect ratio), 1=Use it
 AllowUnevenPixelSizes=0
 IgnoreAspectRatio=0
 UseInterpolation=0
 UseShaders=0
 ShaderId=0
 ;
 ;=======Gamepad=======
 ; If using the Xbox 360 Controller, turns the rumble On or Off
 RumbleOn=0
Set "ScreenshotPath" to the path of your choice. When you use the "Print Screen" key, a perfect screenshot (without shaders) will get placed in this folder.
Set "Translation" to the translation header in system_opengl_translation.ini - See the section below
Set "StartFullscreen" to 1 if you want to always start in fullscreen mode regardless of the last state the game was in, otherwise if it's "0", the plugin will look to the "Fullscreen" parameter. "Fullscreen" is enforced by the plugin, wereas "StartFullscreen" is not. Set both to 0 to start in windowed mode.
If for some reason you or someone playing your game can't use OpenGL, set "UseDirectDraw" to 0 to disable it entirely.
The "Gamepad" section is actually used by the xbx_controller, plugin, but I'm including it here for completion's sake. If you know of any other plugins that use the Settings.ini, you'll want to account for that before copying the above one in.
Supported "Video Options" menu translations:
- en (English)
- sp (Spanish)
- fr (French)
- de (German)
- it (Italian)
As of 1.0, the non-english translations are literally from google translate, so if they're not accurate, please let me know! Also, if you would like to add additional translations, let me know as well. They are very easy.
system_opengl_translation.ini format:
[en]
VideoOptions=Video Options
RenderMode=Render Mode
DirectDraw=DirectDraw
OpenGL=OpenGL
DisplayMode=Display Mode
Fullscreen=Fullscreen
Windowed=Windowed
WindowResolution=Window Resolution
UseDesktopResolution=Use Desktop Resolution
Yes=Yes
No=No
AllowUnevenPixels=Allow Uneven Pixels
IgnoreAspectRatio=Ignore Aspect Ratio
Interpolation=Interpolation
Shader=Shader
None=None
The key (first value) will always be in english TitleCase, whereas the actual translation will be the value to the right. The header (en) in this case define what language this is. It can be anything, but I decided to go with 2 character abbreviations
@load_video_options
- Call the video options menu from anywhere
@quit_game
- A simple Quit game command (that hooks into the OpenGL plugin to safely exit). If you use the BetterAEP patch, use this command instead of its quit method (although there is experimental support for that coded in this plugin)
@set_shader_param
- Sets a shader's float parameter (experimental)
- text - The shader's parameter
- text - A textual representation of a float value (ex: "0.975")
Use in custom menus. These work the same way as they do in the Video Options menu
@bind_variable
- For building your own menu in 2k3. This will bind Settings.ini updates to a 2k3 Variable so they are always synced (less work in 2k3)
- text - The Settings.ini key
- number - The variable ID
@toggle_shaders
- Loop through available shaders
- number - reverse direction (1), normal direction (0)
@set_interpolation
- Set interpolation on or off
- number - on (1), off (0)
@set_use_max_resolution
- Use desktop resolution & refresh fullscreen
- number - on (1), off (0)
@set_ignore_aspect_ratio
- Ignore aspect ratio
- number - on (1), off (0)
@set_allow_uneven_pixels
- Allow uneven pixels
- number - on (1), off (0)
@set_fullscreen
- Set fullscreen/windowed
- number - on (1), off (0)
@toggle_window_scale
- Toggle window scale
- number - reverse direction (1), normal direction (0)
@set_window_scale
- Set window scale
- number - The new scale (if out of range, will set to min/max)
@set_direct_draw
- Set DirectDraw mode.
- number - DirectDraw (1), OpenGL (0)
@set_window_resolution_to_hero_name
- Treats a hero name as a string and sets it to the window resolution (in "width x height" format)
- number - The ID of the hero
@set_shader_name_to_hero_name
- Treats a hero name as a string and set one to the name of the current shader (or "None")
- number - The ID of the hero
@set_desktop_res_to_hero_name
- Treats a hero name as a string and set one to the desktop resolution (in "Yes (width x height)" format)
- number - The ID of the hero
@get_direct_draw_large_window
- In DirectDraw mode, sets a switch to whether it's in large window mode or not
- number - the ID of the switch
@get_direct_draw_is_fullscreen
- In DirectDraw mode, sets a switch to whether it's in fullscreen mode or not
- number - the ID of the switch
Since this effectively turns your project into one that supports OpenGL, you can expand on your project in some new (but limited) ways.
First limitation is to keep in mind this does NOT allow you to place OpenGL objects inside of your game. It's simply a new renderer. However, if you want to dip your toes into SFML and maybe make some menus or something that can be layered on top of the existing engine, read further.
Recompiling this plugin has a big requirement. Not just ANY version of SFML, but only the included version that I've compiled for TDM GCC 4.8.1 (The compiler that DynRPG requires)
-
Extract the src\SFML-2.5.0-TDM-GCC-32.7z file with 7-zip to C:\SFML-2.5.0-TDM-GCC-32\
-
Copy the rest of the included src folder somewhere and open the system_opengl.cbp project file.
-
The linker and search directories for SFML should be setup already. Make sure DynRPG is in your compiler's include folder (C:\TDM-GCC-32\ in my case).
-
Build it. It should compile.