In this guide, we'll walk through the process of creating a website using Hugo, a static site generator, and hosting it through GitHub Pages.
Before we begin, ensure you have the following:
- Basic knowledge of the command line.
- A GitHub account.
- Download Hugo from the official releases page.
- Follow the installation instructions for your operating system.
- Verify that you have installed latest version of Hugo
hugo version- Open your terminal or command prompt.
- Run the following command to create a new Hugo site:
hugo new site <your_site_name>- Move into the folder created
cd <your_site_name>A similar directory structure will be created:
my-site/
├── archetypes/
│   └── default.md
├── assets/
├── content/
├── data/
├── layouts/
├── public/
├── resources/
├── static/
├── themes/
└── config.toml         <-- site configuration
- Create a Github repository.
- Add your GitHub repository as a remote origin:
    git init
    git add .
    git commit -m "first commit"
    git branch -M main
    git remote add origin git@github.com:<USER_NAME>>/<REPOSITORY_NAME>.git
git push -u origin main- Explore themes from the Hugo themes directory.
- Follow the documentation of your chosen theme to install it into your Hugo site. 3.Here we are using this command to install the ananke theme to the themes folder
git submodule add https://github.com/theNewDynamic/gohugo-theme-ananke.git themes/ananke- Add this line to the config.toml file, to define the theme that is going to be used for your website. You can use any theme that you prefer.
echo "theme = 'ananke'" >> config.toml- Now you are ready to run your hugo website in localhost. Press Ctrl + C to stop Hugo’s development server.
hugo server- Navigate to the
contentdirectory of your Hugo site. - Create Markdown or HTML files to add your content (e.g., pages, blog posts).
- Modify the
config.tomlorconfig.yamlfile in your Hugo site's root directory. - Configure settings such as site title, description, and other options specific to your site and chosen theme.
- Run the following command to generate the static files for your site:
hugoor
hugo -d /path/to/your/directory- Go to your repository's settings on GitHub.
- Navigate to the "Pages" section. In the center of your screen you will see this:
- Change the Source to GitHub Actions. The change is immediate; you do not have to press a Save button.
- Create an empty file in your local repository.
.github/workflows/hugo.yaml- Copy and paste the YAML below into the file you created. Change the branch name and Hugo version as needed.
# Sample workflow for building and deploying a Hugo site to GitHub Pages
name: Deploy Hugo site to Pages

on:
  # Runs on pushes targeting the default branch
  push:
    branches:
      - main

  # Allows you to run this workflow manually from the Actions tab
  workflow_dispatch:

# Sets permissions of the GITHUB_TOKEN to allow deployment to GitHub Pages
permissions:
  contents: read
  pages: write
  id-token: write

# Allow only one concurrent deployment, skipping runs queued between the run in-progress and latest queued.
# However, do NOT cancel in-progress runs as we want to allow these production deployments to complete.
concurrency:
  group: "pages"
  cancel-in-progress: false

# Default to bash
defaults:
  run:
    shell: bash

jobs:
  # Build job
  build:
    runs-on: ubuntu-latest
    env:
      HUGO_VERSION: 0.124.0
    steps:
      - name: Install Hugo CLI
        run: |
          wget -O ${{ runner.temp }}/hugo.deb https://github.com/gohugoio/hugo/releases/download/v${HUGO_VERSION}/hugo_extended_${HUGO_VERSION}_linux-amd64.deb \
          && sudo dpkg -i ${{ runner.temp }}/hugo.deb
      - name: Install Dart Sass
        run: sudo snap install dart-sass
      - name: Checkout
        uses: actions/checkout@v4
        with:
          submodules: recursive
          fetch-depth: 0
      - name: Setup Pages
        id: pages
        uses: actions/configure-pages@v4
      - name: Install Node.js dependencies
        run: "[[ -f package-lock.json || -f npm-shrinkwrap.json ]] && npm ci || true"
      - name: Build with Hugo
        env:
          # For maximum backward compatibility with Hugo modules
          HUGO_ENVIRONMENT: production
          HUGO_ENV: production
        run: |
          hugo \
            --gc \
            --minify \
            --baseURL "${{ steps.pages.outputs.base_url }}/"
      - name: Upload artifact
        uses: actions/upload-pages-artifact@v3
        with:
          path: ./public

  # Deployment job
  deploy:
    environment:
      name: github-pages
      url: ${{ steps.deployment.outputs.page_url }}
    runs-on: ubuntu-latest
    needs: build
    steps:
      - name: Deploy to GitHub Pages
        id: deployment
uses: actions/deploy-pages@v4- Commit the change to your local repository with a commit message of something like “Added workflow”, and push to GitHub.
    git add .
    git commit -m "Added workflow"
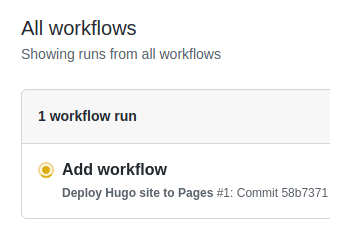
git push -u origin main- From GitHub’s main menu, choose Actions. You will see something like this:
- When GitHub has finished building and deploying your site, the color of the status indicator will change to green.
9.Click on the commit message as shown above. You will see this:
Under the deploy step, you will see a link to your live site.
In the future, whenever you push a change from your local repository, GitHub will rebuild your site and deploy the changes.
Your Hugo website is now hosted on GitHub Pages! You can further customize your site, add more content, and update it easily by rebuilding your site with Hugo and pushing changes to GitHub.


