This workshop is important because:
We want pages that users can see and interact with! And we want to take advantage of how easy Rails makes views... if we follow the "Rails way".
After this lesson, developers will be able to:
- Compare client-side and server-side templating.
- Describe how layouts, view templates, and partials fit together for Rails' server-side templating.
- Recognize Rails path helpers and URL helpers.
- Explain benefits of using Rails form helpers and link helpers, and determine correct syntax for them.
Before this workshop, developers should already be able to:
- Start a Rails app with a route and controller for a home page view.
- Incorporate routes, a controller, and a model for a single resource.
- Read and write routes.
- Describe templating.
Work with a partner to answer the following questions. Write your answers on your table.
-
What is HTML "templating"?
-
We've been rendering templates on the client side with Angular, React, and/or ES6 string template literals. This generally means the user will see part of the page, but the rest of the page is filled in after data comes back from an AJAX call. List at least one benefit and one drawback of this approach. (Consider things like page load time, number of HTTP requests, user interaction, search engines reading pages.)
-
Rails will render templates on the server side, adding data into an HTML file before sending it to the client side. List at least one benefit and one drawback of this approach. (Consider things like page load time, number of HTTP requests, user interaction, search engines reading pages.)
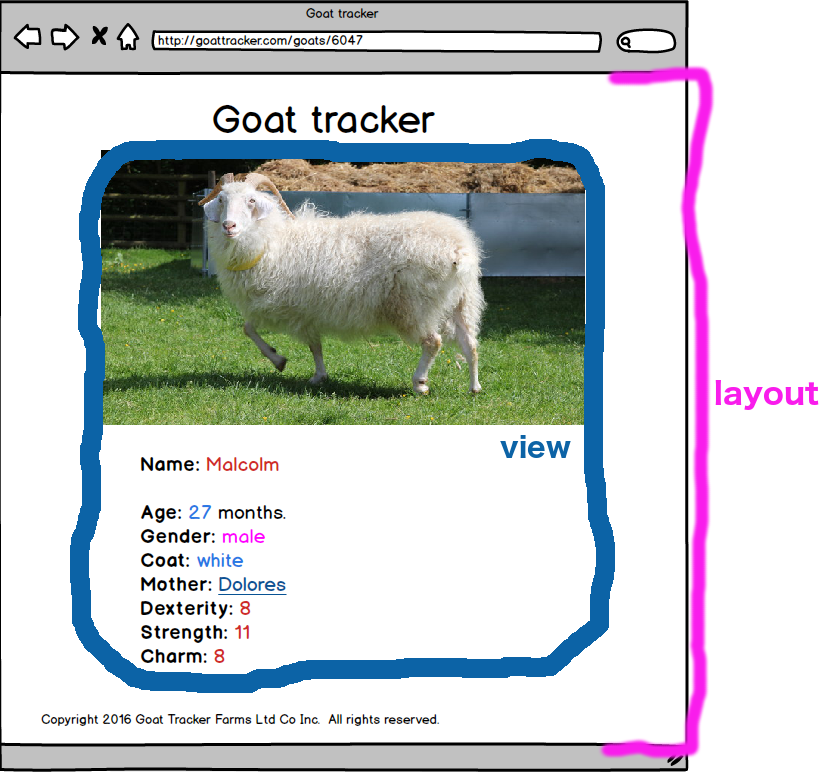
In Rails, the pages a user sees are rendered on the server side as a combination of a layout template and a view template. The view template, in turn, might be built up with one or more smaller "partial" templates. The server has stitches together these pieces into one HTML file before sending the completed file to the client side for display.
When a Rails app is created, Rails will automatically add a main application layout file: app/views/layouts/application.html.erb.
We can use the main application layout for the lines of HTML that link site-wide CSS and JavaScript files. We can also use it for material like a footer that stays the same across all pages from multiple controllers.
Templates are always rendered into a <%= yield %> tag in a layout. The app/views/layouts/application.html.erb layout already contains a yield statement, a <head> section, and links to the app's CSS and JavaScript files.
It is possible to use multiple layouts.
View templates contain all the content that's specific to one page.
Each controller will have its own directory inside app/views to contain the view templates used by that controller. For fully CRUD-able RESTful resources, there will be views for:
- index
- show
- new
- edit
Partials allow us to take a portion of a template and move it into a separate file.
Check for Understanding: Why might we want to separate out portions of our HTML view templates?
Ideas
-
A best practice is to always keep every template small. A rule of thumb would be to keep templates to about 50 lines for readability. If we wrote the bulk of our HTML directly in view templates, we'd quickly exceed this limit.
-
We might have content that is repeated on more than one page associated with a controller - partials help us reuse HTML code for this content.
-
Separating code into partials makes our views more modular and easier to change.
Partials are always named starting with an underscore: app/views/products/_form.html.erb or app/views/shared/_menu.rb.
Partials are included from inside a view file. The syntax uses the view helper method render: <%= render "form" %>. Note that you don't include the starting _ when rendering a partial.
Here is syntax for some use cases:
- Most common: In a view, render a partial from a file called
app/views/products/_product.html.erb.
<%- # inside app/views/products/show.html.erb %>
<%= render "product" %>- In a view, render a partial from a file inside a directory, called
app/views/shared/_footer.html.erb.
<%- # inside app/views/products/show.html.erb %>
<%= render "shared/footer" %>- Less common: You can also pass data into a partial.
Pass a variable product to a partial to be used within the partial:
<%- # inside app/views/products/index.html.erb %>
<% @products.each do |product| %>
  <%= render partial: "product", locals: {product: product} %>
<% end %>

or

<%= render partial: "customer", object: @customer %>- There's also a shorter syntax for the common pattern of repeating a partial for all items in a collection:
<%- # inside app/views/products/index.html.erb %>
<%= render partial: "product", collection: @products %>
The Layouts and Rendering Rails guide section on using partials has more information and examples.
- How can we split up pages into layout and views if the website is structured as shown below?
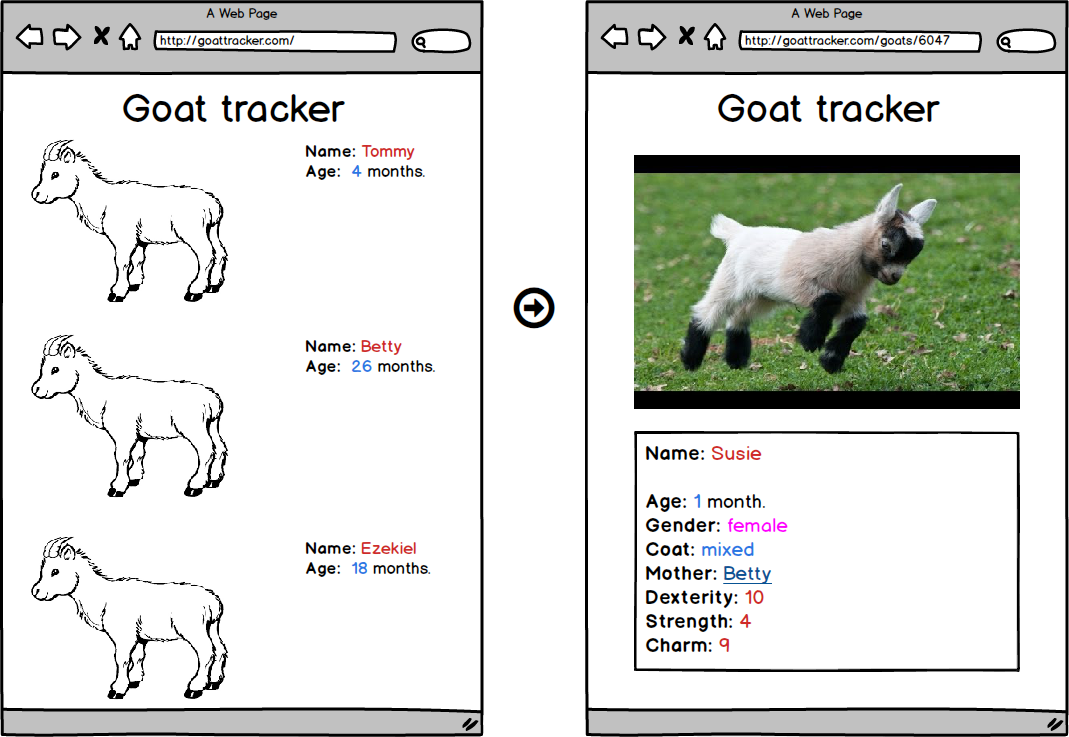
In Rails, the page <head> will already be in the application layout. We can move the top menu and the footer into the layout to reduce repetition in the individual pages.
Layout:
<!DOCTYPE html>
<head>
  <!-- metadata, CSS link, JS link -->
</head>
<body>
  <header>
    <!-- all header & menu html.erb -->
  </header>
  <%= yield %>
  <footer>
    <!-- all footer html.erb -->
  </footer>
</body>
Templates:
<!-- app/views/goats/show.html.erb -->
<!-- show page main content -->
<%= image_tag(@goat.image_url) %>
  <!-- continue single goat show page html.erb -->
<!-- app/views/goats/index.html.erb -->
<!-- index page main content -->
<%= @goats.each do |goat| %>
   <!-- continue goat list page html.erb -->
Remember: yield is where the current page content will be rendered.
We can also move the header and/or the footer into a partial. This option would be best when we only use the menu on some pages, and other pages use different content for that portion of the page. For example, the home page might use a hero image in place of the header.
- What would our layout and view code look like if we split the header/menu section and the hero image into individual partials?
Layout:
<!DOCTYPE html>
<head>
    <!-- metadata, CSS link, JS link -->
</head>
<body>
  <%= yield %>
  <footer>
    <!-- all footer html.erb -->
  </footer>
</body>
Templates:
<!-- app/views/wecome/about.html.erb -->
<%= render "shared/header" %>
<!-- continue current page content -->
or, on another page,
<!-- app/views/welcome/index.html.erb -->
<%= render "shared/hero_image" %>
<!-- continue current page content -->
Alternately, if the header is on every page, we could keep the main layout file short by adding a named yield and content_for.
Layout with named yield and content_for:
<!DOCTYPE html>
<html>
  <head>
  <%= yield :head %>
  </head>
  <body>
  <%= yield %>
  </body>
</html>
Templates:
<% content_for :head do %>
  <title>Goat Tracker - About</title>
<% end %>

<%= render "shared/header" %>
<!-- rest of the about page content -->
A very common example of using partials in Rails is moving code for a new/edit form into a partial.
Now that we've gone over how layout templates, view templates, and partial templates come together to create the pages users see, let's dive into how our apps' controllers will trigger rendering these views.
Every route in Rails will execute a method inside a controller. In Rails, the basic logic for rendering an HTML view is straightforward. When the method is executed:
- Rails looks for a directory inside
viewscorresponding to the controller's name (directorypostsforPostsController). - Inside that folder, Rails looks for an
.html.erbfile with a name matching the method's name.
For example, if we visit http://localhost:3000/posts in the browser, that GET request should be routed to the PostsController#index method (because of RESTful conventions).
By default, controller methods will render views files that match the controller method name. So when Rails executes the code in index, it will look for and render a template located in app/views/posts/index.html.erb unless we tell it to do something else.
Check for Understanding: Which RESTful controller actions in Rails usually render an HTML view? What are their purposes?
click for a list
index- display a list of all the records for one type of resourceshow- display details of one singe recordnew- display a form for users to create a new recordedit- display a form for users to update a record
And which RESTful controller actions in Rails DO NOT render an HTML view? What are their purposes?
click for a list
create- work with the database to create a record (based on form input)update- work with the database to update one record (based on form input)destroy- work with the database to destroy one record
Lets take a look at a create action:
# inside app/controllers/PostsController.rb
def create
  # ...
  if post.save
    redirect_to post, notice: 'Post was successfully created.'
  else
    render :new
  end
end
Check for Understanding: What is happening in the code above?
click for explanation
Based on the result of trying to save the post, the method will execute either the code in the "if" or in the "else".
If the new post correctly saves, the response will be a redirect to that post's show page. If the new post doesn't save correctly, the new post form view is rendered again. Note that neither one of these options renders a create.html.erb file.
We've seen two ways to do something other than rendering the HTML view that matches our controller action name:
- We can redirect to another action.
- We can use a
renderstatement to specify a view to render that doesn't match the action name.
Rails 5 comes bundled with a jbuilder gem that helps us create JSON views instead of HTML. This gives us the flexibility to easily respond to requests for JSON content.
Check for Understanding
An app might have a directory app/views/products with the files listed below. Explain in 6 or fewer words what each file is for.
_form.html.erb
edit.html.erb
index.html.erb
index.json.jbuilder
new.html.erb
show.html.erb
show.json.jbuilder
Rails provides a ton of helper methods to make it easier to write code. Today, we'll look at a few important helpers that every Rails app should take advantage of.
Rails adds helper methods that return the paths for routes in your app. These are configured through the config/routes.rb file.
Here's some rails routes output:
$ rails routes
     Prefix Verb   URI Pattern                 Controller#Action
    turkeys GET    /turkeys(.:format)          turkeys#index
            POST   /turkeys(.:format)          turkeys#create
 new_turkey GET    /turkeys/new(.:format)      turkeys#new
edit_turkey GET    /turkeys/:id/edit(.:format) turkeys#edit
     turkey GET    /turkeys/:id(.:format)      turkeys#show
            PATCH  /turkeys/:id(.:format)      turkeys#update
            PUT    /turkeys/:id(.:format)      turkeys#update
            DELETE /turkeys/:id(.:format)      turkeys#destroy
The Prefix on the left clues us in to the available URL and path helpers.
Just taking the first line, we can tell that a turkeys_path helper exists. This method will return the path that corresponds to the index route for all turkeys ('/turkeys).
Looking further down the line, we can see following helpers exist: new_turkey_path, edit_turkey_path, turkey_path.
Some of those routes require an id. For those helpers, we'll pass an argument to tell the helper how to fill in the id portion of the path.
# examples
turkey_path(12)        returns  "turkeys/12/edit"
turkey_path(@turkey)   returns  "turkeys/#{@turkey.id}"
You can set individual route prefixes by using as: in your routes.
# inside config/routes.rb
get 'posts/new', to: 'posts#new', as: 'new_post'
The turkeys output from above used resources in the route configuration, so the Rails auto-generated prefixes for many of the routes. It's good practice to stick to these prefixes when possible even if you're writing out routes by hand instead of using resources.
# inside config/routes.rb
resources :turkeys
There are also URL helpers that use the same prefixes to generate a full URL instead of just the path part. For instance, turkeys_url. See the Rails Routing Guide Path and URL helpers section.
Rails provides a huge swath of helpers designed to make it more convenient to generate HTML for your views, especially HTML related to your resources. These view helpers also enforce the Rails way by automatically setting some attributes inside the HTML.
Let's start by looking at some simple and very commonly used view helpers.
Pair up. One person should silently skim the documentation for link_to. The other should silently skim the documentation for
button_to.
After 2 minutes, turn to your partner and explain what kind of element your method generates in the HTML and what kind of request we can expect that element to send.
As a team, list differences between link_to and button_to. Come up with an example of where we could use each in a blog app.
Simple link:
link_to "Profile", @profile
# => <a href="/profiles/1">Profile</a>
Setting class and id in HTML:
link_to "Articles", articles_path, id: "news", class: "article"
# => <a href="/articles" class="article" id="news">Articles</a>Image delete button
<%= button_to "Delete Image", { action: "delete", id: @image.id },
                                method: :delete, data: { confirm: "Are you sure?" } %>

# => "<form method="post" action="/images/delete/1" class="button_to">
#      <input type="hidden" name="_method" value="delete" />
#      <input data-confirm='Are you sure?' value="Delete Image" type="submit" />
#      <input name="authenticity_token" type="hidden" value="10f2163b45388899ad4d5ae948988266befcb6c3d1b2451cf657a0c293d605a6"/>
# </form>"Some browsers don't support PUT, PATCH & DELETE as form submission methods. Rails however has a work-around for this.
Rails adds a hidden input field with the name _method. Rails sets the actual method of the form to "post" but internally changes the request type based on the hidden field before the request gets to the routes.
form_tag(search_path, method: "patch")<form accept-charset="UTF-8" action="/search" method="post">
<input name="_method" type="hidden" value="patch" />
<input name="utf8" type="hidden" value="✓" />
<input name="authenticity_token" type="hidden" value="f755bb0ed134b76c432144748a6d4b7a7ddf2b71" />
...
</form>Remember: run
rails routesand look at the Prefix column to see what_pathhelpers are available.
| Path helper | using this path helper with link_to |
|---|---|
turkeys_path |
link_to "view all turkeys", turkeys_path |
new_turkey_path |
link_to "create a new turkey", new_turkey_path |
edit_turkey_path |
link_to "edit this turkey", edit_turkey @turkey |
turkey_path |
link_to "view this turkey", turkey_path @turkey |
turkey_path |
link_to "view this turkey", turkey_path 12 |
As we saw with button_to, Rails can generate forms for us. There are two main kinds of helpers we can use to generate forms: FormTagHelper and FormBuilderHelper. You can read more about both in the Form Helpers Rails Guide
- FormTagHelper's
form_tagis very general, and it's often used for method/action combinations that don't map directly to a RESTful route for one of our resources.
<%= form_tag("/search", method: "get") do %>
  <%= label_tag(:q, "Search for:") %>
  <%= text_field_tag(:q) %>
  <%= submit_tag("Search") %>
<% end %>
Generated html:
<form accept-charset="UTF-8" action="/search" method="get">
<input name="utf8" type="hidden" value="✓" />
<label for="q">Search for:</label>
<input id="q" name="q" type="text" />
<input name="commit" type="submit" value="Search" />
</form>- FormBuilderHelper's
form_foris intended to work with our resources and RESTful routes. It does a lot to help you pre-fill values.
<%= form_for @article, url: {action: "create"}, html: {class: "nifty_form"} do |f| %>
  <%= f.text_field :title %>
  <%= f.text_area :body, size: "60x12" %>
  <%= f.submit "Create" %>
<% end %>
Generated html:
<form accept-charset="UTF-8" action="/articles" method="post" class="nifty_form">
  <input id="article_title" name="article[title]" type="text" />
  <textarea id="article_body" name="article[body]" cols="60" rows="12"></textarea>
  <input name="commit" type="submit" value="Create" />
</form>We'll mostly be working with resources, so it's important to get some exposure to form_for.
- You build up a form in ERB.
<%= form_for @article, url: {action: "create"}, html: {class: "nifty_form"} do |f| %>
  <%= f.text_field :title %>
  <%= f.text_area :body, size: "60x12" %>
  <%= f.submit "Create" %>
<% end %>
Inside a form builder, you'll build up a form using an object. That's the parameter in the form_for do... end block. It's usually called f.
Each line inside the form will generate a label or an input. Most of these f.____ methods take in a symbol. That symbol tells the form builder which attribute of the model is being input in that field. Looking at the form builder above, we can tell that the @article variable has a title attribute and a body attribute.
- Rails uses this code to generate a form for you!
Note that when the HTML is generated, the name HTML attribute for each form input will be a combination of the model name and the attribute symbol.
<form accept-charset="UTF-8" action="/articles" method="post" class="nifty_form">
  <input id="article_title" name="article[title]" type="text" />
  <textarea id="article_body" name="article[body]" cols="60" rows="12"></textarea>
  <input name="commit" type="submit" value="Create" />
</form>
The name HTML attribute is important to us in forms because these names become the keys in the data the client sends to the server.
- You get the data in your controller!
In Rails, we access this data in a controller through the params hash. In the example above, the controller will receive a params hash that looks like this:
{
  'article' => {
                 'title' => '#whatever value the title text input had when submitted',
                 'body' => '#whatever value the body textarea had when submitted'
               }
}
It's a best practice to use "strong parameters," which is a pattern of using built-in methods to say what format of parameters your app will accept. With the example above, we'd want to write the following in our controller code:
private

# Using a private method to encapsulate the permissible parameters
# is a good pattern since you'll be able to reuse the same
# permit list between create and update. Also, you can specialize
# this method with per-user checking of permissible attributes.
def article_params
  params.require(:article).permit(:title, :body)
endResearch one of the methods below, and prepare to give a 2 sentence explanation about where it is used and what it does to everyone!
csrf_meta_tagsstylesheet_link_tagjavascript_include_tagaudio_tagimage_tagimage_urlvideo_tagtime_ago_in_wordshidden_fieldorf.hidden_fieldpassword_fieldcolor_fieldf.labelcheck_boxcollection_check_boxesselect(form builder)date_fielddate_selecttruncatepluralizesimple_formatnumber_to_human
- Describe how layouts, view templates, and partials work together.
- How can we figure out what path helpers are available?
- Why would we use
form_forandlink_to? - Where would you look for syntax for Rails form helpers?
- Glossary
- Rails Guides:
- API documentation:
- ActionView's FormHelper
- ActionController's
render - ActionController's
redirect_to