![]()
🔍 An in-game UI for exploring, debugging and modifying Unity games.
✔️ Supports most Unity versions from 5.2 to 2021+ (IL2CPP and Mono).
✨ Powered by UniverseLib


⚡ Thunderstore releases: BepInEx Mono | BepInEx IL2CPP | MelonLoader IL2CPP
Releases will be posted at most once per week, generally on weekends.
Nightly builds can be found here.
| Release | IL2CPP | Mono |
|---|---|---|
| BIE 6.X | ✅ link | ✅ link |
| BIE 6.X (CoreCLR) | ✅ link | ✖ |
| BIE 5.X | ✖️ n/a | ✅ link |
- Unzip the release file into a folder
- Take the
plugins/sinai-dev-UnityExplorerfolder and place it inBepInEx/plugins/
Note: BepInEx 6 is obtainable via builds.bepinex.dev
| Release | IL2CPP | Mono |
|---|---|---|
| ML 0.5 | ✅ link | ✅ link |
| ML 0.6 | ✅ link | ✖️ |
- Unzip the release file into a folder
- Copy the DLL inside the
Modsfolder into your MelonLoaderModsfolder - Copy all of the DLLs inside the
UserLibsfolder into your MelonLoaderUserLibsfolder
| IL2CPP | Mono |
|---|---|
| ✅ link | ✅ link |
The standalone release can be used with any injector or loader of your choice, but it requires you to load the dependencies manually.
- Ensure the required libs are loaded - UniverseLib, HarmonyX and MonoMod. Take them from the
UnityExplorer.Editorrelease if you need them. - For IL2CPP, load Il2CppAssemblyUnhollower and start an Il2CppAssemblyUnhollower runtime
- Load the UnityExplorer DLL
- Create an instance of Unity Explorer with
UnityExplorer.ExplorerStandalone.CreateInstance(); - Optionally subscribe to the
ExplorerStandalone.OnLogevent to handle logging if you wish
- Download the
UnityExplorer.Editorrelease. - Install the package, either by using the Package Manager and importing the
package.jsonfile, or by manually dragging the folder into yourAssetsfolder. - Drag the
Runtime/UnityExplorerprefab into your scene, or create a GameObject and add theExplorer Editor Behaviourscript to it.
Although UnityExplorer should work out of the box for most Unity games, in some cases you may need to tweak the settings for it to work properly.
To adjust the settings, open the config file:
- BepInEx:
BepInEx\config\com.sinai.unityexplorer.cfg - MelonLoader:
UserData\MelonPreferences.cfg - Standalone:
sinai-dev-UnityExplorer\config.cfg
Try adjusting the following settings and see if it fixes your issues:
Startup_Delay_Time- increase to 5-10 seconds (or more as needed), can fix issues with UnityExplorer being destroyed or corrupted during startup.Disable_EventSystem_Override- if input is not working properly, try setting this totrue.
If these fixes do not work, please create an issue in this repo and I'll do my best to look into it.
If you want to inspect an object or Type from outside the C# console, use the InspectorManager class:
To inspect an object:
UnityExplorer.InspectorManager.Inspect(theObject);To inspect a Type:
UnityExplorer.InspectorManager.Inspect(typeof(SomeClass));- Use the Scene Explorer tab to traverse the active scenes, as well as the DontDestroyOnLoad and HideAndDontSave objects.
- The "HideAndDontSave" scene contains objects with that flag, as well as Assets and Resources which are not in any scene but behave the same way.
- You can use the Scene Loader to easily load any of the scenes in the build (may not work for Unity 5.X games)
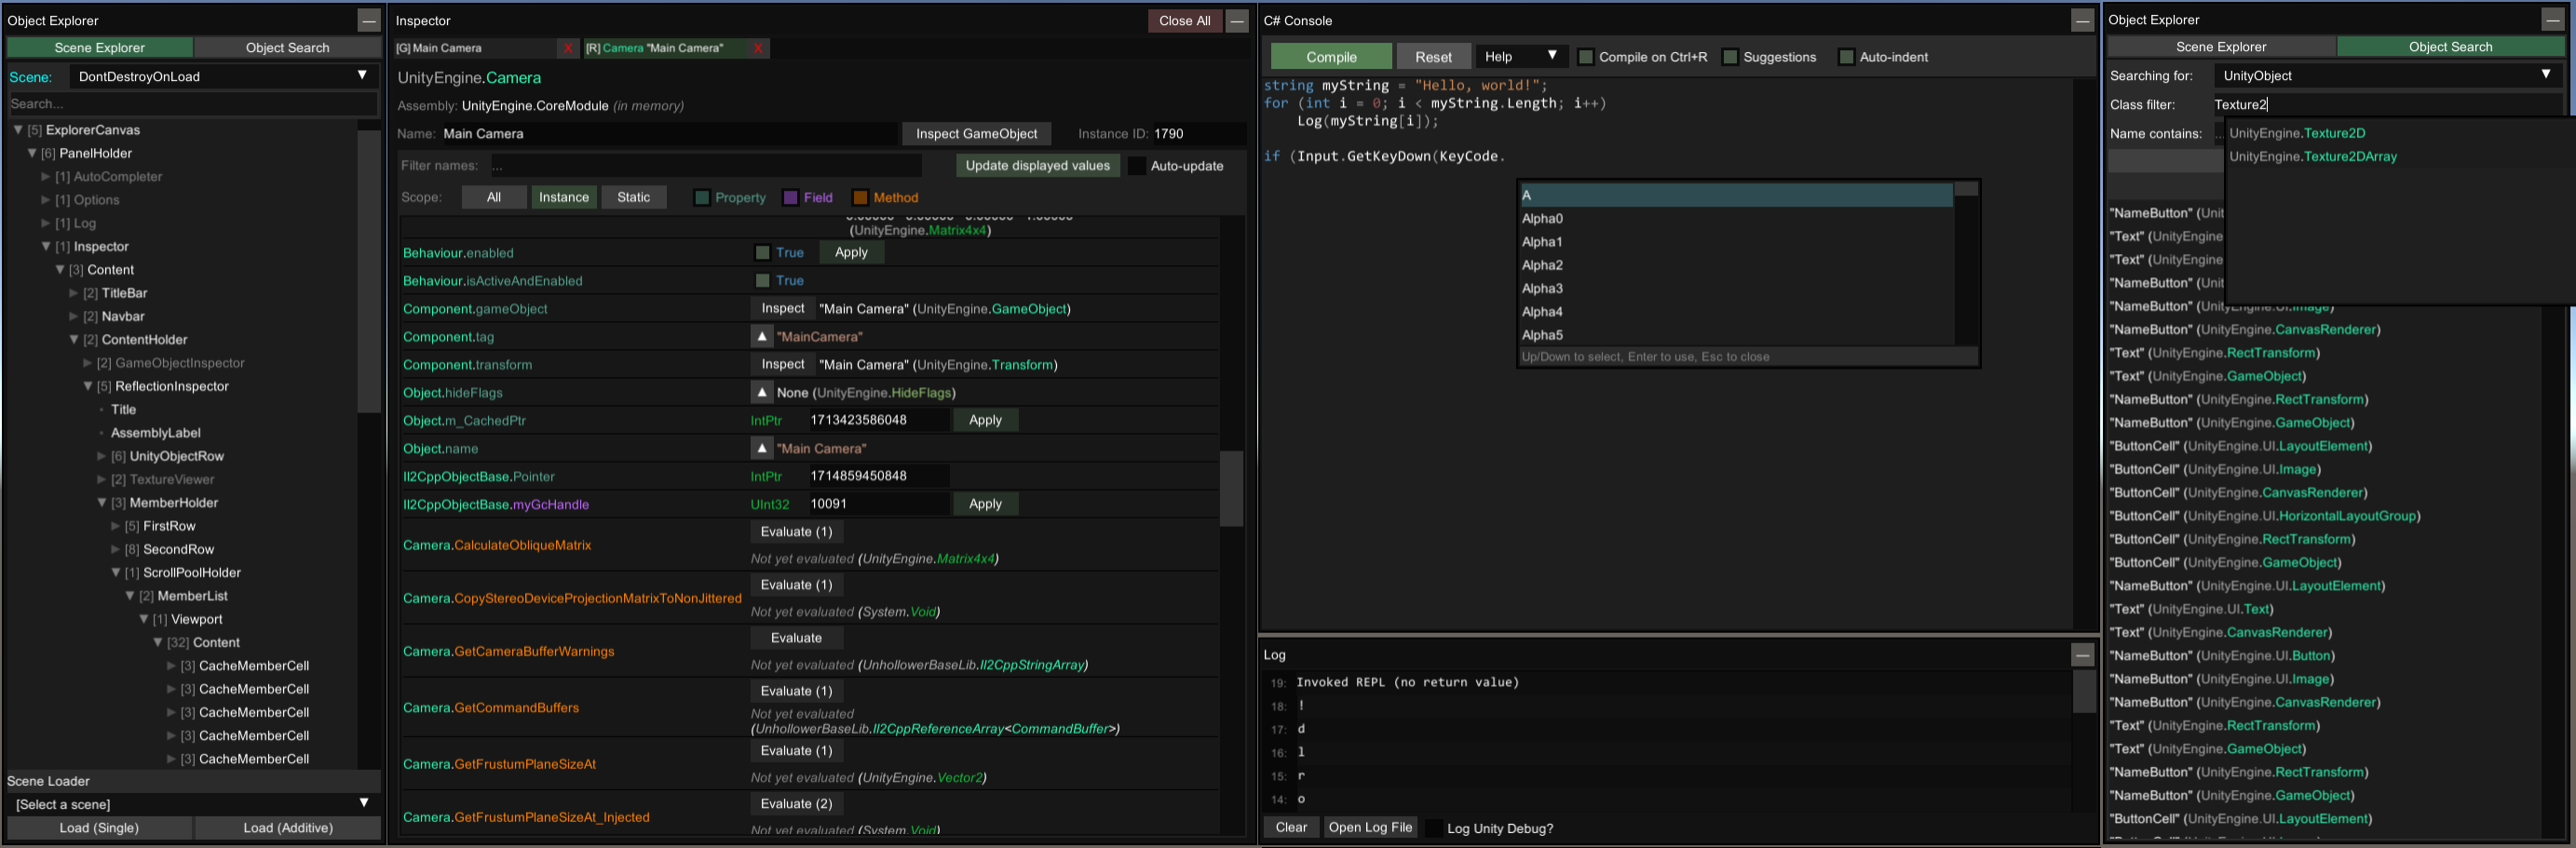
- Use the Object Search tab to search for Unity objects (including GameObjects, Components, etc), C# Singletons or Static Classes.
- Use the UnityObject search to look for any objects which derive from
UnityEngine.Object, with optional filters - The singleton search will look for any classes with a typical "Instance" field, and check it for a current value. This may cause unexpected behaviour in some IL2CPP games as we cannot distinguish between true properties and field-properties, so some property accessors will be invoked.
- Use the UnityObject search to look for any objects which derive from
The inspector is used to see detailed information on objects of any type and manipulate their values, as well as to inspect C# Classes with static reflection.
- The GameObject Inspector (tab prefix
[G]) is used to inspect aGameObject, and to see and manipulate its Transform and Components.- You can edit any of the input fields in the inspector (excluding readonly fields) and press Enter to apply your changes. You can also do this to the GameObject path as a way to change the GameObject's parent. Press the Escape key to cancel your edits.
- note: When inspecting a GameObject with a Canvas, the transform controls may be overridden by the RectTransform anchors.
- The Reflection Inspectors (tab prefix
[R]and[S]) are used for everything else- Automatic updating is not enabled by default, and you must press Apply for any changes you make to take effect.
- Press the
▼button to expand certain values such as strings, enums, lists, dictionaries, some structs, etc - Use the filters at the top to quickly find the members you are looking for
- For
Texture2D,Image,SpriteandMaterialobjects, there is aView Texturebutton at the top of the inspector which lets you view the Texture(s) and save them as a PNG file. - For
AudioClipobjects there is aShow Playerbutton which opens an audio player widget. For clips which are loaded asDecompressOnLoad, there is also a button to save them to a.wavfile.
- The C# Console uses the
Mono.CSharp.Evaluatorto define temporary classes or run immediate REPL code. - You can execute a script automatically on startup by naming it
startup.csand placing it in thesinai-dev-UnityExplorer\Scripts\folder (this folder will be created where you placed the DLL file). - See the "Help" dropdown in the C# console menu for more detailed information.
- The Hooks panel allows you to hook methods at the click of a button for debugging purposes.
- Simply enter any class and hook the methods you want from the menu.
- You can edit the source code of the generated hook with the "Edit Hook Source" button. Accepted method names are
Prefix(which can returnboolorvoid),Postfix,Finalizer(which can returnExceptionorvoid), andTranspiler(which must returnIEnumerable<HarmonyLib.CodeInstruction>). You can define multiple patches if you wish.
- The "Mouse Inspect" dropdown in the "Inspector" panel allows you to inspect objects under the mouse.
- World: uses Physics.Raycast to look for Colliders
- UI: uses GraphicRaycasters to find UI objects
- UnityExplorer provides a basic Free Camera which you can control with your keyboard and mouse.
- Unlike all other features of UnityExplorer, you can still use Freecam while UnityExplorer's menu is hidden.
- Supports using the game's main Camera or a separate custom Camera.
- See the Freecam panel for further instructions and details.
- The "Clipboard" panel allows you to see your current paste value, or clear it (resets it to
null)- Can copy the value from any member in a Reflection Inspector, Enumerable or Dictionary, and from the target of any Inspector tab
- Can paste values onto any member in a Reflection Inspector
- Non-parsable arguments in Method/Property Evaluators allow pasting values
- The C# Console has helper methods
Copy(obj)andPaste()for accessing the Clipboard
- You can change the settings via the "Options" tab of the menu, or directly from the config file.
- BepInEx:
BepInEx\config\com.sinai.unityexplorer.cfg - MelonLoader:
UserData\MelonPreferences.cfg - Standalone
{DLL_location}\sinai-dev-UnityExplorer\config.cfg
- BepInEx:
- Run the
build.ps1powershell script to build UnityExplorer. Releases are found in theReleasefolder.
Building individual configurations from your IDE is fine, though note that the intial build process builds into Release/<version>/... instead of the subfolders that the powershell script uses. Batch building is not currently supported with the project.
- ManlyMarco for Runtime Unity Editor [license], the ScriptEvaluator from RUE's REPL console was used as the base for UnityExplorer's C# console.
- Geoffrey Horsington for mcs-unity [no license], used as the
Mono.CSharpreference for the C# Console.
UnityExplorer is in no way associated with Unity Technologies. "Unity", Unity logos, and other Unity trademarks are trademarks or registered trademarks of Unity Technologies or its affiliates in the U.S. and elsewhere.