Authentication web component provided by Superflows. This component allows you to implement a microservice-backed passwordless email-otp-based authentication functionality to your HTML, CSS, and Javascript app.

Remembering passwords has become a headache these days. Password-less sign-in is in vogue, and naturally so! It is just so convenient as users needn’t remember their passwords! User experience, user convenience, data & privacy protection and security as some of the important aspects that need to be considered, while developing an authentication system. According to my humble opinion, OTP-based password-less authentication is one of the simplest & safest ways to authenticate users.
A microservice is an independently deployable module of an application that has a scoped & well-defined functionality. User authentication, user profiling, customer support ticketing, payments & subscriptions are a few modules that can be developed as microservices. You can architect your application such that it is composed of several microservices working in tandem with each other. Broadly speaking, the microservice-based architecture makes your application modular and more maintainable, as it scales.
This tutorial demonstrates how to add microservice-backed passwordless email-otp-based authentication functionality to your HTML, CSS, and Javascript app using SfUserAuth, a low-code web component library.
So brace yourself, get into your developer groove, on your mark, get set and go! 👨🔧👩🔧
Authentication functionality is critical as your entire application will hinge on it. This tutorial demonstrates the use of the library SfUserAuth, which commoditizes the authentication functionality.
SfUserAuth is a low code solution, which will allow you to add the authentication functionality to your app, even if you are just a junior frontend developer with no knowledge of backend development.
Look at the example below. It is a single-page application developed using purely HTML, CSS and Javascript. It uses the SfUserAuth library for implementing the authentication microservice. Developing this application is the goal of the current tutorial.
Go ahead, open the link in a new tab, and play around with it. To experience the authentication flow, click on the sign-in button.
Please note the pre-requisites of this tutorial:
Familiarity With Frontend Web Development - You need to be familiar with the basic concepts of HTML, CSS & Javascript. You need not be an expert developer here, but basic knowledge is necessary. W3 Schools Roadmap could be a good starting point for novices.
NPM Installation - In this example, we will use an NPM-based web server. To follow this tutorial properly, I will recommend that you have npm installed on your development machine. Once you get the hang of it, you can also try the same method on other web servers, no problem!
AWS Admin Account - You also need access to an AWS admin account. The backend of this tutorial will be hosted on AWS. You don’t need backend coding knowledge, just access to the admin console is enough.
Editor - You will also need a good web editor. I like VS Code. You can use any editor of your choice.
Frontend - The frontend of this application will be designed in pure HTML, CSS, and Javascript.
Backend - The backend is based on the auto-scalable technologies of AWS, namely, DynamoDB & Lambda Functions. Worry not, backend coding knowledge is not required.
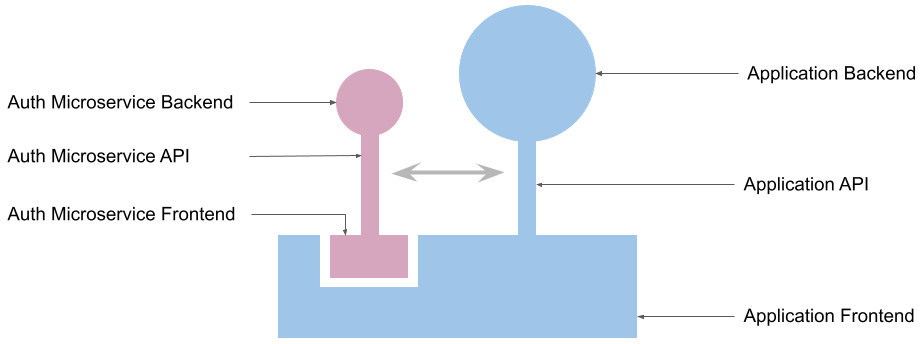
The above diagram depicts the architecture of our application. The authentication module has both the frontend and backend components. However, the application treats it as a black box and doesn't care about its internals.
The application API and the application backend are irrelevant to this tutorial, hence the tutorial doesn't concern itself with them. Here, they are only shown for representational and understanding purposes.
Create a new folder on your machine for this task. I called it SfUserAuth-Demo. You can name it as you want.
npm initJust accept the default values, and keep pressing ENTER until the initialization completes and the package.json file is generated. Your project will now have only one file, namely package.json.
npm install connect serve-staticCreate a folder to store all the html files. I called it "dist/".
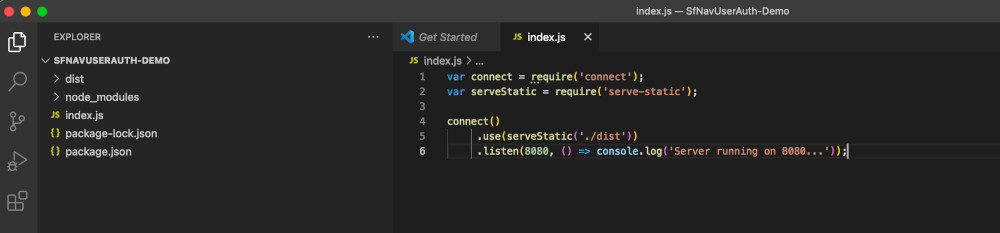
Create index.js, to hold the code for the HTTP server. Paste the code given below in index.js.
var connect = require('connect');
var serveStatic = require('serve-static');

connect()
     .use(serveStatic('./dist'))
     .listen(8080, () => console.log('Server running on 8080...'));
Your folder structure should look something like this:
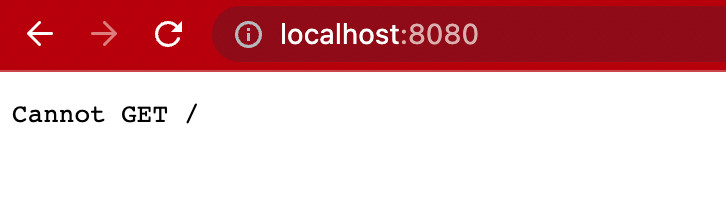
Start the web server using the below command
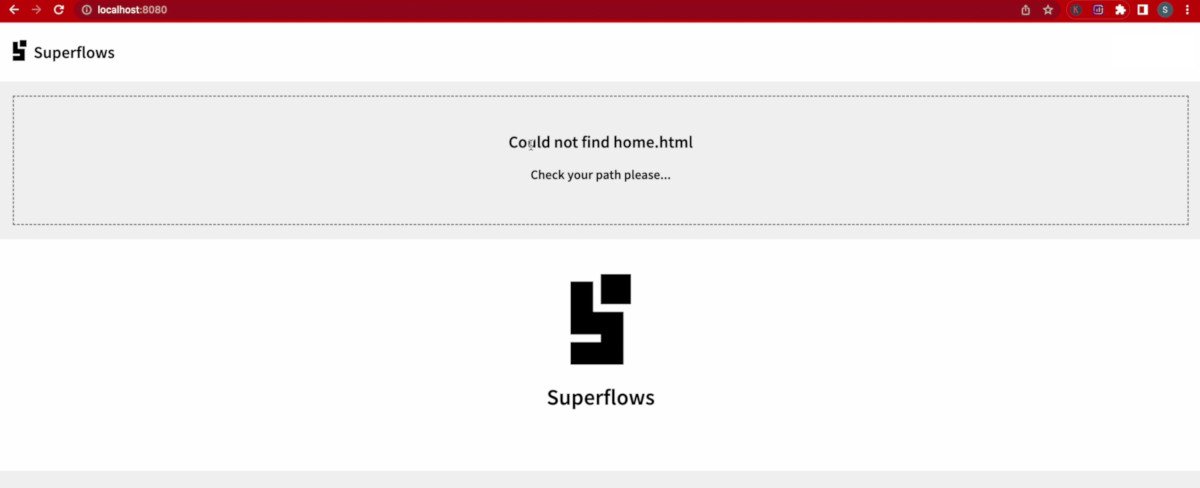
node index.jsBrowse to http://localhost:8080/ for confirming that the web server is running. A running server will throw an error message similar to the one given below. This is because we haven't yet created index.html in the dist folder.
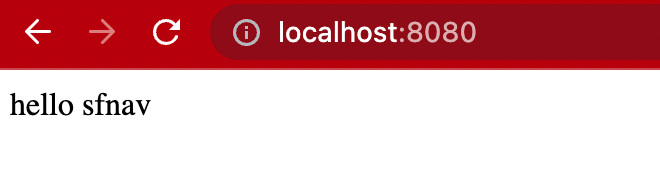
Create an index.html file in the dist folder and initialize it with the following code:
<html>
hello sfnav
</html>
Go back to the browser and refresh it. Confirm that the HTTP server now serves the index.html page.
The code of the HTML skeleton is given below. Copy and paste it into your dist/index.html.
<!DOCTYPE html>
<html>
<head>
<meta charset="utf-8" />
<meta name="viewport" content="width=device-width, initial-scale=1">
<title><sf-nav> Demo</title>
<!-- Integration material icons as they are used in sf-nav -->
<link href="https://fonts.googleapis.com/icon?family=Material+Icons" rel="stylesheet">
<!-- Google fonts integration -->
<link rel="preconnect" href="https://fonts.googleapis.com">
<link rel="preconnect" href="https://fonts.gstatic.com" crossorigin>
<link href="https://fonts.googleapis.com/css2?family=Source+Sans+Pro:wght@200;300;400;600&display=swap" rel="stylesheet">
<!-- Integration the web components module -->
<script src="https://unpkg.com/@webcomponents/webcomponentsjs@latest/webcomponents-loader.js"></script>
<!-- Integration lit and sf-nav web components module -->
<script type="module">
import {LitElement, html, css} from 'https://unpkg.com/lit-element/lit-element.js?module';
import {SfNav} from 'https://unpkg.com/sf-nav/sf-nav.js?module';
import {SfUserAuth} from 'https://unpkg.com/sf-user-auth@1.0.69/sf-user-auth.js?module';
</script>
<style>
body {
background-color: #efefef;
margin: 0px;
font-family: 'Source Sans Pro';
}
sf-nav:not(:defined) {
display: none;
}
</style>
</head>
<body style="margin: 0px;">
<div id="nav-container">
<sf-nav id="sf-nav">
<!-- Set the brand name -->
<h2 slot="brandName"><a href="#home" >Superflows</a></h2>
<!-- Set the brand logo -->
<a slot="brandImage" href="#home" ><img alt="logo" src="https://superflows-images.s3.ap-south-1.amazonaws.com/superflows_black_transparent_200.png" /></a>
</sf-nav>
</div>
</body>
</html>This skeleton code does the following:
-
It sets up the viewport
-
It includes fonts, you can use any fonts of your choice
-
It includes the web component loader script
-
It includes the Lit library. The navigation component (SfNav) and the authentication component (SfUserAuth), both depend on Lit, hence this inclusion
-
It includes the material icons package, which is required by the SfNav and SfUserAuth web components
-
It includes the SfNav and SfUserAuth web component libraries
-
It includes a style block that - (1) Sets some basic styling to the document body and (2) Ensures that the SfNav component will show up only after it is defined properly
-
It then includes/renders the SfNav component in the body HTML with a brand name and brand image.
💾 ↺ Save dist/index.html, and reload the browser.
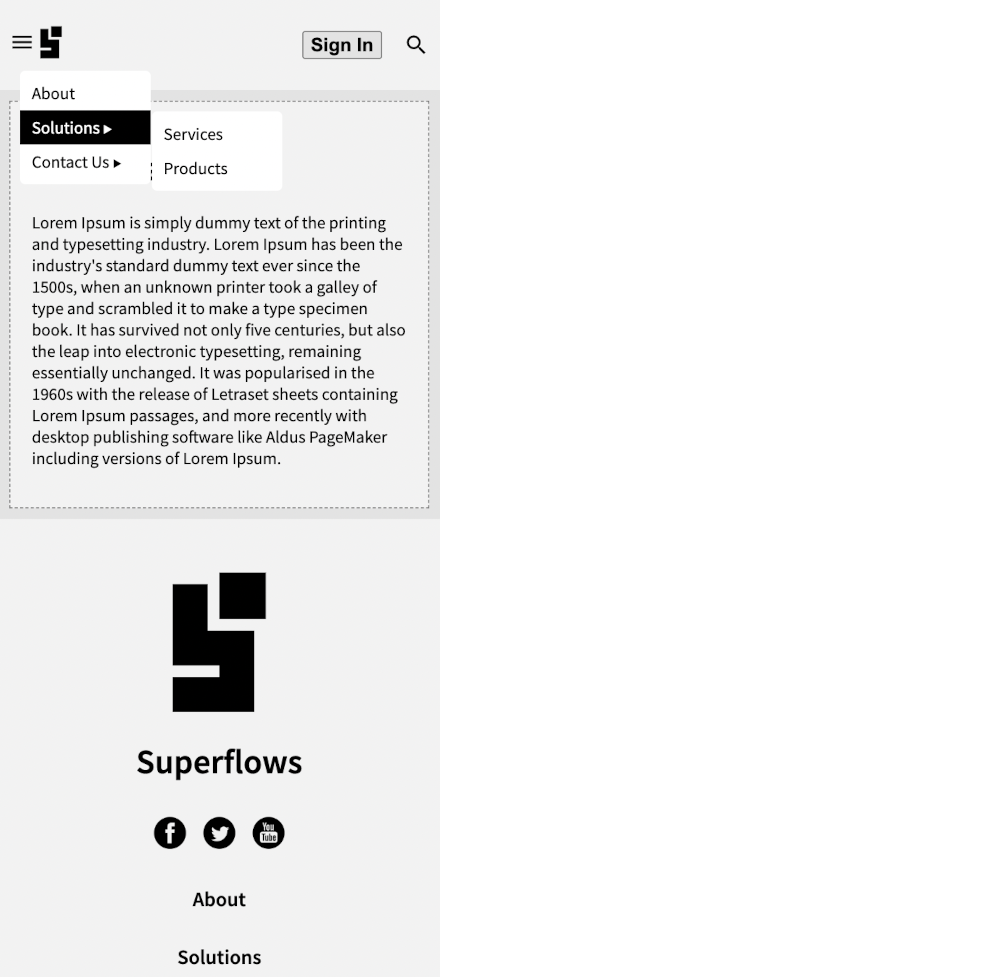
You will see that a bare-bones navigation component has loaded which only contains the brand name and brand image. The point to note is that it contains both the header part and the footer part.
Create a page content slot in the sf-nav block as shown below. This container sits between the header and footer and dynamically displays the page content as the user navigates across pages.
<sf-nav>

        <!-- Set the brand name -->
        <h2 slot="brandName"><a href="#home" >Superflows</a></h2>
        <!-- Set the brand logo -->
        <a slot="brandImage" href="#home" ><img alt="logo" src="https://superflows-images.s3.ap-south-1.amazonaws.com/superflows_black_transparent_200.png" /></a>

        <!-- Page Content -->
        <div slot="content">
        </div>

</sf-nav>To enable parameter pass-down during routing, include the following Javascript code block in the sf-nav block. This code block:
-
Listens to the routeChange event from SfNav and updates the routeMap associative array with the new route and its parameters, every time the routeChange event is fired.
-
Exposes two functions - (1) getCurrentPathname and (2) getCurrentArgs, which can be used to obtain the current location and the current parameters.
<body>
    <sf-nav>
    <!-- Set the brand name -->
            <h2 slot="brandName"><a href="#home" >Superflows</a></h2>
            <!-- Set the brand logo -->
            <a slot="brandImage" href="#home" ><img alt="logo" src="https://superflows-images.s3.ap-south-1.amazonaws.com/superflows_black_transparent_200.png" /></a>

            <!-- Page Content -->
            <div slot="content">
            </div>
    </sf-nav>
    <script>
        var routeMap = [];

        function getCurrentPathName() {
          return window.location.hash.length === 0 ? '' : window.location.hash.split("/")[0].replace('#', '');
        }
        function getCurrentArgs() {
          return routeMap[getCurrentPathName() + '.html'];
        }

        document.getElementsByTagName('sf-nav')[0].addEventListener('routeChange', (e) => {
          routeMap[e.detail.pathName] = e.detail.args;
        })
    </script>
</body>At this point, the routing configuration is complete.
💾 ↺ Save dist/index.html, and reload the browser.
You will observe the following:
-
The header and the Footer are now separated with a content block in between.
-
SfNav now throws the 'Could not find home.html' message. Don't worry, this is perfectly fine because we haven't yet created the home.html file.
Create a new file dist/home.html with the below HTML:
<div class="cContainer">
<h1>Home Page</h1>
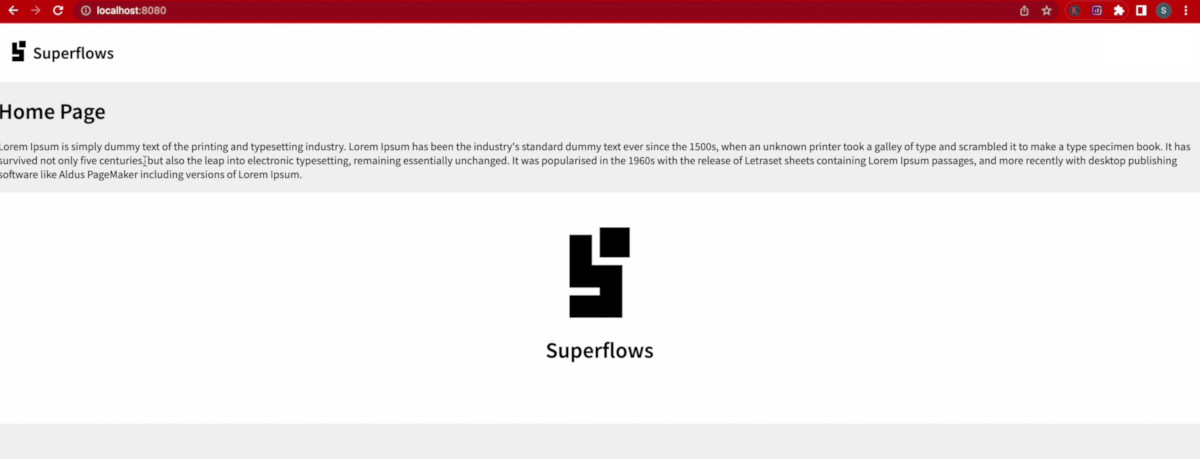
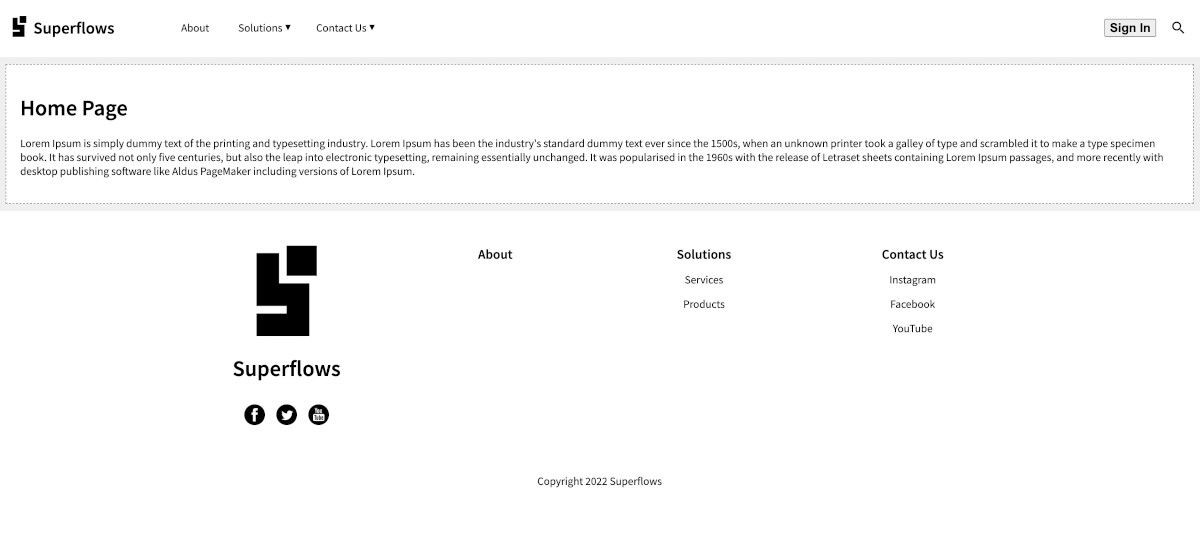
<p>Lorem Ipsum is simply dummy text of the printing and typesetting industry. Lorem Ipsum has been the industry's standard dummy text ever since the 1500s, when an unknown printer took a galley of type and scrambled it to make a type specimen book. It has survived not only five centuries, but also the leap into electronic typesetting, remaining essentially unchanged. It was popularised in the 1960s with the release of Letraset sheets containing Lorem Ipsum passages, and more recently with desktop publishing software like Aldus PageMaker including versions of Lorem Ipsum.</p>
</div>💾 ↺ Save dist/home.html, and reload the browser.
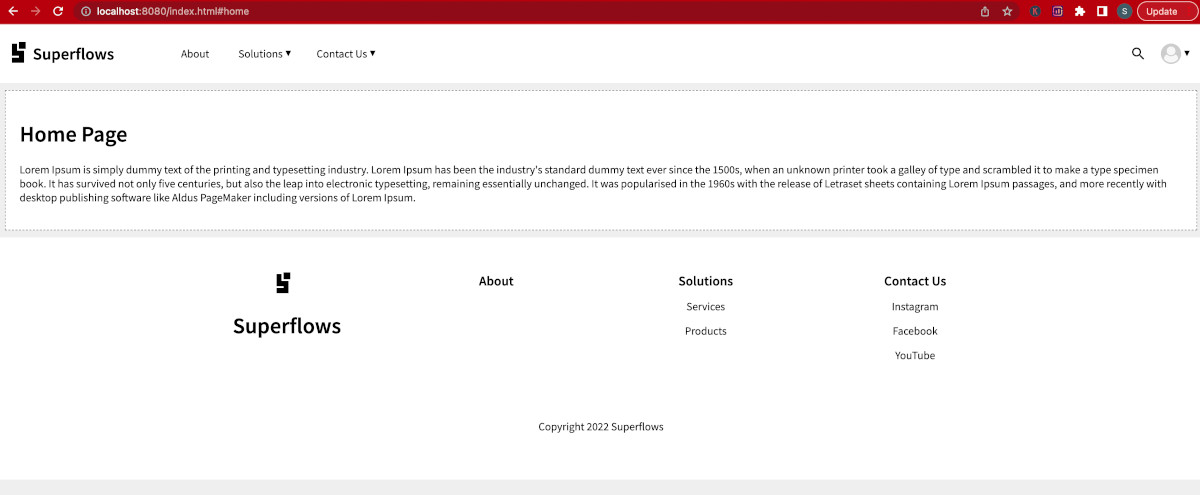
The home page content will now load.
You will observe that the content loads properly. Let us style it a bit, so that it looks a bit nicer. Add the following styles in the style block of dist/index.html:
<head>
    <style>
        <!-- other styles -->

        .cContainer {
            margin: 10px;
            padding: 20px;
            border: dashed 1px gray;
            background-color: white;
        }
    </style>
</head>
💾 ↺ Save dist/index.html, and reload the browser.

This looks good for now. We can surmise now that routing is working normally. Let us move ahead.
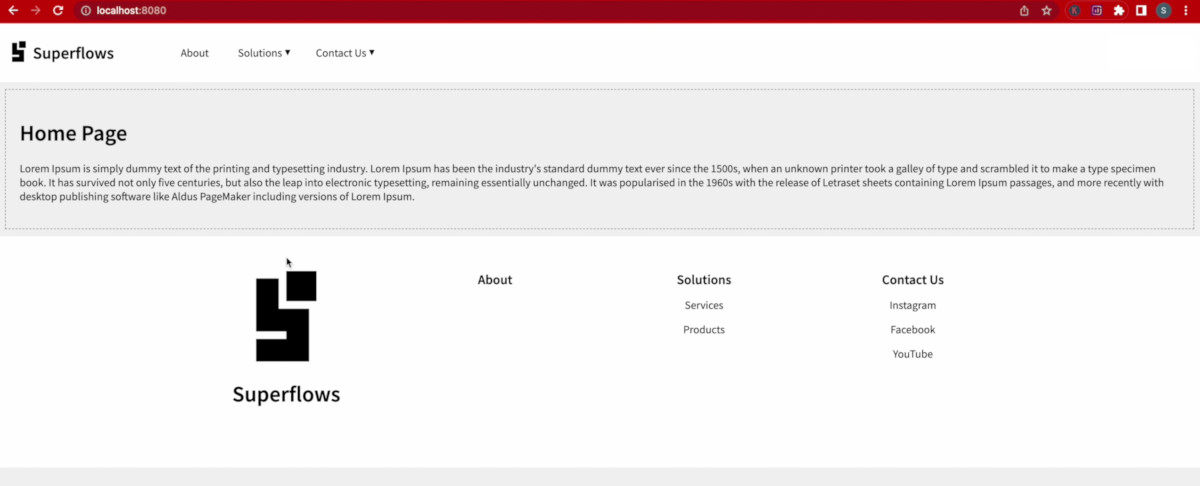
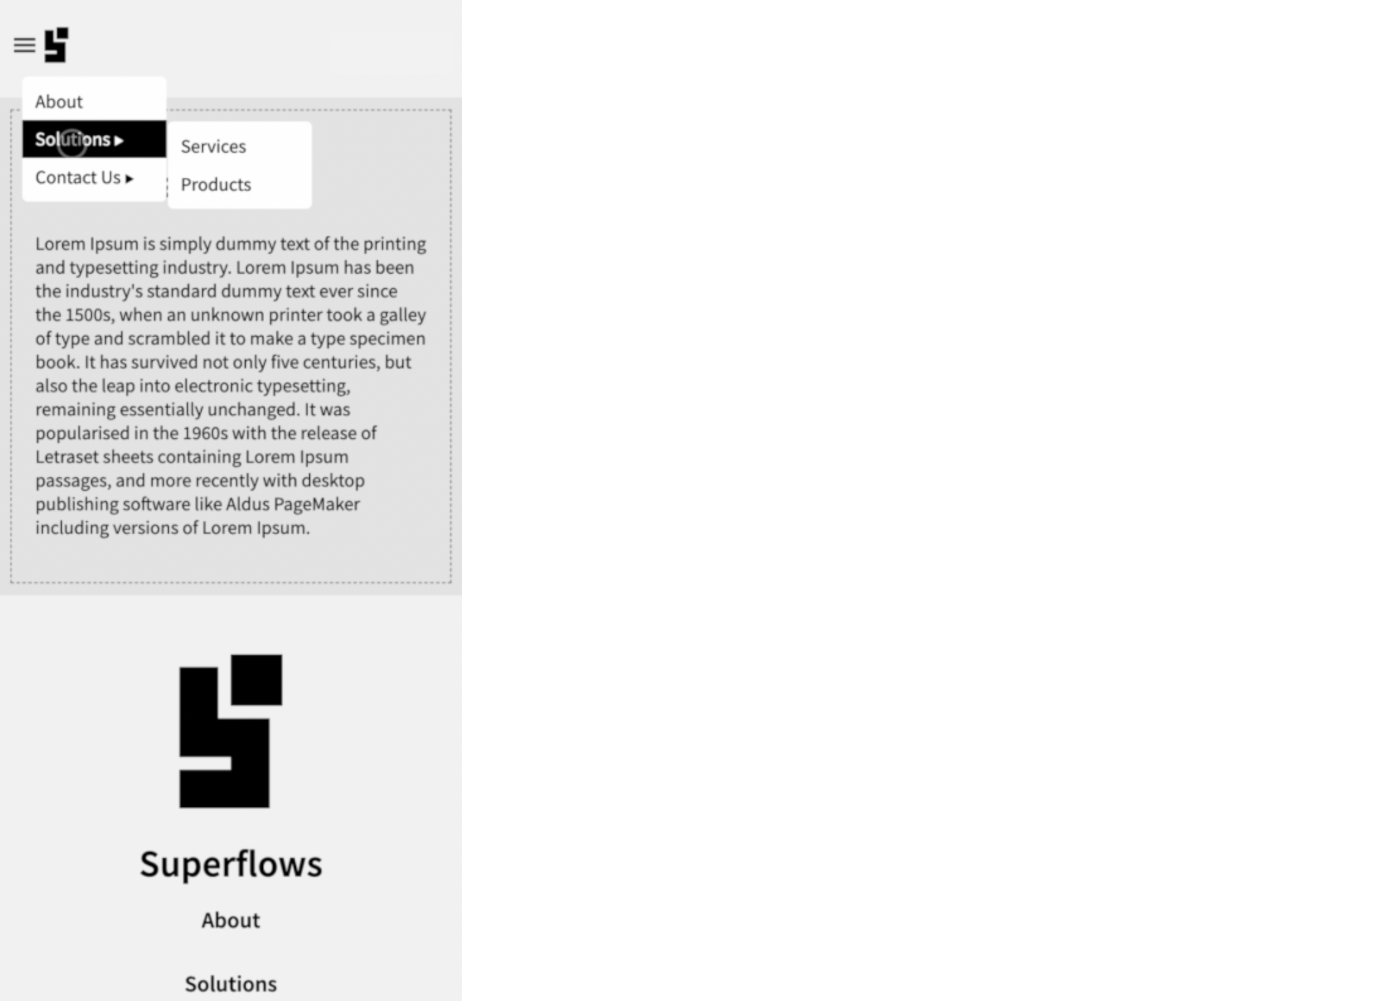
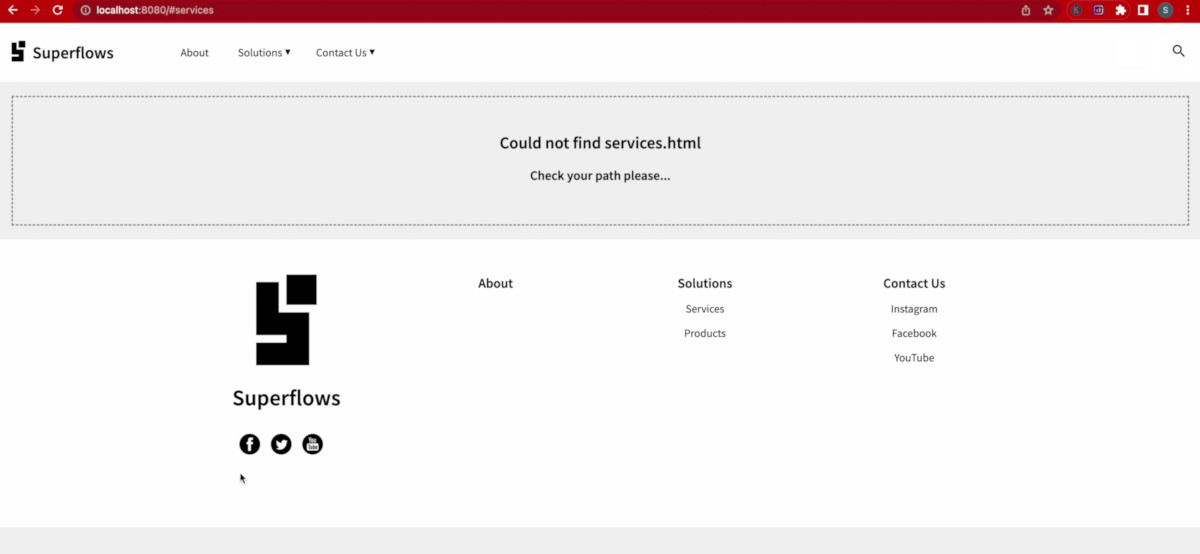
SfNav supports two-level menus. Creating it is pretty straightforward. Create an unordered list as shown below and set it to the main menu slot. Some menu items point to internal links (links with hash) and some menu items point to external links (links with http(s)).
In this example, we create and insert the menu dynamically into the navbar. Hence the menu is defined in Javascript as shown:
const menu = `
            <!-- Set the main menu -->
            <ul slot="mainMenu">
                <li><a href="#about">About</a></li>
                <li class="li-solutions">
                    <a href="javascript:void(0);" class="a-solutions">Solutions</a>
                    <ul>
                        <li><a href="#services">Services</a></li>
                        <li><a href="#products">Products</a></li>
                    </ul>
                </li>
                <li>
                    <a href="javascript:void(0);">Contact Us</a>
                    <ul>
                        <li><a href="https://instagram.com">Instagram</a></li>
                        <li><a href="https://facebook.com">Facebook</a></li>
                        <li><a href="https://youtube.com">YouTube</a></li>
                    </ul>
                </li>
            </ul>
        `;
To accommodate the dynamic insertion of the menu, we restructure the index.html a little bit. It should look like:
<!DOCTYPE html>
<html>
<head>
<meta charset="utf-8" />
<meta name="viewport" content="width=device-width, initial-scale=1">
<title><sf-nav> Demo</title>
<!-- Integration material icons as they are used in sf-nav -->
<link href="https://fonts.googleapis.com/icon?family=Material+Icons" rel="stylesheet">
<!-- Google fonts integration -->
<link rel="preconnect" href="https://fonts.googleapis.com">
<link rel="preconnect" href="https://fonts.gstatic.com" crossorigin>
<link href="https://fonts.googleapis.com/css2?family=Source+Sans+Pro:wght@200;300;400;600&display=swap" rel="stylesheet">
<!-- Integration the web components module -->
<script src="https://unpkg.com/@webcomponents/webcomponentsjs@latest/webcomponents-loader.js"></script>
<!-- Integration lit and sf-nav web components module -->
<script type="module">
import {LitElement, html, css} from 'https://unpkg.com/lit-element/lit-element.js?module';
import {SfNav} from 'https://unpkg.com/sf-nav/sf-nav.js?module';
import {SfUserAuth} from 'https://unpkg.com/sf-user-auth@1.0.69/sf-user-auth.js?module';
</script>
<style>
body {
background-color: #efefef;
margin: 0px;
font-family: 'Source Sans Pro';
}
sf-nav:not(:defined) {
display: none;
}
.cContainer {
margin: 10px;
padding: 20px;
border: dashed 1px gray;
background-color: white;
}
</style>
</head>
<body style="margin: 0px;">
<div id="nav-container">
<sf-nav id="sf-nav">
<!-- Set the brand name -->
<h2 slot="brandName"><a href="#home" >Superflows</a></h2>
<!-- Set the brand logo -->
<a slot="brandImage" href="#home" ><img alt="logo" src="https://superflows-images.s3.ap-south-1.amazonaws.com/superflows_black_transparent_200.png" /></a>
<!-- Page Content -->
<div slot="content">
</div>
<!-- Call to action -->
<a slot="cta" href="#auth/signin">Sign In</a>
<!-- Copyright notice -->
<p slot="copyright">Copyright 2022 Superflows</p>
<!-- Set the social media links -->
<ul slot="socialMedia">
<li><a href="https://facebook.com"><img src="https://superflows-images.s3.ap-south-1.amazonaws.com/facebook-black_round.png" /></a></li>
<li><a href="https://twitter.com"><img src="https://superflows-images.s3.ap-south-1.amazonaws.com/twitter_black_round.png" /></a></li>
<li><a href="https://youtube.com"><img src="https://superflows-images.s3.ap-south-1.amazonaws.com/youtube_black_round.png" /></a></li>
</ul>
</sf-nav>
</div>
<script>
//
// Navigation bar related Javascript
//
// Hash map for storing paths & arguments
var routeMap = [];
// Menu HTML to be inserted into sf-nav
const menu = `
<!-- Set the main menu -->
<ul slot="mainMenu">
<li><a href="#about">About</a></li>
<li class="li-solutions">
<a href="javascript:void(0);" class="a-solutions">Solutions</a>
<ul>
<li><a href="#services">Services</a></li>
<li><a href="#products">Products</a></li>
</ul>
</li>
<li>
<a href="javascript:void(0);">Contact Us</a>
<ul>
<li><a href="https://instagram.com">Instagram</a></li>
<li><a href="https://facebook.com">Facebook</a></li>
<li><a href="https://youtube.com">YouTube</a></li>
</ul>
</li>
</ul>
`;
// What's the current path?
function getCurrentPathName() {
return window.location.hash.length === 0 ? '' : window.location.hash.split("/")[0].replace('#', '');
}
// What are the current arguments?
function getCurrentArgs() {
return routeMap[getCurrentPathName() + '.html'];
}
// Initiate navigation bar listeners
function initiateListeners() {
document.getElementsByTagName('sf-nav')[0].addEventListener('routeChange', (e) => {
routeMap[e.detail.pathName] = e.detail.args;
})
}
//
// Handling the authentication
//
// Initiate the menu (first load)
function insertSfNavMenu() {
const currentInnerHTML = document.getElementsByTagName('sf-nav')[0].innerHTML;
const newInnerHTML = currentInnerHTML + menu;
document.getElementById('nav-container').innerHTML = '<sf-nav>' + newInnerHTML + '</sf-nav>';
initiateListeners();
}
function initPage() {
insertSfNavMenu();
}
initPage();
</script>
</body>
</html>💾 ↺ Save dist/index.html, and reload the browser.
If you click on any menu items with internal links such as services, products, you will observe that SfNav throws the file not found message. This is because we haven't yet created these files.
Social media links can be configured using an unordered list as well. Below is an example:
<body>
    <sf-nav>

        <!-- Set the social media links -->
        <ul slot="socialMedia">
            <li><a href="https://facebook.com"><img src="https://superflows-images.s3.ap-south-1.amazonaws.com/facebook-black_round.png" /></a></li>
            <li><a href="https://twitter.com"><img src="https://superflows-images.s3.ap-south-1.amazonaws.com/twitter_black_round.png" /></a></li>
            <li><a href="https://youtube.com"><img src="https://superflows-images.s3.ap-south-1.amazonaws.com/youtube_black_round.png" /></a></li>
        </ul>

    </sf-nav>
</body>
💾 ↺ Save dist/index.html, and reload the browser.
The copyright notice can be configured in the footer as follows:
<body>
    <sf-nav>

        <!-- Copyright notice -->
        <p slot="copyright">Copyright 2022 Superflows</p>

    </sf-nav>
</body>
💾 ↺ Save dist/notification.html, and reload the browser.
The copyright notice will be displayed in the footer.
To initiate the authentication flow, we need a call to action button on the navigation bar. In SfNav, it can be configured as follows:
<body>
    <sf-nav>

        <!-- Call to action -->
        <a slot="cta" href="#auth">Sign In</a>

     </sf-nav>
</body>
💾 ↺ Save dist/notification.html, and reload the browser.
The call to action button will be displayed in the header.
Search functionality is available by default. Just subscribe to the searchClick event to capture the event when the user types something in the search box and presses Enter.
<script>
document.getElementsByTagName('sf-nav')[0].addEventListener('searchClick', (e) => {console.log('search clicked ' + JSON.stringify(e.detail));})
</script>After the modifications in the previous steps, the dist/index.html should look like the following:
<!DOCTYPE html>
<html>
<head>
<meta charset="utf-8" />
<meta name="viewport" content="width=device-width, initial-scale=1">
<title><sf-nav> Demo</title>
<!-- Integration material icons as they are used in sf-nav -->
<link href="https://fonts.googleapis.com/icon?family=Material+Icons" rel="stylesheet">
<!-- Google fonts integration -->
<link rel="preconnect" href="https://fonts.googleapis.com">
<link rel="preconnect" href="https://fonts.gstatic.com" crossorigin>
<link href="https://fonts.googleapis.com/css2?family=Source+Sans+Pro:wght@200;300;400;600&display=swap" rel="stylesheet">
<!-- Integration the web components module -->
<script src="https://unpkg.com/@webcomponents/webcomponentsjs@latest/webcomponents-loader.js"></script>
<!-- Integration lit and sf-nav web components module -->
<script type="module">
import {LitElement, html, css} from 'https://unpkg.com/lit-element/lit-element.js?module';
import {SfNav} from 'https://unpkg.com/sf-nav/sf-nav.js?module';
import {SfUserAuth} from 'https://unpkg.com/sf-user-auth@1.0.69/sf-user-auth.js?module';
</script>
<style>
body {
background-color: #efefef;
margin: 0px;
font-family: 'Source Sans Pro';
}
sf-nav:not(:defined) {
display: none;
}
.cContainer {
margin: 10px;
padding: 20px;
border: dashed 1px gray;
background-color: white;
}
</style>
</head>
<body style="margin: 0px;">
<div id="nav-container">
<sf-nav id="sf-nav">
<!-- Set the brand name -->
<h2 slot="brandName"><a href="#home" >Superflows</a></h2>
<!-- Set the brand logo -->
<a slot="brandImage" href="#home" ><img alt="logo" src="https://superflows-images.s3.ap-south-1.amazonaws.com/superflows_black_transparent_200.png" /></a>
<!-- Page Content -->
<div slot="content">
</div>
<!-- Call to action -->
<a slot="cta" href="#auth/signin">Sign In</a>
<!-- Copyright notice -->
<p slot="copyright">Copyright 2022 Superflows</p>
<!-- Set the social media links -->
<ul slot="socialMedia">
<li><a href="https://facebook.com"><img src="https://superflows-images.s3.ap-south-1.amazonaws.com/facebook-black_round.png" /></a></li>
<li><a href="https://twitter.com"><img src="https://superflows-images.s3.ap-south-1.amazonaws.com/twitter_black_round.png" /></a></li>
<li><a href="https://youtube.com"><img src="https://superflows-images.s3.ap-south-1.amazonaws.com/youtube_black_round.png" /></a></li>
</ul>
</sf-nav>
</div>
<script>
//
// Navigation bar related Javascript
//
// Hash map for storing paths & arguments
var routeMap = [];
// Menu HTML to be inserted into sf-nav
const menu = `
<!-- Set the main menu -->
<ul slot="mainMenu">
<li><a href="#about">About</a></li>
<li class="li-solutions">
<a href="javascript:void(0);" class="a-solutions">Solutions</a>
<ul>
<li><a href="#services">Services</a></li>
<li><a href="#products">Products</a></li>
</ul>
</li>
<li>
<a href="javascript:void(0);">Contact Us</a>
<ul>
<li><a href="https://instagram.com">Instagram</a></li>
<li><a href="https://facebook.com">Facebook</a></li>
<li><a href="https://youtube.com">YouTube</a></li>
</ul>
</li>
</ul>
`;
// What's the current path?
function getCurrentPathName() {
return window.location.hash.length === 0 ? '' : window.location.hash.split("/")[0].replace('#', '');
}
// What are the current arguments?
function getCurrentArgs() {
return routeMap[getCurrentPathName() + '.html'];
}
// Initiate navigation bar listeners
function initiateListeners() {
document.getElementsByTagName('sf-nav')[0].addEventListener('searchClick', (e) => {console.log('hurray ' + JSON.stringify(e.detail));})
document.getElementsByTagName('sf-nav')[0].addEventListener('routeChange', (e) => {
routeMap[e.detail.pathName] = e.detail.args;
})
}
// Initiate the menu (first load)
function insertSfNavMenu() {
const currentInnerHTML = document.getElementsByTagName('sf-nav')[0].innerHTML;
const newInnerHTML = currentInnerHTML + menu;
document.getElementById('nav-container').innerHTML = '<sf-nav>' + newInnerHTML + '</sf-nav>';
initiateListeners();
}
function initPage() {
insertSfNavMenu();
}
initPage();
</script>
</body>
</html>In the above section, we have created the call to action button as follows:
<!-- Call to action -->
<a slot="cta" href="#auth">Sign In</a>
This means, clicking on the sign-in button should load the auth page. Go ahead and click it.
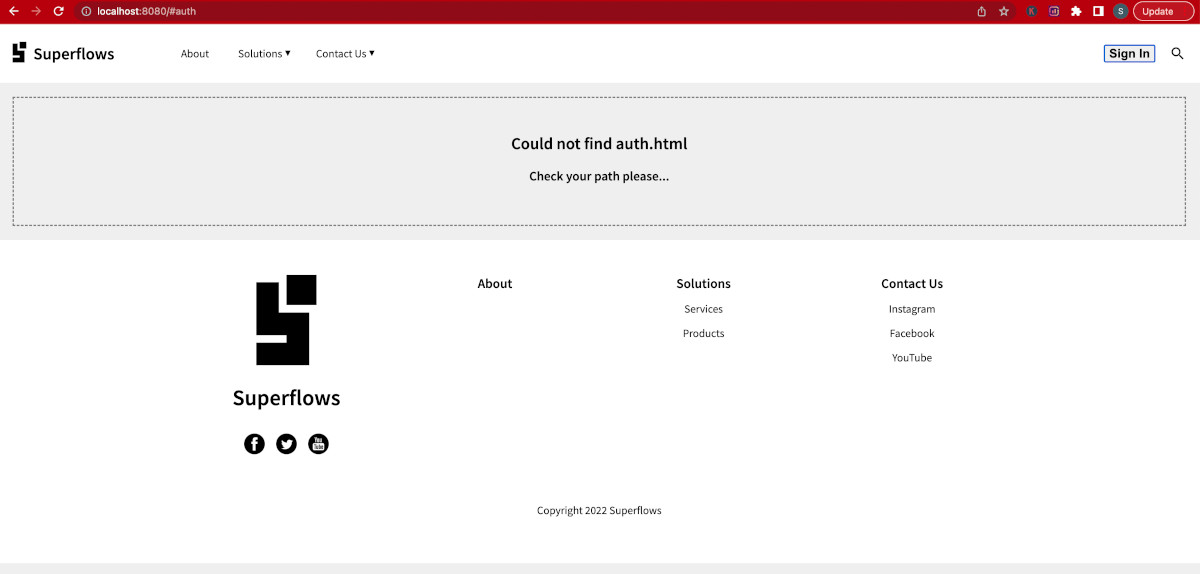
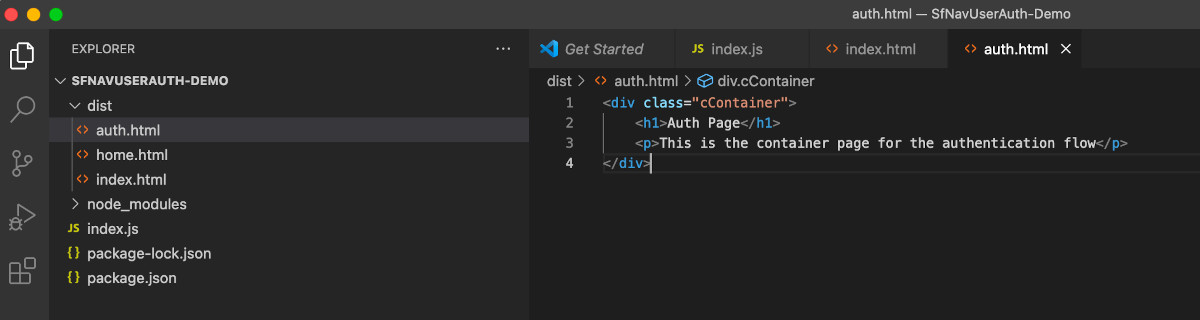
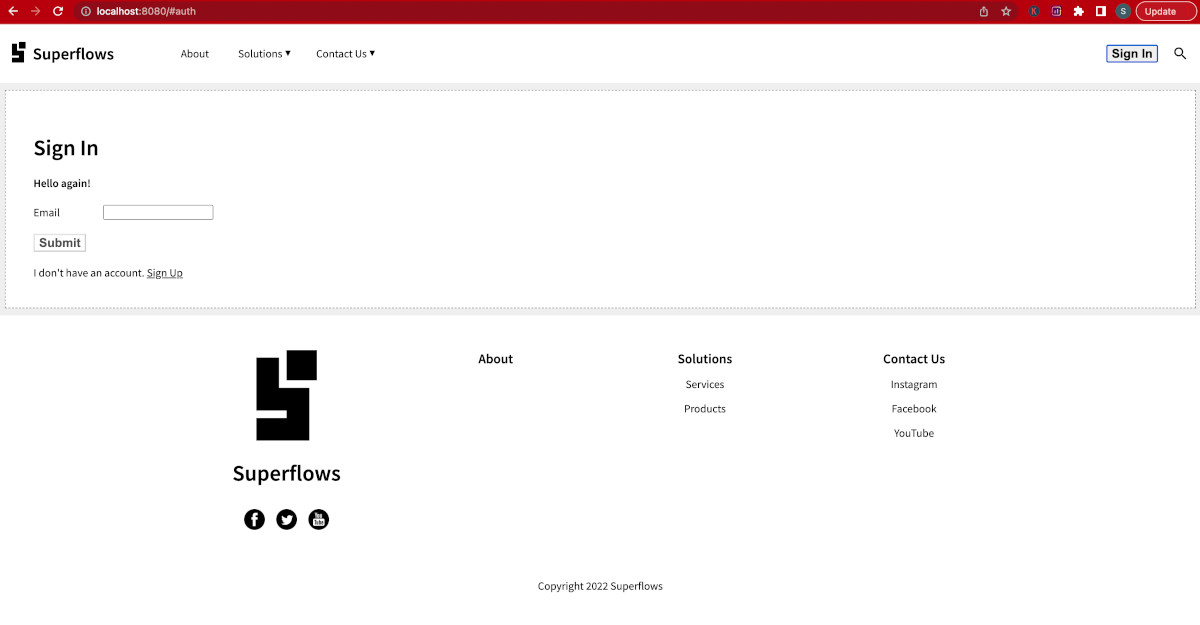
Page not found error will be shown because we haven't yet created that page. So let us create the dist/auth.html page then with the code given below:
<div class="cContainer">
    <h1>Auth Page</h1>
    <p>This is the container page for the authentication flow</p>
</div>
💾 ↺ Save dist/auth.html, and reload the browser.
The auth page content will be loaded now.

Your folder structure should look something like this:
At this point, we are done with the initial setup of our frontend. Time to set up our backend now.
Sign in to the AWS console with your AWS admin account. Go to IAM > Users.
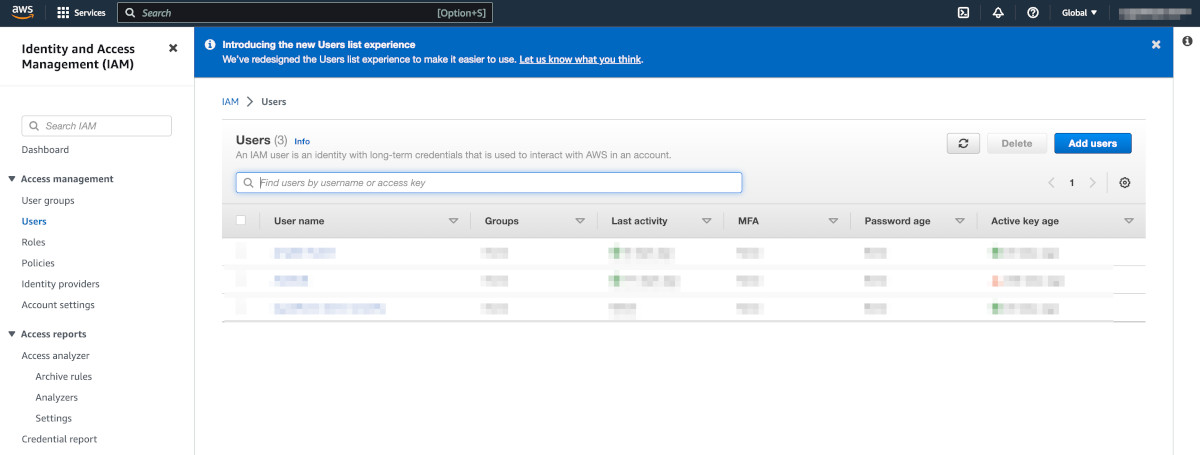
Click on Add Users. In the Specify user details step write the name as SfUserAuthDemo. Let the enable console access option remain unchecked. Do not select it.
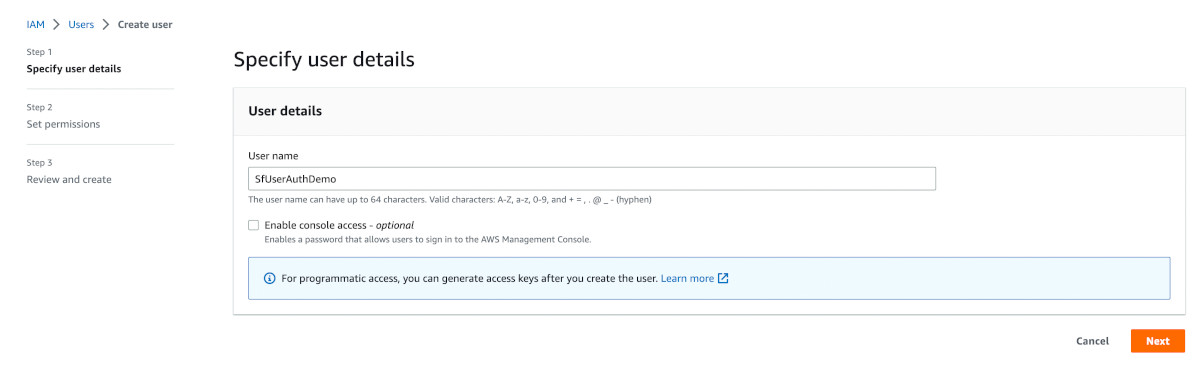
Click Next.
On the set permission page, choose the 'Attach policies directly' option. Permissions will then drop down below. From the list of permissions, search and attach the following permissions one by one:
-
AmazonAPIGatewayAdministrator
-
AmazonAPIGatewayInvokeFullAccess
-
AmazonDynamoDBFullAccess
-
AmazonS3FullAccess
-
AmazonSESFullAccess
-
IAMFullAccess
-
AWSLambda_FullAccess
Do not set the permissions boundary. Leave it untouched.
Click Next.
Review and confirm that you have attached the policies properly.
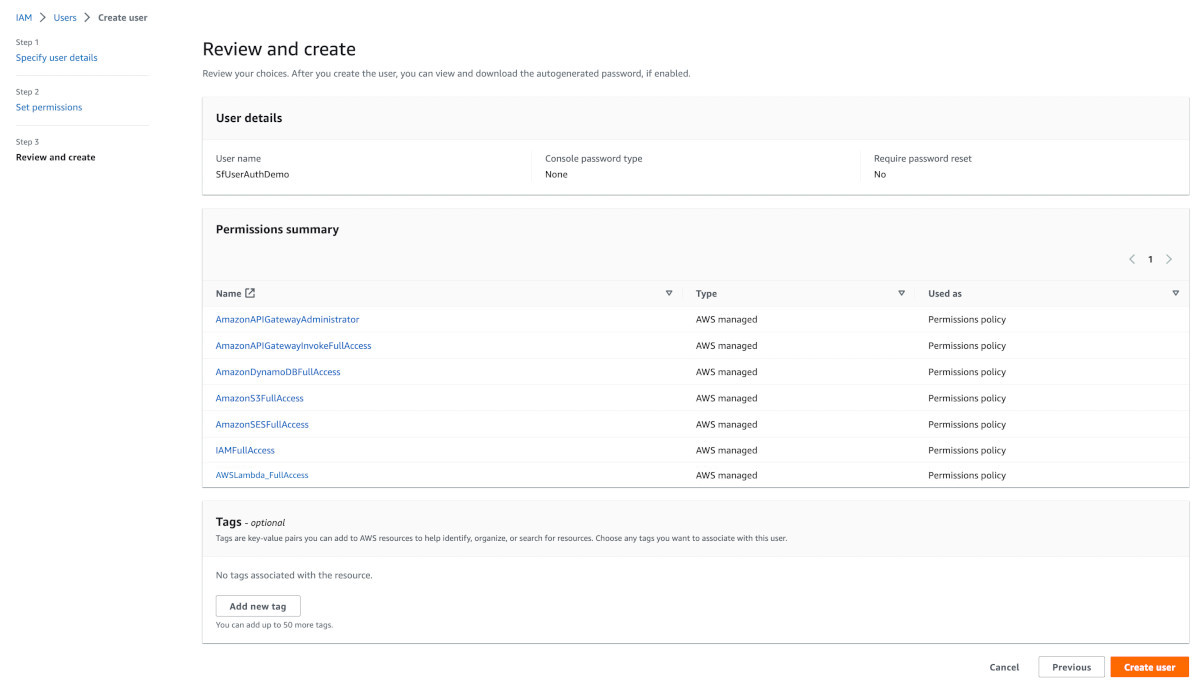
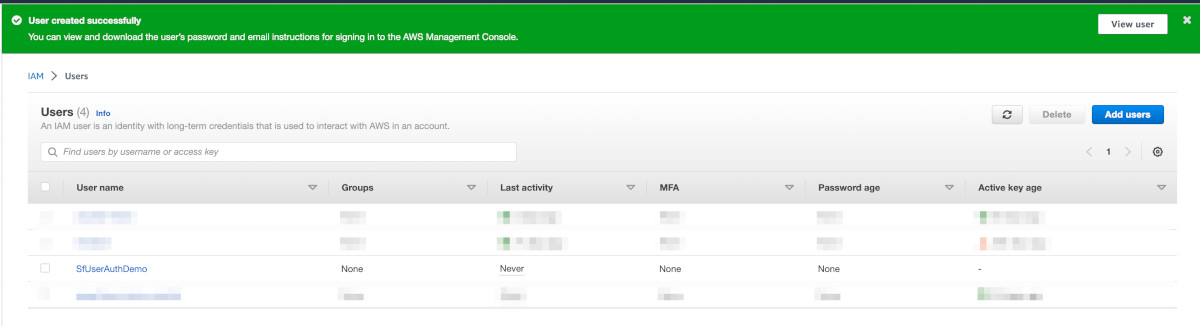
Click Create User.
The user should get created successfully as shown in the image below:
Click on the user. The user information would load. Then click on the 'Security Credentials' tab.
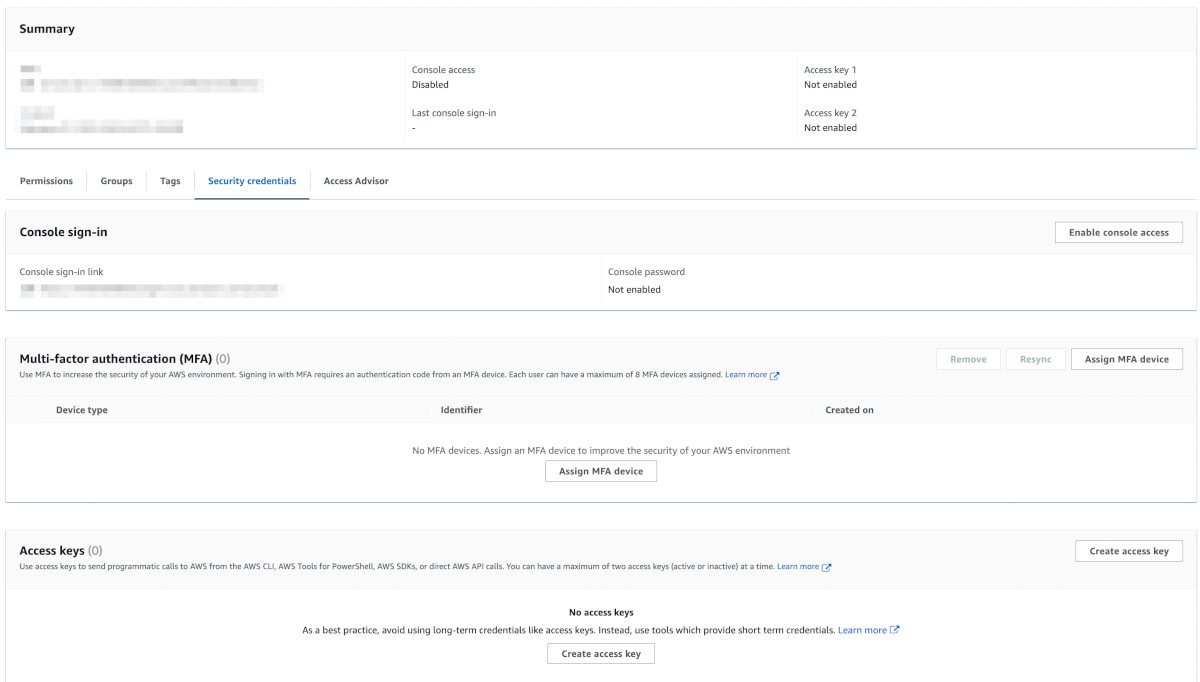
Since we haven't created any access keys yet, it will show 'No access keys'. Go ahead and click on the 'Create access key' button.
In step 1, choose the 'Command Line Interface (CLI)' option and check the 'I understand' checkbox.
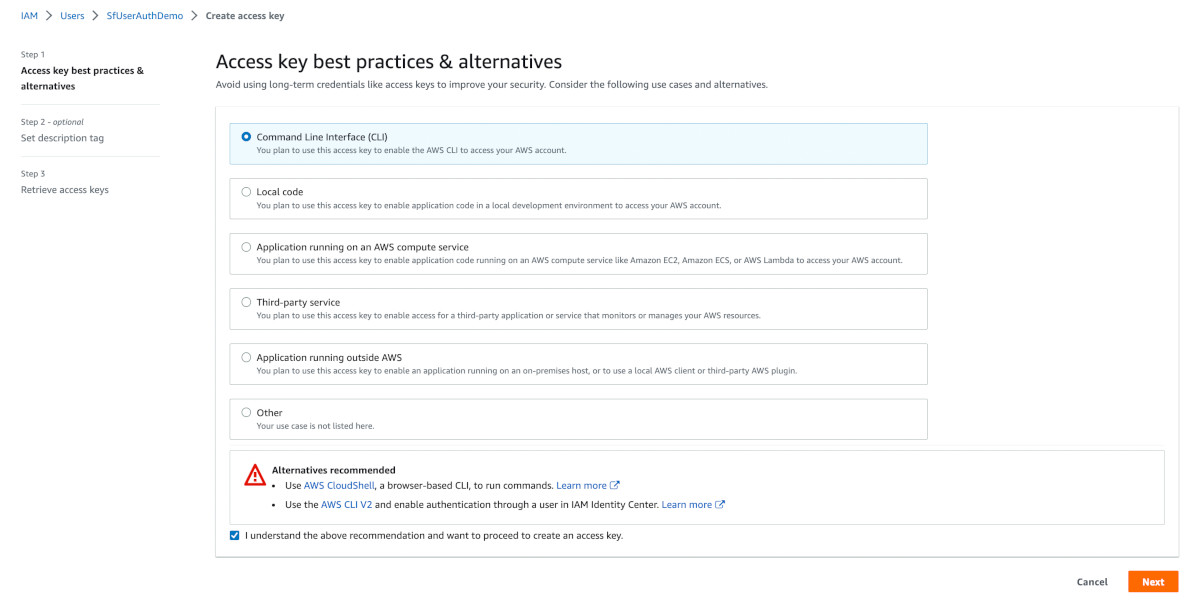
Click Next.
In step 2, insert the text 'Access key to setup the backend for SfUserAuthDemo' in the description field.
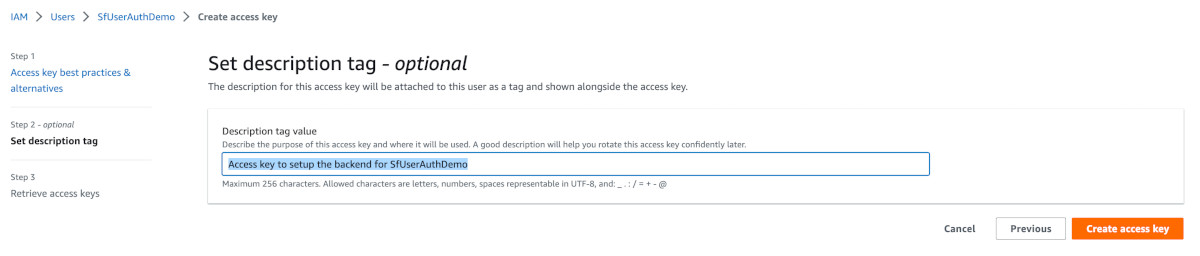
Click on Create access key.
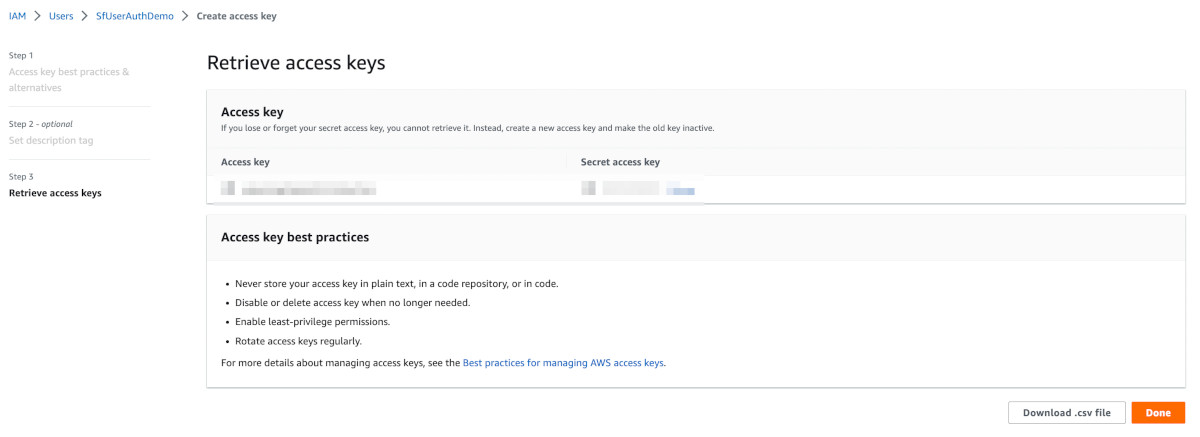
In step 3, retrieve your access key. Save your access key and secret in a secure location.
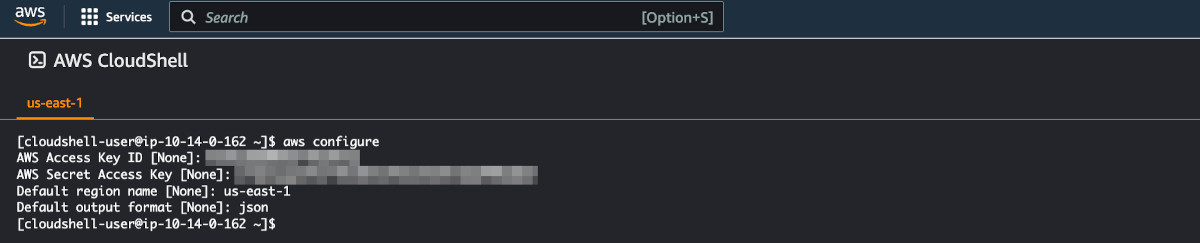
At this point, we have completed creating the credentials. Now let us use those credentials and set up the cloud shell.
Go to Cloud Shell on AWS. A browser-based shell console will open. Type the aws configure command to configure the cloud shell.
aws configure-
When prompted, copy and paste the access key id and the access key secret, which you just created in the previous step.
-
Use any aws region of your choice. In case you are unsure, please look up the region from here.
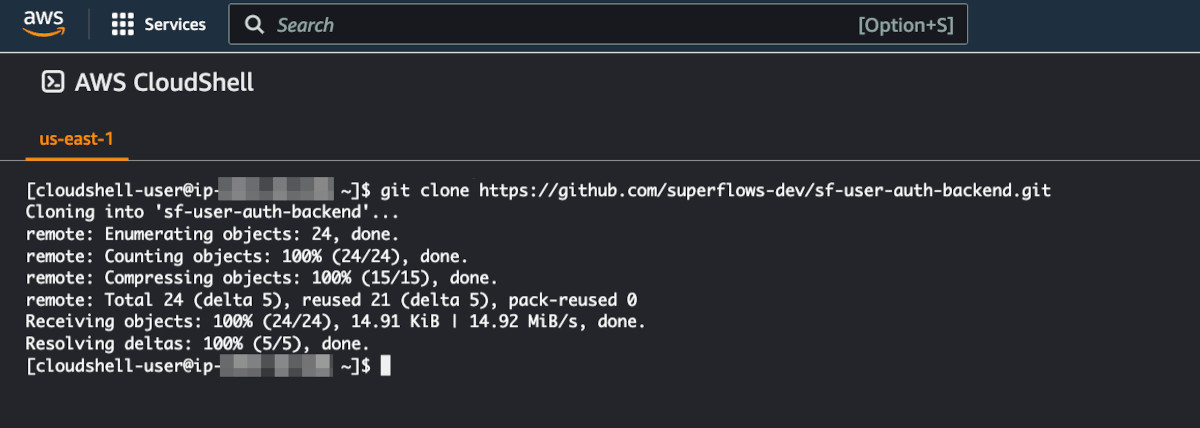
Clone the backend repository into the cloud shell as shown below. You can also find the source code here.
[cloudshell-user@ip-aa-bb-cc-dd ~]$ git clone https://github.com/superflows-dev/sf-user-auth-backend.gitIt should look something like this:
After the clone is successful, go to the source directory.
[cloudshell-user@ip-aa-bb-cc-dd ~]$ cd sf-user-auth-backend/Open the config file 'aws.config.sh' using vim.
[cloudshell-user@ip-aa-bb-cc-dd sf-user-auth-backend]$ vim aws.config.shThe initial part of the script contains the 'script config section'. That needs to be configured properly. It will look something like this:
###########
# Script Config
###########

adminemail=admin@abc.com
correspondenceemail=hello@abc.com
awsregion=us-east-1
awsaccount=121212121212
apistage=test
weborigin=http://localhost:8000
appname=MyAppName
tablename=T_SF_User_Auth_test
rolename=R_SF_User_Auth_test
policyname=P_SF_User_Auth_test
functionname=F_SF_User_Auth_test
api=API_SF_User_Auth_test

###########
# Script Config Ends
###########
Following is the explanation of all the parameters in the script config section:
adminemail - It is the first user of the microservice and is considered as the administrator. Its record in the database has an admin flag.
correspondenceemail - This email address is used for communication purposes for example sending a one-time password (OTP).
Please note that a verification link will be sent to this email address, so ensure you have access to its inbox.
awsregion - This is the same region, which you have chosen in Step 6 of this tutorial.
awsaccount - This is the unique 12-digit number that identifies your aws account. You can obtain this number by clicking on your aws account name dropdown in the top right corner of the aws console.
apistage - The default stage is test. You can change it to prod and run the script again to create a separate production stage. But first, ensure that the test stage is configured and running properly. When you are in development mode, use the test stage.
weborigin - This is the web origin, where your frontend website will be deployed. For example, when you are developing on your local machine, it will be on localhost. In our current tutorial, as seen in Step 1.6, our frontend project is running on http://localhost:8080, so we will set our WebOrigin to http://localhost:8080. But when you move to production, WebOrigin should be the URL, where the frontend will be deployed.
appname - Name of your application.
tablename - This is the DynamoDB table that stores the data. You can maintain the default nomenclature, which is T_SF_User_Auth_<stage>
rolename - This is the name of the role that gets created as a part of the deployment process. You can maintain the default nomenclature, which is R_SF_User_Auth_<stage>
policyname - This is the name of the policy that gets created as a part of the deployment process. You can maintain the default nomenclature, which is P_SF_User_Auth_<stage>
functionname - This is the name of the lambda function that gets created as a part of the deployment process. You can maintain the default nomenclature, which is F_SF_User_Auth_<stage>
api - This is the name of the API that gets created as a part of the deployment process. You can maintain the default nomenclature, which is API_SF_User_Auth_<stage>
To configure, set the :
-
adminemail > email address, which you want to set as admin
-
correspondenceemail > email address, which will be used for correspondence, verification required
-
awsregion > region of your choice
-
awsaccount > your aws account id
-
weborigin > url where frontend is deployed (mostly localhost if developing on local machine)
-
appname > name of your application
Leave the rest untouched. Close the vim editor.
Run the backend deployment script as follows:
[cloudshell-user@ip-aa-bb-cc-dd sf-user-auth-backend]$ bash aws.config.shThe script will run, the output will be something like this:
Hello there! I will be guiding you today to complete the aws configuration. There are a few steps involved, but you needn't worry, I will do all the heavy lifting for you 😀. In between though, I will need some inputs from you and will need you to follow my instructions. Just stay with me and I think you'll be good!

=========================
Step 1: SES Configuration
=========================

>> Correspondence email: suxxxxxxxxxx@gmail.com

💬 Email identity suxxxxxxxxxx@gmail.com creation SUCCESSFUL  ✓ : "EMAIL_ADDRESS"

⏳ Checking the status of Email identity suxxxxxxxxxx@gmail.com

💬 SES: Email identity suxxxxxxxxxx@gmail.com not yet ready for sending  ⚠  emails

>> Instruction
💬 Verification email has been sent to suxxxxxxxxxx@gmail.com, verify it

>> Next Steps
💬 Do what the instruction says, then come back here and run me again

Exiting for now...
In the first execution, the script adds the correspondence email in aws and triggers the verification email. Go to the inbox of your correspondence email. You will have received an email, which will look something like this:
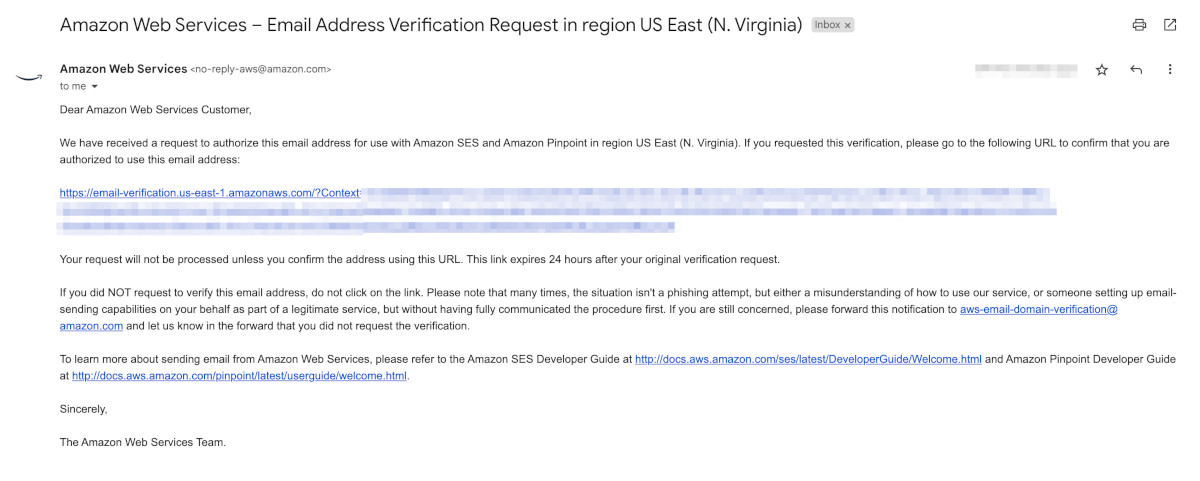
Click on the verification link. AWS will verify it and forward you to the success page.

After the correspondence email is verified successfully, run the backend deployment script again:
[cloudshell-user@ip-aa-bb-cc-dd sf-user-auth-backend]$ bash aws.config.shThe script will run and deploy the backend. For the sake of brevity, I am not posting the entire output of the script here. If the backend deployment is successful, the last few lines of the output will look something like this:
⏳ Deploying API Gateway function

💬 Auth deployment creation SUCCESSFUL  ✓ : "2asdwp"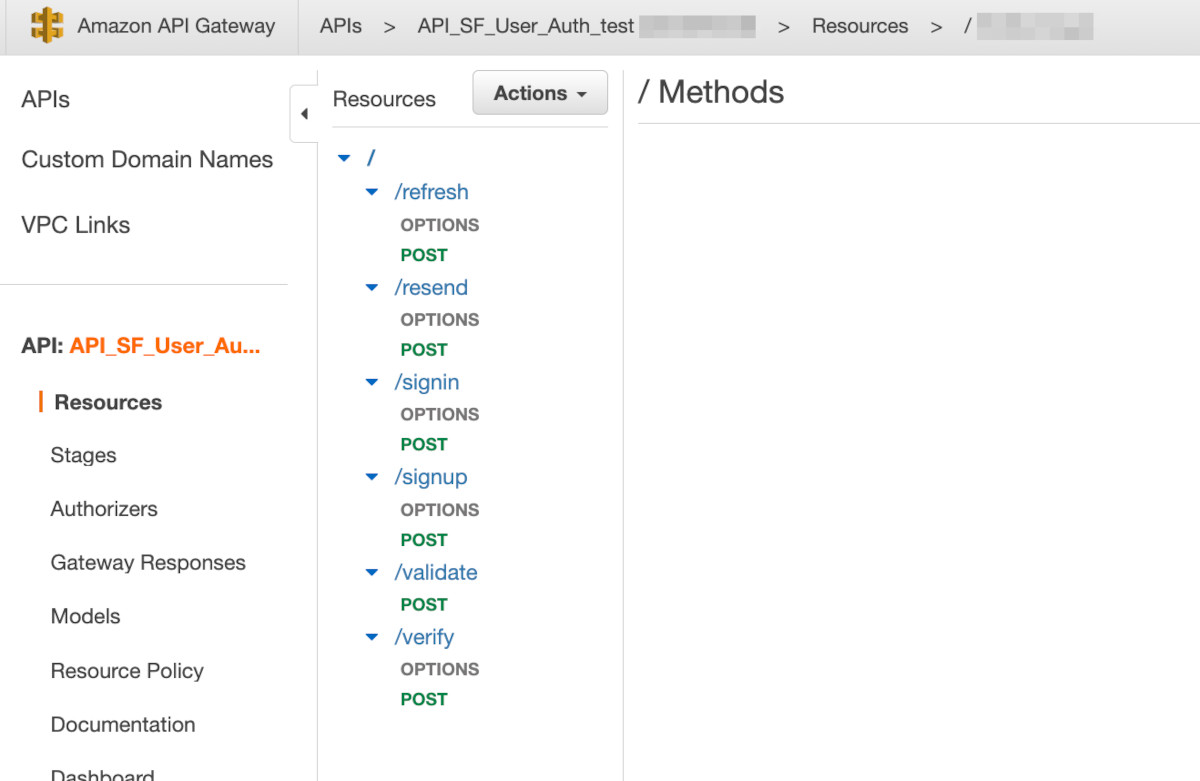
Script Ended...Go to API Gateway in the AWS console. You will see the API 'API_SF_User_Auth_test' created.

Click on it. Confirm that you are seeing 6 resources - refresh, resend, signin, signup, validate & verify. It should look something like this:
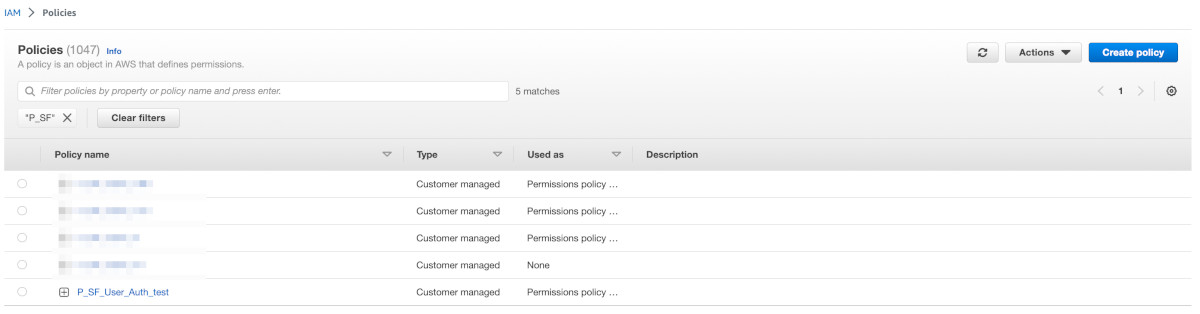
Go to IAM > Access Management > Policies in the AWS console. You will see the policy 'P_SF_User_Auth_test' created.
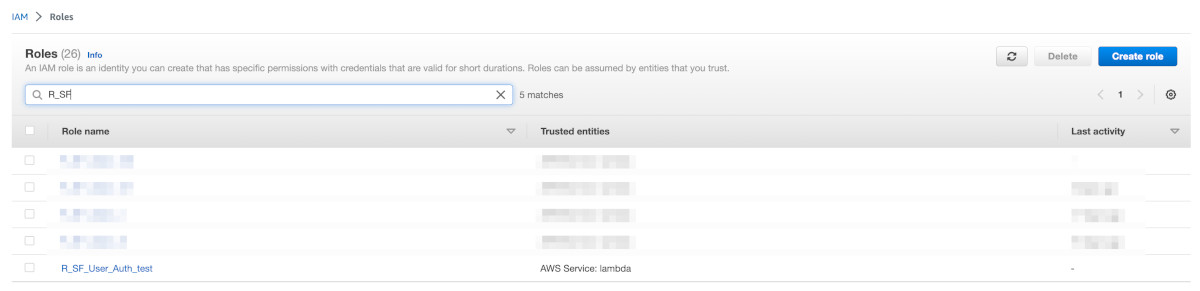
Go to IAM > Access Management > Roles in the AWS console. You will see the policy 'R_SF_User_Auth_test' created.
Go to Lambda Functions in the AWS console. You will see the function 'F_SF_User_Auth_test' created.

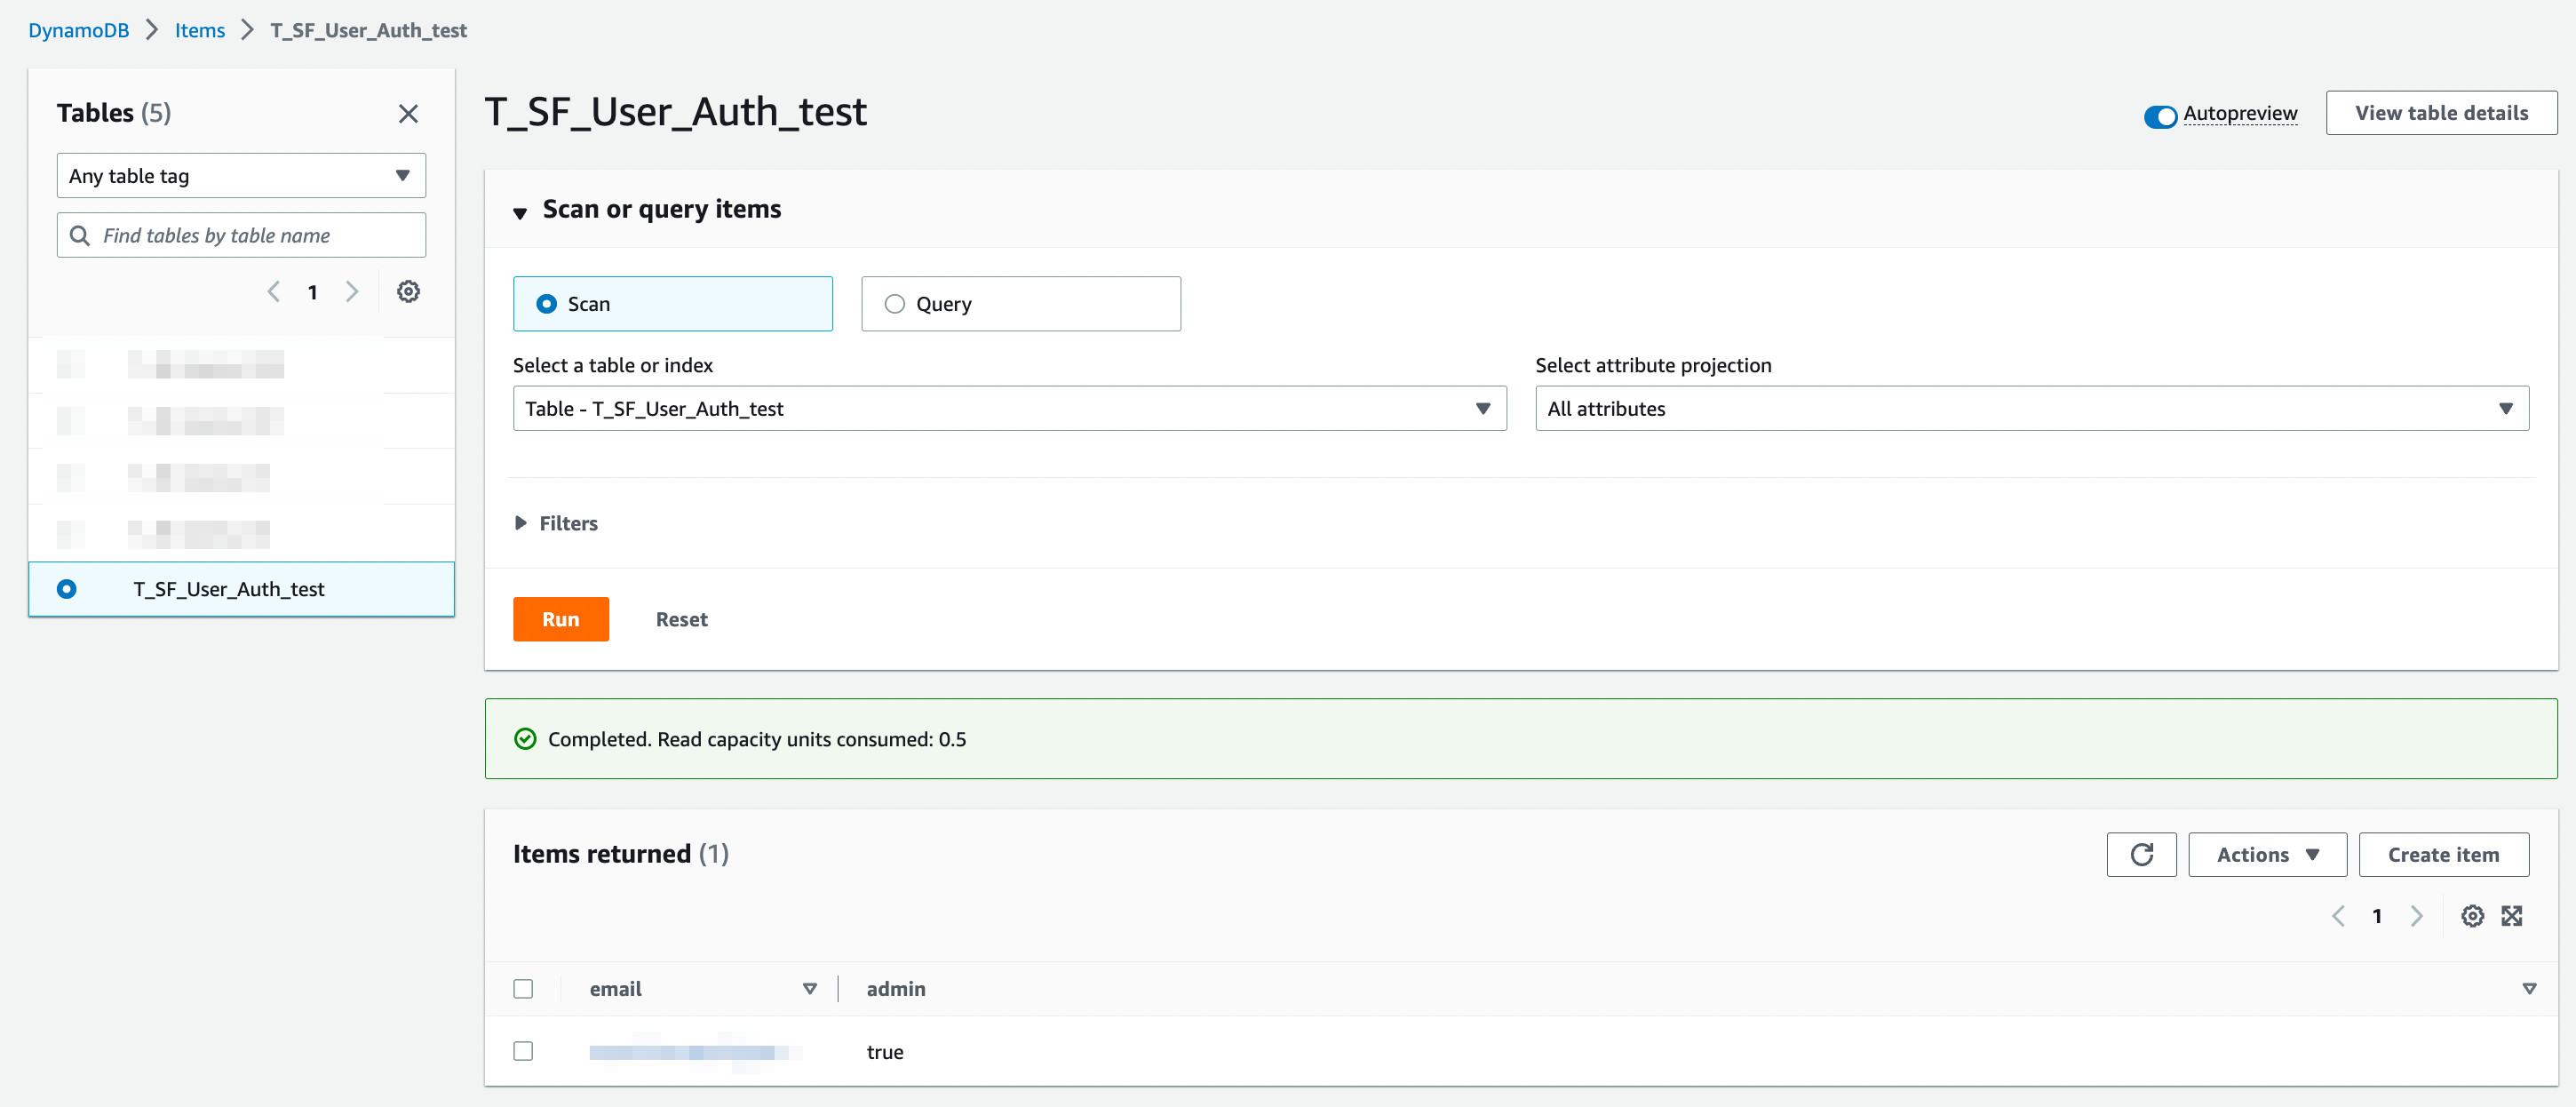
Go to the DynamoDB in the AWS console. Click on Tables. You will see the table 'T_SF_User_Auth_test' created.
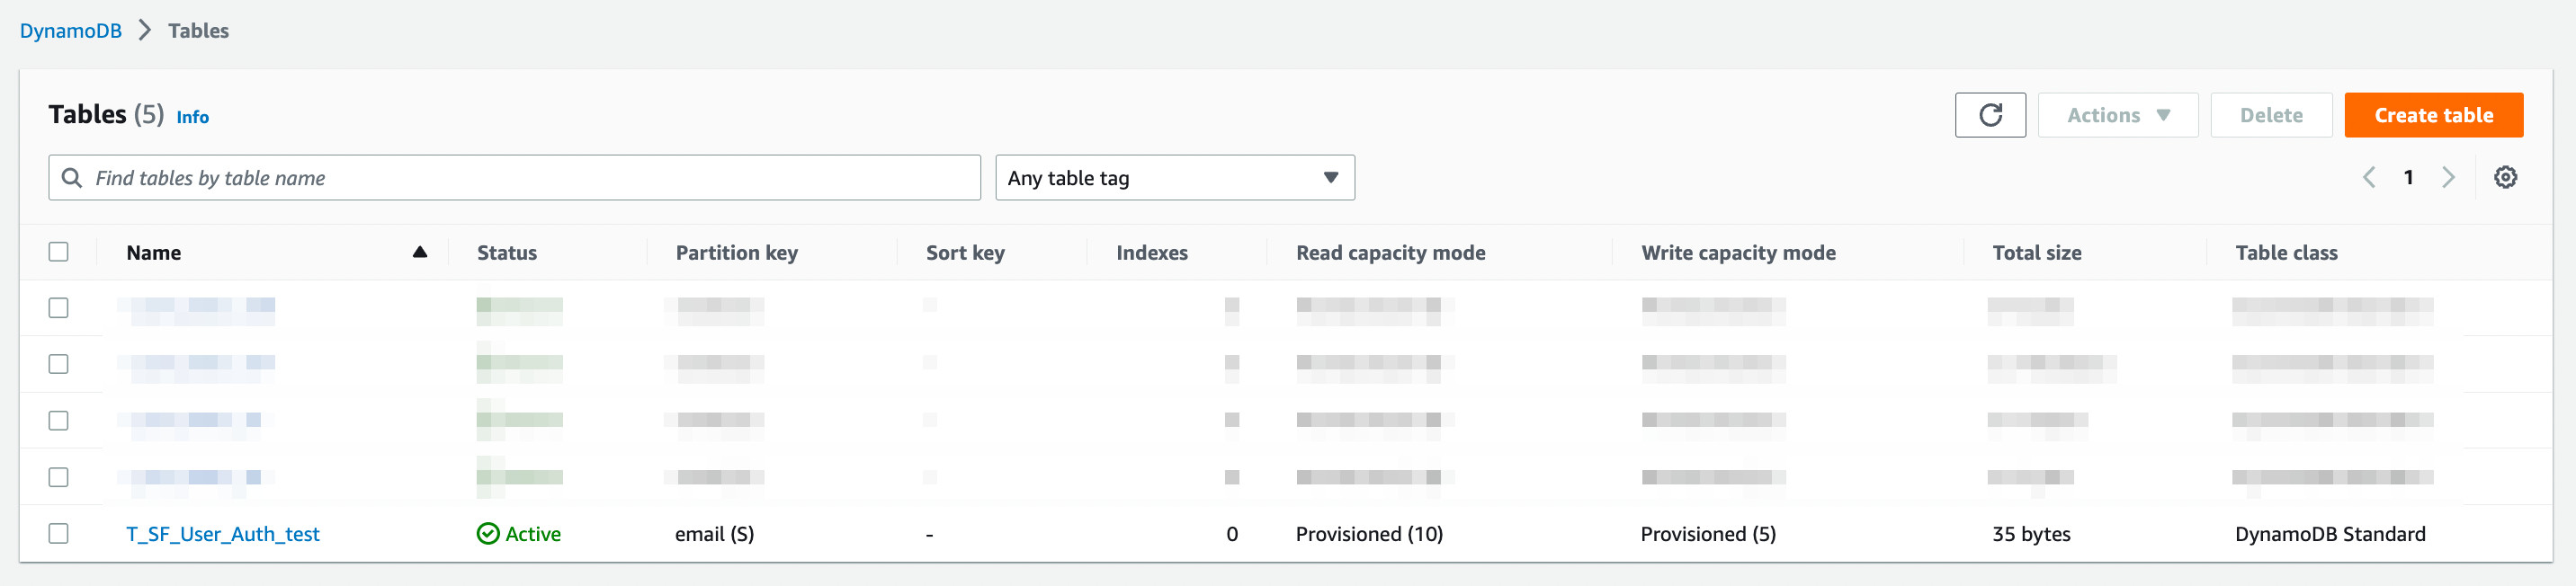
Click on the table 'T_SF_User_Auth_test'. Then click on Explore Items. You will see that one record with the admin email that you provided, is created and its admin flag is set to true.
Arriving at this point, we can conclude that the backend has been set up and configured properly. It is now time to go back and work on the frontend.
Update dist/auth.html with the following code. This piece of code:
-
Creates a container div
-
Includes the SfUserAuth component (which is already imported in dist/index.html)
<div class="cContainer">
    <sf-user-auth id="sf_auth" appName="Superflows" apiId="<api-id>" logo="https://superflows-images.s3.ap-south-1.amazonaws.com/superflows_black_transparent_200.png">
        <div slot="privacy">
            <h1>Privacy</h1>
            <p>Privacy policy goes here
        </div>
        <div slot="terms">
            <h1>Terms</h1>
            <p>Terms & Conditions go here
        </div>
    </sf-user-auth>
</div>
<script>
    document.querySelector('#sf_auth').onArgs = getCurrentArgs;
</script>
💾 ↺ Save dist/auth.html, and reload the browser.
Click on the Sign In Button in the navigation bar. You will be redirected to the Sign In page of the authentication microservice. This indicates that the SfUserAuth component has been integrated properly in the frontend.
SfUserAuth triggers the following events:
-
accessTokenReceived - after successful sign-in, this event is triggered. The payload of this event contains the access token, which can be used for further operations.
-
signedOut - after successful sign-out
It is the responsibility of the enclosing HTML app to subscribe to these events and do the needful handling.
When the SfUserAuth module triggers the accessTokenReceived event, the access token obtained from its payload should be stored in a memory variable. It should never be stored in permanent storage such as cookies, or local storage. If the access token expires, control should be transferred back to the SfUserAuth component. It maintains a refresh token internally and issues a new access token using it.
After every hard refresh, it is the responsibility of the HTML app to transfer the control to the SfUserAuth module and obtain the access token. If the access token is obtained successfully, sign-in is valid and the navigation bar should be updated by showing the profile image and the profile menu. If the access token is expired and cannot be refreshed even by the refresh token, it declines to provide the access token to the HTML app. It triggers the signedOut event instead. Should such a scenario arise, the HTML app should implement its sign-out protocol and update its navigation bar and hide the profile section.
Modified dist/index.html:
<!DOCTYPE html>
<html>
<head>
<meta charset="utf-8" />
<meta name="viewport" content="width=device-width, initial-scale=1">
<title><sf-nav> Demo</title>
<!-- Integration material icons as they are used in sf-nav -->
<link href="https://fonts.googleapis.com/icon?family=Material+Icons" rel="stylesheet">
<!-- Google fonts integration -->
<link rel="preconnect" href="https://fonts.googleapis.com">
<link rel="preconnect" href="https://fonts.gstatic.com" crossorigin>
<link href="https://fonts.googleapis.com/css2?family=Source+Sans+Pro:wght@200;300;400;600&display=swap" rel="stylesheet">
<!-- Integration the web components module -->
<script src="https://unpkg.com/@webcomponents/webcomponentsjs@latest/webcomponents-loader.js"></script>
<!-- Integration lit and sf-nav web components module -->
<script type="module">
import {LitElement, html, css} from 'https://unpkg.com/lit-element/lit-element.js?module';
import {SfNav} from 'https://unpkg.com/sf-nav/sf-nav.js?module';
import {SfUserAuth} from 'https://unpkg.com/sf-user-auth@1.0.69/sf-user-auth.js?module';
</script>
<style>
body {
background-color: #efefef;
margin: 0px;
font-family: 'Source Sans Pro';
}
sf-nav:not(:defined) {
display: none;
}
.cContainer {
margin: 10px;
padding: 20px;
border: dashed 1px gray;
background-color: white;
}
</style>
</head>
<body style="margin: 0px;">
<div id="nav-container">
<sf-nav id="sf-nav">
<!-- Set the brand name -->
<h2 slot="brandName"><a href="#home" >Superflows</a></h2>
<!-- Set the brand logo -->
<a slot="brandImage" href="#home" ><img alt="logo" src="https://superflows-images.s3.ap-south-1.amazonaws.com/superflows_black_transparent_200.png" /></a>
<!-- Page Content -->
<div slot="content">
</div>
<!-- Call to action -->
<a slot="cta" href="#auth/signin">Sign In</a>
<!-- Copyright notice -->
<p slot="copyright">Copyright 2022 Superflows</p>
<!-- Set the social media links -->
<ul slot="socialMedia">
<li><a href="https://facebook.com"><img src="https://superflows-images.s3.ap-south-1.amazonaws.com/facebook-black_round.png" /></a></li>
<li><a href="https://twitter.com"><img src="https://superflows-images.s3.ap-south-1.amazonaws.com/twitter_black_round.png" /></a></li>
<li><a href="https://youtube.com"><img src="https://superflows-images.s3.ap-south-1.amazonaws.com/youtube_black_round.png" /></a></li>
</ul>
</sf-nav>
</div>
<script>
//
// Navigation bar related Javascript
//
// Hash map for storing paths & arguments
var routeMap = [];
// Menu HTML to be inserted into sf-nav
const menu = `
<!-- Set the main menu -->
<ul slot="mainMenu">
<li><a href="#about">About</a></li>
<li class="li-solutions">
<a href="javascript:void(0);" class="a-solutions">Solutions</a>
<ul>
<li><a href="#services">Services</a></li>
<li><a href="#products">Products</a></li>
</ul>
</li>
<li>
<a href="javascript:void(0);">Contact Us</a>
<ul>
<li><a href="https://instagram.com">Instagram</a></li>
<li><a href="https://facebook.com">Facebook</a></li>
<li><a href="https://youtube.com">YouTube</a></li>
</ul>
</li>
</ul>
`;
// Profile menu HTML to be inserted into sf-nav
const profileMenu = `
<ul id="profile-menu" slot="profileMenu">
<li>
<a href="#auth/signout">Sign Out</a>
</li>
</ul>
`;
// Profile image HTML to be inserted into sf-nav
const profileImg = `
<img id="profile-img" alt="profile" slot="profilePicture" src="https://superflows-images.s3.ap-south-1.amazonaws.com/user.png" />
`;
// What's the current path?
function getCurrentPathName() {
return window.location.hash.length === 0 ? '' : window.location.hash.split("/")[0].replace('#', '');
}
// What are the current arguments?
function getCurrentArgs() {
return routeMap[getCurrentPathName() + '.html'];
}
// Initiate navigation bar listeners
function initiateListeners() {
document.getElementsByTagName('sf-nav')[0].addEventListener('searchClick', (e) => {console.log('hurray ' + JSON.stringify(e.detail));})
document.getElementsByTagName('sf-nav')[0].addEventListener('routeChange', (e) => {
routeMap[e.detail.pathName] = e.detail.args;
})
}
//
// Handling the authentication
//
// Initiate the menu (first load)
function insertSfNavMenu() {
const currentInnerHTML = document.getElementsByTagName('sf-nav')[0].innerHTML;
const newInnerHTML = currentInnerHTML + menu;
document.getElementById('nav-container').innerHTML = '<sf-nav>' + newInnerHTML + '</sf-nav>';
initiateListeners();
}
// Update the navigation bar after sign in successful
function insertSignInSfNavMenu() {
window.location.hash='#home';
setTimeout(() => {
const currentInnerHTML = document.getElementsByTagName('sf-nav')[0].innerHTML;
console.log(currentInnerHTML);
const newInnerHTML = currentInnerHTML + (currentInnerHTML.indexOf('profilePicture') < 0 ? profileImg : "") + menu + profileMenu;
document.getElementById('nav-container').innerHTML = '<sf-nav>' + newInnerHTML + '</sf-nav>';
initiateListeners();
}, 500);
}
// Update the navigation bar after sign out successful
function insertSignOutSfNavMenu() {
window.location.hash='#home';
setTimeout(() => {
if(document.getElementById('profile-img') != null) {
document.getElementById('profile-img').outerHTML = '';
const currentInnerHTML = document.getElementsByTagName('sf-nav')[0].innerHTML;
const newInnerHTML = currentInnerHTML + menu;
document.getElementById('nav-container').innerHTML = '<sf-nav>' + newInnerHTML + '</sf-nav>';
initiateListeners();
}
}, 500);
}
function initPage() {
insertSfNavMenu();
window.location.hash = '#auth';
}
initPage();
</script>
</body>
</html>Modified dist/auth.html
<div class="cContainer">
    <sf-user-auth id="sf_auth" appName="Superflows" apiId="bdbdff3oa9" logo="https://superflows-images.s3.ap-south-1.amazonaws.com/superflows_black_transparent_200.png">
        <div slot="privacy">
            <h1>Privacy</h1>
            <p>Privacy policy goes here
        </div>
        <div slot="terms">
            <h1>Terms</h1>
            <p>Terms & Conditions go here
        </div>
    </sf-user-auth>
</div>
<script>

    var accessToken;

    document.querySelector('#sf_auth').onArgs = getCurrentArgs;
    document.getElementsByTagName('sf-user-auth')[0].addEventListener('accessTokenReceived', (e) => {
        accessToken = e.detail.accessToken.token;
        insertSignInSfNavMenu();
        //console.log('setting hash');

    })
    document.getElementsByTagName('sf-user-auth')[0].addEventListener('signedOut', (e) => {
        insertSignOutSfNavMenu();
    })
</script>We still haven't connected the backend to the frontend. Go to AWS API Gateway and note the API ID of 'API_SF_User_Auth_test'.

Copy this API ID and paste it into the apiId property of the sf-user-auth component.
This connects the SfUserAuth component, the frontend of the microservice to the API Gateway, which is the backend of the microservice.
Reload the browser.
Click on the sign-in button in the navigation bar. The sign-in page of the auth module will load. Enter any random email address in the email input and submit. Since that email does not exist in the database, 'Account does not exist!' error will be thrown. If this error is thrown, you can safely assume that the frontend-backend connection has been done properly and the microservice is ready to be used in test mode.
Something like this should be shown:

AWS's Simple Email Service (SES) is used for sending one-time passwords via emails. SES works in two modes - (1) Sandbox (used for testing) and (2) Production. In the sandbox mode, SES only delivers emails to verified email addresses. So all those email addresses, which you'll be using for receiving OTPs during testing, need to be manually added into SES and then subsequently verified as well.
Go to AWS > SES. Something like this should show up:

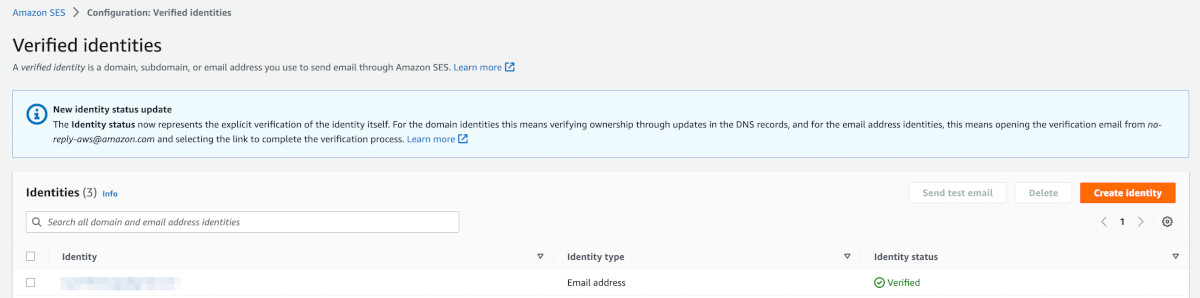
Click on the Left sidebar> Configuration > Verified identities.
A list of verified emails would show up. It will most probably contain one verified identity, your correspondence email address, which you verified in Step 9.
Click on 'Create identity'.
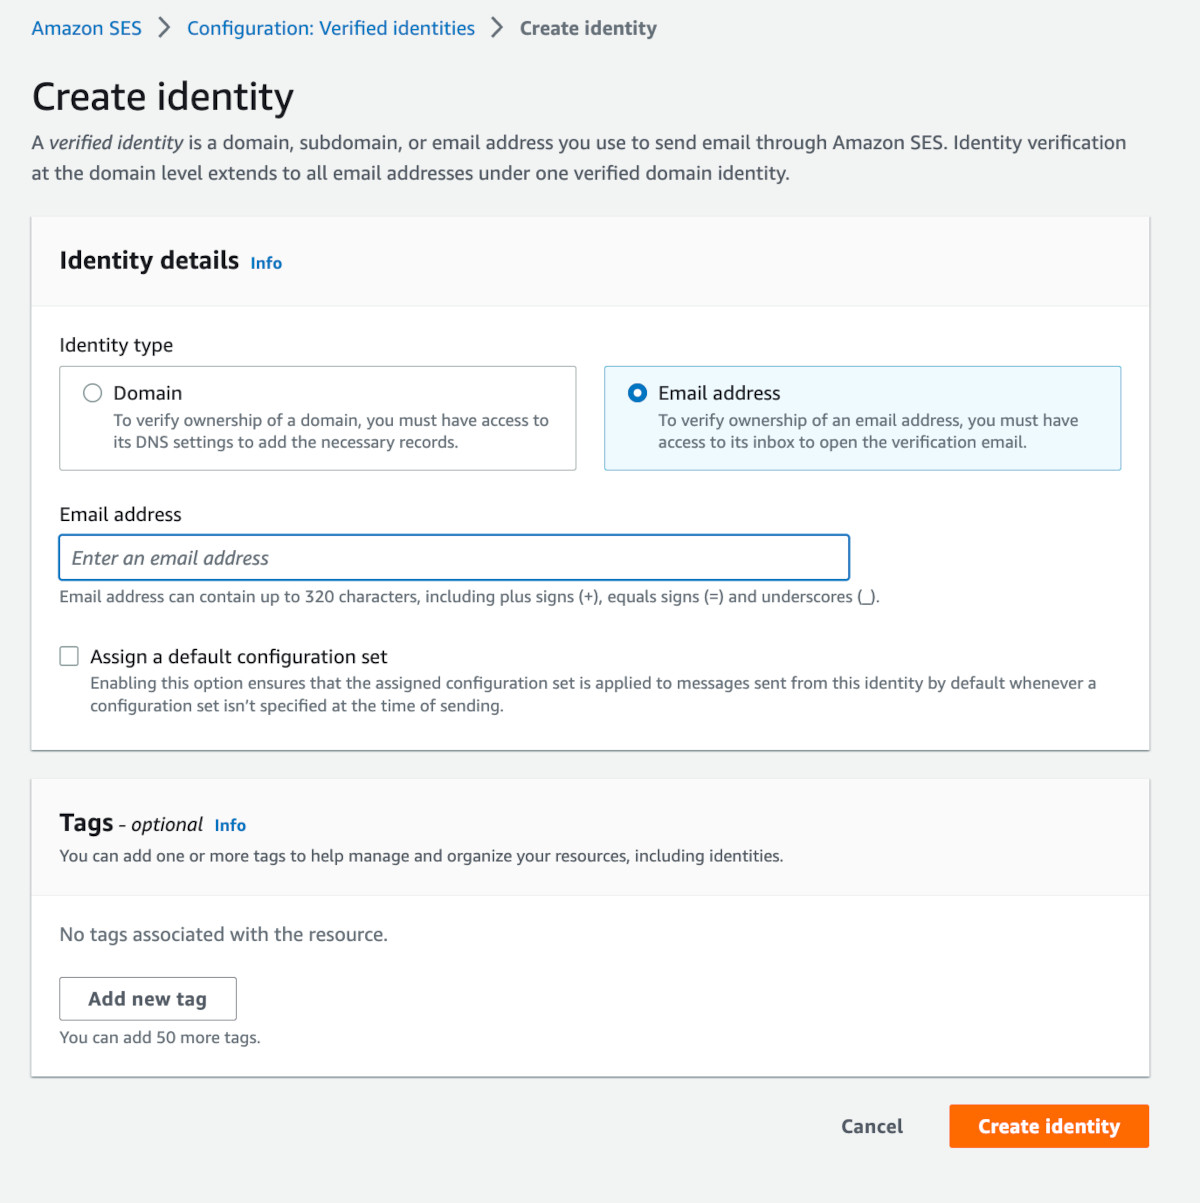
The Create identity page will open up. Choose 'Email address' as the option and enter the email address on which, you wish to receive the OTP, during testing.
Then click the 'Create identity' button. Post this, an email will be sent to the email address with a verification link. Click on it and complete the verification process.
Repeat this process for all the other email addresses, you wish to use during testing.
You are already on the sign-in page at the end of Step 11. Let us start by creating a new account. Click on the Sign-Up link at the bottom. It will take you to the Sign Up page.
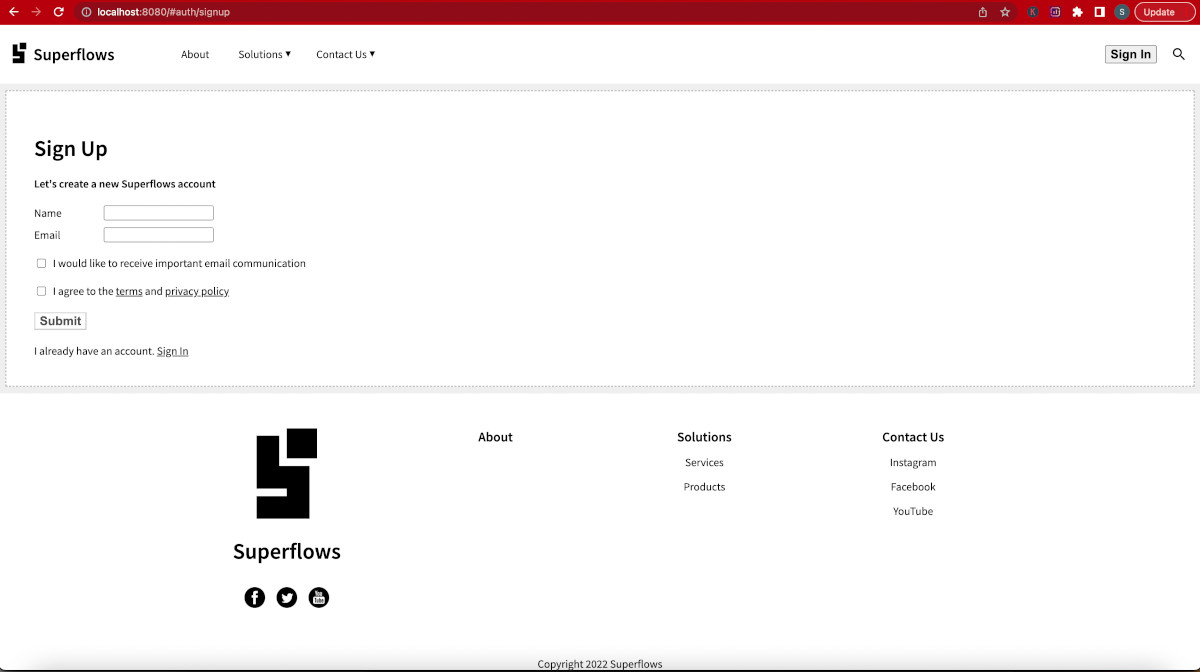
Fill up the sign-up form. While filling up, you will notice that the client-side and server-side error handling has already been implemented.
Tip
Please use the email address, you verified in step 12 for testing the sign-up flow. Since your AWS SES is in development mode at the moment, it is capable of delivering emails to only verified identities.
You can also try using the admin email address, you provided in Step 8. It will throw an error as it already exists in the database.
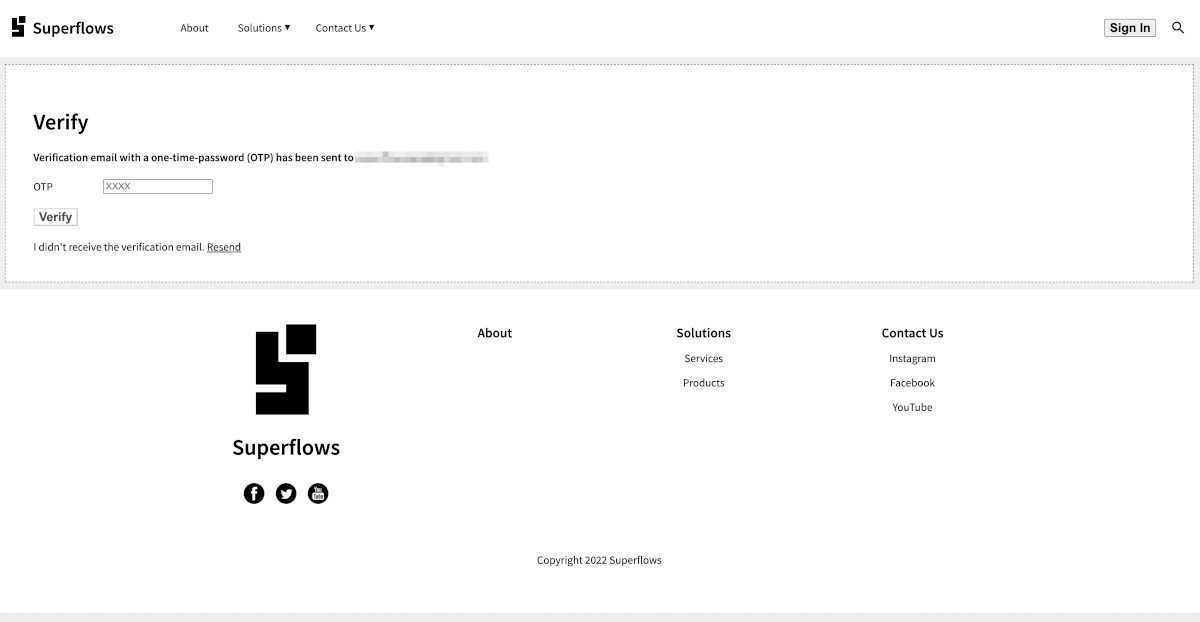
Press submit. If all goes well, a new account for that email address will be created in the backend. A one-time password will be emailed and the user will be taken to the OTP page.
The OTP page will look something like this:
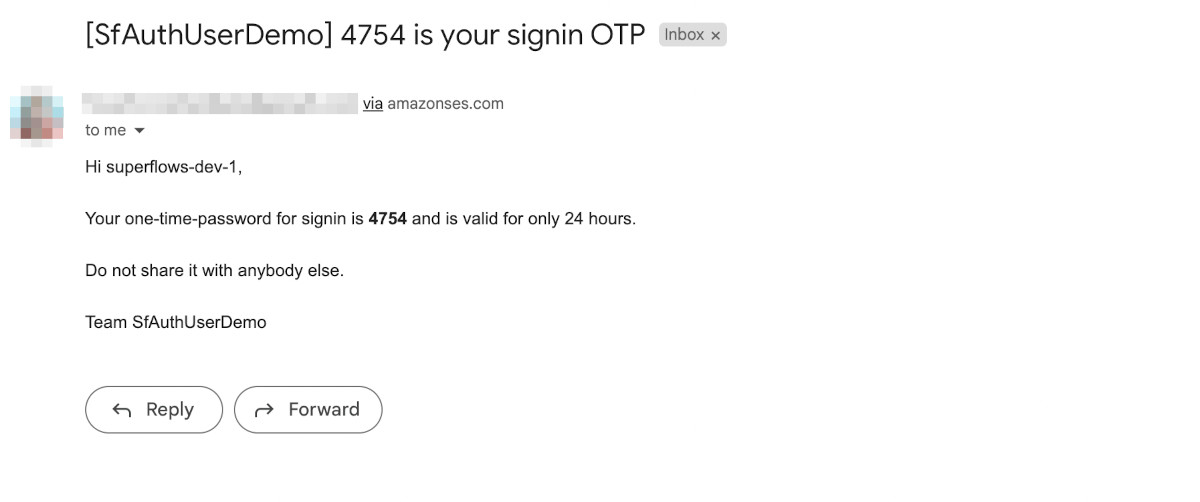
The OTP email will look something like this:
Enter the OTP and press submit. If the entered OTP is valid and correct, the home page will be loaded. Pay particular attention to the navigation bar, where the profile section has been added.
Click on the profile picture dropdown. You will see the sign-out option as a part of the profile menu:
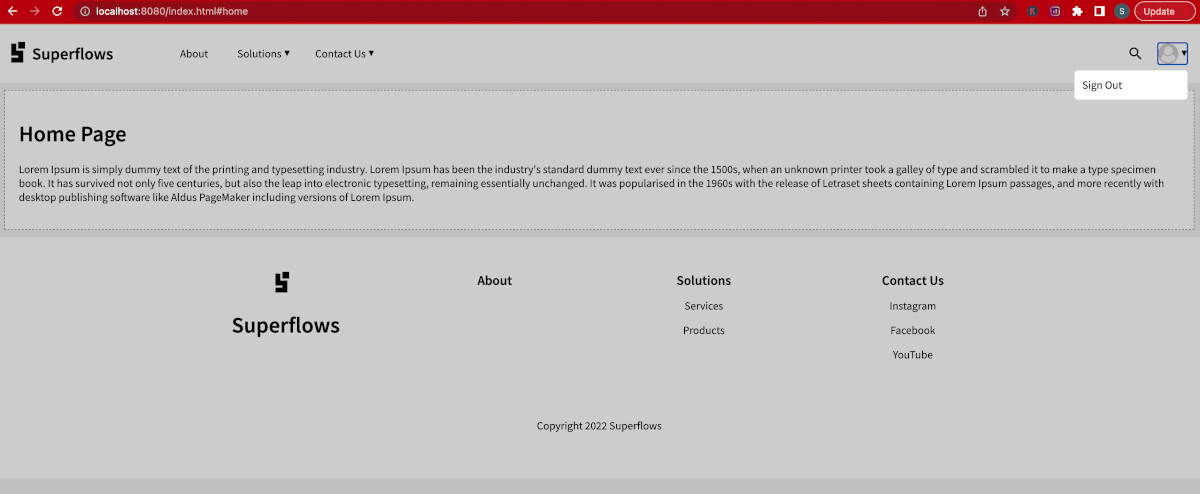
Click on Sign Out and confirm that it indeed signs out.
The authentication microservice provides 6 API endpoints:
-
signin - triggers and email with OTP if email already exists
-
signup - if the email doesn't exist, create an account and then trigger an email with OTP
-
verify - verifies the OTP, returns the refresh token if successful
-
validate - validates the access token
-
refresh - generates a new access token from the refresh token
-
resend - resends the OTP on email
Click this link to understand the API documentation.
To understand the finer transactions of the SfUserAuth microservice, please study the sequence diagram given below.
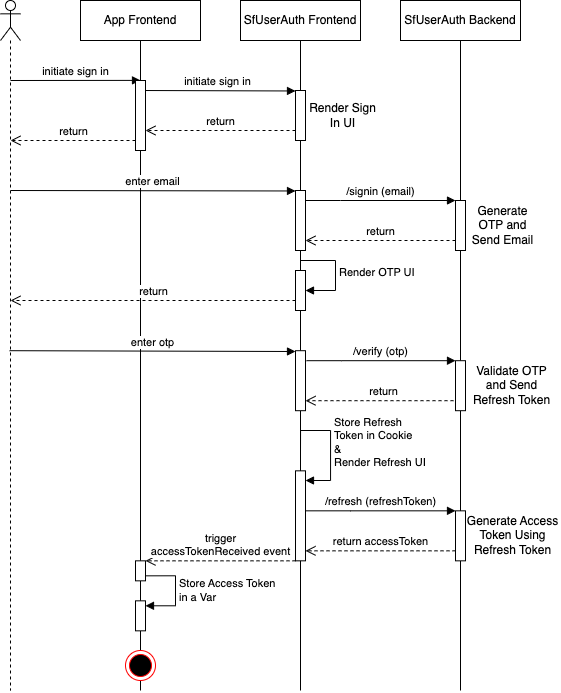
The diagram details the happy flow of the sign-in functionality. From sign-in initiation to the reception of the access token.
-
After you receive the access token, you should store it in your main memory and use it in your application APIs.
-
Treat the SfUserAuth microservice as your authentication service.
-
With every API request to your application backend, send the email and the accessToken.
-
For API requests that need authentication, your application backend can extract the email and the access token from the requests and then authenticate them with the SfUserAuth microservice backend directly, by using the /validate API endpoint. The API documentation is given here.
Firstly, congratulations on reaching this step! 🏆
Moving to production now is easier than you can imagine!
Go to step 8. Change the backend deployment script as follows:
###########
# Script Config
###########

adminemail=<your admin email from production>
correspondenceemail=<your correspondence email from production>
awsregion=<your aws region for production>
awsaccount=<your aws account>
apistage=prod
weborigin=<your frontend deployment url for production>
appname=<your app name for production>
tablename=T_SF_User_Auth_prod
rolename=R_SF_User_Auth_prod
policyname=P_SF_User_Auth_prod
functionname=F_SF_User_Auth_prod
api=API_SF_User_Auth_prod

###########
# Script Config Ends
###########
Complete steps 8, 9 and 10. Your production backend will be ready. You will have a new API ID for production.
At this step, you will essentially have two parallel deployments. The first deployment is your test deployment and the second deployment will be your production deployment.
In your production-code/dist/auth.html, just replace the apiId of the SfUserAuth component with the production API ID, you received at the end of step 18.1.
<sf-user-auth id="sf_auth" appName="Superflows" apiId="<production-api-id>" logo="<app-logo>">
        <div slot="privacy">
            <h1>Privacy</h1>
            <p>Privacy policy goes here
        </div>
        <div slot="terms">
            <h1>Terms</h1>
            <p>Terms & Conditions go here
        </div>
</sf-user-auth>As depicted in Step 12, the AWS SES service, which is used for sending emails, is by default in sandbox mode. This means that you can send emails to only verified identities.
Once you move to production, you will need unrestricted email sending. To enable that, go to AWS > SES, click on 'Request Production Access' and complete the steps to enable production access.
Congratulations! You are in production. 🍺 Cheers! -
This helps you set up the authentication microservice on an 'auto-scalable' and 'serverless' AWS backend.
-
Backend coding know-how is not required. Even a single junior frontend developer can make things happen.
Adding some resources below for your convenience.
Tests can be run with the test script.
npm test- Chromium: |██████████████████████████████| 11/11 test files | 32 passed, 0 failed
- Firefox: |██████████████████████████████| 11/11 test files | 32 passed, 0 failed
- Webkit: |██████████████████████████████| 11/11 test files | 32 passed, 0 failed
Code coverage: 99 % (Overall) 100% (Main flow)
To run the dev server and open the project in a new browser tab:
npm run serveThere is a development HTML file located at /dev/index.html that you can view at http://localhost:8000/dev/index.html. Note that this command will serve your code using Lit's development mode (with more verbose errors). To serve your code against Lit's production mode, use npm run serve:prod.
MIT © superflows-dev
