Tutorial
This tutorial is an introduction to userlevel FastClick. It does not especially focus on high-speed and hence is also applicable to good old Click. Once accustomed to the usage of FastClick, see the high-speed I/O page for high-speed considerations.
Configure and compile FastClick in userlevel mode, with multi-threading enabled.
./configure --enable-userlevel --disable-linuxmodule --enable-user-multithread
make
FastClick will be built in bin/click, sudo make install will make it available system-wide. If you're going to develop in Click, this is not necessarly a good idea as you may have difference in includes.
FastClick uses simple configuration files that describe a pipeline of elements packets must follow, more exactly, a graph.
Eg, the following configuration file :
FromDevice(eth0) -> Print -> Queue -> ToDevice(eth1)
Would produce an internal graph like this one :
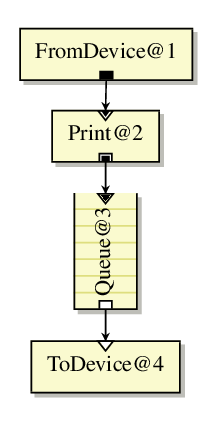
Elements are piped together using the ->arrow syntax. Elements can be named using the syntax name :: Element(...). The following configuration is identical to the first one :
fd  :: FromDevice(eth0);
td  :: ToDevice(eth1);
fd -> p :: Print -> Queue -> td ;
Running Click with those configurations would display all packets coming from the interface eth0 and forward them through eth1. But let's not get ahead of ourselves. In the first part of this tutorial, we will only use virtual devices (host interfaces) so anyone can run these examples without the need for multiple real network cards.
This link will provide more information about the Click language. You may want to go through this resource at the end of the tutorial.
Assuming you wrote one of the configuration above in a file named "router.click", you can launch Click with :
> bin/click router.click
You can also directly launch click with the configuration given as a string:
> bin/click -e "FromDevice(eth0) -> Print -> Queue -> ToDevice(eth1)"
The first configuration will be one which creates a virtual interface in your host, which will respond to pings to some addresses as if a real host was attached in a network "behind" the virtual interface.
The following configuration will create a virtual interface, print all packets sent from your computer to it, then discard the packets.
Idle -> tap :: KernelTap(10.100.0.1/24, DEVNAME vEth1) -> Print() -> Discard;
The Idle element is necessary because Click knows that the KernelTap element may receive packets (that would be sent to your host). If nothing was piped to the tap element, Click would refuse to run because it is most likely a misconfiguration. We, therefore, pipe the Idle element, that will be ... idle. But Click will see that some element is attached to tap, and therefore be happier.
To run the configuration, assuming you put the content of the block above in a file named CONFIG, you can launch :
> sudo bin/click CONFIGSuperUser is needed to create a TAP device. Click himself does not require root access. At this point, you will probably see some packets going through. Your host is probably sending DHCP requests, LLDP packets, etc.
If you try to ping a host on the subnet of this TAP interface, packets will appear in Click. Eg :
ping 10.100.0.2
Click will display lines like this one :
> sudo bin/click CONFIG
  90 | 33330000 0016eea6 9cdb3322 86dd6000 00000024 00010000
  54 | 01005e00 0016eea6 9cdb3322 080046c0 00280000 40000102
  90 | 33330000 0016eea6 9cdb3322 86dd6000 00000024 00010000
  42 | ffffffff ffffeea6 9cdb3322 08060001 08000604 0002eea6
But those packets are not ICMP, they are ARP packets trying to find the MAC address of 10.100.0.2. Therefore our configuration needs to be able to respond to ARP packets before ICMP ones.
define ($ip 10.100.0.2,
        $mac aa:aa:aa:aa:aa:aa)

Idle -> tap :: KernelTap(10.100.0.1/24, DEVNAME vEth1) ;
tap -> c :: Classifier(12/0806 20/0001, 12/0806 20/0002, 12/0800, -);

//Answer to ARP requests
c[0] -> ARPResponder( $ip  $mac)  -> tap ;
//Discard ARP replies for now
c[1] -> Discard;
//Print IP packets
c[2] -> Print("IP", -1) -> Discard;
//Discard non-IP, non-ARP packets
c[3] -> Discard;
This example introduces the Define element. It allows setting some variable that can be used later in the configuration. Variables can be overridden with the command line, making it useful for prototyping bin/click CONFIG ip=10.200.0.5. The Classifier element will emit packets to different outputs (edges of the graph starting from the classifier element) according to some rules passed as parameters. 12/0806 means the 2 bytes 0x0806 at offset 12, which happen to be the ethertype field, 0x0806 being the value for ARP packets. Similarly, 20/0001 defines ARP requests while 20/0002 is for ARP responses. 12/0800 is IPv4. All other packets will be sent to the last output. When not specified, the arrow syntax will "branch" output 0 of elements. The syntax c[2] -> will specify that the output number 2 of the element named "c" should be piped to the element at the right of the arrow.
Now, Click will get the ARP request, answer to it and then you'll see the proper ICMP echo request. To display the full content of the packet, you may pass MAXLENGTH -1 to the Print element.
> sudo bin/click CONFIG
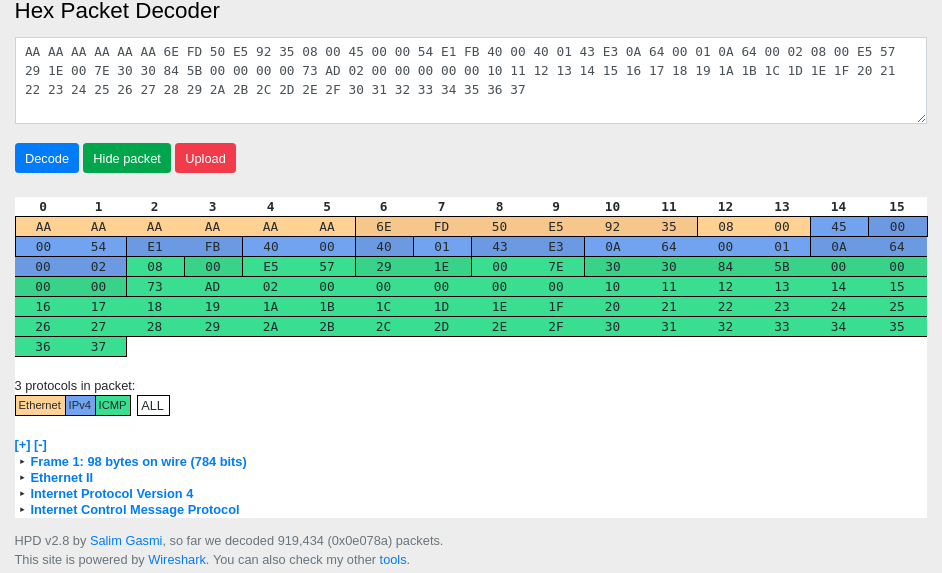
IP: 98 | aaaaaaaa aaaa6efd 50e59235 08004500 0054de59 40004001 47850a64 00010a64 00020800 bfb6291e 007d2f30 845b0000 00009a4f 02000000 00001011 12131415 16171819 1a1b1c1d 1e1f2021 22232425 26272829 2a2b2c2d 2e2f3031 32333435 3637The website Hex Packet Decoder may come very handy to parse packets from this raw data.
Now, let's focus on the ICMP responder.
define ($ip 10.100.0.2,
        $mac aa:aa:aa:aa:aa:aa)

Idle -> tap :: KernelTap(10.100.0.1/24, DEVNAME vEth1) ;
tap -> c :: Classifier(12/0806 20/0001, 12/0806 20/0002, 12/0800, -);

//Answer to ARP requests
c[0] -> ARPResponder( $ip  $mac)  -> tap ;
//Discard ARP replies for now
c[1] -> [1]arp :: ARPQuerier($ip, $mac) -> tap;

//Handle pings
c[2] -> Strip(14) -> CheckIPHeader -> ip  :: IPClassifier(proto icmp && icmp type echo, -);
ip[0] -> ICMPPingResponder -> arp -> tap;
ip[1] -> IPPrint -> Discard;

//Discard non-IP, non-ARP packets
c[3] -> Discard;
IP packets now go to Strip, that will remove the Ethernet header. CheckIPHeader will ensure the IP packet is correct and set the annotations of the packets so it is recognised as an IP packet. IPClassifier is a convenient version of Classifier, that allows using standard names instead of offsets as with Classifier. ICMP echo requests are given to ICMPPingResponder, while other IP packets are passed to IPPrint. ICMP responses are in turn forwarded to ARPQuerier. ARPQuerier emits ARP request to discover the ip address of the specified destination. In this case, ICMPPingResponder forges a request for your host, 10.100.0.1. As it is the first time this IP is seen, the ARP querier will emit a request. Classifier[2] will redirect replies to the special second port of ARPQuerier made to receive responses.
Note that we replace Print with IPPrint. IPPrint gives us a more human-readable input for TCP, ICMP and UDP packets.
> sudo bin/click CONFIG
1535390884.495460730: 10.100.0.1 > 224.0.0.22: ip-proto-2
1535390884.593490365: 10.100.0.1.5353 > 224.0.0.251.5353: udp 143
1535390884.673790291: 10.100.0.1.5353 > 224.0.0.251.5353: udp 94
[...]
> ping 10.100.0.2
PING 10.100.0.2 (10.100.0.2) 56(84) bytes of data.
64 bytes from 10.100.0.2: icmp_seq=1 ttl=255 time=0.100 ms
64 bytes from 10.100.0.2: icmp_seq=2 ttl=255 time=0.070 ms
[...]
This tutorial is to be continued with multi-threading and more evolved examples.