The ESP8266 is a microcontroller developed by Espressif Systems. Known as a WiFi Module, this microcontroller has the ability to perform WiFi related activities like Internet of things applications and home automation. Ranging in price and features, there are many types of ESP8266 modules available, but all of them are incredibly useful for IoT world.
- An ESP8266 module.
- An Arduino UNO, UartSBee or any Uart to USB device.
- Arduino IDE 1.6.5 or higher
- Ubidots library
- Jumper wires.
NOTE: This library is also compatible with the NodeMcu v1.0, please refer to our help center to find guides and examples codes.
- identify the pinout of ESP8266.
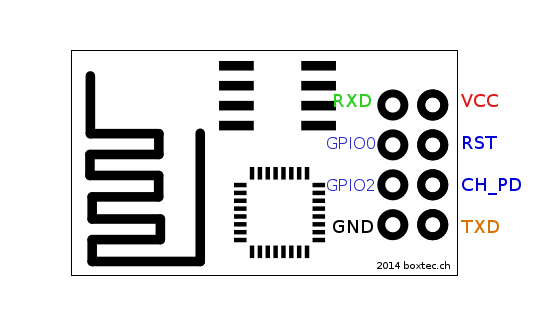
| ESP8266 | UARTbee | Arduino UNO |
|---|---|---|
| RXD | TXD | RX |
| GPIO0 | GND | GND |
| GPIO2 | — | — |
| GND | GND | GND |
| VCC | 3.3V | 3.3V |
| RST | — | — |
| CH_PD | 3.3V | 3.3V |
| TXD | RXD | TX |
Note: If you are using an Arduino UNO you will need to set Arduino RST to GND. Please be careful with the VCC of the ESP8266, it works only with a 3.3V supply.
- Download the Arduino IDE.
- Open you IDE and click on File -> Preferences.
- In additional Boards Manager URLs add this line and click the "OK" button: “http://arduino.esp8266.com/stable/package_esp8266com_index.json”
- Open the Boards Manager from Tools -> Board menu and install esp8266 platform.
- Select the ESP8266 board from Tools > Board > Generic ESP8266 Module.
- Download the Ubidots library here.
- Now, click on Sketch -> Include Library -> Add .ZIP Library.
- Select the .ZIP file of Ubidots and then "Accept" or "Choose".
- Close the Arduino IDE and open it again.
Ubidots(const char* token, UbiServer server, IotProtocol iot_protocol)
Creates an Ubidots instance.
NOTE: If you use HTTP or TCP to send data, the client will implement TLS 2.0 using the native ESP8266 secure client to secure your data. Keep in mind that due to the security checks needed, the packet may take a little more time to be sent than without TLS. If you wish to send data insecurely, use UDP or any of the available examples at our docs.
As Ubidots makes its best to secure your data, we do not guarantee any issue, data miss or external sniff coming from the native secure client or bugs in the library.
- @token, [Required]. Your Ubidots unique account TOKEN.
- @server, [Optional], [Options] = [
UBI_INDUSTRIAL,UBI_EDUCATIONAL], [Default] =UBI_INDUSTRIAL. The server to send data, setUBI_EDUCATIONALif your account is educational type. - @iot_protocol, [Optional], [Options] = [
UBI_HTTP,UBI_TCP,UBI_UDP], [Default] =UBI_TCP. The IoT protocol that you will use to send or retrieve data.
void add(const char *variable_label, double value, char *context, unsigned long dot_timestamp_seconds, unsigned int dot_timestamp_millis)
Adds a dot with its related value, context and timestamp to be sent to a certain data source.
Important: The max payload length is 700 bytes, if your payload is greater it won't be properly sent. You can see on your serial console the payload to send if you call the setDebug(bool debug) method and pass a true value to it.
- @variable_label, [Required]. The label of the variable where the dot will be stored.
- @value, [Required]. The value of the dot.
- @context, [Optional]. The dot's context.
- @dot_timestamp_seconds, [Optional]. The dot's timestamp in seconds.
- @dot_timestamp_millis, [Optional]. The dot's timestamp number of milliseconds. If the timestamp's milliseconds values is not set, the seconds will be multplied by 1000.
float get(const char* device_label, const char* variable_label)
Returns as float the last value of the dot from the variable.
- @device_label, [Required]. The device label which contains the variable to retrieve values from.
- @variable_label, [Required]. The variable label to retrieve values from.
void addContext(char *key_label, char *key_value)
Adds to local memory a new key-value context key. The method inputs must be char pointers. The method allows to store up to 10 key-value pairs.
- @key_label, [Required]. The key context label to store values.
- @key_value, [Required]. The key pair value.
void getContext(char *context)
Builds the context according to the chosen protocol and stores it in the context char pointer.
- @context, [Required]. A char pointer where the context will be stored.
void setDebug(bool debug)
Makes available debug messages through the serial port.
- @debug, [Required]. Boolean type to turn off/on debug messages.
bool send(const char* device_label, const char* device_name);
Sends all the data added using the add() method. Returns true if the data was sent.
- @device_label, [Optional], [Default] = Device's MAC Address. The device label to send data. If not set, the device's MAC address will be used.
- @device_name, [Optional], [Default] = @device_label. The device name otherwise assigned if the device doesn't already exist in your Ubidots account. If not set, the device label parameter will be used. NOTE: Device name is only supported through TCP/UDP, if you use another protocol, the device name will be the same as device label.
bool wifiConnect(const char* ssid, const char* password)
Attempts to connect to the cloud using WiFi with the specified credentials.
- @ssid, [Optional], [Required]. WiFi SSID to connect to name.
- @password, [Required]. WiFi password credential.
bool wifiConnected()
Returns true if the device is connected to the cloud using WiFi.
bool serverConnected();
Returns true if the device has a socket opened with Ubidots.
void setDeviceType(const char* deviceType)
Sets a device type to be added in your request. This method works only if you set HTTP as iot protocol in your instance constructor.
Refer to the examples folder