

Redux is a popular JavaScript library for managing the state of your application. It is very common and if you are working with React, chances are — you’ve already heard about it.
state is: it’s like a global object which holds information that you use for various purposes later in the app (e.g. making decisions on which components to render and when, rendering the stored data etc).
In Redux You don't actually change the state, you create updated copies of the state. This is probably one of the most important things to understand about Redux's state changing pattern, make sure you commit it to memory.
A store holds the whole state tree of your application. The only way to change the state inside it is to dispatch an action on it.
Store Methods#
-
getState() : getState for accessing the current state of the application
-
dispatch(action) : dispatch for changing state via an action
-
subscribe(listener) : subscribe for responding to state changes
-
replaceReducer(nextReducer)
A reducer is just a function that takes two arguments and returns your app's current state. The two arguments it takes are:
            const reducer = (state, action) => {
                     return state
              }
reducer function as an argument within createStore(), it will be called a couple of times
- Once on initialization (this sets our store's initial state) And every time an action is dispatched
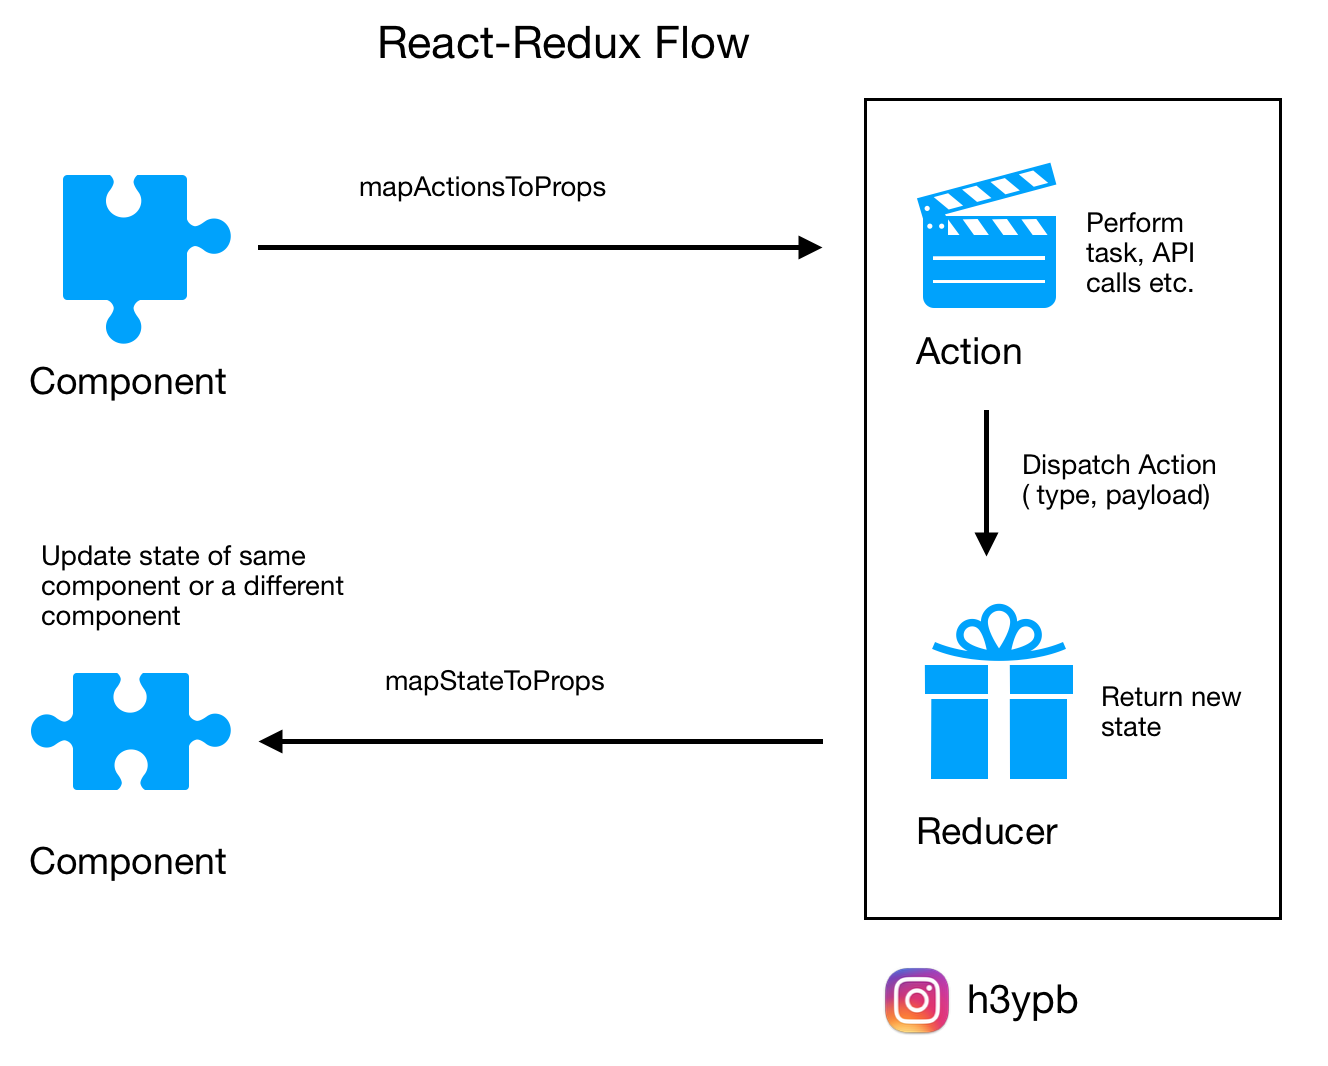
Redux actions are JavaScript objects that contain two properties: type and payload. These actions are "dispatched," or used as arguments by the Redux store's dispatch API method
          const mapStateToProps = (state, ownProps) => ({
            // ... computed data from state and optionally ownProps
          })

          const mapDispatchToProps = {
            // ... normally is an object full of action creators
          }

          // `connect` returns a new function that accepts the component to wrap:
          const connectToStore = connect(
            mapStateToProps,
            mapDispatchToProps
          )
          // and that function returns the connected, wrapper component:
          const ConnectedComponent = connectToStore(Component)

          // We normally do both in one step, like this:
          connect(
            mapStateToProps,
            mapDispatchToProps
          )(Component)
npx create-react-app my-app --template redux
The connect() function connects a React component to a Redux store.It does not modify the component class passed to it; instead, it returns a new, connected component class that wraps the component you passed in.
function connect(mapStateToProps?, mapDispatchToProps?, mergeProps?, options?)
The connect function takes another function as an argument: mapStateToProps. mapStateToProps determines what state from our store we want to pull into our component. In this case, we're specifying to only pull our state's posts property
In addition to our mapStateToProps function, we're also going to add a mapDispatchToProps function which will give us access to our Redux store's dispatch method:
- https://youtu.be/1QI-UE3-0PU
- https://egghead.io/courses/getting-started-with-redux
- https://medium.com/fullstack-academy/thunks-in-redux-the-basics-85e538a3fe60
- https://www.youtube.com/watch?v=hMIGj1690QA&list=PLD8nQCAhR3tSSFktby1h8htS6QWTTneEr
- https://chriscourses.com/blog/redux
- https://github.com/james-priest/udacity-nanodegree-react
- https://redux.js.org/tutorials/essentials/part-5-async-logic
- https://www.youtube.com/watch?v=BwuLxPH8IDs
This project was bootstrapped with Create React App.
In the project directory, you can run:
Runs the app in the development mode.
Open http://localhost:3000 to view it in the browser.
The page will reload if you make edits.
You will also see any lint errors in the console.
Launches the test runner in the interactive watch mode.
See the section about running tests for more information.
Builds the app for production to the build folder.
It correctly bundles React in production mode and optimizes the build for the best performance.
The build is minified and the filenames include the hashes.
Your app is ready to be deployed!
See the section about deployment for more information.
Note: this is a one-way operation. Once you eject, you can’t go back!
If you aren’t satisfied with the build tool and configuration choices, you can eject at any time. This command will remove the single build dependency from your project.
Instead, it will copy all the configuration files and the transitive dependencies (webpack, Babel, ESLint, etc) right into your project so you have full control over them. All of the commands except eject will still work, but they will point to the copied scripts so you can tweak them. At this point you’re on your own.
You don’t have to ever use eject. The curated feature set is suitable for small and middle deployments, and you shouldn’t feel obligated to use this feature. However we understand that this tool wouldn’t be useful if you couldn’t customize it when you are ready for it.
You can learn more in the Create React App documentation.
To learn React, check out the React documentation.
This section has moved here: https://facebook.github.io/create-react-app/docs/code-splitting
This section has moved here: https://facebook.github.io/create-react-app/docs/analyzing-the-bundle-size
This section has moved here: https://facebook.github.io/create-react-app/docs/making-a-progressive-web-app
This section has moved here: https://facebook.github.io/create-react-app/docs/advanced-configuration
This section has moved here: https://facebook.github.io/create-react-app/docs/deployment
This section has moved here: https://facebook.github.io/create-react-app/docs/troubleshooting#npm-run-build-fails-to-minify