Installation
https://packaging.python.org/tutorials/installing-packages/
WARNING: We are not responsible if you mess up your system!
Only the last version of Python 2 is supported (2.7) and will be referred to as python2
For Python 3, you need python3.x, where x should be >= 6 and will be referred to as python3 (lesser versions may work, but aren't tested/supported)
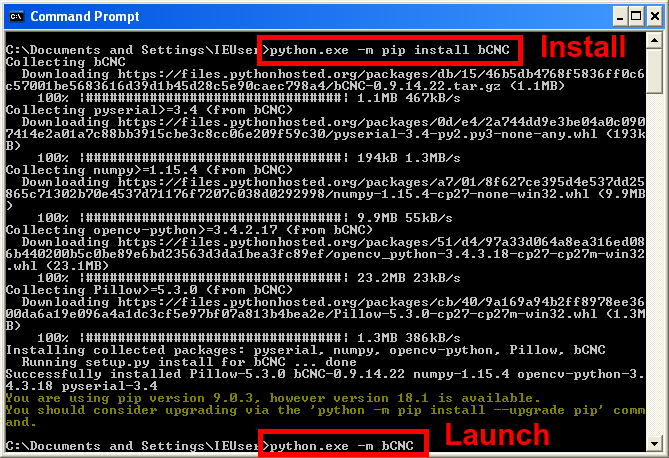
For both Python versions, you need tkinter support and working pip. Then, you can use pip install bCNC to install bCNC and all of it's dependencies (except for tkinter, which has to be installed/compiled as an integral part of python). After that, bCNC can be launched using python -m bCNC command.
Note that if you have both python2 and python3 installed, you may need to use python2 and/or pip2 binaries, rather than just python and/or pip, to make sure that the correct version of python is used. The same may apply if using python3 on a system with python2 i.e. use python3 and/or pip3. Also, if you read about installing packages (you certainly should have) you should also know that 2/3 could be 2.x/3.x or whatever was setup in your system.
Update: bCNC supports python2 and now python3. However, python2 was deprecated in 2020 (still supported, for now) and more modules are dropping python2 support (will likely to be phased out soon). Also, note that python3 dropped support for Windows XP and Windows 7 in python3.5 (users using those versions, YMMV)
If you don't have pip binary for the correct python version in your PATH, you can launch it by calling python -m pip, rather than just pip.
https://pypi.org/project/bCNC/
Special cases on specific OS and other ways to run:
If you want to use pip install --upgrade git+https://github.com/vlachoudis/bCNC to install latest development version from github (because you are a developer, or you want to try new cool features), you will also need git binary installed and available in your PATH, so pip can use it to fetch the source code from github.
If you don't have git installed, you can use pip install --upgrade https://github.com/vlachoudis/bCNC/archive/master.zip
Alternatively, you can use pip install . directly in git folder.
Or just download sources from github (zip/tar file), unpack it, then launch python -m bCNC in the bCNC directory (not inside of bCNC-master) or double clicking the main .py file. This should work if you've previously used pip install bCNC, in which case, pip downloaded and installed all the required dependencies or you already have all the required dependencies.
- Update your system (optional) and install git, python (with tkinter support) and pip:
	# This is specific for Debian/Ubuntu, other distros have other package managers than apt-get
	sudo apt-get update
	sudo apt-get upgrade
	sudo apt-get install git python python3-tk python-pip
- Install bCNC using pip and launch it:
	sudo pip install --upgrade bCNC
	#sudo pip install --upgrade git+https://github.com/vlachoudis/bCNC  # if you want git version
	python -m bCNC
Happy milling!
If you are a package maintainer of a distribution, there's likely some unified way to make Python packages for your distro. Eg.:
- Py2deb is a tool to build Debian packages from Python packages: https://pypi.org/project/py2deb/
- ArchLinux has guidelines: https://wiki.archlinux.org/index.php/Python_package_guidelines
1.) Install Python 3: https://www.python.org/downloads/

Do not forget to install Tcl/Tk and pip modules, while doing so. Also, check that Python will be added to path:


2.) Open commandline and install bCNC using pip:
Press Windows+R to open Run box. Type cmd and then click OK to open a regular command prompt.

py -m pip install bCNC

3.) Launch bCNC
py -m bCNC

bCNC is loaded and Windows Defender may popup, Happy CNC milling!

1.) Install python 2: https://www.python.org/downloads/
Do not forget to install Tcl/Tk and pip modules while doing so. Also, check that Python will be added to path:

2.) Open commandline and install bCNC using pip:
This installs bCNC to C:\Python27\Lib\site-packages\bCNC\ and launches it using python -m bCNC
There may be experimental .exe builds available at https://github.com/vlachoudis/bCNC/releases Those builds do not require anything, since they come bundled with Python and all needed libraries. Only download, unpack zip and launch bCNC.exe
If you want to build .exe yourself, it's possible. But first, you need to install python+pip and non-exe version of bCNC with all it's requirements on Windows. Then there is make-exe.bat in the bCNC install directory to build the exe.
This will also create a rather large "build" subdirectory.
That is solely for caching purposes and you should delete it before redistributing!
The build procedure and script may also need to be updated to support Python 3.
This is a basic example of how to compile bCNC to .exe file.
(given that bCNC is working in the first place, e.g. using pip install bCNC).
Go to the directory where bCNC is installed and do the following:
pip install pyinstaller
pyinstaller --onefile --distpath . --hidden-import tkinter --paths lib;plugins;controllers --icon bCNC.ico --name bCNC __main__.py
This will take a minute or two, but in the end, it should create bCNC.exe.
If you are going to report bugs in .exe version of bCNC,
please check first if that bug occurs even when running directly in python (without .exe build).
Since python2 support is slowly being dropped by bCNC and/or it's submodules, the following table may need updating.
| OS | Python | Notes |
|---|---|---|
| Windows XP SP3 | 2.7.5 | pyserial newer than 3.0.1 will not work |
| Windows Vista SP2 | 2.7.9 | |
| Windows 7 | 2.7.* | Any 2.7 version should work |
| Windows 8.1 | 2.7.10 is known to work | |
| Windows 10 | 2.7.* | Any 2.7 version should work |
| Windows 10 | 3.8.* | Tested 18-11-2020 |
| Windows 10 | 3.9.* | Tested 18-11-2020 |
The instructions from the link below worked: guide on Medium
Here is the recap:
- Install pyenv and tcl-tk
  brew install pyenv
  brew install tcl-tk
- Add environment variables into: ~/.zshrc or other shell rc and restart the shell/terminal
# python pyenv
export PATH="$HOME/.pyenv/bin:$PATH"
if which pyenv > /dev/null; then
  eval "$(pyenv init -)";
fi
# pyenv-virtualenv
if which pyenv-virtualenv-init > /dev/null; then
  eval "$(pyenv virtualenv-init -)";
fi
# tcl-tk
export PATH="/usr/local/opt/tcl-tk/bin:$PATH"
export LDFLAGS="-L/usr/local/opt/tcl-tk/lib"
export CPPFLAGS="-I/usr/local/opt/tcl-tk/include"
export PKG_CONFIG_PATH="/usr/local/opt/tcl-tk/lib/pkgconfig"
export PYTHON_CONFIGURE_OPTS="--with-tcltk-includes='-I/usr/local/opt/tcl-tk/include' --with-tcltk-libs='-L/usr/local/opt/tcl-tk/lib -ltcl8.6 -ltk8.6'"
- Install pyenv virtualenv
brew install pyenv-virtualenv

pyenv install 3.8.0

exec $SHELL
- Test tcl tk setup
  mkdir ~/foo; cd ~/foo
  pyenv local 3.8.0
  pyenv version
  python -m tkinter -c 'tkinter._test()'
- Install and launch bCNC
    pip install --upgrade bCNC
    #pip install --upgrade git+https://github.com/vlachoudis/bCNC #if you want git version
    python -m bCNC
Installs the same way as any other Linux. But bear in mind that opencv-python can't be currently installed using pip on ARM, this might give you some problems.
Some packages may be needed in order to install source distribution of python modules:
apt-get install python-pip python-setuptools python-dev python-tk libjpeg-dev zlib1g zlib1g-dev
Opencv workaround (Don't even try to install Opencv on a Raspberry (3b)):
source : https://raspberrypi-guide.github.io/programming/install-opencv.html
sudo apt-get install build-essential cmake pkg-config libjpeg-dev libtiff5-dev libjasper-dev libpng-dev libavcodec-dev libavformat-dev libswscale-dev libv4l-dev libxvidcore-dev libx264-dev libfontconfig1-dev libcairo2-dev libgdk-pixbuf2.0-dev libpango1.0-dev libgtk2.0-dev libgtk-3-dev libatlas-base-dev gfortran libhdf5-dev libhdf5-serial-dev libhdf5-103 libqtgui4 libqtwebkit4 libqt4-test python3-pyqt5 python3-dev -y

pip install opencv-contrib-python==4.1.0.25
To start bCNC in full screen when the raspberry pi boots, a .desktop must be created in autostart. Create a file /etc/xdg/autostart/bCNC.desktop with the following content:
[Desktop Entry]
Type=Application
Name=bCNC
Comment=The CNC interface
NoDisplay=false
Exec=python -m bCNC --fullscreen  # python /python2 /python3
NotShowIn=GNOME;KDE;XFCE;
Note that the pi must have autologin enabled for this to automatically show on the boot-screen.
On this page, there is mention of way to build .deb and .exe packages, I wish to do this automatically, but don't have the needed infrastructure. If you manage to setup automatic builds of bCNC, please let us know.