Tutorial: Get account balance and transactions
This tutorial will demonstrate how to query financial data using the Yapily API in just a few minutes using Postman or an SDK.
-
Install Postman (if you plan to use Postman)
Estimated time: ~15 mins
Start from...
Step 1 - if you do not have an application in the Yapily Dashboard
Step 5 - if you already have an application to test in the Dashboard
Step 12 - if you already have a Postman collection added
- Register or log into the Yapily Dashboard
- Click My Applications
- Click Add new to create an application and fill in the name field.
- Click Save and download the file containing your application's by clicking Download Secret

Note: This file containing your application credential is only generated when your application is created. If you lose the application secret, you will need to click the Revoke Secret button. This will create a new application secret (invalidating any requests using the old secret), and generate a new credentials file.
- Click on the Institutions tab
- Click Add institution in the application window
- Select the Preconfigured Sandbox option in the environment dropdown menu to filter for sandbox environments only:
(Note: The institutions in this filtered list are configured with an existing application registered for that institution's API. To manage your application with an institution, you will need to register an application with the institution you are interested in).
- To choose a sandbox, select Open on the preconfigured sandbox of choice
- To add this sandbox to your application, click the Select button. You will know that you have selected a preconfigured sandbox if you are prompted to use preconfigured credentials. If prompted select, Yes, Preconfigured Credentials otherwise go back to Step 7 and ensure you choose a preconfigured sandbox.
 (Note: The institutions in this filtered list are configured with an existing application registered for that institution's API. To manage your application with an institution, you will need to
 Complete any set of instructions below to see the Yapily API in action. The SDKs were generated using the Yapily API's Swagger specification. Alternatively, you can create your own SDK or use Swagger Code Generator to create one.
Using Postman
- Under Tools, click Download Postman Collection
- Open Postman and import the application's Postman collection by clicking Import and importing the file
- Click the menu button (•••) for your imported collection and click Edit.
Under the variables tab, replace the value of the
application-secretwith theapplication-secretvalue from your downloaded credentials file (from step 9). Also set the value of theinstitution-idto the ID of the institution that you added in the dashboard. This is visible in the dashboard and can also be obtained by making a call to the https://api.yapily.com/institutions endpoint in Postman.

 Under the variables tab, replace the value of the
 Notice the application-uuid and application-secret are configured in Postman as the credentials for basic authentication
- Expand the Application folder of your Postman collection and select the Create Users (POST https://api.yapily.com/users) request. Set an
applicationUserIdof any value you would like to represent the user in your application and click Send (ThisapplicationUserIdcan be used as a user-friendly filter for most of the GET endpoints). - Copy the
uuidreturned from this request and paste this as theuser-uuidvalue as a global variable for this folder (the same as you did for theapplication-secretin step 12).

- Expand the Financial Data folder of your Postman collection and select the Create Account Authorisation (POST https://api.yapily.com/account-auth-requests) request. Check the contents body. If you have a callback configured in the dashboard (it can be a dummy url), set it as the value of the
callbackfield, otherwise remove it. Click Send. - Copy the
authUrlvalue and paste into your internet browser. This is the url that users of your application will need to authenticate with the institution in order to authorise your application's access to their data. Follow the authorisation steps (using the test users' credentials). - Once you have logged in and given consent you will need to retrieve the consent token to sign queries for financial data and payments.

If you used a callback: you will have received the consent token as the consent URL query parameter as well as the user id and institution id.
If you did not use a callback (e.g. you intend to poll for the consent): return to Postman and select Get User Consents and hit Send. Copy the value of the id field in the response and paste it as the value for the consent-id Postman collection variable. Then select Get Consent and click Send to retrieve the consent token which is present as the consentToken value in the response.
Copy the consent token and set it as the value of the Postman collection variable consent-token.
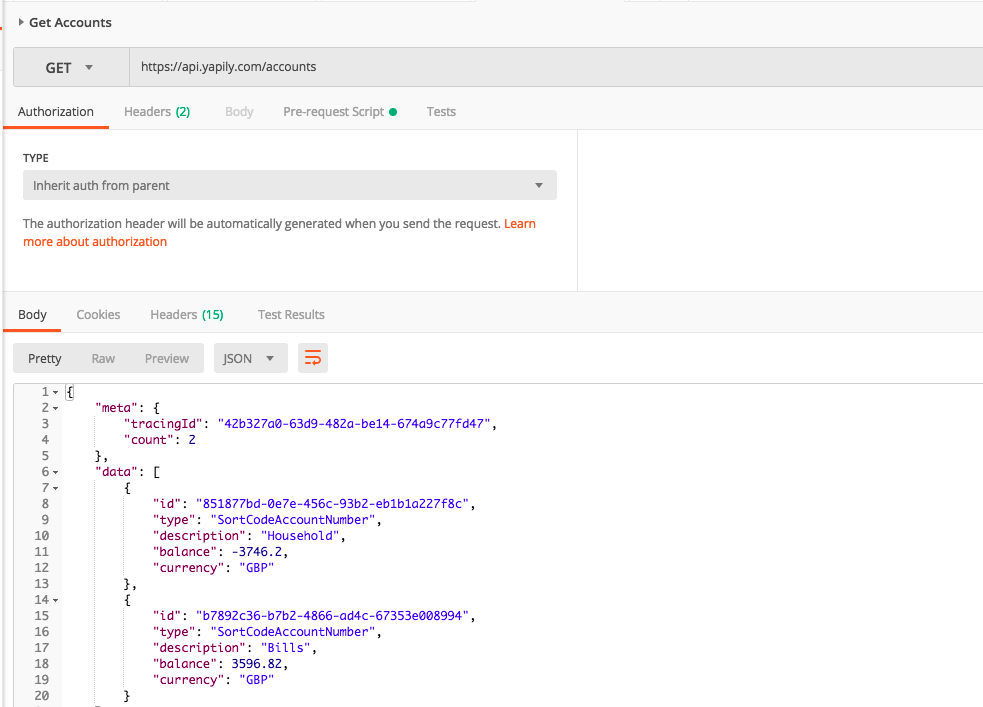
- Select the Get Accounts request and click Send. Copy the
accountIdof the account of interest and paste it as a Postman collection variable for your collection (see step 12). - Select the Get Account request and click Send.
- Select the Get Transactions request and click Send.
That's it!
Using the Java SDK
- Clone the Java SDK project into a directory using Git
git clone git@github.com:yapily/yapily-sdk-java.git
These steps can be completed in your IDE or on the command line.
- Change to the examples directory
cd yapily-sdk-java/examples
-
Open the file src/main/java/yapily/examples/Constants.java in the editor of your choice and change the values of the string constants
APPLICATION_IDandAPPLICATION_SECRETto the application key and secret of your Yapily application obtained from the Dashboard. -
In the folder src/main/yapily/examples you will find classes prefixed with 'Example'. Open ExampleAccountDetails.java in the editor of your choice and change the string constant
INSTITUTION_IDto the ID of the institution that you have added to your application in the dashboard.
- Once ready, simply run the main method of ExampleAccountDetails.java in your IDE of choice or, to run the ExampleAccountDetails class on the command line, run maven package, copy the dependencies and run the compiled class
mvn package
mvn dependency:copy-dependencies
java -cp target/yapily-sdk-examples-0.1.1.jar:target/dependency/* yapily.examples.ExampleAccountDetails
That's it!
Using the Node.js SDK
- Clone the Node SDK project into a directory using Git
git clone git@github.com:yapily/yapily-sdk-nodejs.git
These steps can be completed in your IDE or on the command line.
- Change to the examples directory
cd yapily-sdk-nodejs/examples
-
Open the file constants.js in the editor of your choice and change the values of the string constants
APPLICATION_IDandAPPLICATION_SECRETto the application key and secret of your Yapily application obtained from the Dashboard. -
Open ExampleAccountDetails.js in the editor of your choice and change the value of
institutionIdto the ID of the institution that you have added to your application in the dashboard.
- Once ready, initialise the examples directory as an npm project, install the SDK and run ExampleAccountDetails.js
npm init
npm install ../sdk
node ExampleAccountDetails.js

That's it!
Using the Python SDK
- Clone the Python SDK project into a directory using Git
git clone git@github.com:yapily/yapily-sdk-python.git
These steps can be completed in your IDE or on the command line.
- Change to the examples directory
cd yapily-sdk-python/examples
-
Open the file constants.py in the editor of your choice and change the values of the string constants
APPLICATION_IDandAPPLICATION_SECRETto the application key and secret of your Yapily application obtained from the Dashboard. -
Open example_account_details.py in the editor of your choice and change the value of
institution_idto the ID of the institution that you have added to your application in the dashboard.
- Once ready, install the SDK if you haven't already and run example_account_details.py
npm install ../sdk
python3 example_account_details.py

That's it!
- Try getting account details for another institution. You will need a new consent token, as the consent token represents a user's consent for your application to query data from an institution.
- Want to see your own account data? Some banks also allow you to configure applications for access to your personal account. Add either Monzo or Starling Personal Access to your application in the Dashboard and set the relevant
institution-id. Follow the relevant instructions using your bank account details to log in as normal.