EGroupware Customizing
1. Upload Logs, favicon, Background image and fonts for EGroupware
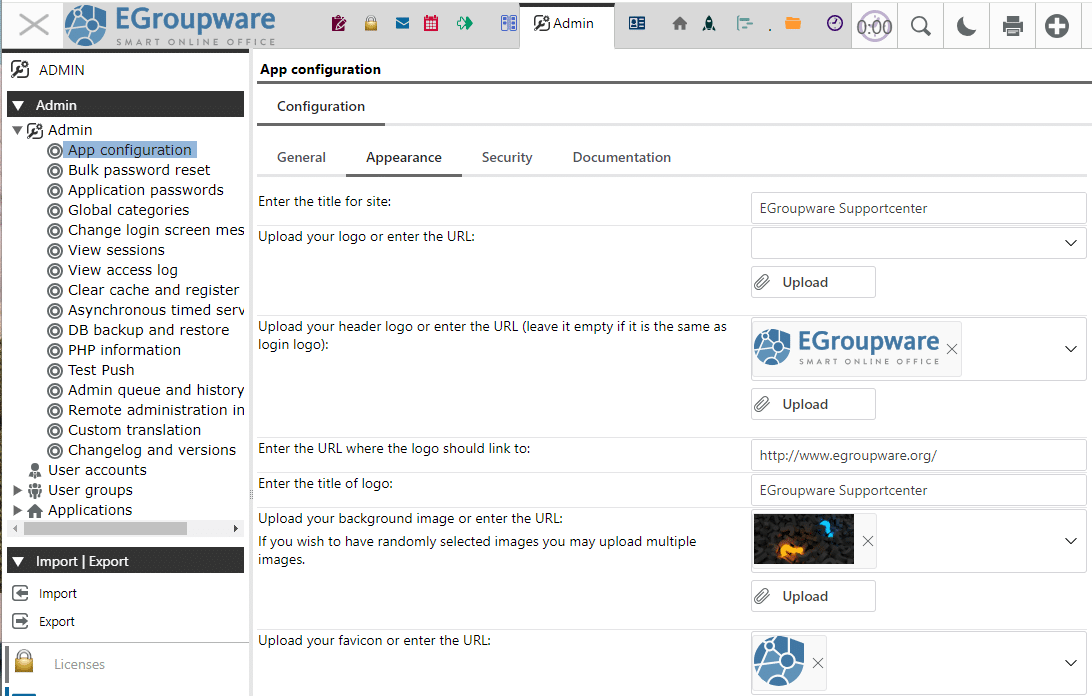
- Go to Admin -> App configuration -> tab Appearance
- Admin can upload a logo, which is used for login page and in EGroupware Header or two different ones e.g. different background color or format, in general its possible to use SVG, JPG or PNG - recommendation is SVG!
- Admin can upload one or several back ground images for the login page, they are used by chance on any reload of the page.
- Admin can also add some titles and links e.g. to your website
-
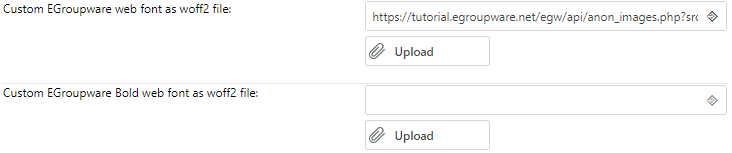
NEW: Admin can upload 2 different fonts, called "EGroupware" and "EGroupware Bold", EGroupware is used instead of the default font in whole EGroupware. EGroupware and EGroupware Bold are also available in the Text editor (at the bottom of all fonts).
Please be aware that a custom font used in email is not included in the sent mail and therefore the display can be different for the recipient!
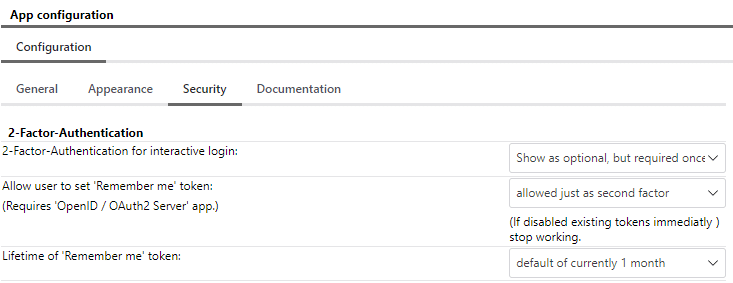
2. Adapt login box e.g. remove "remember me" or add/remove language selector
- Go to Admin -> App configuration -> tab Security: 2-Factor Authentication and remember me token
- Go to Admin -> App configuration -> tab General: Show language select box on login page?

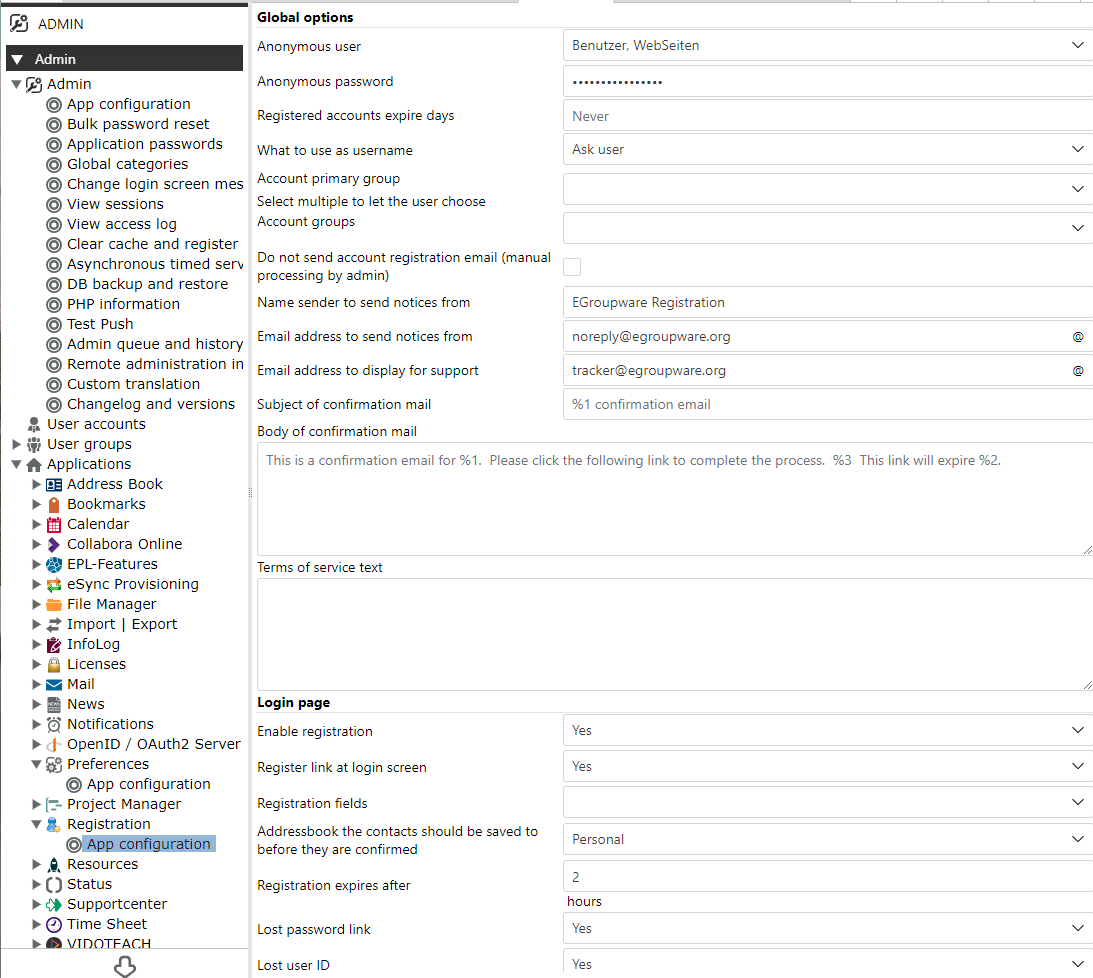
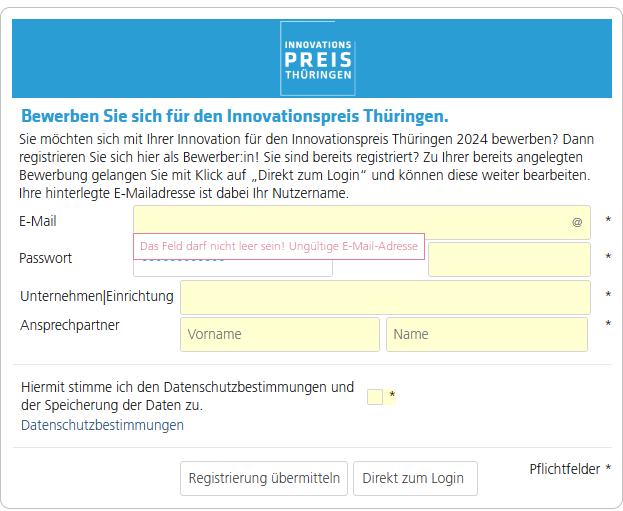
3. Configure registration of users or lost password links using registration app
- Go to Admin -> Applications -> Registration -> App configuration
- Admin can configure which fields should be displayed for registration of new users, messages and several other options, see screenshot above
- Admin can configure what is displayed in the login box e.g. only lost password link or also registration
- If Admin want to customize more detailed the registration form, this can be done with a custom etemplate "registration_form.xet"
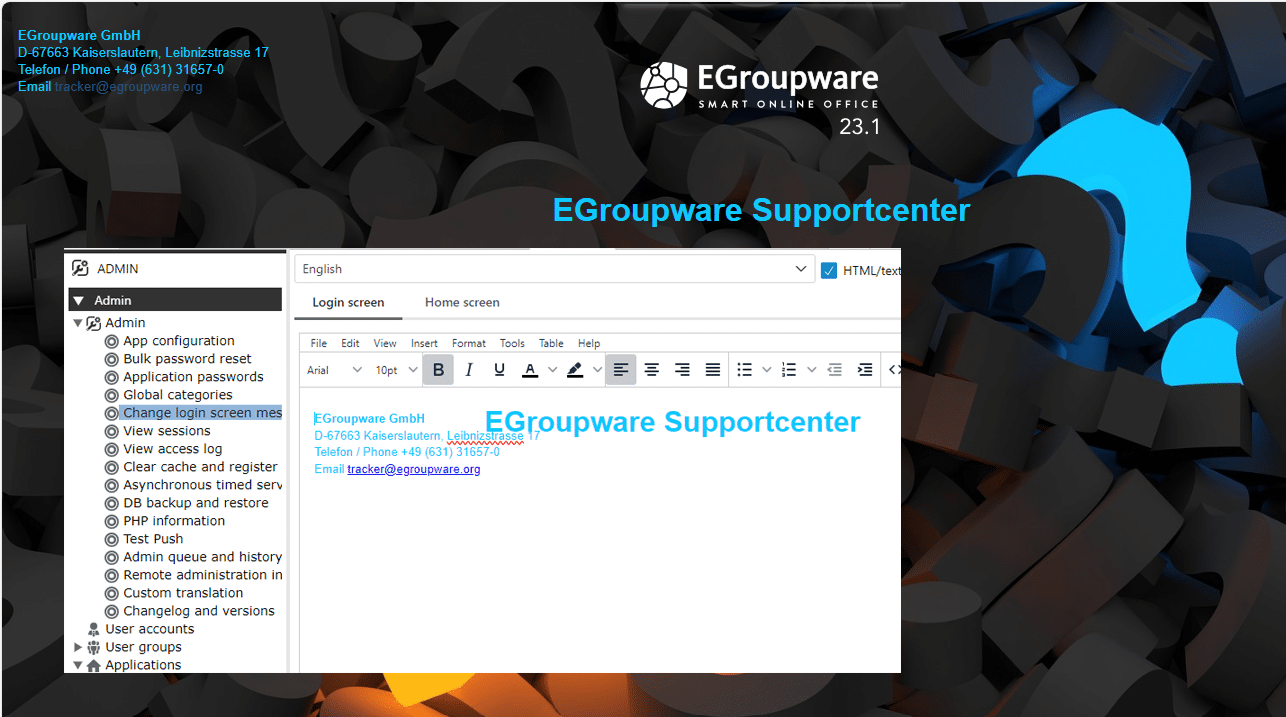
4. Change login screen message e.g. to add infos or imprint to the login page
- Go to Admin-> Change login screen message
- There are 2 options for "login screen" and "home screen" and Admin can choose or set it per language (english is the default and will be used, if there is no specific language set)
- The text editor allows to add text, set color in html or change the font (including EGroupware fonts). Additionally Admin can specify css to e.g. position imprint or address top left/right. Or hide EGroupware icons of login box or on the bottom of the page.
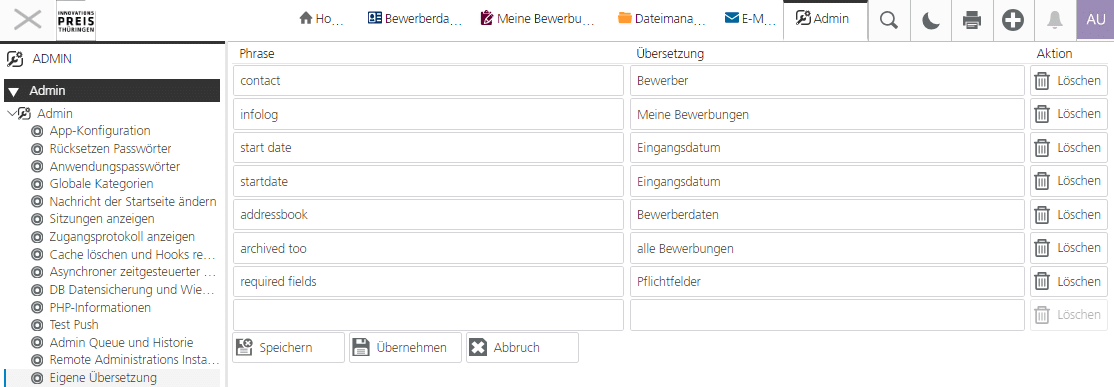
- Admin -> custom translation
- Admin needs to add the english phrase and a translation for it. The custom translation is used in all languages and has the highest priority
- It can be used to translate an app e.g. Infolog into "Task management" (or "meine Bewerbungen") or a specific phrase e.g. "private" to "confidential" or "startdate" to "Eingangsdatum"
1. General
- EGroupware has lots of different custom field types like "text", "select box", "link to adressbook, Infolog, project" ...
- If app supports types (e.g. infolog, tracker, adressbook), admin can select for which type the custom field should show up, by selecting the types or empty for all.
- If "Required" is set, entry of that type can't be saved, when the field is not set!
- If Admin specify attribute "Private", the custom field is only displayed to this users or groups! After changing permissions you need to clear cache (Admin -> clear cache" as permissions are cached!
- Order can be changed by inserting a number between 2 customfields
- Custom field name can't be changed as the name is used in the database! But Admin can change the label which is displayed to the users. We recommend to avoid space and umlaute in the custom field name. While it can be used easily in the custom field label!
-
NEW: Admin can specify a tab name for each custom field, the tabs are generated automatically in the order of the first appearance. By default all custom field tabs are showing up before history tab, but it can be changed in eTemplate by attribute cfPrepend. See also examples below from Adress book using custom fields in different tabs
Example two infolog with lots of custom fields in several tabs and a custom etemplate with some custom buttons and logic
 Example two infolog with lots of custom fields in several tabs and a custom etemplate with some custom buttons and logic
2. Details of custom fields and options
- Custom fields of type label or header are spanning all columns, while "regular custom fields" are displaying in 2 columns with label and value. If custom fields are having long labels and you want to change the width of the label column, this can be done by css in the etemplate using "styles" e.g.
<styles>
   table.et2_customfield_list tr td:first-child {
      width: 30%;
      overflow-x:hidden;
      text-overflow:ellipsis;
   }
</styles>
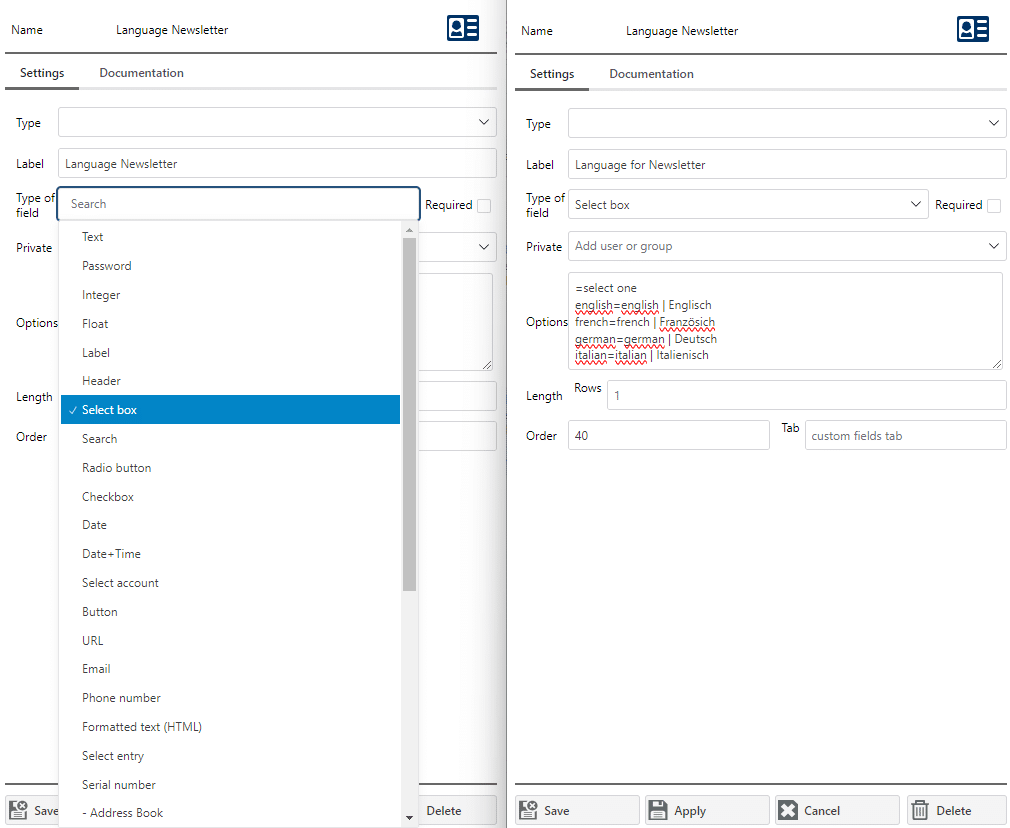
- Custom fields of type "selectbox" (or Radio button) can specify the values in options (splited by new line) e.g.
=select one
english=english | Englisch
french=french | Französisch
german=german | Deutsch
The part before "=" specifies the value stored in the database, while the label behind "=" is what gets displayed to the user. We recommend to avoid space and umlaute for the value and don't change it. Label can be adapted at any time as well as adding new values to the select box options.
- Admin can specify multiple rows (for text fields or select boxes),to get a textbox with X rows or a multi-selection. With option "maxlength=2000" the allowed text length can be specified, so user can't add more characters.
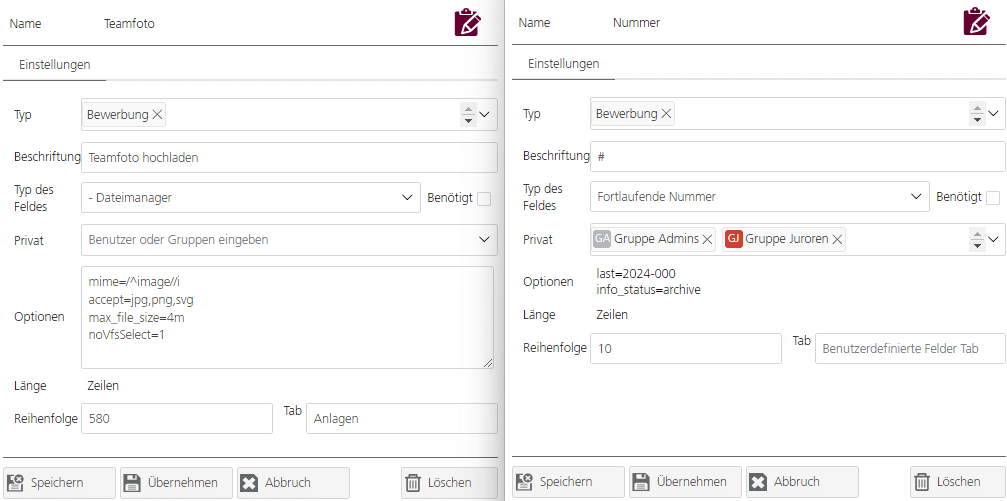
- "Select entry - Filemanager" allows to select files from local or filemanager. If you specify a directory in the name e.g. "invoice/" user can upload multiple files, while if just a name is given e.g. "Teamfoto" the single image get uploaded and renamed accordingly. There can be several options specified like mime-type, accepted formats. max_file_size or options to hide Filemanager selection - see example below left side.
- "Serial number" can be used to generate automatically a number starting from option "last" and optional using a filter criteria like "info_status=archived" or "invoiced", which sets the number only, when that status is set. See example below right side.
- This is NOT meant as a full introduction or manual for eTemplate usage, its just a rough overview especially about modification with customfields
- Reference for widgets (a full documentation is planned, but not yet done!): https://etemplate.egroupware.org/
-
IN EGroupware EPL version Admin can mount eTemplates-Directory into filemanager in Admin -> Applications -> Filemanager -> VFS mounts and versioning by simply clicking on the button:
- In filemanager there is now directly the directory "/etemplates" with subdirectories of the applications e.g. "addressbook" or "infolog". In the app-directory is another subdirectory called "templates" with two other subs "default" and "mobile".
- If you check for example /etemplates/addressbook/templates/default you see files like "edit.xet", "display.xet" and "index.xet". "display.xet" is used in CRM-view, so if you want to show there additional information of an organization e.g. a customer-number this can be added there. "index.xet" is used for the addressbook contact list and can be adapted, if you e.g. want to display custom fields in separat columns. If you modify "edit-xet" this will be used for the editing (or read only) of contacts.
- If you have different contact or infolog types, its also possible to change "edit.xet" only for a specific type by using the same name like the type. Simple example you have an additional contact type "Organisation" and like to use there an other etemplate. You name it "edit.Organisation.xet" and upload it to filemanager. As soon as you reload EGroupware the new etemplate is used instead of the original "edit.xet" for the contact of type "Organisation". If you change "edit.xet", upload it and reload the browser its used instead for all contact types. As soon as you delete the added file and reload an other time, you get again the original files we provide. So you can easily start and customizing ...
- You can specify in the eTemplate also custom CSS by adding at the end "styles" e.g.

<styles>
   .my_heading { font-weight: bold; font-size: 115%; `
</styles>
- Or you can include some Javascript which gets explicitly executed, while external Javascript would be blocked from CSP (contend security policy) by adding it between a tag "script" e.g. a simple example to set the title of an Infolog including a customfield
<script>
app.infolog.set_title_custom = function(event, widget)
{
let title = app.infolog.et2.getDOMWidgetById("info_subject");
let cf_1 = app.infolog.et2.getDOMWidgetById("#customfield1");
if (title && !title.get_value())
{
title.set_value("Some general text " + (cf_1 ? cf_1.get_value() : ""));
}
return true;
};
</script>
-
NEW: Customfields do not longer need a specific customfield tab in the template and the et2-tabbox, they get generated automatically taking some general attributes/properties into account: cfPrepend="history" (the default is before history-tab or at the end, if there is no history, but you can specify also other tabs or leave it empty, so tabs get generated from the beginning!); cfExclude="customfield-name" (comma separated for multiple fields),
cfTypeFilter="@info_type"(infolog) orcfTypeFilter="$cont[tid]"(addressbook) andcfPrivateTab="!$cont[no_private_cfs]"(Addressbook only, as app-config allows to get private custom fields in a separate tab) -
If you want to position a customfield e.g. "customer-number" in an other tab, you specify in et2-tabbox
cfExclude="customer-number"and in the tab where it should be displayed simply<customfields id="#customer-number" span="2"/>.
| Language: |  |
- General information
- Distribution specific instructions
- Update recommendations and troubleshooting
- Tuning EGroupware for higher number of users
- Docker-compose installation: Linux, Windows, Mac, Synology, QNAP
- Configure IMAP push
- IMAP Push Notifications for Dovecot 2.2+
- Using EGroupware Mail server with ActiveDirectory
CTI / Computer Telephone Integration
Using SmallPART with a LMS (Moodle, OpenOLAT, ...)
Synchronisation between Untis / Webuntis and EGroupware
Development