Salesforce Initial Setup
The Grassroots Survey package contains metadata like custom fields and custom objects that are used in the mobile app.
Use the following link to install the Grassroots Survey Salesforce package.
https://metadeploy.herokuapp.com/products/grms/
After the installation is complete, you can see the Grassroots Survey application in the Salesforce application launcher ("waffle menu" in upper left). The following table summarizes the package components that are useful to be aware of as you proceed to the next steps in the Salesforce initial setup:
| Name | Description | API Name |
|---|---|---|
| Field Survey | Custom Object | GRMS_Survey__c |
| Field Worker and Client Relationship | Custom Object | GRMS_FieldWorkerClientRelation__c |
| Contact Type | Contact Custom Field | GRMS_ContactType__c |
| Field Worker | Contact Type Picklist Value | Field Worker |
| Survey Client | Contact Type Picklist Value | Survey Client |
| Login Email | Contact Custom Field | GRMS_LoginEmail__c |
| Field Worker and Client Layout | Contact Page Layout | |
| Field Survey Layout | Field Survey Page Layout | |
| Grassroots Survey App Admin | Permission Set | GRMS_App_Admin |
The Sample Surveys package is intended to provide some of the fields a new Mobile App administrator may want to include.
Keep in mind that the Grassroots Mobile Survey App was designed to be customizable and flexible to meet the needs of nonprofits that differ widely in how they gather information and how they want to organize and report on it.
The Sample Surveys Unmanaged Package is an optional install, but we highly recommend installing it. We have prepared two types of surveys, Home Care and Disaster Relief, with fields and page layouts that you can use as is, or pick and choose which fields are relevant for your organization. Or, maybe you'll install, see how the pages work, and then proceed to create totally different surveys for your organization.
To install, go to the following link:

Create an integration user in your org. Make sure the integration user profile has Read access to the Contact object and record types and Create access to GRMS objects.
- You can assign the
Grassroots Survey App AdminPermission Set to the integration user (or any other user) to open up full permissions on the objects installed by theGrassroots SurveySalesforce package.
Make sure you record the username and password of the integration user because they are needed later in Heroku setup. Its security token is also needed if the integration user's profile doesn't have Login IP restrictions.
In Setup, type Permission Sets into the QuickFind box. Click on Permission Sets. Choose Grassroots Survey App Admin.

Assign this Permission Set to the Integration User (the User you created as part of the GRMS installation). Assign it also to anyone on the staff that will be working with the Field Surveys, including the organization's System Administrator.
Click Manage Assignments. Here you can add or remove assignments for this permission set.

-
Go to
Setup>Object Manger>Field Survey>Fields & Relationships -
Click on New, then Lookup Relationship and choose Contact for Related to.
-
Fill in Survey Client for the field label.
-
Create a Lookup Filter where the Survey Client: Contact Type = Survey Client like the screenshot below. This will limit the lookups for this field to just Survey Clients.

-
On the next page, specify the profiles that should have access to this field. Click Next.
-
Choose which page layouts you would like this field to appear on. The default is all Field Survey object layouts. Click Next.
-
Choose the Contact layouts that you'd like this related list of surveys to appear on. Click on Save.
Here's what the completed field looks like. Note that you may want to shift where the field is on your page layout later on.

These will ensure that you have the reporting functionality and the activity and history tracking capability. Navigate to the Field Survey object in Object Manager in your Salesforce Org's Setup area. Click on Details, then click Edit. Add the boxes ticked below in the screenshot.

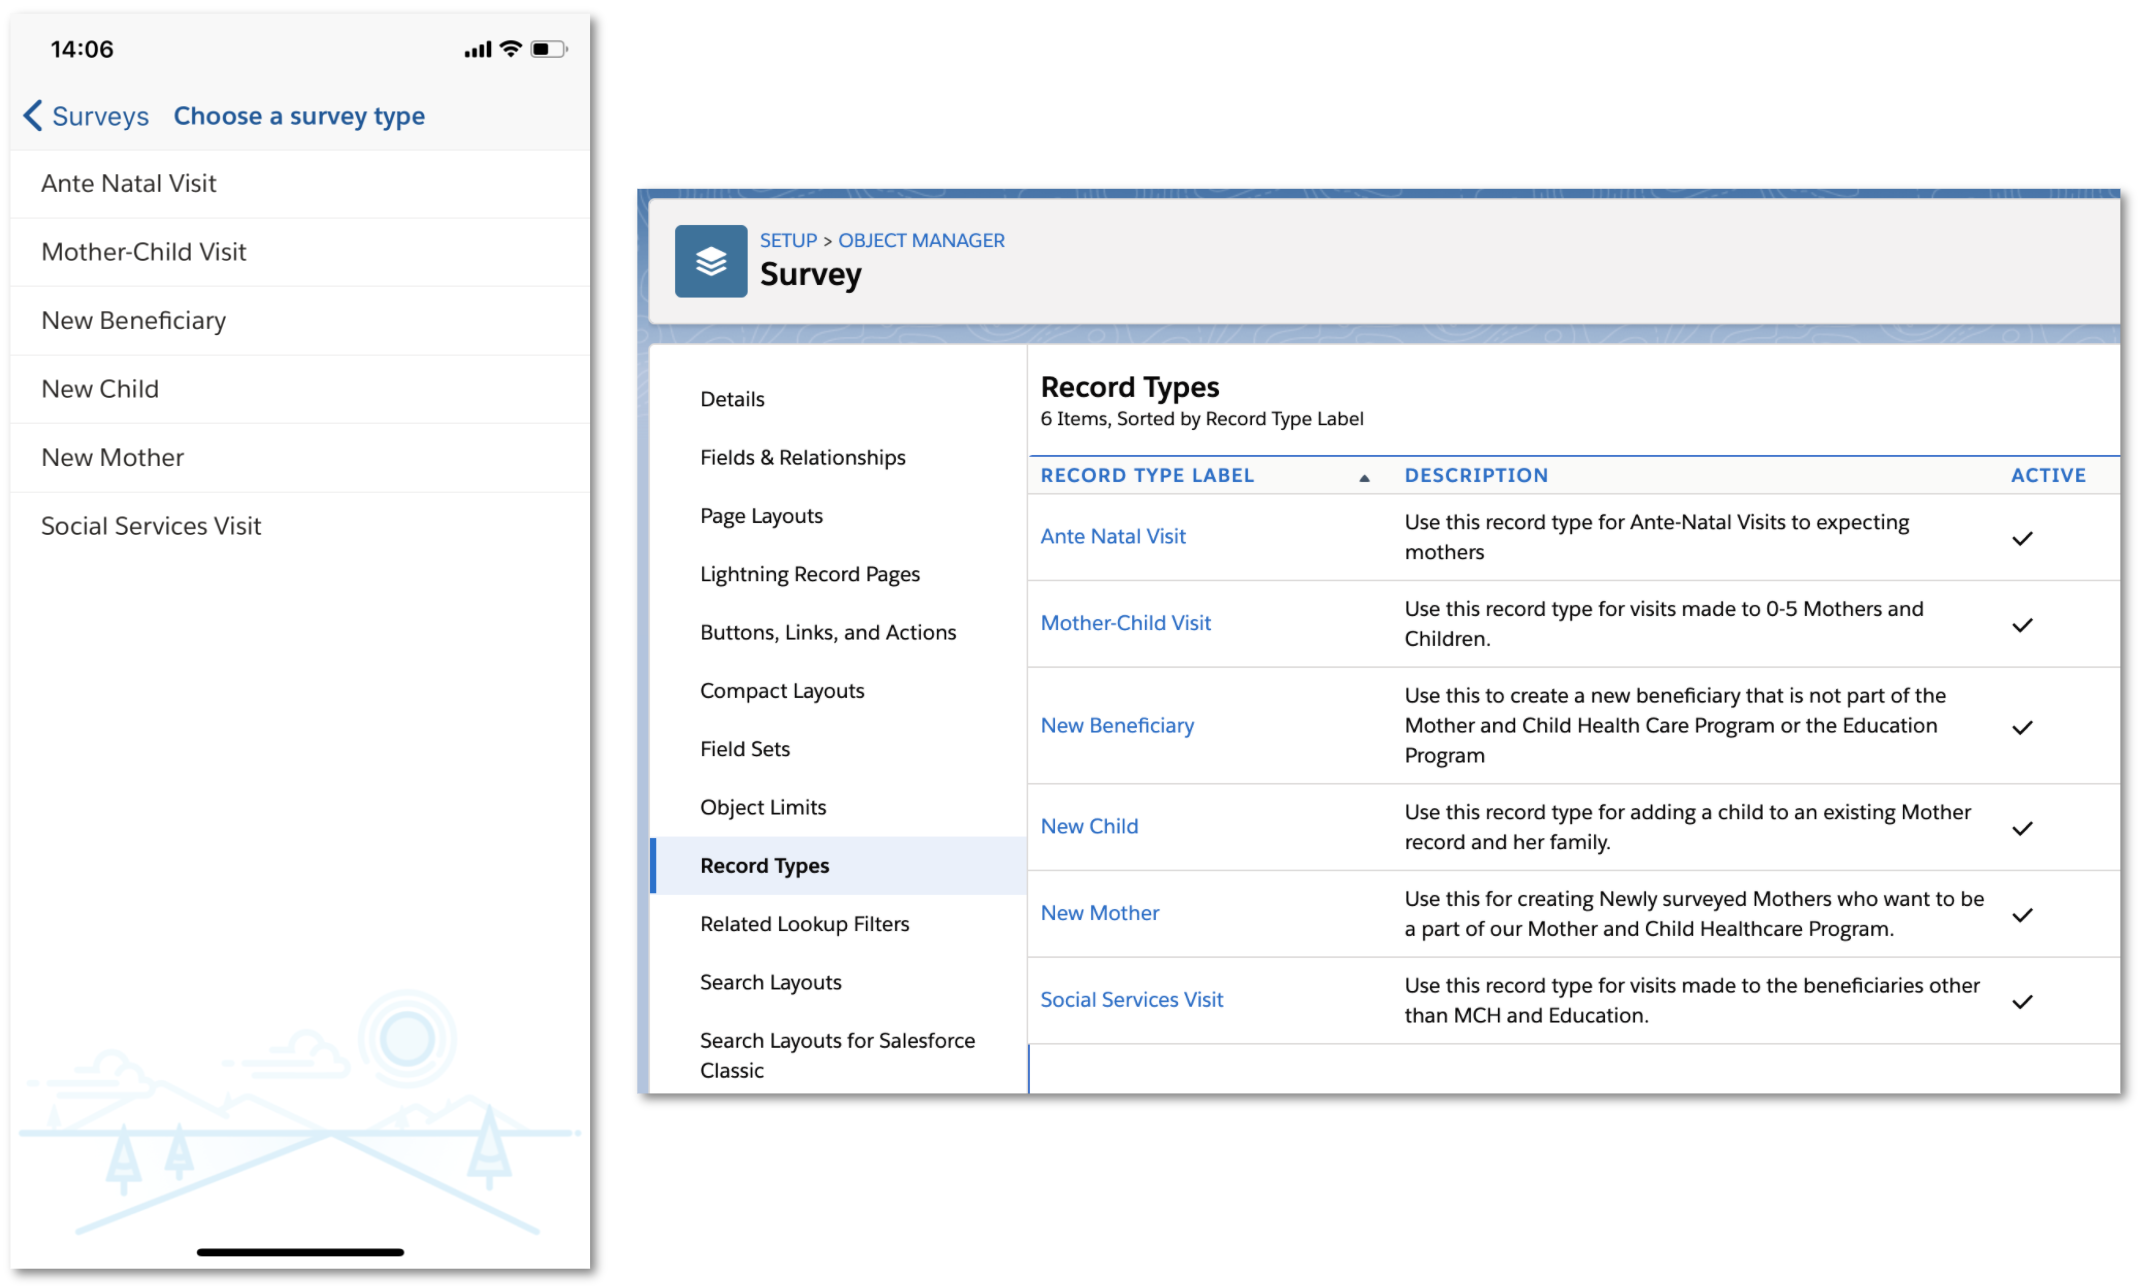
Most organizations need several surveys for use in the field, for example: New Client, Health Visit, Paperwork Visit, Student Success Visit, etc. For each distinct kind of survey that will have its own fields and picklists and will need its own page layout, create a record type.
If you are using the Sample Survey pack, it comes with two record types - Disaster Relief and Homecare. (Pro Tip: Keep Homecare and Disaster Relief Survey record types in your org and modify to meet your needs if they meet your fieldwork scenarios.)
Assign GRMS Record Types to Sys Admin and your Integration User. Note that if you have the Sample Survey Pack installed, you still need to assign the two record types that come with it to profiles.

- Go to
Setup>Users>Profiles - Choose either the System Administrator or you Integration User's profile
- Click on
Object Settings>Field Surveys - Assign the Record Types for the surveys that you are going to use.
Begin by making a list of all the fields you'll need that should be on the survey. Think about what data you need to collect and what type of fields you need to do that. Add these fields to the Field Survey object.
Keep in mind the mobile app field limitations listed below when creating fields for your surveys.
- You need to add at least one editable field to an editable section on the default Field Survey Layout for your mobile app to load your record types.
- Your fields will be added to the page layouts in the order you create the fields. This will likely not be the order you want them to appear on your survey. You’ll want to organize and rearrange your page layouts so they make sense for your staff who are out in the field collecting data.
- Include Sections on your page layouts, and give these names, for example: Personal Info, Communication Prefs, Address, Health Needs, Disaster Needs, or Referrals.
- Only sections that are editable on the page layout are displayed in the mobile app. For the example below, the [Information] section is not displayed on the mobile app because it's not an editable section in the page layout.

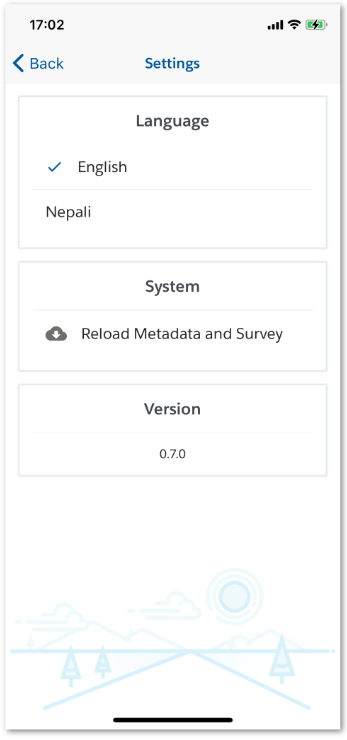
Changes to your field survey layouts are synced to the mobile app after mobile app login, or by the Reload Metadata and Survey button on the [Settings] screen in the mobile app as shown here:
Assign the layouts associated with each record type to the appropriate profiles.

- Find Compact Layout in the sidebar on the Field Survey object in Object Manager. The field that is at the top of a Compact Layout for a record type will be the field that shows in the list of available surveys in the mobile app. The rest of the fields will show at the top of a Field Survey record page in Salesforce.
- Rearrange the fields for your usage and delete any fields showing that you don't need.

If either one of these is not on the page layout, add the Login Email field and the Contact Type field to the Contact Page Layout. The field is already created. You just need to put it on the page.
- In Setup, Click Object Manager
- Find the Contact object
- Click Page Layouts
- Click and Drag the Login Email and Contact Type to the Page Layouts.
- These two fields may already be on the Field Worker and Client Page Layout, but would still need to be added to the regular Contact Layout, if you are using that page layout.
- Save

Include Field Surveys and Client Relationships in the Contact Related List. This way, we can see who is conducting surveys, and who is being surveyed. Be sure to Click Save.

To change the visible fields, you can click on the wrench and add the fields that you want to see on Related Lists when you go to the Contact object.

This is the object where we associate your survey field workers with their "caseload." The mobile phone will be able to populate each field worker's "clients" so that the field workers don't have to scroll too far to find the people they are responsible for.
- Go to
Setup>Object Manager>Field Worker & Client Relationships>TypeCustom Field - Scroll down to the Values section and click on New.
- Add values that will suit your organization's use for Survey Client relationships such as Mother, Child, Regular Client, Drop In, etc.
- Deactivate the placeholder Relation 1, Relation 2, etc values.
The Grassroots Survey package has the Contact Type (GRMS_ContactType__c) picklist field with the following values:
-
Field Worker: identifies field workers (your staff who collect survey data) -
Survey Client: identifies clients (contacts who engage with the field worker).
In this step you will add yourself as a field worker in Salesforce. This is a necessary step for you to be able to demo, test, and help your field workers sign in to the mobile app later. Field workers are represented in Salesforce as Contact records with the Field Worker picklist value for the Contact Type field.
-
Create a contact record that has the
Field WorkerContact Type, with any name you like (either yours or a placeholder name like Sally Fieldworker). -
Enter your email address in the
Login Emailfield. The value of this field is used in Heroku/Auth0 as the login username for the mobile app. Note: Login email is case sensitive on the mobile app. -
Create additional Contact records with a Contact Type of 'Field Worker' for other staff who will use the mobile app. The Field Workers, whether they are disaster relief workers, teachers in classrooms, or health professionals making house calls, are the people assessing the situation on the ground, using our mobile app that works even without the internet.

If you already have a list of clients, you can create Contact records for them in advance. Follow the instructions above for creating Field Worker Contact records, making sure to give them the Contact Type picklist value of 'Survey Client'.
You can create a client list for your field workers by entering records in the User and Client Relationships object. This is a junction object that links survey client and field worker Contacts. Once you have created these linked Contact records, your field workers will have assigned survey clients available in the Survey Client field on the mobile app.
Click on the New button on the Field Worker and Client Relationships object. Note the following as you create records:
- Relationship Number is automatically generated. As is the record owner.
- Field Worker will be the Contacts with the Contact Type field set to Field Worker.
- Client will be the Contacts with the Contact Type field set to Survey Client.
- Type picklist field can be customized to meet your organization's needs as noted above in the Update the Type Field Picklist Values section.
Be mindful of the following limitations of the Field Survey object as it's used in the mobile app:
- Read-only fields are not supported and are invisible in the mobile app.
- Multi-select Picklist fields are not currently supported and are invisible in the mobile app.
- Lookups to non-Contact fields are not supported and are invisible on the mobile app.
- The
Survey Date (GRMS_SurveyDate__c)field doesn't appear in the mobile app, but the value of this field is automatically set to the date when you create the field survey locally on the mobile device.
Now your Salesforce org is configured for use with the mobile app! Go to Heroku Initial Setup to set up the handshake between Salesforce and the mobile app.