Preparing the Teensy
This guide is applicable to both RADIO MUSIC and CHORD ORGAN
We recommend only buying a genuine Teensy from Thonk or PJRC to avoid any compatibility issues
- It's easiest to burn the firmware before you do anything else
- Out of the box, the Teensy can be powered over USB, but later we'll disable USB power before installing it in the module.
- It's still easy to reprogram the Teensy when the module is complete, but it requires modular power as well as the USB cable, which can be fiddly.
-
Download the Teensy Loader for OSX / Linux / Windows
-
To install firmware, you only need Teensy Loader. Teensyduino and the Arduino environment are NOT required until you want to write and compile your own firmware
-
Install and follow the instructions for your version
-
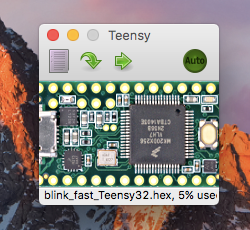
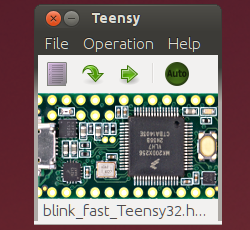
Test that Loader system is working by installing the fast and slow Blink demo files on your Teensy and seeing the LED flashing. Then you're ready to install the Radio Music .hex file.
-
To do that, download and install Latest Radio Music Firmware Hex File or Latest Chord Organ Firmware Hex File.
-
In Teensy Loader, go to File/Open Hex File and open the unzipped Radio Music hex file (ending .hex). Then just press the button on your Teensy and it will load into the chip.
-
If you have any trouble, check the Teensy Troubleshooting page. Make sure you have a proper USB cable, not a cheapo charging-only cable. Kindle cables work well!
-
Other problems? Check the troubleshooting page.
- The Teensy3.1 is a tiny board that normally comes without any pins
- There are a couple of things to do before installing it on the module
- If you are a little out of practice with your soldering you may want to leave these steps until after the main build - Radio Music Build Document.
- You only need to cut the trace if you will ever want to have computer + modular power at the same time (like if you need to update firmware after soldering in the Teensy without a socket or if you want to update the firmware while the teensy is installed in the module).
- When installing a Teensy with external power, you need to cut the tiny power trace between these pads on the underside of the board. The stock board is fully powered over USB.
- Just cut the trace, and use a multimeter to check there is no longer any connection between the pads

- This module requires the Teensy to have 29 pins attached
- These go down both sides, with one extra pin in A14/DAC (so the sound can get out!)
- If your module came with pins around all three sides, that's fine.
- The SMT pads on the bottom of the Teensy are not used in this project


- If you have a spare breadboard, you can use it to hold the pins and the Teensy while soldering

- You can also use stackable headers in these pins. This would make it possible to use the headers as an expansion port for the module, but makes the overall module a little deeper.
We recommend only buying a genuine Teensy from Thonk or PJRC to avoid any compatibility issues
- Parts List
- Preparing your Teensy 3.1 or 3.2
- Formatting and setting up the SD Card
- Building the module
- Testing and calibration
- Troubleshooting and FAQ
- PCB Versions
- Schematics